标签:环境 请求 qpi lov makefile 下载 nsa 管理 pre
Nginx --升级
一.Nginx 升级实验
源码包安装(1.配置 2.编译 3.安装)
1.先解压升级包
[root@vlnx251101 ~]# tar xf nginx-1.13.4.tar.gz

2.转到升级包那个目录
[root@vlnx251101 ~]# cd nginx-1.13.4/

3.指定目录等问题 (prce-8.40)支持正则
[root@vlnx251101 nginx-1.13.4]# ./configure --prefix=/usr/local/nginx --user=nginx --group=nginx --with-http_ssl_module --with-http_stub_status_module --with-file-aio --with-http_dav_module --with-pcre=../pcre-8.40

[root@vlnx251101 nginx-1.13.4]# make
4.查看当前版本
[root@vlnx251101 nginx-1.13.4]# /usr/local/nginx/sbin/nginx -v
nginx version: nginx/1.12.1
5.把之前的旧的备份一下
[root@mysqlb nginx-1.13.4]# mv /usr/local/nginx/sbin/nginx /usr/local/nginx/sbin/nginx.bak

[root@mysqlb nginx-1.13.4]# ls
auto     CHANGES.ru  configure  html     Makefile  objs    src
CHANGES  conf        contrib    LICENSE  man       README
[root@mysqlb nginx-1.13.4]# cp  objs/nginx /usr/local/nginx/sbin/

6.查看当前版本
[root@mysqlb nginx-1.13.4]# /usr/local/nginx/sbin/nginx -v
nginx version: nginx/1.13.4
方法一:
[root@mysqlb nginx-1.13.4]# make upgrade
方法二:
1.查看nginx的pid
[root@mysqlb ~]# ps -ef | grep nginx
root      64600      1  0 16:47 ?        00:00:00 nginx: master process /usr/local/ngin
/sbin/nginxnginx     64601  64600  0 16:47 ?        00:00:00 nginx: worker process
root      70426  58718  0 17:21 pts/3    00:00:00 grep --color=auto nginx
2.执行 kill -USR2 pid
[root@mysqlb ~]# kill -USR2 64600
[root@mysqlb ~]# ps -ef | grep nginx
root      64600      1  0 16:47 ?        00:00:00 nginx: master process /usr/local/ngin
/sbin/nginxnginx     64601  64600  0 16:47 ?        00:00:00 nginx: worker process
root      70428  64600  0 17:22 ?        00:00:00 nginx: master process /usr/local/ngin
/sbin/nginxnginx     70429  70428  0 17:22 ?        00:00:00 nginx: worker process
root      70432  58718  0 17:23 pts/3    00:00:00 grep --color=auto nginx
3.执行 kill -WINCH pid
[root@mysqlb ~]# kill -WINCH 64600
[root@mysqlb ~]# ps -ef | grep nginx
root      64600      1  0 16:47 ?        00:00:00 nginx: master process /usr/local/ngin
/sbin/nginxroot      70428  64600  0 17:22 ?        00:00:00 nginx: master process /usr/local/ngin
/sbin/nginxnginx     70429  70428  0 17:22 ?        00:00:00 nginx: worker process
root      70434  58718  0 17:24 pts/3    00:00:00 grep --color=auto nginx
4.执行 kill -QUIT pid
[root@mysqlb ~]# kill -QUIT 64600
[root@mysqlb ~]# ps -ef | grep nginx
root      70428      1  0 17:22 ?        00:00:00 nginx: master process /usr/local/ngin
/sbin/nginxnginx     70429  70428  0 17:22 ?        00:00:00 nginx: worker process
root      70436  58718  0 17:26 pts/3    00:00:00 grep --color=auto nginx
不执行第四步还可以恢复之前的旧版本
[root@vlnx251101 ~]# rm -rf /usr/local/nginx/sbin/nginx
[root@vlnx251101 ~]# cp /usr/local/nginx/sbin/nginx.bak /usr/local/nginx/sbin/nginx

[root@vlnx251101 ~]# kill -HUP 44610
[root@vlnx251101 ~]# ps -ef | grep nginx
root      44610      1  0 12:40 ?        00:00:00 nginx: master process /usr/local/nginx/sbin/nginx
root      74746  44610  0 14:38 ?        00:00:00 nginx: master process /usr/local/nginx/sbin/nginx
nginx    74747  74746  0 14:38 ?        00:00:00 nginx: worker process
nginx    77990  44610  0 14:53 ?        00:00:00 nginx: worker process

[root@vlnx251101 ~]# kill -QUIT 74746
[root@vlnx251101 ~]# ps -ef | grep nginx
root      44610      1  0 12:40 ?        00:00:00 nginx: master process /usr/local/nginx/sbin/nginx
nginx    77990  44610  0 14:53 ?        00:00:00 nginx: worker process
二. LuaJIT即采用C语言写的Lua代码的解释器
1.下载LuaJIT
先安装yum install wget
[root@mysqlb ~]# wget http://luajit.org/download/LuaJIT-2.0.5.tar.gz
2.编译,安装
[root@mysqlb ~]# tar xf LuaJIT-2.0.5.tar.gz

[root@mysqlb ~]# cd LuaJIT-2.0.5/

[root@mysqlb LuaJIT-2.0.5]# make install  PREFIX=/usr/local/luajit

[root@mysqlb LuaJIT-2.0.5]# echo "/usr/local/luajit/lib/" > /etc/ld.so.conf.d/usr_local_luajit_lib.conf

[root@mysqlb LuaJIT-2.0.5]# ldconfig (刷新配置文件)
3.配置环境变量
[root@mysqlb LuaJIT-2.0.5]# export LUAJIT_LIB=/usr/local/luajit/lib

[root@mysqlb LuaJIT-2.0.5]# export LUAJIT_INC=/usr/local/luajit/include/luajit-2.0
4.Lua程序
[root@mysqlb LuaJIT-2.0.5]# vim hello.lua

[root@mysqlb LuaJIT-2.0.5]# cat hello.lua
print ("Hello World")

[root@mysqlb LuaJIT-2.0.5]# lua hello.lua
Hello World

[root@mysqlb LuaJIT-2.0.5]# lua
Lua 5.1.4  Copyright (C) 1994-2008 Lua.org, PUC-Rio
>
> print ("Hello World")
Hello World
>
5.下载NDK与Lua_module
[root@mysqlb ~]# tar xf ngx_devel_kit-0.3.0.tar
[root@mysqlb ~]# tar xf lua-nginx-module-0.10.10.tar
[root@mysqlb ~]# tar xf nginx-1.13.4.tar
[root@mysqlb ~]# cd nginx-1.13.4
[root@mysqlb nginx-1.13.4]# make clean
rm -rf Makefile objs
[root@mysqlb nginx-1.13.4]# ./configure --prefix=/usr/local/nginx1134 --user=nginx --gro
up=nginx --with-http_ssl_module --with-http_stub_status_module --with-file-aio --with-http_dav_module --with-pcre=../pcre-8.40 --add-module=../ngx_devel_kit-0.3.0 --add-module=../lua-nginx-module-0.10.10
[root@mysqlb nginx-1.13.4]# make && make install
6.更改配置文件
[root@mysqlb nginx-1.13.4]# vim /usr/local/nginx1134/conf/nginx.conf
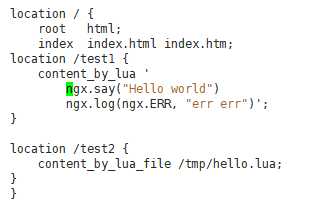
[root@mysqlb nginx-1.13.4]# echo ‘ngx.say("Hello World")‘ > /tmp/hello.lua
千万记得杀死80端口进程

[root@mysqlb nginx-1.13.4]# pkill nginx

[root@mysqlb nginx-1.13.4]# /usr/local/nginx1134/sbin/nginx -c /usr/local/nginx1134/conf
/nginx.conf
7.结果
[root@mysqlb nginx-1.13.4]# curl 192.168.88.101/test1
Hello world
[root@mysqlb nginx-1.13.4]# curl 192.168.88.101/test2
Hello World
标签:环境 请求 qpi lov makefile 下载 nsa 管理 pre
原文地址:https://www.cnblogs.com/MR-ws/p/11202711.html