标签:png 并且 info append 坐标 database ide 做了 项目实战
数据转化为VOC格式:
一、我们先看 VOC格式的数据是什么???
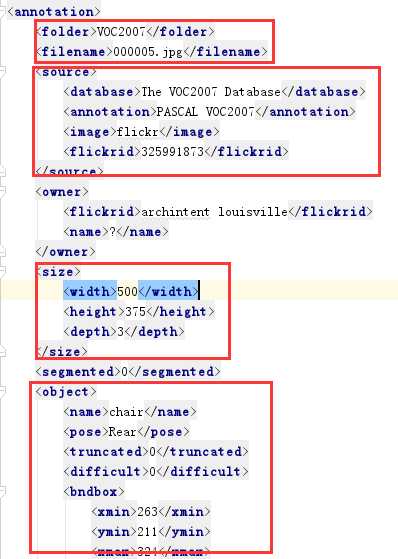
Annotations:存放xml 包括 文件夹信息 图片名称、 图片尺寸信息、 图片中object的信息。
JPEGImages:   存放图片


二、分析Wider FACE数据集:

数据集中的txt中信息为:
第一行: 图片路径
第二行:多少个人脸
第三行:bbox信息   存储的左上角 坐标 和 高度宽度
三、代码转换:
  1 import os,cv2,sys,shutil
  2
  3 from xml.dom.minidom import Document
  4
  5 def writexml(filename,saveimg,bboxes,xmlpath,typename):
  6     #xml打包的函数,我们不需要知道内部做了什么。
  7     #我们只需要将图片名称   图片信息   bbox信息    最终存储信息 作为参数 就可以了
  8     #不需要做修改
  9
 10     doc = Document()                                #定义文件对象
 11     annotation = doc.createElement(‘annotation‘)  #创建根节点
 12     doc.appendChild(annotation)    #存放在doc中
 13     # 定义annotation 的子节点
 14     folder = doc.createElement(‘folder‘)
 15
 16     folder_name = doc.createTextNode(‘widerface‘)
 17     folder.appendChild(folder_name)
 18     annotation.appendChild(folder)
 19     filenamenode = doc.createElement(‘filename‘)
 20     filename_name = doc.createTextNode(filename)
 21     filenamenode.appendChild(filename_name)
 22     annotation.appendChild(filenamenode)
 23     source = doc.createElement(‘source‘)
 24     annotation.appendChild(source)
 25     database = doc.createElement(‘database‘)
 26     database.appendChild(doc.createTextNode(‘wider face Database‘))
 27     source.appendChild(database)
 28     annotation_s = doc.createElement(‘annotation‘)
 29     annotation_s.appendChild(doc.createTextNode(‘PASCAL VOC2007‘))
 30     source.appendChild(annotation_s)
 31     image = doc.createElement(‘image‘)
 32     image.appendChild(doc.createTextNode(‘flickr‘))
 33     source.appendChild(image)
 34     flickrid = doc.createElement(‘flickrid‘)
 35     flickrid.appendChild(doc.createTextNode(‘-1‘))
 36     source.appendChild(flickrid)
 37     owner = doc.createElement(‘owner‘)
 38     annotation.appendChild(owner)
 39     flickrid_o = doc.createElement(‘flickrid‘)
 40     flickrid_o.appendChild(doc.createTextNode(‘yanyu‘))
 41     owner.appendChild(flickrid_o)
 42     name_o = doc.createElement(‘name‘)
 43     name_o.appendChild(doc.createTextNode(‘yanyu‘))
 44     owner.appendChild(name_o)
 45
 46     size = doc.createElement(‘size‘)
 47     annotation.appendChild(size)
 48
 49     width = doc.createElement(‘width‘)
 50     width.appendChild(doc.createTextNode(str(saveimg.shape[1])))
 51     height = doc.createElement(‘height‘)
 52     height.appendChild(doc.createTextNode(str(saveimg.shape[0])))
 53     depth = doc.createElement(‘depth‘)
 54     depth.appendChild(doc.createTextNode(str(saveimg.shape[2])))
 55
 56     size.appendChild(width)
 57
 58     size.appendChild(height)
 59     size.appendChild(depth)
 60     segmented = doc.createElement(‘segmented‘)
 61     segmented.appendChild(doc.createTextNode(‘0‘))
 62     annotation.appendChild(segmented)
 63     for i in range(len(bboxes)):
 64         bbox = bboxes[i]
 65         objects = doc.createElement(‘object‘)
 66         annotation.appendChild(objects)
 67         object_name = doc.createElement(‘name‘)
 68         object_name.appendChild(doc.createTextNode(typename[i]))  #人脸数据的话 直接为 “face”
 69         objects.appendChild(object_name)
 70         pose = doc.createElement(‘pose‘)
 71         pose.appendChild(doc.createTextNode(‘Unspecified‘))
 72         objects.appendChild(pose)
 73         truncated = doc.createElement(‘truncated‘)
 74         truncated.appendChild(doc.createTextNode(‘1‘))
 75         objects.appendChild(truncated)
 76         difficult = doc.createElement(‘difficult‘)
 77         difficult.appendChild(doc.createTextNode(‘0‘))
 78         objects.appendChild(difficult)
 79         bndbox = doc.createElement(‘bndbox‘)
 80         objects.appendChild(bndbox)
 81         xmin = doc.createElement(‘xmin‘)
 82         xmin.appendChild(doc.createTextNode(str(bbox[0])))
 83         bndbox.appendChild(xmin)
 84         ymin = doc.createElement(‘ymin‘)
 85         ymin.appendChild(doc.createTextNode(str(bbox[1])))
 86         bndbox.appendChild(ymin)
 87         xmax = doc.createElement(‘xmax‘)
 88         xmax.appendChild(doc.createTextNode(str(bbox[2])))#  bbox[0] +
 89         bndbox.appendChild(xmax)
 90         ymax = doc.createElement(‘ymax‘)
 91         ymax.appendChild(doc.createTextNode(str(bbox[3])))#  bbox[1] +
 92         bndbox.appendChild(ymax)
 93     f = open(xmlpath, "w")
 94     f.write(doc.toprettyxml(indent=‘‘))
 95     f.close()
 96
 97
 98 rootdir = "/media/kuan/新加卷/wider_face"  #定义数据集的根目录wider_face  下载好的
 99
100
101 def convertimgset(img_set):  #解析函数 img_set 作为解析的路径    img_sets = ["train","val"]
102     imgdir = rootdir + "/WIDER_" + img_set + "/images"                                   #图片文件的路径
103     gtfilepath = rootdir + "/wider_face_split/wider_face_" + img_set + "_bbx_gt.txt"  #标注信息
104     fwrite = open(rootdir + "/ImageSets/Main/" + img_set + ".txt", ‘w‘)  #写入txt中 main 底下的文件夹 对应140行
105     index = 0    #表示解析到第几张图
106     with open(gtfilepath, ‘r‘) as gtfiles:      #打开真值文件,获取bbox
107         while(True):                            #true   index< 1000 #前1000个样本
108             filename = gtfiles.readline()[:-1]         #读取一行数据, 为图像路径
109             if filename == None or filename == "":
110                 break
111             imgpath = imgdir + "/" + filename         #图片的绝对路径
112             img = cv2.imread(imgpath)                 #拿到读取图片   可以获取到shape信息
113             if not img.data:
114                 break;
115             numbbox = int(gtfiles.readline())         #读取到了第二行    人脸个数
116             bboxes = []
117             print(numbbox)
118             for i in range(numbbox):                 #读取bbox信息  numbbox 行
119                 line = gtfiles.readline()
120                 lines = line.split(" ")
121                 lines = lines[0:4]
122
123                 bbox = (int(lines[0]), int(lines[1]), int(lines[2]), int(lines[3]))  #存储的左上角 坐标 和 高度宽度
124
125                 if int(lines[2]) < 40 or int(lines[3]) < 40:
126                     continue
127
128                 bboxes.append(bbox)             #存放到bbox中   numbbox个人脸信息
129
130                 #cv2.rectangle(img, (bbox[0],bbox[1]),(bbox[0]+bbox[2],bbox[1]+bbox[3]),color=(255,255,0),thickness=1)
131
132             filename = filename.replace("/", "_")    #图片的名称存储
133
134             if len(bboxes) == 0:
135                 print("no face")
136                 continue
137             #cv2.imshow("img", img)
138             #cv2.waitKey(0)
139             cv2.imwrite("{}/JPEGImages/{}".format(rootdir,filename), img)  #写入图像JPEGImages
140             fwrite.write(filename.split(".")[0] + "\n")     #写入txt中 main 底下的文件夹
141             xmlpath = "{}/Annotations/{}.xml".format(rootdir,filename.split(".")[0])
142             writexml(filename, img, bboxes, xmlpath)   #调用函数
143             print("success number is ", index)
144             index += 1
145
146     fwrite.close()
147
148 if __name__=="__main__":
149     img_sets = ["train","val"]
150     for img_set in img_sets:
151         convertimgset(img_set)
152     #修改文件名
153     shutil.move(rootdir + "/ImageSets/Main/" + "train.txt", rootdir + "/ImageSets/Main/" + "trainval.txt")
154     shutil.move(rootdir + "/ImageSets/Main/" + "val.txt", rootdir + "/ImageSets/Main/" + "test.txt")
通过上面三个步骤我们就生成了VOC格式的数据集,现在我们只需要放到工程目录下并且进行修改 就可以开始训练了。
详细修改方法见下:
https://www.cnblogs.com/WSX1994/p/11216953.html
标签:png 并且 info append 坐标 database ide 做了 项目实战
原文地址:https://www.cnblogs.com/WSX1994/p/11218264.html