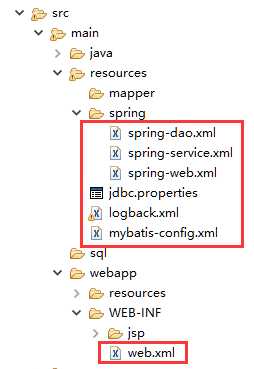
搭建ssm框架,我们要分几步进行,把每个配置文件分开写,这样看上去一目了然,有利于后期的修改维护,对自己也可以记请每一步的内容和步骤,方便记忆
一.spring-dao.xml
二.jdbc. properties
三.mybatis-config.xml
四.spring-service.xml
五.spring-web.xml
六. web.xml
七.logback.xml
详细配置如下:
第一步:先在spring文件夹里新建spring-dao.xml文件,因为spring的配置太多了,这里我们分三层
dao service web
1.读入数据库连接的相关参数
2.配置数据连接池
3.配置连接属性,
4.配置c3p0,只配了几个常用的
5.配置SqlSessionFactory对象(mybatis)
6.扫描dao层接口,动态实现dao接口
spring-dao.xml

 1 <?xml version="1.0" encoding="UTF-8"?>
 2 <beans xmlns="http://www.springframework.org/schema/beans"
 3         xmlns:xsi="http://www.w3.org/2001/XMLSchema-instance" xmlns:context="http://www.springframework.org/schema/context"
 4         xsi:schemaLocation="http://www.springframework.org/schema/beans      http://www.springframework.org/schema/beans/spring-beans.xsd      http://www.springframework.org/schema/context      http://www.springframework.org/schema/context/spring-context.xsd">
 5         <!-- 配置整合mybatis过程 -->
 6         <!-- 1.配置数据库相关参数properties的属性:${url} -->
 7         <context:property-placeholder location="classpath:jdbc.properties" />
 8
 9         <!-- 2.数据库连接池 -->
10         <bean id="dataSource" class="com.mchange.v2.c3p0.ComboPooledDataSource">
11                 <!-- 配置连接池属性 -->
12                 <property name="driverClass" value="${jdbc.driver}" />
13                 <property name="jdbcUrl" value="${jdbc.url}" />
14                 <property name="user" value="${jdbc.username}" />
15                 <property name="password" value="${jdbc.password}" />
16
17                 <!-- c3p0连接池的私有属性 -->
18                 <property name="maxPoolSize" value="30" />
19                 <property name="minPoolSize" value="10" />
20                 <!-- 关闭连接后不自动commit -->
21                 <property name="autoCommitOnClose" value="false" />
22                 <!-- 获取连接超时时间 -->
23                 <property name="checkoutTimeout" value="10000" />
24                 <!-- 当获取连接失败重试次数 -->
25                 <property name="acquireRetryAttempts" value="2" />
26         </bean>
27
28         <!-- 3.配置SqlSessionFactory对象 -->
29         <bean id="sqlSessionFactory" class="org.mybatis.spring.SqlSessionFactoryBean">
30                 <!-- 注入数据库连接池 -->
31                 <property name="dataSource" ref="dataSource" />
32                 <!-- 配置MyBaties全局配置文件:mybatis-config.xml -->
33                 <property name="configLocation" value="classpath:mybatis-config.xml" />
34                 <!-- 扫描entity包 使用别名 -->
35                 <property name="typeAliasesPackage" value="com.soecode.lyf.entity" />
36                 <!-- 扫描sql配置文件:mapper需要的xml文件 -->
37                 <property name="mapperLocations" value="classpath:mapper/*.xml" />
38         </bean>
39
40         <!-- 4.配置扫描Dao接口包,动态实现Dao接口,注入到spring容器中 -->
41         <bean class="org.mybatis.spring.mapper.MapperScannerConfigurer">
42                 <!-- 注入sqlSessionFactory -->
43                 <property name="sqlSessionFactoryBeanName" value="sqlSessionFactory" />
44                 <!-- 给出需要扫描Dao接口包 -->
45                 <property name="basePackage" value="com.soecode.lyf.dao" />
46         </bean>
47 </beans>
jdbc. properties
jdbc.driver=com.mysql.jdbc.Driver
jdbc.url=jdbc:mysql://localhost:3307/ssm?useUnicode=true&characterEncoding=utf8
jdbc.username=root
jdbc.password=
因为这里用到mybatis,所以需要mybatis核心文件,在recourse文件夹里新建mybatis-configx.xml
1.使用自增主键
2.使用列别名
3.开启驼峰命名转换create_time ->createTime
mybatis-config.xml
<?xml version="1.0" encoding="UTF-8" ?>
<!DOCTYPE configuration
  PUBLIC "-//mybatis.org//DTD Config 3.0//EN"
  "http://mybatis.org/dtd/mybatis-3-config.dtd">
<configuration>
        <!-- 配置全局属性 -->
        <settings>
                <!-- 使用jdbc的getGeneratedKeys获取数据库自增主键值 -->
                <setting name="useGeneratedKeys" value="true" />

                <!-- 使用列别名替换列名 默认:true -->
                <setting name="useColumnLabel" value="true" />

                <!-- 开启驼峰命名转换:Table{create_time} -> Entity{createTime} -->
                <setting name="mapUnderscoreToCamelCase" value="true" />
        </settings>
</configuration>
第二步:刚弄好到层,接下来service层。在spring文件夹创建spring-service.xml
1.扫描service包所有的@Service注解
2.配置事务管理器,把事物交有spring来完成
3.配置基于注解的声明事物,可以直接在方法上@Transaction
spring-service.xml
<?xml version="1.0" encoding="UTF-8"?>
<beans xmlns="http://www.springframework.org/schema/beans"
        xmlns:xsi="http://www.w3.org/2001/XMLSchema-instance"
        xmlns:context="http://www.springframework.org/schema/context"
        xmlns:tx="http://www.springframework.org/schema/tx"
        xsi:schemaLocation="http://www.springframework.org/schema/beans      http://www.springframework.org/schema/beans/spring-beans.xsd      http://www.springframework.org/schema/context      http://www.springframework.org/schema/context/spring-context.xsd      http://www.springframework.org/schema/tx      http://www.springframework.org/schema/tx/spring-tx.xsd">
        <!-- 扫描service包下所有使用注解的类型 -->
        <context:component-scan base-package="com.soecode.lyf.service" />

        <!-- 配置事务管理器 -->
        <bean id="transactionManager"
                class="org.springframework.jdbc.datasource.DataSourceTransactionManager">
                <!-- 注入数据库连接池 -->
                <property name="dataSource" ref="dataSource" />
        </bean>

        <!-- 配置基于注解的声明式事务 -->
        <tx:annotation-driven transaction-manager="transactionManager" />
</beans>
第三步:配置web,在spring文件夹里新建spring-web.xml
1.开启SpringMVC注解模式,可以使用@RequestMapping,@PathBariable,@ResponseBady等
2.对静态资源的处理 ,如js,css,jsp等
3.配置警示牌、显示ViewResolver,例如controller中某个方法返回一个string类型的“login”,实际上回返回“WEB-INF/login.jsp”
4.扫描web层的@Controller注解
spring-web.xml
<?xml version="1.0" encoding="UTF-8"?>
<beans xmlns="http://www.springframework.org/schema/beans"
        xmlns:xsi="http://www.w3.org/2001/XMLSchema-instance"
        xmlns:context="http://www.springframework.org/schema/context"
        xmlns:mvc="http://www.springframework.org/schema/mvc"
        xsi:schemaLocation="http://www.springframework.org/schema/beans      http://www.springframework.org/schema/beans/spring-beans.xsd      http://www.springframework.org/schema/context      http://www.springframework.org/schema/context/spring-context.xsd      http://www.springframework.org/schema/mvc      http://www.springframework.org/schema/mvc/spring-mvc-3.0.xsd">
        <!-- 配置SpringMVC -->
        <!-- 1.开启SpringMVC注解模式 -->
        <!-- 简化配置:           (1)自动注册DefaultAnootationHandlerMapping,AnotationMethodHandlerAdapter           (2)提供一些列:数据绑定,数字和日期的format @NumberFormat, @DateTimeFormat, xml,json默认读写支持   -->
        <mvc:annotation-driven />

        <!-- 2.静态资源默认servlet配置          (1)加入对静态资源的处理:js,gif,png          (2)允许使用"/"做整体映射  -->
        <mvc:default-servlet-handler/>

        <!-- 3.配置jsp 显示ViewResolver -->
        <bean class="org.springframework.web.servlet.view.InternalResourceViewResolver">
                <property name="viewClass" value="org.springframework.web.servlet.view.JstlView" />
                <property name="prefix" value="/WEB-INF/jsp/" />
                <property name="suffix" value=".jsp" />
        </bean>

        <!-- 4.扫描web相关的bean -->
        <context:component-scan base-package="com.soecode.lyf.web" />
</beans>
第四步:最后就是修改web.xml文件
web.xml
<web-app xmlns="http://xmlns.jcp.org/xml/ns/javaee" xmlns:xsi="http://www.w3.org/2001/XMLSchema-instance"
        xsi:schemaLocation="http://xmlns.jcp.org/xml/ns/javaee                      http://xmlns.jcp.org/xml/ns/javaee/web-app_3_1.xsd"
        version="3.1" metadata-complete="true">
        <!-- 如果是用mvn命令生成的xml,需要修改servlet版本为3.1 -->
        <!-- 配置DispatcherServlet -->
        <servlet>
                <servlet-name>seckill-dispatcher</servlet-name>
                <servlet-class>org.springframework.web.servlet.DispatcherServlet</servlet-class>
                <!-- 配置springMVC需要加载的配置文件                  spring-dao.xml,spring-service.xml,spring-web.xml                  Mybatis - > spring -> springmvc          -->
                <init-param>
                        <param-name>contextConfigLocation</param-name>
                        <param-value>classpath:spring/spring-*.xml</param-value>
                </init-param>
        </servlet>
        <servlet-mapping>
                <servlet-name>seckill-dispatcher</servlet-name>
                <!-- 默认匹配所有的请求 -->
                <url-pattern>/</url-pattern>
        </servlet-mapping>
</web-app>
我们在项目中经常会使用到日志,若以这里还有配置日志xml,在resources文件夹里新建logback.xml
logback.xml
<?xml version="1.0" encoding="UTF-8"?>
<configuration debug="true">
        <appender name="STDOUT" class="ch.qos.logback.core.ConsoleAppender">
                <!-- encoders are by default assigned the type ch.qos.logback.classic.encoder.PatternLayoutEncoder -->
                <encoder>
                        <pattern>%d{HH:mm:ss.SSS} [%thread] %-5level %logger{36} - %msg%n</pattern>
                </encoder>
        </appender>

        <root level="debug">
                <appender-ref ref="STDOUT" />
        </root>
</configuration>
到目前为止,我们一共写了7个配置文件