标签:ORC cli 去掉 添加 主程序 har system identity comm
一、动态sql语句
bean部分的User类代码:
public class User {
        private int id;
        private String name;
        private int age;//如果在if判断中用null,则把int改成Integer
        private String sex;
        private  List<Integer> ids;
}
dao部分的接口UserDao代码:
public interface UserDao {
     /**
      *  根据id查询
      * @param id
      * @return
      */
    public User selectByWhere1(User user);
    public User selectByWhere2(User user);
    public User selectByWhere3(User user);
    /**
     * 添加
     * @param user
     */
    public void addUser(User user);
    /**
     * 删除用户
     * @param id
     */
    public void deleteByIds(User ids);
    public void delete(@Param("ids") List<Integer> ids);
    //调用其他的类型要先设置key,Mybatis默认为map
    public void deleteByIds2(User ids);
    /**
     * 更新用户
     * @param user
     */
    public void updateUser(User user);


}
以下为mapper.xml部分:
1.if语句
<!-- 根据name和sex来查询数据。如果name为空,那么将只根据sex来查询;反之只根据name来查询
缺点:如果第二个条件满足,第一个条件不满足,那么就会导致sql语句出错
where 1=1 防止where后面什么也没有会报错
-->
<select id="selectByWhere1" parameterType="int" resultType="com.zhiyou100.xz.bean.User">
     select * from users
          <if test="name!=null">
              where name=#{name}
          </if>
          <if test="sex!=null and sex!=‘‘">
              and sex=#{sex}
          </if>
</select>
2.if+where 语句
<!-- 解决:如果第二个条件满足,第一个条件不满足,那么就会导致sql语句出错
if+where:如果第一个条件满足,则用where,并去掉where后的and
-->
<select id="selectByWhere2"  resultType="com.zhiyou100.xz.bean.User">
             select * from users
         <where>
          <if test="name!=null">
              and name=#{name}
          </if>
          <if test="sex!=null and sex!=‘‘">
              and sex=#{sex}
          </if>
         </where>
</select>
3. if+set 语句
 <!-- if+set:如果传来的字段为null,那么保留原来的内容 -->
     <update id="updateUser" parameterType="com.zhiyou100.xz.bean.User">
             update users
             <set>
                  <if test="name!=null">
                      name=#{name},
                  </if>
                   <if test="sex!=null and sex!=‘‘">
                      sex=#{sex},
                   </if>
                   <if test="age>0">
                       age=#{age}
                   </if>
             </set>
             where id=#{id}
     </update>
4. choose(when,otherwise) 语句
<!-- choose+where+otherwise -->
     <select id="selectByWhere3"  resultType="com.zhiyou100.xz.bean.User">
             select * from users
         <where>
             <choose>
                  <when test="name!=null and name!=‘‘">
                      name like concat(‘%‘,#{name},‘%‘)
                  </when>
                  <when test="sex!=null and sex!=‘‘">
                      sex=#{sex}
                  </when>
                  <otherwise>
                      age>=#{age}
                  </otherwise>
              </choose>
         </where>
     </select>
5. trim 语句
<!-- trim -->
     <select id="selectByWhere2"  resultType="com.zhiyou100.xz.bean.User">
             select * from users
         <trim prefix="where" prefixOverrides="and / or">
              <if test="name!=null">
                  and name=#{name}
              </if>
              <if test="sex!=null and sex!=‘‘">
                  and sex=#{sex}
              </if>
         </trim>
     </select>
<!-- trim -->
     <update id="updateUser" parameterType="com.zhiyou100.xz.bean.User">
             update users
             <!--
                 prefix:把trim中返回的字符串前添加一个set
                 prefixOverrides:覆盖trim中返回的字符串的前缀为and | or
                 suffix:把trim中返回的字符串后添加一个指定字符串
                 suffixOverrides:覆盖trim中返回的字符串的前缀
              -->
             <trim prefix="set" suffixOverrides=",">
                  <if test="name!=null">
                      name=#{name},
                  </if>
                   <if test="sex!=null and sex!=‘‘">
                      sex=#{sex},
                   </if>
                   <if test="age>0">
                       age=#{age}
                   </if>
             </trim>
             where id=#{id}
     </update>
6. SQL 片段
<!-- sql片段  -->
    <sql id="usercolumns">
       id,name,age,sex
    </sql>

<select id="selectByWhere1" parameterType="int" resultType="com.zhiyou100.xz.bean.User">
          select
          <!-- 引用相应的sql片段  -->
          <include refid="usercolumns" />
             from users
          <if test="name!=null">
              where name=#{name}
          </if>
          <if test="sex!=null and sex!=‘‘">
              and sex=#{sex}
          </if>
    </select>
7. foreach 语句
<!-- delete from users where id in(?,?,?) -->
     <delete id="deleteByIds">
             delete from users where id in
             <!--
                 collection:表示要遍历的集合名称
                 open:以(作为开始
                 close:以)作为结束
                 separator:每个元素之间使用,分割
                 item:每次遍历的值赋值给的变量名
              -->
             <foreach collection="ids" open="(" close=")" separator="," item="id">
                     #{id}
             </foreach>
     </delete>
     <!-- delete from users where id=1 or id=4 or id=6 -->
     <delete id="delete">
             delete from users
             <!--
                 collection:表示要遍历的集合名称
                 open:以(作为开始
                 close:以)作为结束
                 separator:每个元素之间使用,分割
                 item:每次遍历的值赋值给的变量名
                 这里最好不要在foreach标签中用open="where " 因为当id等于0时,做全表删除时会报错
              -->
              <where>
             <foreach collection="ids"  separator="or" item="id">
                     id=#{id}
             </foreach>
             </where>
     </delete>
8. 总结
其实动态 sql 语句的编写往往就是一个拼接的问题,为了保证拼接准确,我们最好首先要写原生的 sql 语句出来,然后在通过 mybatis 动态sql 对照着改,防止出错。
二、逆向工程
通过前面的学习,在实际开发中,我们基本上能对mybatis应用自如了,但是我们发现了一个问题,所有操作都是围绕着po类,xxxMapper.xml文件,xxxMapper接口等文件来进行的。如果实际开发中数据库的表特别多,那么我们需要手动去写每一张表的po类,xxxMapper.xml,xxxMapper.java文件,这显然需要花费巨大的精力,而且可能由于表字段太多,写错了而不知道也是可能的。
所以我们在实际开发中,一般使用逆向工程方式来自动生成所需的文件,如dao,bean,xml映射文件 。
http://www.mybatis.org/generator/index.html
1.新建一个工程并导入jar包
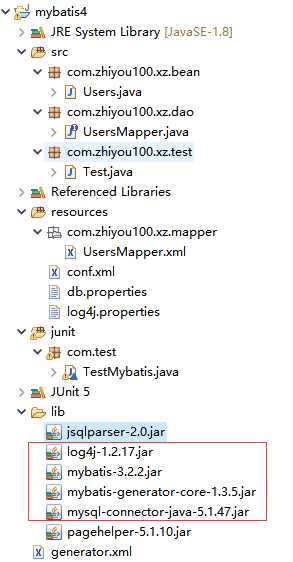
注意:使用逆向工程时,最好新建一个工程,如果你在原来的工程中使用,那也可以,但是有一定的风险,因为mybatis是根据配置文件中配置的路径来生成的文件的,如果你工程中有相同名字的文件,那么就会被新生成的文件所覆盖。所以实际开发中,我们一般新建一个工程,将生成的文件复制到自己的所需的工程中。
2.创建generator.xml配置文件
<?xml version="1.0" encoding="UTF-8"?>
<!DOCTYPE generatorConfiguration
  PUBLIC "-//mybatis.org//DTD MyBatis Generator Configuration 1.0//EN"
  "http://mybatis.org/dtd/mybatis-generator-config_1_0.dtd">

<generatorConfiguration>
    <!-- mysql驱动jar所在的位置 -->
  <classPathEntry location="D:\\mysql\\mysql-connector-java-5.1.47.jar" />

    <!-- 数据源的信息 -->
  <context id="DB2Tables" targetRuntime="MyBatis3">
      <!-- 禁止所有注释 -->
      <commentGenerator>
        <property name="suppressAllComments" value="true" />
    </commentGenerator>
    <jdbcConnection driverClass="com.mysql.jdbc.Driver"
        connectionURL="jdbc:mysql://localhost:3306/mybatis"
        userId="root"
        password="root">
    </jdbcConnection>

    <javaTypeResolver >
      <property name="forceBigDecimals" value="false" />
    </javaTypeResolver>
    <!-- 生产的实体类所在的位置 -->
    <javaModelGenerator targetPackage="com.zhiyou100.xz.bean" targetProject="./src">
      <property name="enableSubPackages" value="true" />
      <property name="trimStrings" value="true" />
    </javaModelGenerator>
    <!-- 生成的映射文件所在的位置 -->
    <sqlMapGenerator targetPackage="com.zhiyou100.xz.mapper"  targetProject="./resources">
      <property name="enableSubPackages" value="true" />
    </sqlMapGenerator>
    <!-- 生产的dao文件所在位置 -->
    <javaClientGenerator type="XMLMAPPER" targetPackage="com.zhiyou100.xz.dao"  targetProject="./src">
      <property name="enableSubPackages" value="true" />
    </javaClientGenerator>
    <!-- 某张表与实体类的对应关系
        schema:该表所在的数据库
        tableName:表名
        domainObjectName:实体类名
     当需要多张表建立实体类时要建立多个table标签
     -->
    <table schema="mybatis" tableName="users" domainObjectName="Users"
    enableCountByExample="false" enableSelectByExample="false" enableUpdateByExample="false" enableDeleteByExample="false">
    <!--以Example结尾的属性全为false,是为了减少生成复杂的方法 -->
      <property name="useActualColumnNames" value="true"/>
      <generatedKey column="ID" sqlStatement="DB2" identity="true" />
      <columnOverride column="DATE_FIELD" property="startDate" />
      <ignoreColumn column="FRED" />
      <columnOverride column="LONG_VARCHAR_FIELD" jdbcType="VARCHAR" />
    </table>

  </context>
</generatorConfiguration>
注意:
1、连接数据库的配置,包括数据名称,数据库用户名密码等配置
2、指定要生成代码的包名,包括实体类po的包名,mapper的包名等
3、指定数据库中哪些表需要生成文件
3.运行主程序生成代码
package com.zhiyou100.xz.test;

import java.io.File;
import java.util.ArrayList;
import java.util.List;

import org.mybatis.generator.api.MyBatisGenerator;
import org.mybatis.generator.config.Configuration;
import org.mybatis.generator.config.xml.ConfigurationParser;
import org.mybatis.generator.internal.DefaultShellCallback;

public class Test {
      public static void main(String[] args) throws Exception{
          List<String> warnings = new ArrayList<String>();
           boolean overwrite = true;
           File configFile = new File("generator.xml");
           ConfigurationParser cp = new ConfigurationParser(warnings);
           Configuration config = cp.parseConfiguration(configFile);
           DefaultShellCallback callback = new DefaultShellCallback(overwrite);
           MyBatisGenerator myBatisGenerator = new MyBatisGenerator(config, callback, warnings);
           myBatisGenerator.generate(null);
    }
}
三、分页查询助手pagehelper
1.导入jar包

2.在mybatis工程下的conf.xml中配置拦截器插件
<!--
    plugins在配置文件中的位置必须符合要求,否则会报错,顺序如下:
    properties?, settings?,
    typeAliases?, typeHandlers?,
    objectFactory?,objectWrapperFactory?,
    plugins?,
    environments?, databaseIdProvider?, mappers?
    -->
    <plugins>
    <!-- com.github.pagehelper为PageHelper类所在包名 -->
        <plugin interceptor="com.github.pagehelper.PageInterceptor">
            <!-- 使用下面的方式配置参数,后面会有所有的参数介绍 -->
            <property name="param1" value="value1"/>
        </plugin>
    </plugins>
3.先在UsersMapper.xml中写出查询所有的sql语句
 <resultMap id="BaseResultMap" type="com.zhiyou100.xz.bean.Users">
    <id column="id" jdbcType="INTEGER" property="id" />
    <result column="NAME" jdbcType="VARCHAR" property="NAME" />
    <result column="age" jdbcType="INTEGER" property="age" />
    <result column="sex" jdbcType="VARCHAR" property="sex" />
  </resultMap>
  <sql id="Base_Column_List">
    id, NAME, age, sex
  </sql>
  <!-- 查询所有 -->
  <select id="selectAll" resultMap="BaseResultMap">
          select <include refid="Base_Column_List" /> from users
  </select>
4.在接口UsersMapper中写 出查询所有的方法
package com.zhiyou100.xz.dao;

import java.util.List;

import com.zhiyou100.xz.bean.Users;

public interface UsersMapper {
    //查询所有用户
    List<Users> selectAll();
}
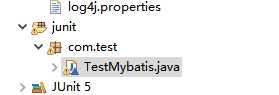
5.测试运行,并在其中使用PageHelper类设置起始页与每页显示的条数和用pageInfo进行查询结果的封装。
package com.test;


import java.io.Reader;
import java.util.ArrayList;
import java.util.List;

import org.apache.ibatis.io.Resources;
import org.apache.ibatis.session.SqlSession;
import org.apache.ibatis.session.SqlSessionFactory;
import org.apache.ibatis.session.SqlSessionFactoryBuilder;
import org.junit.jupiter.api.AfterAll;
import org.junit.jupiter.api.BeforeAll;
import org.junit.jupiter.api.Test;

import com.github.pagehelper.PageHelper;
import com.github.pagehelper.PageInfo;
import com.zhiyou100.xz.bean.Users;
import com.zhiyou100.xz.dao.UsersMapper;

class TestMybatis {
    static SqlSession session=null;
    final String str="com.zhiyou100.xz.mapper.UserMapper";
    static  UsersMapper usersMapper;
    @BeforeAll
    static void setUpBeforeClass() throws Exception {
        //解析配置文件conf.xml
                Reader reader=Resources.getResourceAsReader("conf.xml");
                //获取SessionFactory对象
                SqlSessionFactory sessionFactory=new SqlSessionFactoryBuilder().build(reader);

                //获取Session对象,表示jdbc中connection,操作数据库的
                session=sessionFactory.openSession();
                //得到接口的实现类
                usersMapper=session.getMapper(UsersMapper.class);//相当于创建一个Dao对象
    }
    @Test
    void testSelectByPage() {
        //1.使用PageHelper类设置起始页和每页显示的条数
        int pageNum=1;//当前的页码 从网页中可以获取
        int pageSize=2;//pageSize:自定义
        PageHelper.startPage(pageNum,pageSize);

        //2.调用查询所有的方法
        List<Users> list=usersMapper.selectAll();
        System.out.println(list);
        //3.用PageInfo对结果进行封装
        PageInfo<Users> page = new PageInfo<>(list);
        System.out.println(page);
    }
    @AfterAll
    static void tearDownAfterClass() throws Exception {
        session.commit();//提交数据   事物管理:要么都执行,要么都不执行
    }


}
标签:ORC cli 去掉 添加 主程序 har system identity comm
原文地址:https://www.cnblogs.com/sitian2050/p/11437265.html