标签:image add online 启动 this 打开 ace cto ssh
参考 https://zhuanlan.zhihu.com/p/47733615
Windows 启用 WSL 功能支持
> Enable-WindowsOptionalFeature -Online -FeatureName Microsoft-Windows-Subsystem-Linux
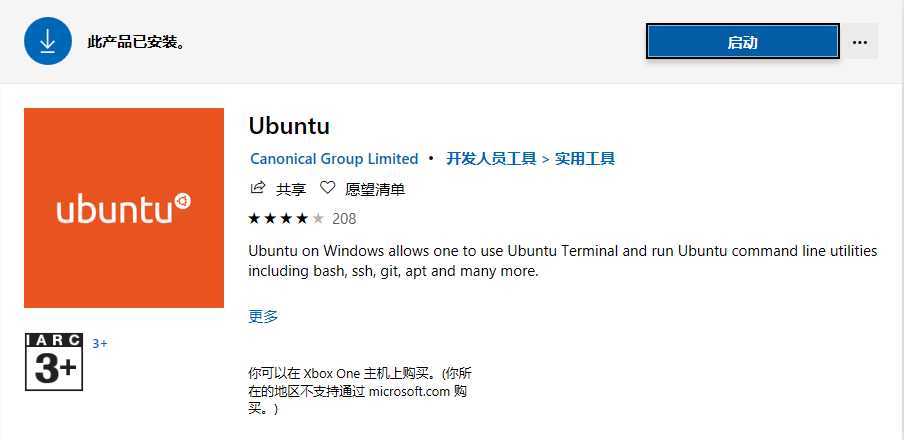
在Windows应用商店中下载安装 Ubuntu 系统
Ubuntu 系统设置更新源设置为国内更新源
lsgx@DESKTOP-OS0DFSI:~$ sudo cp /etc/apt/sources.list /etc/apt/sources.list.bak
lsgx@DESKTOP-OS0DFSI:~$ sudo cat /etc/apt/sources.list
# See https://mirrors.tuna.tsinghua.edu.cn/help/ubuntu/
# 默认注释了源码镜像以提高 apt update 速度,如有需要可自行取消注释
deb https://mirrors.tuna.tsinghua.edu.cn/ubuntu/ bionic main restricted universe multiverse
deb-src https://mirrors.tuna.tsinghua.edu.cn/ubuntu/ bionic main restricted universe multiverse
deb https://mirrors.tuna.tsinghua.edu.cn/ubuntu/ bionic-updates main restricted universe multiverse
deb-src https://mirrors.tuna.tsinghua.edu.cn/ubuntu/ bionic-updates main restricted universe multiverse
deb https://mirrors.tuna.tsinghua.edu.cn/ubuntu/ bionic-backports main restricted universe multiverse
deb-src https://mirrors.tuna.tsinghua.edu.cn/ubuntu/ bionic-backports main restricted universe multiverse
deb https://mirrors.tuna.tsinghua.edu.cn/ubuntu/ bionic-security main restricted universe multiverse
deb-src https://mirrors.tuna.tsinghua.edu.cn/ubuntu/ bionic-security main restricted universe multiverse

# 预发布软件源,不建议启用
#deb https://mirrors.tuna.tsinghua.edu.cn/ubuntu/ bionic-proposed main restricted universe multiverse
#deb-src https://mirrors.tuna.tsinghua.edu.cn/ubuntu/ bionic-proposed main restricted universe multiverse

lsgx@DESKTOP-OS0DFSI:~$
Ubuntu 系统升级更新
lsgx@DESKTOP-OS0DFSI:~$ sudo apt-get update && sudo apt-get upgrade -y && sudo apt-get upgrade -y && sudo apt-get dist-upgrade -y && sudo apt-get autoremove -y
Ubuntu 系统安装 ssh 服务
lsgx@DESKTOP-OS0DFSI:~$ sudo apt-get install aptitude
lsgx@DESKTOP-OS0DFSI:~$
lsgx@DESKTOP-OS0DFSI:~$ sudo aptitude remove openssh-server openssh-sftp-server
lsgx@DESKTOP-OS0DFSI:~$ sudo aptitude install openssh-server openssh-sftp-server
lsgx@DESKTOP-OS0DFSI:~$
lsgx@DESKTOP-OS0DFSI:~$ sudo cat /etc/ssh/sshd_config
#       $OpenBSD: sshd_config,v 1.101 2017/03/14 07:19:07 djm Exp $

# This is the sshd server system-wide configuration file.  See
# sshd_config(5) for more information.

# Restart ssh service command : sudo service ssh --full-restart

# This sshd was compiled with PATH=/usr/bin:/bin:/usr/sbin:/sbin

# The strategy used for options in the default sshd_config shipped with
# OpenSSH is to specify options with their default value where
# possible, but leave them commented.  Uncommented options override the
# default value.

Port 2222
#AddressFamily any
ListenAddress 0.0.0.0
#ListenAddress ::

#HostKey /etc/ssh/ssh_host_rsa_key
#HostKey /etc/ssh/ssh_host_ecdsa_key
#HostKey /etc/ssh/ssh_host_ed25519_key

# Ciphers and keying
#RekeyLimit default none

# Logging
#SyslogFacility AUTH
#LogLevel INFO

# Authentication:

#LoginGraceTime 2m
PermitRootLogin no
#StrictModes yes
#MaxAuthTries 6
#MaxSessions 10

#PubkeyAuthentication yes

# Expect .ssh/authorized_keys2 to be disregarded by default in future.
#AuthorizedKeysFile     .ssh/authorized_keys .ssh/authorized_keys2

#AuthorizedPrincipalsFile none

#AuthorizedKeysCommand none
#AuthorizedKeysCommandUser nobody

# For this to work you will also need host keys in /etc/ssh/ssh_known_hosts
#HostbasedAuthentication no
# Change to yes if you don‘t trust ~/.ssh/known_hosts for
# HostbasedAuthentication
#IgnoreUserKnownHosts no
# Don‘t read the user‘s ~/.rhosts and ~/.shosts files
#IgnoreRhosts yes

# To disable tunneled clear text passwords, change to no here!
PasswordAuthentication yes
#PermitEmptyPasswords no

# Change to yes to enable challenge-response passwords (beware issues with
# some PAM modules and threads)
ChallengeResponseAuthentication no

AllowUsers lsgx

# Kerberos options
#KerberosAuthentication no
#KerberosOrLocalPasswd yes
#KerberosTicketCleanup yes
#KerberosGetAFSToken no

# GSSAPI options
#GSSAPIAuthentication no
#GSSAPICleanupCredentials yes
#GSSAPIStrictAcceptorCheck yes
#GSSAPIKeyExchange no

# Set this to ‘yes‘ to enable PAM authentication, account processing,
# and session processing. If this is enabled, PAM authentication will
# be allowed through the ChallengeResponseAuthentication and
# PasswordAuthentication.  Depending on your PAM configuration,
# PAM authentication via ChallengeResponseAuthentication may bypass
# the setting of "PermitRootLogin without-password".
# If you just want the PAM account and session checks to run without
# PAM authentication, then enable this but set PasswordAuthentication
# and ChallengeResponseAuthentication to ‘no‘.
UsePAM yes

#AllowAgentForwarding yes
#AllowTcpForwarding yes
#GatewayPorts no
X11Forwarding yes
#X11DisplayOffset 10
#X11UseLocalhost yes
#PermitTTY yes
PrintMotd no
#PrintLastLog yes
#TCPKeepAlive yes
#UseLogin no
#PermitUserEnvironment no
#Compression delayed
#ClientAliveInterval 0
#ClientAliveCountMax 3
#UseDNS no
#PidFile /var/run/sshd.pid
#MaxStartups 10:30:100
#PermitTunnel no
#ChrootDirectory none
#VersionAddendum none

# no default banner path
#Banner none

# Allow client to pass locale environment variables
AcceptEnv LANG LC_*

# override default of no subsystems
Subsystem       sftp    /usr/lib/openssh/sftp-server

# Example of overriding settings on a per-user basis
#Match User anoncvs
#       X11Forwarding no
#       AllowTcpForwarding no
#       PermitTTY no
#       ForceCommand cvs server
lsgx@DESKTOP-OS0DFSI:~$
lsgx@DESKTOP-OS0DFSI:~$ sudo service ssh --full-restart
lsgx@DESKTOP-OS0DFSI:~$
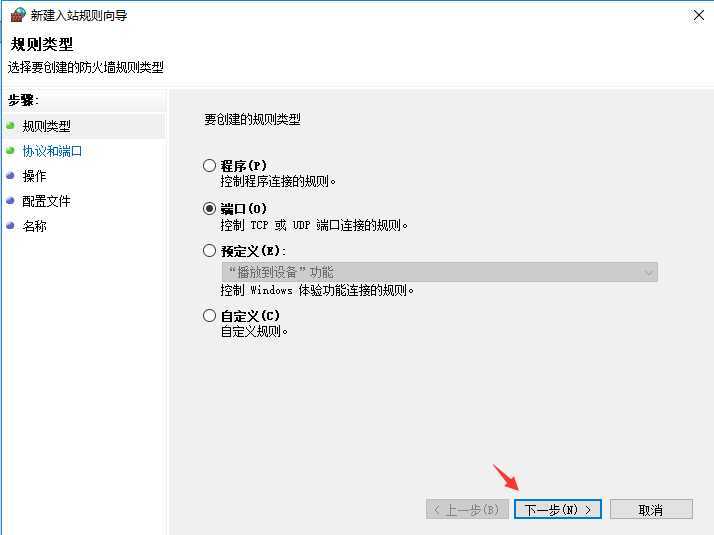
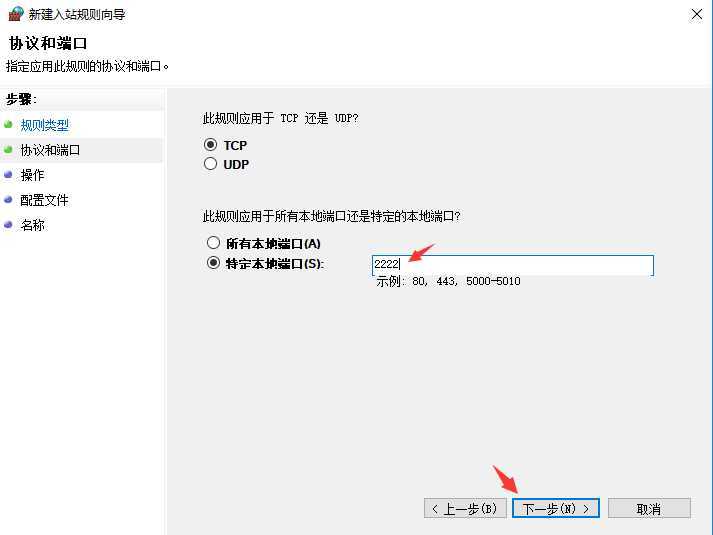
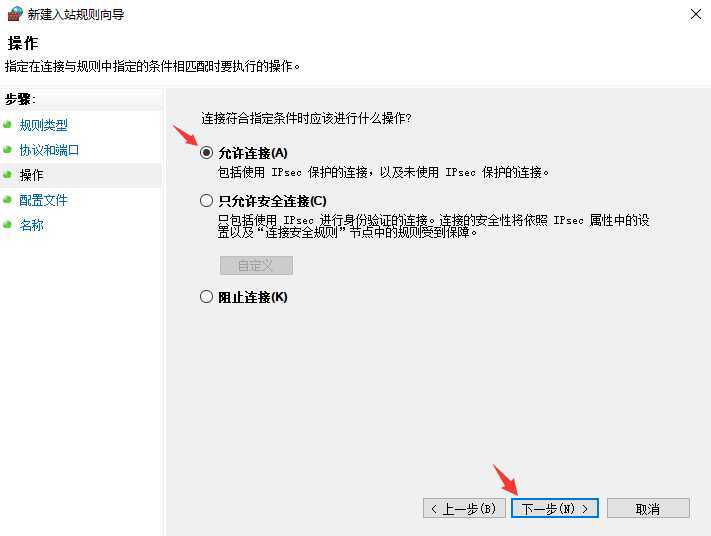
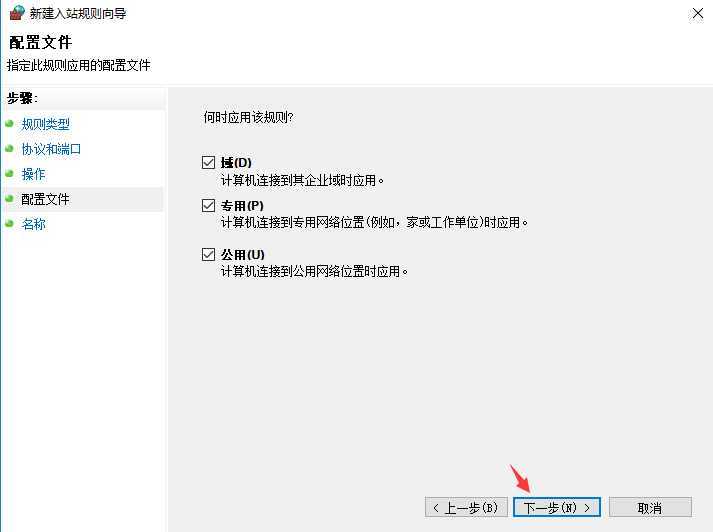
Windows 防火墙中开放 2222 端口拨入
Ubuntu 系统添加启动脚本文件 /etc/init.wsl
lsgx@DESKTOP-OS0DFSI:~$ sudo aptitude install supervisor
lsgx@DESKTOP-OS0DFSI:~$
lsgx@DESKTOP-OS0DFSI:~$ sudo cat /etc/init.wsl
#!/bin/sh
# Filename: /etc/init.wsl
# Usage: sudo /etc/init.wsl [start|stop|restart]

/etc/init.d/cron $1
/etc/init.d/ssh $1
/etc/init.d/supervisor $1

lsgx@DESKTOP-OS0DFSI:~$
lsgx@DESKTOP-OS0DFSI:~$ sudo chmod +x /etc/init.wsl
lsgx@DESKTOP-OS0DFSI:~$
lsgx@DESKTOP-OS0DFSI:~$ sudo cat /etc/sudoers
#
# This file MUST be edited with the ‘visudo‘ command as root.
#
# Please consider adding local content in /etc/sudoers.d/ instead of
# directly modifying this file.
#
# See the man page for details on how to write a sudoers file.
#
Defaults        env_reset
Defaults        mail_badpass
Defaults        secure_path="/usr/local/sbin:/usr/local/bin:/usr/sbin:/usr/bin:/sbin:/bin:/snap/bin"

# Host alias specification

# User alias specification

# Cmnd alias specification

# User privilege specification
root    ALL=(ALL:ALL) ALL

# Members of the admin group may gain root privileges
%admin ALL=(ALL) ALL

# Allow members of group sudo to execute any command
%sudo   ALL=(ALL:ALL) ALL
%sudo   ALL=NOPASSWD: /etc/init.wsl

# See sudoers(5) for more information on "#include" directives:

#includedir /etc/sudoers.d
lsgx@DESKTOP-OS0DFSI:~$
Windows 中添加自动启动的脚本 startubuntu.vbs 。
a. 打开当前用户默认自启动加载文件夹,在 Windows 中,开始-运行,输入:
shell:startup
b. 在当前用户默认自启动加载文件夹中,添加要加载的VBS脚本文件 startubuntu.vbs 。
Set ws = WScript.CreateObject("WScript.Shell")
ws.run "ubuntu run sudo /etc/init.wsl start", vbhide
重启 Windows 系统,验证WSL服务是否自动启动。
================== End
标签:image add online 启动 this 打开 ace cto ssh
原文地址:https://www.cnblogs.com/lsgxeva/p/11558631.html