标签:dem ace throws 准备工作 The 如何 注意 地址 version
1. 什么是shiro
shiro是apache的一个开源框架,是一个权限管理的框架,实现 用户认证、用户授权。
spring中有spring security (原名Acegi),是一个权限框架,它和spring依赖过于紧密,没有shiro使用简单。
shiro不依赖于spring,shiro不仅可以实现 web应用的权限管理,还可以实现c/s系统,
分布式系统权限管理,shiro属于轻量框架,越来越多企业项目开始使用shiro。
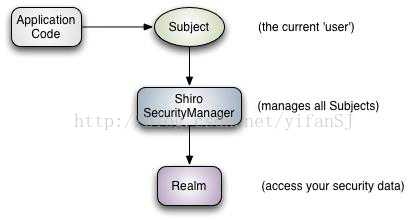
2. 在应用程序角度来观察如何使用Shiro完成工作(图01)
Subject:主体,代表了当前“用户”,这个用户不一定是一个具体的人,与当前应用交互的任何东西都是Subject,如网络爬虫,机器人等;即一个抽象概念;所有Subject 都绑定到SecurityManager,与Subject的所有交互都会委托给SecurityManager;可以把Subject认为是一个门面;SecurityManager才是实际的执行者;
SecurityManager:安全管理器;即所有与安全有关的操作都会与SecurityManager 交互;且它管理着所有Subject;可以看出它是Shiro 的核心,它负责与后边介绍的其他组件进行交互,如果学习过SpringMVC,你可以把它看成DispatcherServlet前端控制器;
Realm:域,Shiro从从Realm获取安全数据(如用户、角色、权限),就是说SecurityManager要验证用户身份,那么它需要从Realm获取相应的用户进行比较以确定用户身份是否合法;也需要从Realm得到用户相应的角色/权限进行验证用户是否能进行操作;可以把Realm看成DataSource,即安全数据源。
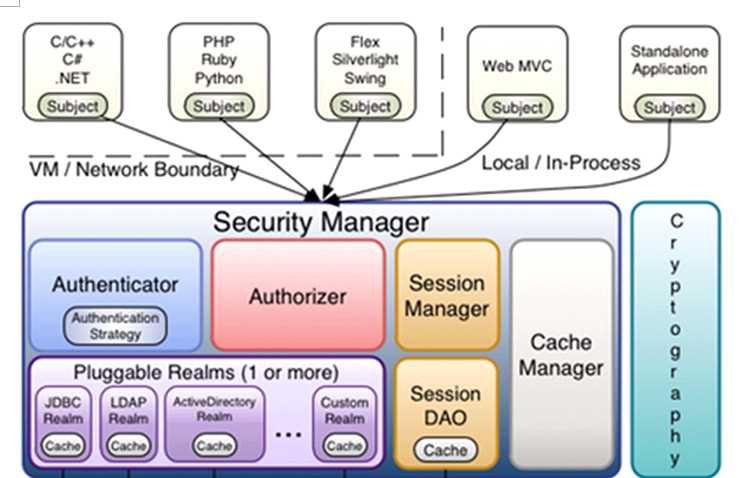
3. shiro架构(图02)
3.1 subject:主体,可以是用户也可以是程序,主体要访问系统,系统需要对主体进行认证、授权。
3.2 securityManager:安全管理器,主体进行认证和授权都是通过securityManager进行。securityManager是一个集合,
真正做事的不是securityManager而是它里面的东西。
3.3 authenticator:认证器,主体进行认证最终通过authenticator进行的。
3.4 authorizer:授权器,主体进行授权最终通过authorizer进行的。
3.5 sessionManager:web应用中一般是用web容器(中间件tomcat)对session进行管理,shiro也提供一套session管理的方式。
shiro不仅仅可以用于web管理也可以用于cs管理,所以他不用web容器的session管理。
3.6 SessionDao: 通过SessionDao管理session数据,针对个性化的session数据存储需要使用sessionDao
(如果用tomcat管理session就不用SessionDao,如果要分布式的统一管理session就要用到SessionDao)。
3.7 cache Manager:缓存管理器,主要对session和授权数据进行缓存(权限管理框架主要就是对认证和授权进行管理,
session是在服务器缓存中的),比如将授权数据通过cacheManager进行缓存管理,
和ehcache整合对缓存数据进行管理(redis是缓存框架)。
3.8 realm:域,领域,相当于数据源,通过realm存取认证、授权相关数据(原来是通过数据库取的)。
注意:authenticator认证器和authorizer授权器调用realm中存储授权和认证的数据和逻辑。
3.9 cryptography:密码管理,比如md5加密,提供了一套加密/解密的组件,方便开发。比如提供常用的散列、加/解密等功能。比如 md5散列算法(md5只有加密没有解密)。
准备工作:
1、导入相关依赖
2、编写shiro.ini文件
[users]
zs=123
ls=456
ww=789
pom.xml
<?xml version="1.0" encoding="UTF-8"?>

<project xmlns="http://maven.apache.org/POM/4.0.0" xmlns:xsi="http://www.w3.org/2001/XMLSchema-instance"
  xsi:schemaLocation="http://maven.apache.org/POM/4.0.0 http://maven.apache.org/xsd/maven-4.0.0.xsd">
  <modelVersion>4.0.0</modelVersion>

  <groupId>com.cjh</groupId>
  <artifactId>shiro</artifactId>
  <version>1.0-SNAPSHOT</version>
  <packaging>war</packaging>

  <name>shiro Maven Webapp</name>
  <!-- FIXME change it to the project‘s website -->
  <url>http://www.example.com</url>

  <properties>
    <project.build.sourceEncoding>UTF-8</project.build.sourceEncoding>
    <maven.compiler.source>1.7</maven.compiler.source>
    <maven.compiler.target>1.7</maven.compiler.target>
    <maven.compiler.plugin.version>3.7.0</maven.compiler.plugin.version>

    <!-- 添加相关依赖 -->
    <junit.version>4.12</junit.version>
    <servlet.version>4.0.0</servlet.version>
    <log4j2.version>2.9.1</log4j2.version>
    <slf4j.version>1.7.7</slf4j.version>
    <log4j2.disruptor.version>3.2.0</log4j2.disruptor.version>

    <shiro.version>1.2.5</shiro.version>
  </properties>


  <dependencies>
    <!-- shiro核心包 -->
    <dependency>
      <groupId>org.apache.shiro</groupId>
      <artifactId>shiro-core</artifactId>
      <version>${shiro.version}</version>
    </dependency>
    <!-- 添加shiro web支持 -->
    <dependency>
      <groupId>org.apache.shiro</groupId>
      <artifactId>shiro-web</artifactId>
      <version>${shiro.version}</version>
    </dependency>
    <!--**********junit**********-->
    <dependency>
      <groupId>junit</groupId>
      <artifactId>junit</artifactId>
      <version>${junit.version}</version>
      <scope>test</scope>
    </dependency>
    <!--**********servlet**********-->
    <dependency>
      <groupId>javax.servlet</groupId>
      <artifactId>javax.servlet-api</artifactId>
      <version>${servlet.version}</version>
      <scope>provided</scope>
    </dependency>
    <!-- **********************  日志配置  ********************** -->
    <dependency>
      <groupId>org.slf4j</groupId>
      <artifactId>slf4j-api</artifactId>
      <version>${slf4j.version}</version>
    </dependency>
    <dependency>
      <groupId>org.slf4j</groupId>
      <artifactId>jcl-over-slf4j</artifactId>
      <version>${slf4j.version}</version>
      <scope>runtime</scope>
      <exclusions>
        <exclusion>
          <artifactId>slf4j-api</artifactId>
          <groupId>org.slf4j</groupId>
        </exclusion>
      </exclusions>
    </dependency>
    <!--2) 用于与slf4j保持桥接-->
    <dependency>
      <groupId>org.apache.logging.log4j</groupId>
      <artifactId>log4j-slf4j-impl</artifactId>
      <version>${log4j2.version}</version>
      <exclusions>
        <exclusion>
          <artifactId>slf4j-api</artifactId>
          <groupId>org.slf4j</groupId>
        </exclusion>
      </exclusions>
    </dependency>
    <!--3) 核心log4j2jar包-->
    <dependency>
      <groupId>org.apache.logging.log4j</groupId>
      <artifactId>log4j-api</artifactId>
      <version>${log4j2.version}</version>
    </dependency>
    <dependency>
      <groupId>org.apache.logging.log4j</groupId>
      <artifactId>log4j-core</artifactId>
      <version>${log4j2.version}</version>
    </dependency>
    <!--4) web工程需要包含log4j-web,非web工程不需要-->
    <dependency>
      <groupId>org.apache.logging.log4j</groupId>
      <artifactId>log4j-web</artifactId>
      <version>${log4j2.version}</version>
      <scope>runtime</scope>
    </dependency>
    <!--5) 需要使用log4j2的AsyncLogger需要包含disruptor-->
    <dependency>
      <groupId>com.lmax</groupId>
      <artifactId>disruptor</artifactId>
      <version>${log4j2.disruptor.version}</version>
    </dependency>

  </dependencies>


  <build>
    <finalName>shiro</finalName>
    <resources>
      <!--解决mybatis-generator-maven-plugin运行时没有将XxxMapper.xml文件放入target文件夹的问题-->
      <resource>
        <directory>src/main/java</directory>
        <includes>
          <include>**/*.xml</include>
        </includes>
      </resource>
      <!--解决mybatis-generator-maven-plugin运行时没有将jdbc.properites文件放入target文件夹的问题-->
      <resource>
        <directory>src/main/resources</directory>
        <includes>
          <include>*.properties</include>
          <include>*.xml</include>
          <include>*.ini</include>
        </includes>
      </resource>
    </resources>
    <pluginManagement><!-- lock down plugins versions to avoid using Maven defaults (may be moved to parent pom) -->
      <plugins>
        <!-- 编码和编译和JDK版本 -->
        <plugin>
          <groupId>org.apache.maven.plugins</groupId>
          <artifactId>maven-compiler-plugin</artifactId>
          <version>${maven.compiler.plugin.version}</version>
          <configuration>
            <source>${maven.compiler.source}</source>
            <target>${maven.compiler.target}</target>
            <encoding>${project.build.sourceEncoding}</encoding>
          </configuration>
        </plugin>


        <plugin>
          <artifactId>maven-clean-plugin</artifactId>
          <version>3.1.0</version>
        </plugin>
        <!-- see http://maven.apache.org/ref/current/maven-core/default-bindings.html#Plugin_bindings_for_war_packaging -->
        <plugin>
          <artifactId>maven-resources-plugin</artifactId>
          <version>3.0.2</version>
        </plugin>
        <plugin>
          <artifactId>maven-compiler-plugin</artifactId>
          <version>3.8.0</version>
        </plugin>
        <plugin>
          <artifactId>maven-surefire-plugin</artifactId>
          <version>2.22.1</version>
        </plugin>
        <plugin>
          <artifactId>maven-war-plugin</artifactId>
          <version>3.2.2</version>
        </plugin>
        <plugin>
          <artifactId>maven-install-plugin</artifactId>
          <version>2.5.2</version>
        </plugin>
        <plugin>
          <artifactId>maven-deploy-plugin</artifactId>
          <version>2.8.2</version>
        </plugin>
      </plugins>
    </pluginManagement>
  </build>

</project>
Dome1.java
package com.cjh.shiro;

import org.apache.shiro.SecurityUtils;
import org.apache.shiro.authc.UsernamePasswordToken;
import org.apache.shiro.config.IniSecurityManagerFactory;
import org.apache.shiro.mgt.SecurityManager;
import org.apache.shiro.subject.Subject;

/**
 * @author
 * @site
 * @company
 * @create 2019-10-12 20:09
 */
public class Demo1 {

    public static void main(String[] args) {
        /*
          1.获取到安全管理器工厂securityManagerFactory
          2.获取到安全管理器
          3.将安全管理器交给securityuitl工具类
          4、从securityutil中获取subject登录主体
          5、获取jsp传递过来的用户名密然后形成一个token令牌
          6、登录操作(登录成功?登录失败)
         */
        IniSecurityManagerFactory factory = new IniSecurityManagerFactory("classpath:shiro.ini");
        SecurityManager securityManager = factory.getInstance();
        SecurityUtils.setSecurityManager(securityManager);
        Subject subject = SecurityUtils.getSubject();
//       模拟接收到了jsp从前端jsp传递过来的用户名密码去完成登录
        String uname = "zs";
        String pwd = "1234";
        UsernamePasswordToken token = new UsernamePasswordToken(uname,pwd);
       try {
           subject.login(token);
           System.out.println("登录成功!!");
       }catch (Exception e){
           System.out.println("登录失败处理措施!!");
       }
       subject.logout();
        System.out.println("登出成功!!");


    }
}
1、准备一个shiro-web.ini文件
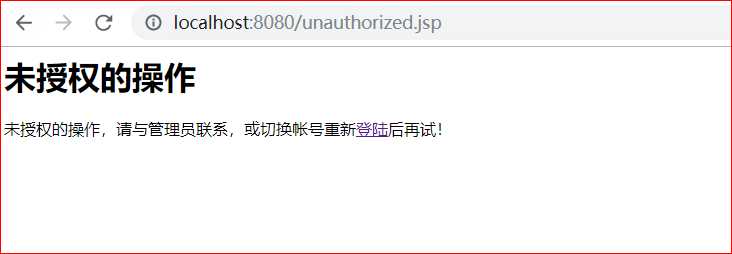
[main]
#定义身份认证失败后的请求url映射,loginUrl是身份认证过滤器中的一个属性
authc.loginUrl=/login
#定义角色认证失败后的请求url映射,unauthorizedUrl是角色认证过滤器中的一个属性
roles.unauthorizedUrl=/unauthorized.jsp
#定义权限认证失败后请求url映射,unauthorizedUrl是角色认证过滤器中的一个属性
perms.unauthorizedUrl=/unauthorized.jsp

[users]
zs=123,role1
ls=123,role2
ww=123,role3
zdm=123,admin


[roles]
role1=user:create
role2=user:create,user:update
role3=user:create,user:update,user:delete,user:view,user:load
admin=user:*


#定义请求的地址需要做什么验证
[urls]
#请求login的时候不需要权限,游客身份即可(anon)
/login.do=anon

#请求/user/updatePwd.jsp的时候,需要身份认证(authc)
/user/updatePwd.jsp=authc

#请求/admin的时候,需要角色认证,必须是拥有admin角色的用户才行
/admin/*.jsp=roles[admin]

#请求/teacher的时候,需要权限认证,必须是拥有user:create权限的角色的用户才行
/user/teacher.jsp=perms["user:update"]
Web.xml
<?xml version="1.0" encoding="UTF-8"?>
<web-app xmlns="http://xmlns.jcp.org/xml/ns/javaee"
         xmlns:xsi="http://www.w3.org/2001/XMLSchema-instance"
         xsi:schemaLocation="http://xmlns.jcp.org/xml/ns/javaee http://xmlns.jcp.org/xml/ns/javaee/web-app_3_1.xsd"
         version="3.1">
  <display-name>Archetype Created Web Application</display-name>
  <context-param>
    <param-name>shiroConfigLocations</param-name>
    <param-value>classpath:shiro-web.ini</param-value>
  </context-param>
  <listener>
    <listener-class>org.apache.shiro.web.env.EnvironmentLoaderListener</listener-class>
  </listener>

  <filter>
    <filter-name>ShiroFilter</filter-name>
    <filter-class>org.apache.shiro.web.servlet.ShiroFilter</filter-class>
  </filter>
  <filter-mapping>
    <filter-name>ShiroFilter</filter-name>
    <url-pattern>/*</url-pattern>
  </filter-mapping>

</web-app>
login.jsp
<%@ page contentType="text/html;charset=UTF-8" language="java" %>
<html>
<head>
    <title>Title</title>
</head>
<body>
    <h1>用户登陆</h1>
    <div style="color: red">${message}</div>
    <form action="${pageContext.request.contextPath}/login" method="post">
        帐号:<input type="text" name="username"><br>
        密码:<input type="password" name="password"><br>
        <input type="submit" value="确定">
        <input type="reset" value="重置">
    </form>
</body>
</html>
main.jsp
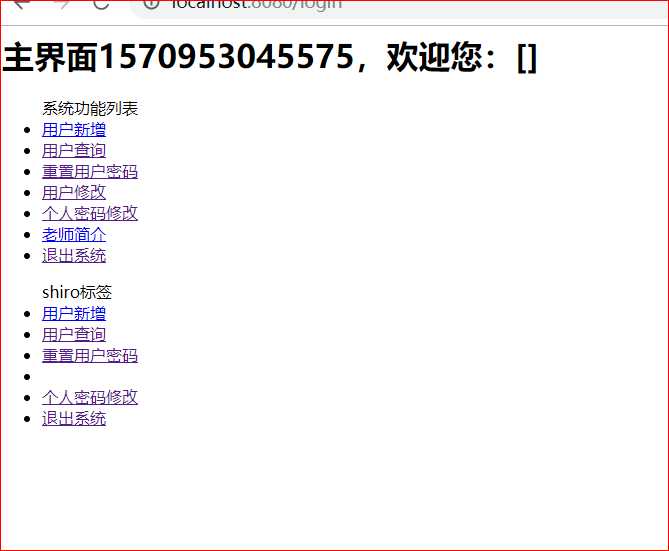
<%@ page contentType="text/html;charset=UTF-8" language="java" %>
<%@taglib prefix="r" uri="http://shiro.apache.org/tags" %>
<html>
<head>
    <title>Title</title>
</head>
<body>
<h1>主界面<%=System.currentTimeMillis()%>,欢迎您:[${sessionScope.username}]</h1>
<ul>
    系统功能列表
    <li>
        <a href="admin/addUser.jsp">用户新增</a>
    </li>
    <li>
        <a href="admin/listUser.jsp">用户查询</a>
    </li>
    <li>
        <a href="admin/resetPwd.jsp">重置用户密码</a>
    </li>
    <li>
        <a href="admin/updateUser.jsp">用户修改</a>
    </li>
    <li>
        <a href="user/updatePwd.jsp">个人密码修改</a>
    </li>
    <li>
        <a href="user/teacher.jsp">老师简介</a>
    </li>
    <li>
        <a href="${pageContext.request.contextPath}/logout">退出系统</a>
    </li>
</ul>
<ul>
    shiro标签
    <li>
        <r:hasPermission name="user:create">
            <a href="admin/addUser.jsp">用户新增</a>
        </r:hasPermission>
    </li>
    <li>
        <a href="admin/listUser.jsp">用户查询</a>
    </li>
    <li>
        <a href="admin/resetPwd.jsp">重置用户密码</a>
    </li>
    <li>
        <r:hasPermission name="user:update">
            <a href="admin/updateUser.jsp">用户修改</a>
        </r:hasPermission>
    </li>
    <li>
        <a href="user/updatePwd.jsp">个人密码修改</a>
    </li>
    <li>
        <a href="${pageContext.request.contextPath}/logout">退出系统</a>
    </li>
</ul>
</body>
</html>
LoginServlt
package com.cjh.shiro;

import org.apache.shiro.SecurityUtils;
import org.apache.shiro.authc.UsernamePasswordToken;
import org.apache.shiro.subject.Subject;

import javax.servlet.ServletException;
import javax.servlet.annotation.WebServlet;
import javax.servlet.http.HttpServlet;
import javax.servlet.http.HttpServletRequest;
import javax.servlet.http.HttpServletResponse;
import java.io.IOException;

/**
 * @author
 * @site
 * @company
 * @create 2019-10-12 20:30
 */
@WebServlet("/login")
public class LoginServlet extends HttpServlet {
    @Override
    protected void doGet(HttpServletRequest req, HttpServletResponse resp) throws ServletException, IOException {
        doPost(req,resp);
    }

    @Override
    protected void doPost(HttpServletRequest req, HttpServletResponse resp) throws ServletException, IOException {
        Subject subject = SecurityUtils.getSubject();
        String uname = req.getParameter("username");
        String pwd = req.getParameter("password");
        UsernamePasswordToken token = new UsernamePasswordToken(uname, pwd);
        try {
            subject.login(token);
            req.getRequestDispatcher("main.jsp").forward(req,resp);
        }catch (Exception e){
            req.setAttribute("message","用户名或密码错误!");
            req.getRequestDispatcher("login.jsp").forward(req,resp);

        }
    }
}
logoutservlt
package com.cjh.shiro;

import org.apache.shiro.SecurityUtils;
import org.apache.shiro.subject.Subject;

import javax.servlet.ServletException;
import javax.servlet.annotation.WebServlet;
import javax.servlet.http.HttpServlet;
import javax.servlet.http.HttpServletRequest;
import javax.servlet.http.HttpServletResponse;
import java.io.IOException;

/**
 * @author
 * @site
 * @company
 * @create 2019-10-12 20:30
 */
@WebServlet("/logout")
public class LogoutServlet extends HttpServlet {
    @Override
    protected void doGet(HttpServletRequest req, HttpServletResponse resp) throws ServletException, IOException {
        doPost(req,resp);
    }

    @Override
    protected void doPost(HttpServletRequest req, HttpServletResponse resp) throws ServletException, IOException {
        Subject subject = SecurityUtils.getSubject();
        subject.logout();
        resp.sendRedirect("login.jsp");

    }
}
结果:
标签:dem ace throws 准备工作 The 如何 注意 地址 version
原文地址:https://www.cnblogs.com/chenjiahao9527/p/11666778.html