标签:hang 内容 vpc ges reg 服务 rap emctl git clone
环境准备:
三台机器,一台做客户端(程序员上传代码用)192.168.1.10,一台做git服务器192.168.1.20(内存设置为4GB),一台做jenkins 192.168.1.30
git: 分布式软件版本控制系统,独立使用的,
1.安装: yum -y install git
2.配置基本信息
git config --global user.name "Mr Zhao" 配置用户名
git config --global userr.email "550418723@qq.com" 配置邮箱
git config --global core.editor vim 配置编辑器
3.查看信息
git config --list
cat ~/.gitconfig 配置文件所在处,可以修改上面的基本信息
4. git的重要工作区域
工作区:编写代码的工作目录
暂存区:.git/index,工作区和版本库之间的缓冲地带,允许用户后悔的区域
版本库:工作区有一个.git目录,这个就是版本库
工作区 --git add --> 暂存区-->git commit-->版本库
5.创建仓库
方法一: 创建项目之初创建
git init mygit
初始化空的 Git 版本库于 /root/mygit/.git/
方法二,在已存在的项目中创建版本库
mkdir myweb
cd myweb
echo "hello linux" > index.html
git init
初始化空的 Git 版本库于 /root/myweb/.git/
ls -A
.git index.html
[root@client myweb]# git status -s
A index.html
?? hosts #未提交到暂存区会出现问号
[root@client myweb]# git add . #将所有文件提交到暂存区
[root@client myweb]# git status -s
A hosts
A index.html
从暂存区撤出hosts
[root@client myweb]# git rm --cached hosts #提交到暂存区后,发现又有需要修改的了,执行此命令
rm ‘hosts‘
[root@client myweb]# git status -s 撤出查看就变成了 ??
A index.html
?? hosts
创建 .gitignore 忽略不需要加入到版本库的文件hosts
[root@client myweb]# echo hosts >> .gitignore # hosts不需要加入到版本库,故将hosts加入到gitignore
[root@client myweb]# echo .gitignore >> .gitignore
[root@client myweb]# cat .gitignore
hosts
.gitignore
[root@client myweb]# git status -s
A index.html
6.提交到版本仓库
git commit #直接敲会出现vim编辑器写日志,,如果是空白日志,终止提交,也就是上面所定义的core vim定义的
git commit -m "init data"
[root@client myweb]# git commit -m "init data"
[master(根提交) a8474aa] init data
1 file changed, 1 insertion(+)
create mode 100644 index.htmlecho hosts >> .gitignore
[root@client myweb]# git status
# 位于分支 master
无文件要提交,干净的工作区
7.删除工作区的文件并恢复:
[root@client myweb]# rm -rf index.html
[root@client myweb]# git status
# 位于分支 master
# 尚未暂存以备提交的变更:
# (使用 "git add/rm <file>..." 更新要提交的内容)
# (使用 "git checkout -- <file>..." 丢弃工作区的改动)
#
# 删除: index.html
#
修改尚未加入提交(使用 "git add" 和/或 "git commit -a")
8.恢复删除的index.html
[root@client myweb]# git checkout -- index.html
[root@client myweb]# ls
hosts index.html
9.从版本库删除文件
[root@client myweb]# git ls-files
hosts1
index.html
[root@client myweb]# git rm hosts1
rm ‘hosts1‘
[root@client myweb]# git ls-files
index.html
[root@client myweb]# git status
# 位于分支 master
# 要提交的变更:
# (使用 "git reset HEAD <file>..." 撤出暂存区)
#
# 删除: hosts1
#
10.彻底删除 (没有后悔药了)
[root@client myweb]# git commit -m "rm hosts1"
[master 9898403] rm hosts1
1 file changed, 1 deletion(-)
delete mode 100644 hosts1
[root@client myweb]# git status
# 位于分支 master
无文件要提交,干净的工作区
11.恢复误删除的文件(再通过版本库恢复找回来)
[root@client myweb]# git log
commit 98984031e3d15efe9d77ed81a9f8c6aaa40c7ed3
Author: Mr.Zhao <550418723@qq.com>
Date: Mon Nov 18 11:52:21 2019 +0800
commit aedf50f5a42a93aa930d6888946e4aa8b3fff863
Author: Mr.Zhao <550418723@qq.com>
Date: Mon Nov 18 11:49:39 2019 +0800
[root@client myweb]# git checkout aedf50f5a42a93aa930d6888946e4aa8b3fff863
Note: checking out ‘aedf50f5a42a93aa930d6888946e4aa8b3fff863‘.
You are in ‘detached HEAD‘ state. You can look around, make experimental
changes and commit them, and you can discard any commits you make in this
state without impacting any branches by performing another checkout.
If you want to create a new branch to retain commits you create, you may
do so (now or later) by using -b with the checkout command again. Example:
git checkout -b new_branch_name
HEAD 目前位于 aedf50f... hosts1
[root@client myweb]# ls
hosts1 index.html
git tag 标记
tag可以为模拟过一次设置标记
如将某一次提交设置为软件版本号
[root@client myweb]# git tag 2.0
[root@client myweb]# git tag
1.0
2.0
git 分支
git
[root@client myweb]# git add .
[root@client myweb]# git commit -m "add passwd"
# 头指针分离自 a8474aa
无文件要提交,干净的工作区
[root@client myweb]# ls
hello index.html passwd
[root@client myweb]# git checkout b1
切换到分支 ‘b1‘
[root@client myweb]# ls
hello index.html passwd
[root@client myweb]# git checkout b1
切换到分支 ‘b1‘
[root@client myweb]# ls
hello index.html passwd
[root@client myweb]# git checkout master
切换到分支 ‘master‘
[root@client myweb]# ls
index.html
[root@client myweb]# git branch 查看分支
git branch 查看分支
[root@client myweb]# git rm passwd
rm ‘passwd‘
[root@client myweb]# git commit -m *
[master aecac25] *
5 files changed, 24 deletions(-)
delete mode 100644 a.txt
delete mode 100644 hello
delete mode 100644 hi.txt
delete mode 100644 index.html
delete mode 100644 passwd
[root@client myweb]# git status
# 位于分支 master
无文件要提交,干净的工作区
gitlab服务器
环境准备
gitlab服务器(至少4GB内存),首先给机器扩大内存
安装docker
1.配置yum 源(华为云yum源)
wget -O /etc/yum.repos.d/CentOS-Base.repo https://repo.huaweicloud.com/repository/conf/CentOS-7-reg.repo
2.安装docker并启动
yum -y install docker
systemctl start docker
systemctl enable docker
3.将镜像导入
docker load < gitlab_zh.tar (从真机/linuxsoft/上拷贝)
4.部署gitlab
1.将docker 宿主机的ssh 端口号改为2022
port 2202
systemctl restart sshd
ssh -p2022 root@192.168.1.20 #以修改后的端口来登录
登陆上去后 ss -nutlp | grep 2022 查看端口是否变了
2.启动容器
[root@git ~] docker run -d -h gitlab --name gitlab -p 443:443 -p 80:80 -p 22:22 --restart always -v /srv/gitlab/config:/etc/gitlab -v /srv/gitlab/logs:/var/log/gitlab -v /srv/gitlab/data:/var/opt/gitlab gitlab_zh:latest
3.查看容器状态,当容器的状态为healthy时,容器才是可用的
docker ps
1e7286081c47 gitlab_zh:latest "/assets/wrapper" 4 minutes ago Up 4 minutes (healthy) 0.0.0.0:22->22/tcp, 0.0.0.0:80->80/tcp, 0.0.0.0:443->443/tcp gitlab
4.gitlab 应用
1.登录服务器,设置root密码
192.168.1.20,设置root密码,用户root登录,输入修改的密码(密码必须设置复杂,如1234.com)
gitlab中重要的概念
1.群组group:对应一个开发团队
2.用户,成员member:对应用户账户,可以将用户加入到组或者项目
3.项目:对应软件项目
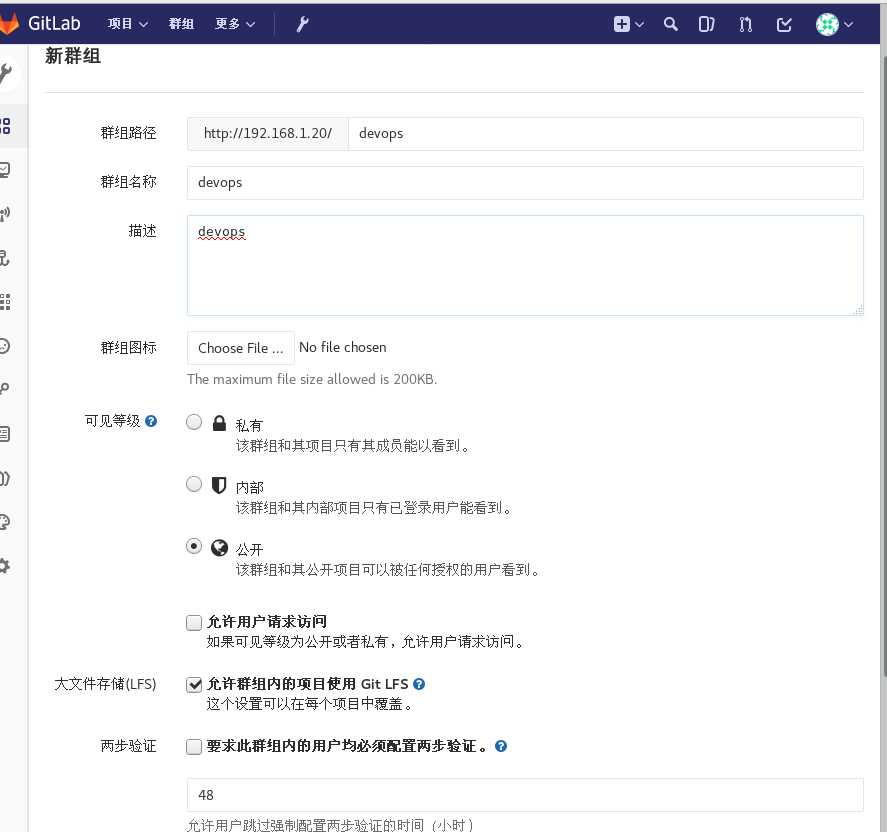
1.创建群组.叫devops
2.新建一个用户,新建用户时,不能设置密码,点创建后,在右上角的编辑处设置密码
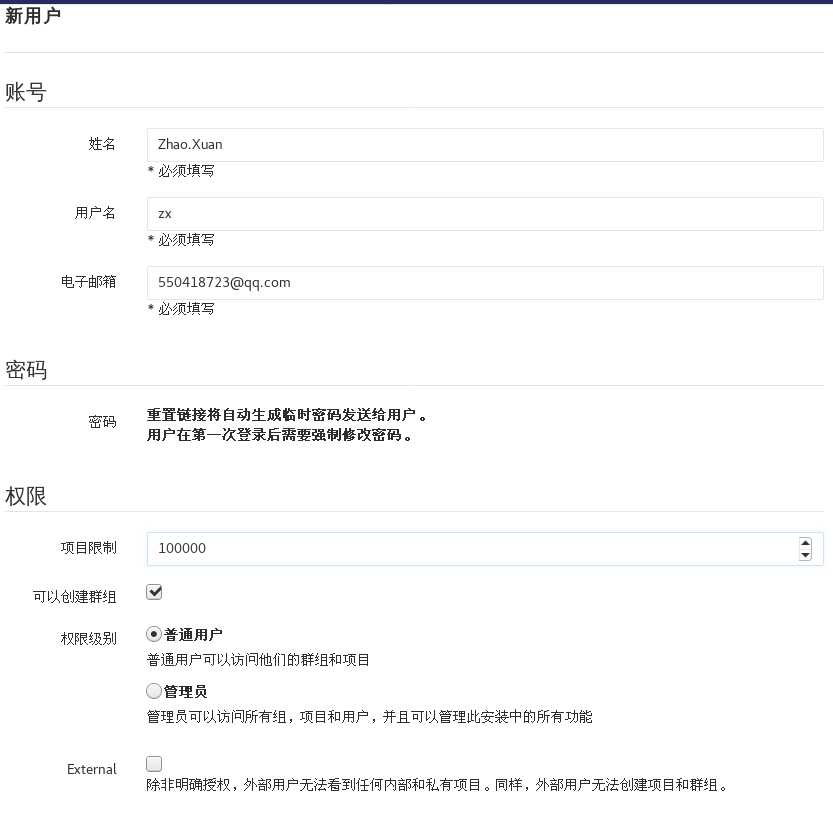
进入编辑后,设置密码为 zhaoxuan123 ,输入两遍
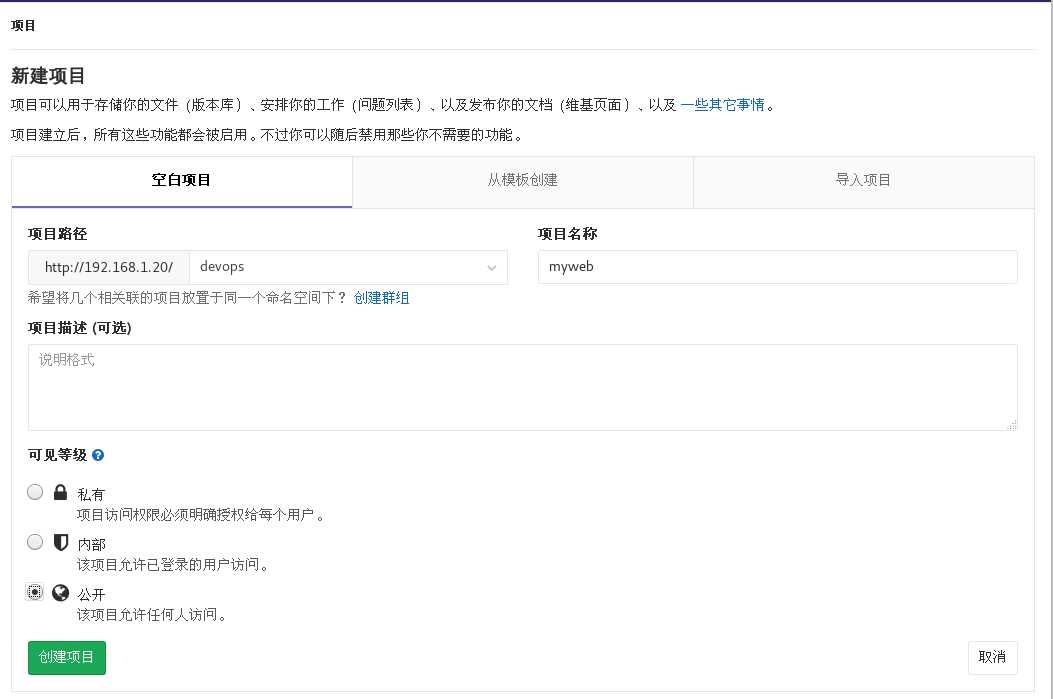
3.创建项目,为devops组创建项目,项目名称为myweb
点击项目左边栏展开,设置-->成员->要要请的成员
为项目授权->将普通用户加入到项目->设置为主程序员
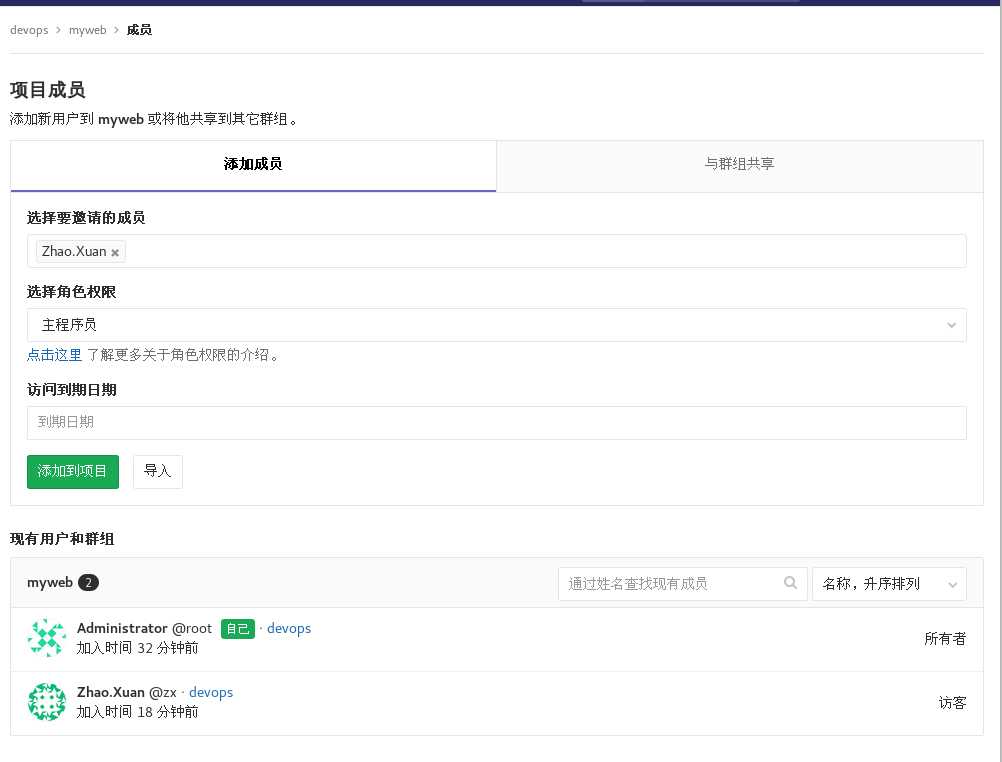
切换为普通用户,上传代码
新用户首次登录时,需要改密码,
新用户为 zx 不是Zhao.Xuan
修改后用普通用户登录进去,查看你的代码
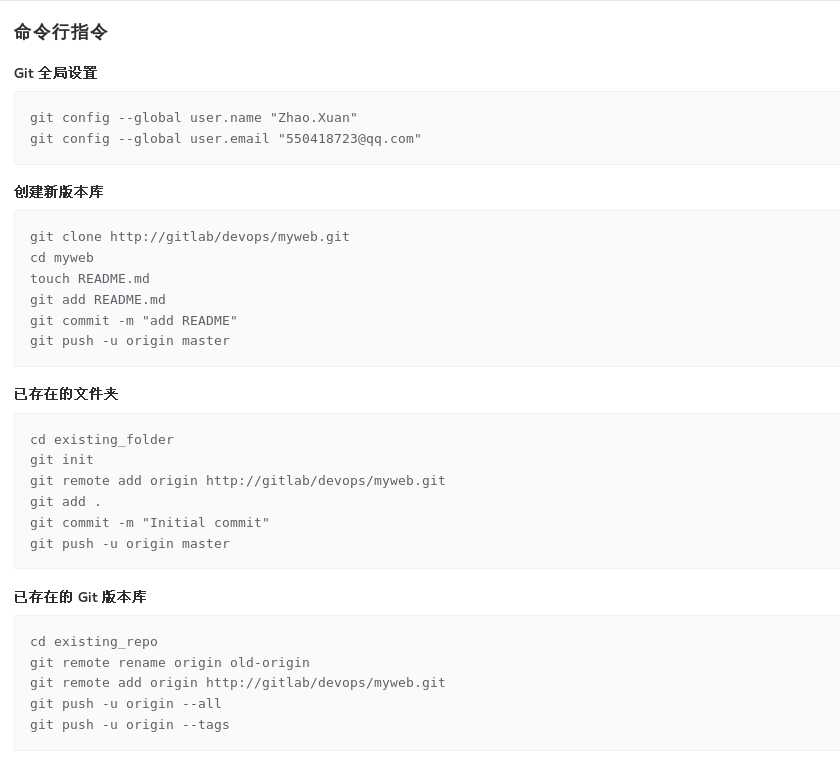
程序员上传代码到gitlab上的devops仓库
先cd到myweb目录下
git remote help add 查看帮助
[root@client myweb]# git remote add origin http://192.168.1.20/devops/myweb.git #推送本地代码到gitlab
[root@client myweb]# git push -u origin --all
Username for ‘http://192.168.1.20‘: zx
Password for ‘http://zx@192.168.1.20‘: zhaoxuan123 #手动输入密码
Counting objects: 20, done.
Delta compression using up to 2 threads.
Compressing objects: 100% (13/13), done.
Writing objects: 100% (20/20), 1.90 KiB | 0 bytes/s, done.
Total 20 (delta 4), reused 0 (delta 0)
To http://192.168.1.20/devops/myweb.git
* [new branch] master -> master
* [new branch] new_branch_name -> new_branch_name
分支 master 设置为跟踪来自 origin 的远程分支 master。
分支 new_branch_name 设置为跟踪来自 origin 的远程分支 new_branch_name。
刷新页面,看是否上传成功
打标签上传
[root@client myweb]# git push -u origin --tags
Username for ‘http://192.168.1.20‘: zx
Password for ‘http://zx@192.168.1.20‘: zhaoxuan123 手动输入密码
Total 0 (delta 0), reused 0 (delta 0)
To http://192.168.1.20/devops/myweb.git
* [new tag] 1.0 -> 1.0
* [new tag] 2.0 -> 2.0
刷新gitlab页面,看看是否有标签
如果add时,有输入错误,可以把它删掉
[root@client myweb]# git remote remove prigin
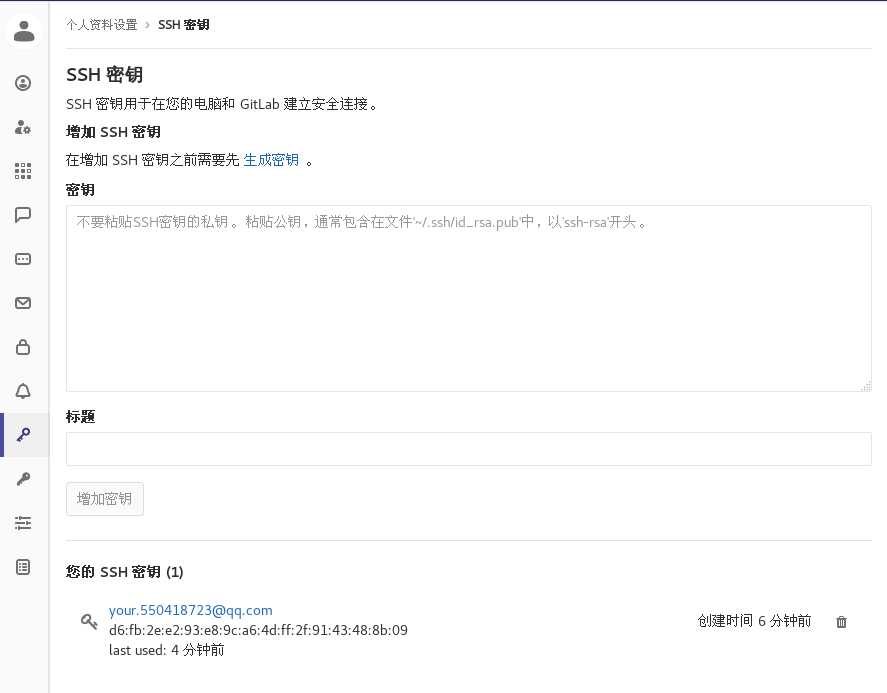
使用ssh实现免密登录
1.点击页面右上角用户->设置
2.把你的ssh秘钥生成后放在秘钥框里
ssh-keygen -t rsa -C "your.550418723@qq.com" -b 4096
[root@client myweb]# cat ~/.ssh/id_rsa.pub
ssh-rsa
AAAAB3NzaC1yc2EAAAADAQABAAACAQDX2vjopcFPloFk9bdjzSdmXY1bPf14bD5T6RBDR/nqZ44H/OcLeb8fhVlZlj0Y9OF4KOer33f/CWU/3CwKDPNw/LEfVxq6TGiot0s1YvLznp3phPPpyTaxPGOjgpb5Hu0aQ14N64g2o/VGtO6ZnEompyJR4n5xdwMcZYi0gFtg5H60atnZuYqHi/+/wBDsFj1voFJb72yrrH3T06jKphIBCLDj0Kq4F8rZwK74GSmt87M2cjynita628ci07NuXzhLukVEhz7oNspy1p4H9gnEMk65sFzNEtAqd+O05BKm9vZxVYW7kXmPCxtgR1JlL3S1xyZIoiaKHBIbHbyMMSYfuTHiUtvRkdeSfNUbTSvheIL8pIydEZhQudmNL+GnMWYXEXQa9VGbeLA4WxxsPsO4fN2dNwIchgUQSABaoxnjFfG5p5lTx5mwrVUfNvpGeKn4Ra/zSXOkT+rWBQq3L9lZegOOPePvQ941LgebQBhEgaX5bXVjOtJ+u9yiJTwIh+VTjZbj/Vq9dMR0B/r+DV9eAw8zmHQ5+QuGoOtXCW+9wgWLgPZAZtmOuLV7ZPt2hW5CUidt2Qw7jpf+Ynx7cFS72CyFhzwY5gGAa7oAZyc6R5VFD9TpEOtzQDdmqc9P1W+AfxcDUbjvpcGppzWQcv/vhswt+fEIQkAfY8b9SUJypQ==
your.550418723@qq.com
删除http上传代码的方式,并改为ssh上传代码的方式
[root@client myweb]# git remote remove origin
[root@client myweb]# git remote add origin git@gitlab:devops/myweb.git
上传代码
[root@client myweb]# echo "i love you" > aaa.html
[root@client myweb]# git add .
[root@client myweb]# git commit -m aaa.html
[master 635a42d] aaa.html
1 file changed, 1 insertion(+)
create mode 100644 aaa.html
[root@client myweb]# git push #上传到gitlab
通过http下载代码
[root@client myweb]# cd /tmp/
[root@client tmp]# git clone http://192.168.1.20/devops/myweb.git
正克隆到 ‘myweb‘...
remote: Counting objects: 29, done.
remote: Compressing objects: 100% (19/19), done.
remote: Total 29 (delta 4), reused 0 (delta 0)
Unpacking objects: 100% (29/29), done.
[root@client tmp]# cd myweb/
[root@client myweb]# ls
1111.xtt
同步代码
标签:hang 内容 vpc ges reg 服务 rap emctl git clone
原文地址:https://www.cnblogs.com/jeffzhao/p/11883727.html