标签:flow coding extra oar 51cto 方法 nsf 现在 verify
转自:https://blog.51cto.com/liqingbiao/2069726
(一)简述
nginx不仅可以做反向代理,还能用作正向代理来进行上网等功能。正向代理:如果把局域网外的Internet想象成一个巨大的资源库,则局域网中的客户端要访问Internet,则需要通过代理服务器来访问,这种代理服务就称为正向代理(也就是大家常说的,通过正向代理进行上网功能)
(二)nginx正向代理的功能
1.由于nginx正向代理的功能指令较少,只需要进行简单的配置即可
server {
    resolver 114.114.114.114;       #指定DNS服务器IP地址
    listen 8080;
    location / {
        proxy_pass http://$http_host$request_uri;     #设定代理服务器的协议和地址
    }
}
以上的配置只能访问80 端口的网站,而不能访问https443端口的网站,现在的网站基本上都是https的要解决技能访问http80端口也能访问https443端口的网站,需要置两个SERVER节点,一个处理HTTP转发,另一个处理HTTPS转发,而客户端都通过HTTP来访问代理,通过访问代理不同的端口,来区分HTTP和HTTPS请求。
server {
    resolver 114.114.114.114;       #指定DNS服务器IP地址
    listen 80;
    location / {
        proxy_pass http://$http_host$request_uri;     #设定代理服务器的协议和地址
                proxy_set_header HOST $http_host;
                proxy_buffers 256 4k;
                proxy_max_temp_file_size 0k;
                proxy_connect_timeout 30;
                proxy_send_timeout 60;
                proxy_read_timeout 60;
                proxy_next_upstream error timeout invalid_header http_502;
    }
}
server {
    resolver 114.114.114.114;       #指定DNS服务器IP地址
    listen 443;
    location / {
       proxy_pass https://$host$request_uri;    #设定代理服务器的协议和地址
             proxy_buffers 256 4k;
             proxy_max_temp_file_size 0k;
       proxy_connect_timeout 30;
       proxy_send_timeout 60;
       proxy_read_timeout 60;
       proxy_next_upstream error timeout invalid_header http_502;
    }
}
2.客户端访问设置:
2.1 Windows系统:
为浏览器配置http代理即可,具体步骤如下:"打开浏览器"->Internet选项” -> “连接” -> “局域网设置” -> “代理服务器”,然后设置如下: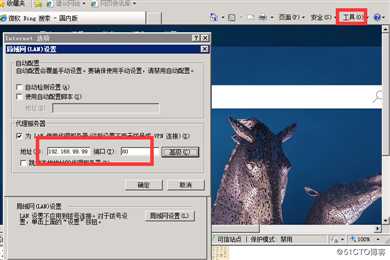
2.2 Linux访问地址如下:
如果访问HTTP网站,可以直接这样的方式: curl --proxy proxy_server:80 http://www.taobao.com/
如果访问HTTPS网站,例如https://www.alipay.com,那么可以使用nginx的HTTPS转发的server:
curl --proxy proxy_server:443 http://www.alipay.com
###通过http的访问
[root@localhost ~]# curl -I --proxy 192.168.99.99:80 www.baidu.com    ###显示http访问的状态码
HTTP/1.1 200 OK
Server: nginx/1.12.2
Date: Wed, 07 Feb 2018 02:09:03 GMT
Content-Type: text/html
Content-Length: 277
Connection: keep-alive
Last-Modified: Mon, 13 Jun 2016 02:50:40 GMT
ETag: "575e1f80-115"
Cache-Control: private, no-cache, no-store, proxy-revalidate, no-transform
Pragma: no-cache
Accept-Ranges: bytes

[root@localhost ~]# curl --proxy 192.168.99.99:80 www.baidu.com       ####显示http访问整个网页
###通过https的访问
[root@localhost ~]# curl -I --proxy 192.168.99.99:443 http://www.taobao.com/ ###
HTTP/1.1 200 OK
Server: nginx/1.12.2
Date: Wed, 07 Feb 2018 02:13:14 GMT
Content-Type: text/html; charset=utf-8
Connection: keep-alive
Vary: Accept-Encoding
Vary: Ali-Detector-Type
Cache-Control: max-age=60, s-maxage=90
X-Snapshot-Age: 1
Content-MD5: LIH52+3GPE2b2ELlP/CffQ==
ETag: W/"295b-1616605047e"
Via: cache47.l2cn624[14,304-0,C], cache29.l2cn624[11,0], cache2.cn12[0,200-0,H], cache5.cn12[0,0]
Age: 17
X-Cache: HIT TCP_MEM_HIT dirn:26:913567405 mlen:-1
X-Swift-SaveTime: Wed, 07 Feb 2018 02:12:57 GMT
X-Swift-CacheTime: 90
Timing-Allow-Origin: *
EagleId: 7250ae1715179695945657582e
Set-Cookie: thw=cn; Path=/; Domain=.taobao.com; Expires=Thu, 07-Feb-19 02:13:14 GMT;
Strict-Transport-Security: max-age=31536000
[root@localhost ~]# curl --proxy 192.168.99.99:443 http://www.taobao.com/ ###通过https代理访问(三)Linux设置代理上网的方法:
线上环境为了安全期间,服务器是不容许上外网的,如果需要通过yum来进行更新或下载相应的软件包就比较麻烦,现在可以通过设置代理的方式来进行上外网的操作,具体方法如下:
(1)使用yum 的设置代理的方法。如果只需要使用yum来更新包的,只需进行yum配置即可。
[root@localhost ~]# vim /etc/yum.conf
proxy=http://192.168.99.99:80
proxy=ftp://192.168.99.99:80
#proxy_username=username                 #####代理的用户名
#proxy_password=password                  #####代理的密码

[root@localhost ~]# yum install iotop -y
Loaded plugins: fastestmirror
base                                                                                                             | 3.6 kB  00:00:00
extras                                                                                                           | 3.4 kB  00:00:00
updates                                                                                                          | 3.4 kB  00:00:00
Loading mirror speeds from cached hostfile
Resolving Dependencies
--> Running transaction check
---> Package iotop.noarch 0:0.6-2.el7 will be installed
--> Finished Dependency Resolution

Dependencies Resolved

========================================================================================================================================
 Package                        Arch                            Version                             Repository                     Size
========================================================================================================================================
Installing:
 iotop                          noarch                          0.6-2.el7                           base                           52 k

Transaction Summary
========================================================================================================================================
Install  1 Package

Total download size: 52 k
Installed size: 156 k
Downloading packages:
iotop-0.6-2.el7.noarch.rpm                                                                                       |  52 kB  00:00:00
Running transaction check
Running transaction test
Transaction test succeeded
Running transaction
  Installing : iotop-0.6-2.el7.noarch                                                                                               1/1
  Verifying  : iotop-0.6-2.el7.noarch                                                                                               1/1

Installed:
  iotop.noarch 0:0.6-2.el7

Complete!
***备注:vi /etc/yum.conf***添加下面内容
proxy = http://username:password@yourproxy:8080/
或者
proxy=http://yourproxy:808
proxy=ftp://yourproxy:808
proxy_username=username
proxy_password=password
2.wget设置代理的方法:
[root@localhost ~]# vim /etc/wgetrc
http_proxy=192.168.99.99:80
http_proxy=192.168.99.99:443
3.curl访问代理设置的方法:
如果访问HTTP网站,可以直接这样的方式: curl --proxy proxy_server:80 http://www.taobao.com/
如果访问HTTPS网站,例如https://www.alipay.com,那么可以使用nginx的HTTPS转发的server:
curl --proxy proxy_server:443 http://www.alipay.com

[root@localhost ~]# curl -I --proxy 192.168.99.99:80 www.baidu.com    ###显示http访问的状态码
HTTP/1.1 200 OK
备注:上边有介绍,详见上边内容。
4.使用设置全局代理的方法:
[root@localhost ~]# vim /etc/profile
http_proxy = http://192.168.99.99:80
http_proxy = http://192.168.99.99:443
ftp_proxy = http://192.168.99.99:80/
export http_proxy
export ftp_proxy
[root@localhost ~]# curl -I https://www.taobao.com
HTTP/1.1 200 OK
Server: Tengine
Date: Wed, 07 Feb 2018 02:50:49 GMT
Content-Type: text/html; charset=utf-8
Connection: keep-alive
Vary: Accept-Encoding
Vary: Ali-Detector-Type
Cache-Control: max-age=60, s-maxage=90
X-Snapshot-Age: 2
Content-MD5: p7MoaH71PI2hqTQ/lcsW4Q==
ETag: W/"295b-1616605047e"
Via: cache40.l2et15-1[0,304-0,H], cache20.l2et15-1[0,0], cache10.cn418[0,200-0,H], cache5.cn418[1,0]
Age: 22
X-Cache: HIT TCP_MEM_HIT dirn:25:104405114 mlen:-1
X-Swift-SaveTime: Wed, 07 Feb 2018 02:50:27 GMT
X-Swift-CacheTime: 90
Timing-Allow-Origin: *
EagleId: 65e3d1e515179718498223532e
Set-Cookie: thw=cn; Path=/; Domain=.taobao.com; Expires=Thu, 07-Feb-19 02:50:49 GMT;
Strict-Transport-Security: max-age=31536000
标签:flow coding extra oar 51cto 方法 nsf 现在 verify
原文地址:https://www.cnblogs.com/-xuan/p/11973865.html