标签:io优化 隐藏 inf http服务 ethernet 空间 目录 firewall user
代理的基本类型传统代理:适用于Internet,需明确指定服务端
透明代理:客户机不需要指定代理服务器的地址和端口,是通过默认路由,防火墙将web重定向给代理
代理的好处
提高web访问速度
隐藏客户机的真实IP地址
实验环境
squid服务器:192.168.149.125
web服务器:192.168.149.135
client服务器:192.168.149.188
在squid服务器上安装squid代理服务器
[root@squid ~]# mkdir /abc
[root@squid ~]# mount.cifs //192.168.100.3/LNMP-C7 /abc/ ##挂载
[root@squid ~]# cd /abc/
[root@squid abc]# tar zxvf squid-3.4.6.tar.gz -C /opt ##解压
[root@squid abc]# yum install gcc gcc-c++ make -y ##安装环境组件
[root@squid abc]# cd /opt/squid-3.4.6
[root@squid squid-3.4.6]# ./configure \
--prefix=/usr/local/squid \ ##安装路径
--sysconfdir=/etc \ ##配置文件目录
--enable-arp-acl \ ##支持acl访问控制列表
--enable-linux-netfilter \ ##支持网络筛选
--enable-linux-tproxy \ ##支持透明
--enable-async-io=100 \ ##io优化
--enable-err-language="Simplify_Chinese" \ ##报错显示简体中文
--enable-underscore \
--enable-poll \
--enable-gnuregex ##支持正则表达
[root@squid squid-3.4.6]# make && make install ##编译安装
[root@squid squid-3.4.6]# ln -s /usr/local/squid/sbin/* /usr/local/sbin/ ##便于系统识别
[root@squid squid-3.4.6]# useradd -M -s /sbin/nologin squid ##创建系统用户
[root@squid squid-3.4.6]# chown -R squid.squid /usr/local/squid/var/ ##给目录所有文件属主属组权限
修改squid配置文件,并优化启动项
[root@squid squid-3.4.6]# vim /etc/squid.conf ##修改squid配置文件
http_access allow all ##添加此项
#http_access deny all ##注释,允许终端访问http_port 3128
cache_effective_user squid ##指定用户squid
cache_effective_group squid ##指定组
[root@squid squid-3.4.6]# squid -k parse ##检查配置文件语法
[root@squid squid-3.4.6]# squid -z ##初始化缓存目录
[root@squid squid-3.4.6]# squid ##开启服务
[root@squid squid-3.4.6]# netstat -ntap | grep 3128 ##查看squid端口
[root@squid squid-3.4.6]# cd /etc/init.d/
[root@squid init.d]# vim squid ##编辑service启动squid的脚本
#!/bin/bash
#chkconfig: 2345 90 25
PID="/usr/local/squid/var/run/squid.pid" ##PID文件进程号
CONF="/etc/squid.conf" ##主配置文件
CMD="/usr/local/squid/sbin/squid" ##启动命令case "$1" in
start)
netstat -ntap | grep squid &> /dev/null
if [ $? -eq 0 ]
then
echo "squid is running"
else
echo "正在启动 squid...."
$CMD
fi
;;
stop)
$CMD -k kill &> /dev/null ##关闭squid
rm -rf $PID &> /dev/null ##删除PID文件
;;
status)
[ -f $PID ] &> /dev/null
if [ $? -eq 0 ]
then
netstat -ntap | grep squid
else
echo "squid is not running"
fi
;;
restart)
$0 stop &> /dev/null
echo "正在关闭 squid..."
$0 start &> /dev/null
echo "正在启动 squid..."
;;
reload)
$CMD -k reconfigure ##重载配置文件
;;
check)
$CMD -k parse ##检查语法
;;
*)
echo "用法:$0{start|stop|reload|status|check|restart}"
;;
esac
[root@squid init.d]# chmod +x squid ##给执行权限
[root@squid init.d]# chkconfig --add squid ##添加到service管理中
[root@squid init.d]# chkconfig --level 35 squid on ##开机自启
设置传统代理配置
[root@squid init.d]# vim /etc/squid.conf ##修改主配置文件
http_port 3128
cache_mem 64 MB ##内存空间大小
reply_body_max_size 10 MB ##允许下载最大文件大小
maximum_object_size 4096 KB ##允许保存缓存空间最大对象大小
[root@squid init.d]# service squid restart
[root@squid init.d]# iptables -L ##查看表内容
[root@squid init.d]# iptables -F ##清空表缓存
[root@squid init.d]# setenforce 0
[root@squid init.d]# iptables -I INPUT -p tcp --dport 3128 -j ACCEPT ##允许3128端口
[root@squid init.d]# service squid reload ##重载配置文件
在web服务器上安装http服务
[root@web ~]# systemctl stop firewalld.service ##关闭防火墙
[root@web ~]# setenforce 0
[root@web ~]# yum install httpd -y ##安装web服务
[root@web ~]# systemctl start httpd.service
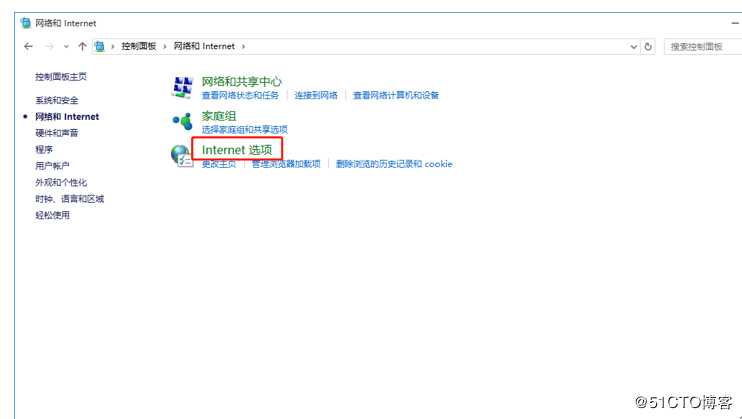
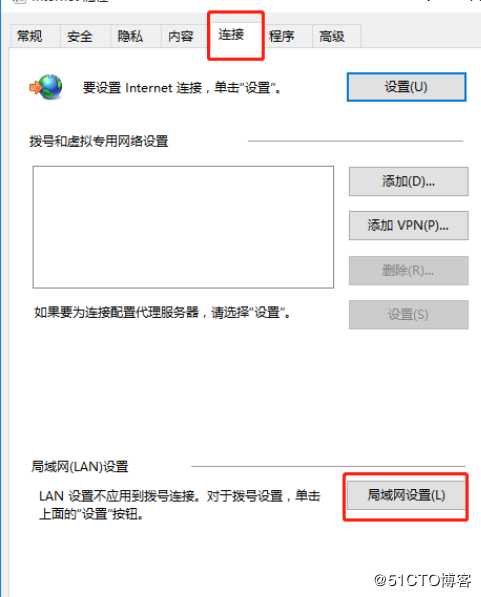
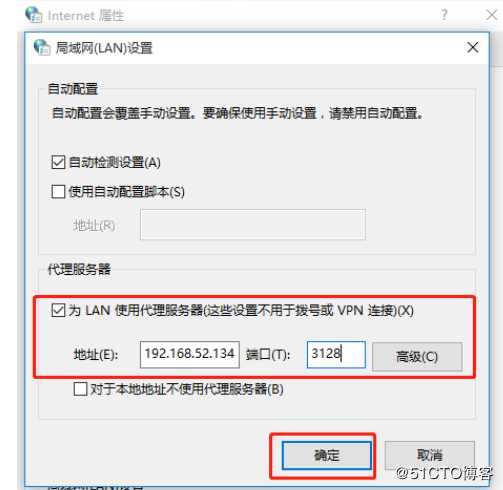
测试代理服务,清除缓存
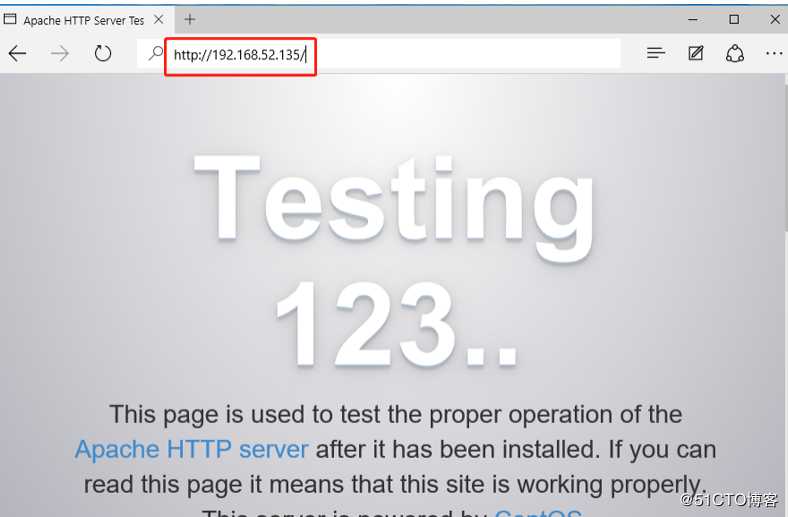
查看web主机的httpd服务日志文件
[root@localhost logs]# head -1 access_log
192.168.52.138 - - [04/Dec/2019:17:09:15 +0800] "GET / HTTP/1.1" 403 4897 "-" "Mozilla/5.0 (Windows NT 10.0; Win64; x64) AppleWebKit/537.36 (KHTML, like Gecko) Chrome/42.0.2311.135 Safari/537.36 Edge/12.10240"
#可以看到是client主机的IP地址访问的
[root@localhost logs]#[root@localhost logs]# tail -1 access_log
192.168.52.134 - - [04/Dec/2019:17:26:55 +0800] "GET /browserconfig.xml HTTP/1.1" 404 215 "-" "Mozilla/5.0 (Windows NT 10.0; Win64; x64) AppleWebKit/537.36 (KHTML, like Gecko) Chrome/42.0.2311.135 Safari/537.36 Edge/12.10240"
#可以看到是squid服务器的IP地址访问的
[root@localhost logs]#
透明代理
squid:192.168.100.1 内网:ens33
12.0.0.1 外网:ens36
web:12.0.0.12
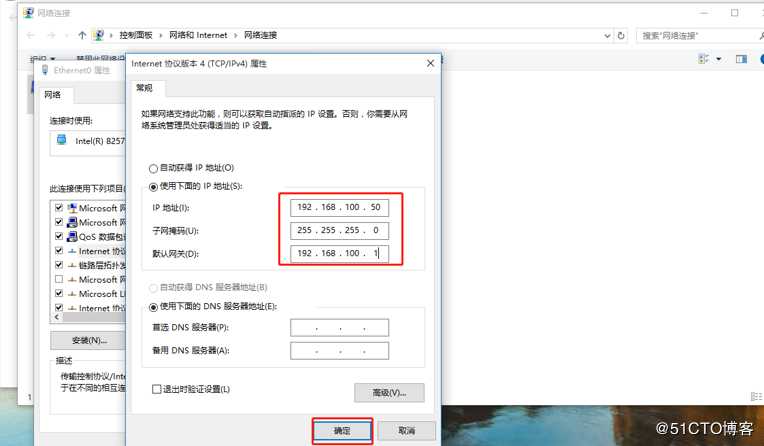
client:192.168.100.50
添加一块网卡,设置透明代理
ens33网卡配置文件:
[root@squid ~]# cd /etc/sysconfig/network-scripts/
[root@squid network-scripts]# vim ifcfg-ens33
TYPE=Ethernet
PROXY_METHOD=none
BROWSER_ONLY=no
BOOTPROTO=static
DEFROUTE=yes
IPV4_FAILURE_FATAL=no
IPV6INIT=yes
IPV6_AUTOCONF=yes
IPV6_DEFROUTE=yes
IPV6_FAILURE_FATAL=no
IPV6_ADDR_GEN_MODE=stable-privacy
NAME=ens33
UUID=8ecd53ce-afdb-46f8-b7ff-b2f428a3bc8f
DEVICE=ens33
ONBOOT=yes
IPADDR=192.168.100.1
NETMASK=255.255.255.0
ens36网卡配置文件:
[root@squid network-scripts]# cp -p ifcfg-ens33 ifcfg-ens36
[root@squid network-scripts]# vim ifcfg-ens36
TYPE=Ethernet
PROXY_METHOD=none
BROWSER_ONLY=no
BOOTPROTO=static
DEFROUTE=yes
IPV4_FAILURE_FATAL=no
IPV6INIT=yes
IPV6_AUTOCONF=yes
IPV6_DEFROUTE=yes
IPV6_FAILURE_FATAL=no
IPV6_ADDR_GEN_MODE=stable-privacy
NAME=ens36
DEVICE=ens36
ONBOOT=yes
IPADDR=12.0.0.1
NETMASK=255.255.255.0
[root@squid network-scripts]# systemctl restart network
[root@squid network-scripts]# ifconfig
ens33: flags=4163<UP,BROADCAST,RUNNING,MULTICAST> mtu 1500
inet 192.168.100.1 netmask 255.255.255.0 broadcast 192.168.100.255
inet6 fe80::c776:9d00:618:88f2 prefixlen 64 scopeid 0x20<link>
ether 00:0c:29:eb:34:07 txqueuelen 1000 (Ethernet)
RX packets 226 bytes 31111 (30.3 KiB)
RX errors 0 dropped 0 overruns 0 frame 0
TX packets 84 bytes 10776 (10.5 KiB)
TX errors 0 dropped 0 overruns 0 carrier 0 collisions 0ens36: flags=4163<UP,BROADCAST,RUNNING,MULTICAST> mtu 1500
inet 12.0.0.1 netmask 255.255.255.0 broadcast 12.0.0.255
inet6 fe80::55bc:65c1:7046:e2d6 prefixlen 64 scopeid 0x20<link>
ether 00:0c:29:eb:34:11 txqueuelen 1000 (Ethernet)
RX packets 216 bytes 30613 (29.8 KiB)
RX errors 0 dropped 0 overruns 0 frame 0
TX packets 76 bytes 9847 (9.6 KiB)
TX errors 0 dropped 0 overruns 0 carrier 0 collisions 0
[root@squid network-scripts]# service network restart ##重启网络服务
[root@squid network-scripts]# vim /etc/sysctl.conf ##开启路由转发
net.ipv4.ip_forward=1
[root@squid network-scripts]# sysctl -p ##加载
在squid服务器上设置透明代理
[root@squid network-scripts]# vim /etc/squid.conf #设置配置文件
http_port 192.168.100.1:3128 transparent #设置透明代理[root@squid ~]# iptables -F #清空表缓存
[root@squid ~]# iptables -t nat -F #清空NAT表缓存
root@squid ~]# setenforce 0 #关闭增强型安全功能
[root@squid network-scripts]# iptables -t nat -I PREROUTING -i ens33 -s 192.168.100.0/24 -p tcp --dport 80 -j REDIRECT --to 3128
#定义规则入口ens33,80端口重定向到3128
[root@squid network-scripts]# iptables -t nat -I PREROUTING -i ens33 -s 192.168.100.0/24 -p tcp --dport 443 -j REDIRECT --to 3128
#https443端口
[root@squid network-scripts]# iptables -I INPUT -p tcp --dport 3128 -j ACCEPT #允许3128端口访问
[root@squid network-scripts]# service squid stop #关闭服务
[root@squid network-scripts]# service squid start #开启服务
正在启动 squid...
[root@squid network-scripts]#
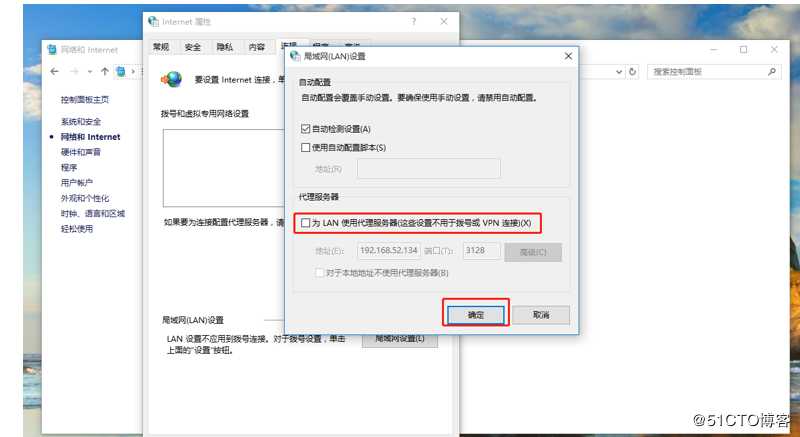
分别将web主机和client测试主机网络模式改为仅主机,配置固定IP地址,关闭代理服务器
测试服务器,查看日志
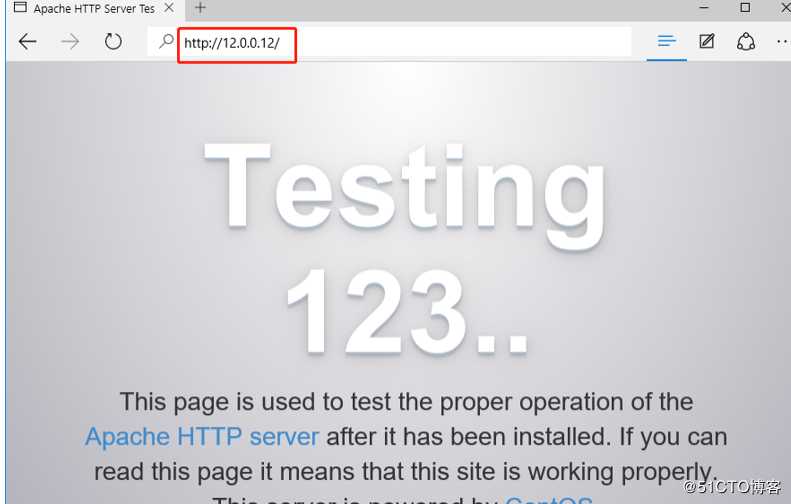
[root@localhost ~]# tail -1 /etc/httpd/logs/access_log
12.0.0.1 - - [04/Dec/2019:19:57:53 +0800] "GET /favicon.ico HTTP/1.1" 404 209 "-" "Mozilla/5.0 (Windows NT 10.0; Win64; x64) AppleWebKit/537.36 (KHTML, like Gecko) Chrome/42.0.2311.135 Safari/537.36 Edge/12.10240"
#可以看到是代理服务器的IP地址访问的
[root@localhost ~]#
标签:io优化 隐藏 inf http服务 ethernet 空间 目录 firewall user
原文地址:https://blog.51cto.com/14449536/2461960