标签:nta 构建 命令 指令 python3 朋友 linux creat type
Dockerfile 可以自定义编写镜像,简单来说就类似写脚本,shell脚本应该接触不少了,就是一个执行后就完成了。
当然做好的镜像也可以传到镜像仓库,就好像github上面一样存储,一个命令就能照搬下来安装。
相信不少朋友会问,为何docker run 一下python就停止了呢?(那执行完了不停止干什么?)
还有为什么我的pip安装,每次安装完成了run下一个python容器就没有已安装的库了?显然run是每次都启动一个新的容器。所以不少网友提倡用Dockerfile制作。
1、学习只需三步:
2、Dockerfile命令科普:
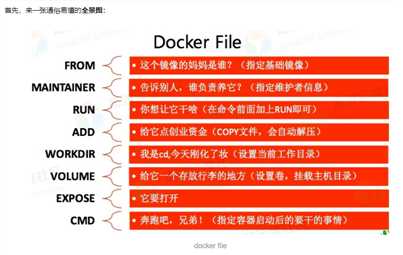
FROM:基础镜像,当前新镜像是基于哪个镜像的
MAINTAINER:镜像维护者的姓名和邮箱地址
RUN:容器构建时需要运行的命令
EXPOSE:当前容器对外暴露出的端口
WORKDIR:指定在创建容器后,终端默认登陆的进来工作目录,一个落脚点
ENV:用来在构建镜像过程中设置环境变量
ADD:将宿主机目录下的文件拷贝进镜像且 ADD 命令会自动处理 URL 和解压 tar 压缩包
COPY:类似 ADD,拷贝文件和目录到镜像中。(COPY src dest 或 COPY ["src","dest"])
VOLUME:容器数据卷,用于数据保存和持久化工作
CMD:指定一个容器启动时要运行的命令,Dockerfile 中可以有多个 CMD 指令,但只有最后一个生效,CMD 会被 docker run 之后的参数替换
ENTRYPOINT:指定一个容器启动时要运行的命令,ENTRYPOINT 的目的和 CMD 一样,都是在指定容器启动程序及参数
ONBUILD:当构建一个被继承的 Dockerfile 时运行命令,父镜像在被子继承后父镜像的 onbuild 被触发
3、网上的图片介绍的还不错,仅供参考:
安装python3,并且安装 requirements.txt 文件内的库。
1、导出 requirements.txt:pip3 freeze >requirements.txt
[root@iZbp19lugf22zbsubsf1y6Z data]# pip3 freeze >requirements.txt
[root@iZbp19lugf22zbsubsf1y6Z data]# ll
total 8
-rw-r--r-- 1 root root  469 Jan  3 20:09 Dockerfile
-rw-r--r-- 1 root root 1107 Jan  3 20:10 requirements.txt
[root@iZbp19lugf22zbsubsf1y6Z data]# cat requirements.txt
allure-pytest==2.8.6
allure-python-commons==2.8.6
amqp==1.4.9
anyjson==0.3.3
appdirs==1.4.3
attrs==19.3.0
Babel==2.7.0
bcrypt==3.1.7...等等
2、创建文件:vi dockerfile
[root@iZbp19lugf22zbsubsf1y6Z data]# vi Dockerfile
3、编写 dockerfile,保存
# 基础镜像:python3.6.5镜像
FROM python:3.6.5

# 镜像维护者的姓名和邮箱地址
MAINTAINER gsxl  <772262624@qq.com>

# 构建时需要运行的命令,更新pip,为了后面pip安装 requirements.txt
RUN pip install --upgrade pip

# 工作目录
WORKDIR /python
ADD . /python

# pip 安装 requirements.txt
RUN pip install -r requirements.txt

# 指定容器启动程序及参数
ENTRYPOINT ["pytest"]

# 默认显示help帮助信息
CMD ["--help"]
4、build 运行(注意后面有个 . ):dcoker build -t 镜像:标签 .
镜像名及标签 == test_py:v1
[root@iZbp19lugf22zbsubsf1y6Z data]# docker build -t test_py:v1 .
8个步骤,结果如下:
root@iZbp19lugf22zbsubsf1y6Z data]# docker build -t test_py:v1 .
Sending build context to Docker daemon  4.096kB
Step 1/8 : FROM python:3.6.5
 ---> 9a58cce9b09f
Step 2/8 : MAINTAINER gsxl  <772262624@qq.com>
 ---> Using cache
 ---> ef78f308960d
Step 3/8 : RUN pip install --upgrade pip
 ---> Using cache
 ---> fcd21328b7d4
Step 4/8 : WORKDIR /python
 ---> Running in 70727434375c
Removing intermediate container 70727434375c
 ---> 89e7bb9cd6b5
Step 5/8 : ADD . /python
 ---> 32b2714720b4
Step 6/8 : RUN pip install -r requirements.txt
 ---> Running in 7a1727fa9b6f
Collecting allure-pytest==2.8.6
  Downloading https://files.pythonhosted.org/packages/8d/be/cc4877a9e2f998bbfd0289b6a2ffac153126b9c8f843ea733cd14371b7e3/allure_pytest-2.8.6-py2.py3-none-any.whl
Collecting allure-python-commons==2.8.6
  Downloading https://files.pythonhosted.org/packages/1a/7d/cd568f55d54012891ecea14f70ec3d8f2471f038f53df7a828f4b3e5080d/allure_python_commons-2.8.6-py2.py3-none-any.whl
Collecting amqp==1.4.9...此处省略
Successfully built 18ccc91cdaf2
Successfully tagged test_py:v1
5、查看镜像:docker images
[root@iZbp19lugf22zbsubsf1y6Z data]# docker images
REPOSITORY          TAG                 IMAGE ID            CREATED             SIZE
test_py             v1                  18ccc91cdaf2        18 minutes ago      1.07GB
1、docker run -it --rm -v ~/data:/python test_py:v1 api_excel_demo/cases/test_register_api.py -s
[root@iZbp19lugf22zbsubsf1y6Z data]# docker run -it --rm -v ~/data:/python test_py:v1 api_excel_demo/cases/test_register_api.py -s
============================================================================================================================ test session starts =============================================================================================================================
platform linux -- Python 3.6.5, pytest-5.3.2, py-1.8.1, pluggy-0.13.1
rootdir: /python
plugins: allure-pytest-2.8.6
collected 3 items

api_excel_demo/cases/test_register_api.py {‘Content-Type‘: ‘application/json‘, ‘X-Requested-With‘: ‘XMLHttpRequest‘}
*******正在执行用例:-----  ID: 1
请求方式:post, 请求url:http://47.97.194.84:8000/api/register/
请求类型为:json ,body参数为:{"account": "gsxl11", "email": "gsxl11@qq.com", "password": "gsxl11", "repassword": "gsxl11"}
响应信息为:恭喜您,账号已成功注册
用例测试结果:  ID: 1---->pass
检查点---->:恭喜您,账号已成功注册
.{‘Content-Type‘: ‘application/json‘, ‘X-Requested-With‘: ‘XMLHttpRequest‘}
*******正在执行用例:-----  ID: 2
请求方式:post, 请求url:http://47.97.194.84:8000/api/register/
请求类型为:json ,body参数为:{"account": "gsxl11", "email": "gsxl11@qq.com", "password": "gsxl11", "repassword": "gsxl11"}
响应信息为:该用户名已被注册,请更换用户名
用例测试结果:  ID: 2---->pass
检查点---->:该用户名已被注册,请更换用户名
.{‘Content-Type‘: ‘application/json‘, ‘X-Requested-With‘: ‘XMLHttpRequest‘}
*******正在执行用例:-----  ID: 3
请求方式:post, 请求url:http://47.97.194.84:8000/api/register/
请求类型为:json ,body参数为:{"account": "", "email": "", "password": "", "repassword": ""}
响应信息为:该用户名已被注册,请更换用户名
用例测试结果:  ID: 3---->pass
检查点---->:该用户名已被注册,请更换用户名
.

============================================================================================================================= 3 passed in 0.42s =============================================================================================================================
欢迎来QQ交流群:482713805
标签:nta 构建 命令 指令 python3 朋友 linux creat type
原文地址:https://www.cnblogs.com/gsxl/p/12129322.html