4: docker0: <BROADCAST,MULTICAST,UP,LOWER_UP> mtu 1500 qdisc noqueue state UP group default
link/ether 02:42:43:7b:1b:bd brd ff:ff:ff:ff:ff:ff
inet 172.17.0.1/16 brd 172.17.255.255 scope global docker0
valid_lft forever preferred_lft forever
inet6 fe80::42:43ff:fe7b:1bbd/64 scope link
valid_lft forever preferred_lft forever
8: veth3b72761@if7: <BROADCAST,MULTICAST,UP,LOWER_UP> mtu 1500 qdisc noqueue master docker0
state UP group default
link/ether 22:a3:13:4d:7f:29 brd ff:ff:ff:ff:ff:ff link-netnsid 2
inet6 fe80::20a3:13ff:fe4d:7f29/64 scope link
valid_lft forever preferred_lft forever
(2)查看容器tomcat01的网络:docker exec -it tomcat01 ip a,可以发现
[root@bogon ~]# docker exec -it tomcat01 ip a
1: lo: <LOOPBACK,UP,LOWER_UP> mtu 65536 qdisc noqueue state UNKNOWN group default qlen 1000
link/loopback 00:00:00:00:00:00 brd 00:00:00:00:00:00
inet 127.0.0.1/8 scope host lo
valid_lft forever preferred_lft forever
7: eth0@if8: <BROADCAST,MULTICAST,UP,LOWER_UP> mtu 1500 qdisc noqueue state UP group default
link/ether 02:42:ac:11:00:02 brd ff:ff:ff:ff:ff:ff link-netnsid 0
inet 172.17.0.2/16 brd 172.17.255.255 scope global eth0
valid_lft forever preferred_lft forever
(3)在centos中ping一下tomcat01的网络,发现可以ping通
ping 172.17.0.2
[root@bogon ~]# ping 172.17.0.2
PING 172.17.0.2 (172.17.0.2) 56(84) bytes of data.
64 bytes from 172.17.0.2: icmp_seq=1 ttl=64 time=0.120 ms
64 bytes from 172.17.0.2: icmp_seq=2 ttl=64 time=0.060 ms
64 bytes from 172.17.0.2: icmp_seq=3 ttl=64 time=0.056 ms
(3)既然可以ping通,而且centos和tomcat1又属于不同的network namespace,是怎么连接的?
很显然,跟之前的实战是一样的,画个图
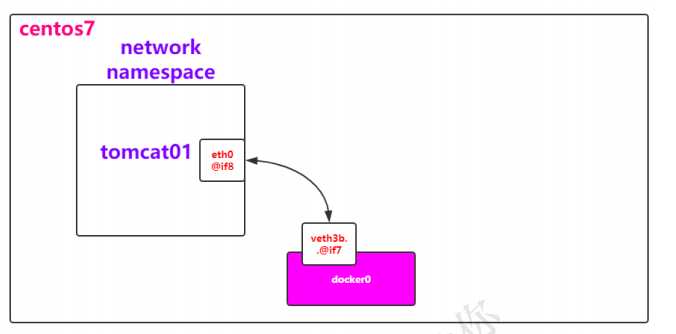
(4)也就是说,在tomcat01中有一个eth0和centos的docker0中有一个veth3是成对的,类似于之前实战中的
veth-ns1和veth-ns2,不妨再通过一个命令确认下:brctl
安装一下:yum install bridge-utils
brctl show
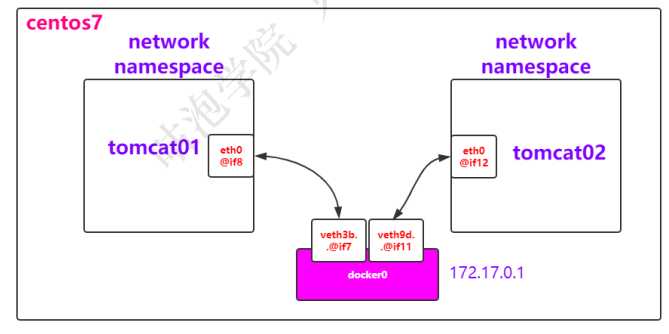
(5)那为什么tomcat01和tomcat02能ping通呢?不多说,直接上图
(5)这种网络连接方法我们称之为Bridge,其实也可以通过命令查看docker中的网络模式:docker network ls
bridge也是docker中默认的网络模式
(6)不妨检查一下bridge:docker network inspect bridge
"Containers": {
"6ad312b32f62b48935f3c95c58ae061df710bfebbd3d721b467507b9516eeb81": {
"Name": "tomcat02",
"EndpointID":
"aa9c612c79f867e874d0cae1aab45374373b61e9cdbe79925d07ae2e89a1cca0",
"MacAddress": "02:42:ac:11:00:03",
"IPv4Address": "172.17.0.3/16",
"IPv6Address": ""
},
"f49fc396d8e04f2b330163d91bb5d1482715202b4e2fd0c7f42833722787742a": {
"Name": "tomcat01",
"EndpointID":
"c5440b063e8fc0c9c44f3f61bf68f577283417eb23cfa9a361d37973d01a8ba5",
"MacAddress": "02:42:ac:11:00:02",
"IPv4Address": "172.17.0.2/16",
"IPv6Address": ""
}
}
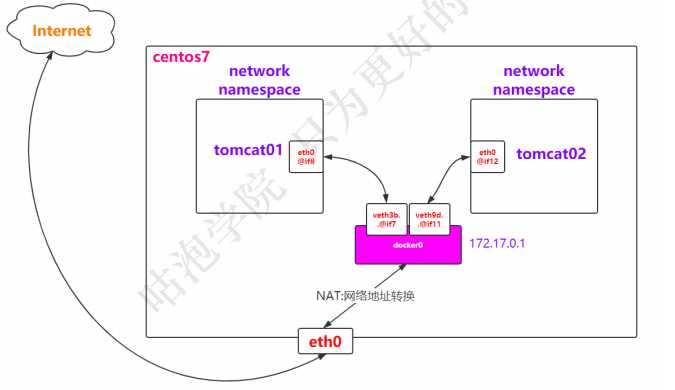
(6)在tomcat01容器中是可以访问互联网的,顺便把这张图画一下咯,NAT是通过iptables实现的
3.4.2 创建自己的network
(1)创建一个network,类型为bridge
docker network create tomcat-net
or
docker network create --subnet=172.18.0.0/24 tomcat-net
(2)查看已有的network:docker network ls
NETWORK ID NAME DRIVER SCOPE
a1aa0d802154 bridge bridge local
058b2ea4bf85 host host local
0604ff19e224 none null local
3012e3afd264 tomcat-net bridge local
(3)查看tomcat-net详情信息:docker network inspect tomcat-net
(4)创建tomcat的容器,并且指定使用tomcat-net
docker run -d --name custom-net-tomcat --network tomcat-net tomcat
(5)查看custom-net-tomcat的网络信息
docker exec -it custom-net-tomcat ip a
(6)查看网卡信息
ip a
(7)查看网卡接口
brctl show
bridge name       bridge id       STP enabled       interfaces
br-3012e3afd264 8000.02429780e75d  no               vethf223a4b
docker0         8000.0242437b1bbd  no               veth3b72761 veth9d8c470
(8)此时在custom-net-tomcat容器中ping一下tomcat01的ip会如何?发现无法ping通
docker exec -it custom-net-tomcat ping 172.17.0.2
PING 172.17.0.2 (172.17.0.2) 56(84) bytes of data.
^C
--- 172.17.0.2 ping statistics ---
4 packets transmitted, 0 received, 100% packet loss, time 3000ms
(9)此时如果tomcat01容器能够连接到tomcat-net上应该就可以咯
docker network connect tomcat-net tomcat01
(10)查看tomcat-net网络,可以发现tomcat01这个容器也在其中
(11)此时进入到tomcat01或者custom-net-tomcat中,不仅可以通过ip地址ping通,而且可以通过名字ping
到,这时候因为都连接到了用户自定义的tomcat-net bridge上
docker exec -it tomcat01 bash
root@f49fc396d8e0:/usr/local/tomcat# ping 172.18.0.2
PING 172.18.0.2 (172.18.0.2) 56(84) bytes of data.
64 bytes from 172.18.0.2: icmp_seq=1 ttl=64 time=0.048 ms
64 bytes from 172.18.0.2: icmp_seq=2 ttl=64 time=0.040 ms
root@f49fc396d8e0:/usr/local/tomcat# ping custom-net-tomcat
PING custom-net-tomcat (172.18.0.2) 56(84) bytes of data.
64 bytes from custom-net-tomcat.tomcat-net (172.18.0.2): icmp_seq=1 ttl=64 time=0.030 ms
64 bytes from custom-net-tomcat.tomcat-net (172.18.0.2): icmp_seq=2 ttl=64 time=0.264 ms
但是ping tomcat02是不通的
root@f49fc396d8e0:/usr/local/tomcat# ping 172.17.0.3
PING 172.17.0.3 (172.17.0.3) 56(84) bytes of data.
64 bytes from 172.17.0.3: icmp_seq=1 ttl=64 time=0.045 ms
64 bytes from 172.17.0.3: icmp_seq=2 ttl=64 time=0.066 ms
root@f49fc396d8e0:/usr/local/tomcat# ping tomcat02
PING tomcat02 (220.250.64.26) 56(84) bytes of data.
3.5 深入分析Container网络-Host & None
3.5.1 Host
(1)创建一个tomcat容器,并且指定网络为none
docker run -d --name my-tomcat-host --network host tomcat
(2)查看ip地址
docker exec -it my-tomcat-host ip a
可以发现和centos是一样的
(3)检查host网络
"Containers": {
"e1f00d47db344b6688e99c0f5b393e232309fbe1a4d9c3fc3e1ce7c107f3312d": {
"Name": "my-tomcat-host",
"EndpointID":
"f08456d9dca024cf6f911f8d32329ba2587ea89554c96b77c32698ace6998525",
"MacAddress": "",
"IPv4Address": "",
"IPv6Address": ""
}
}
3.5.2 None
(1)创建一个tomcat容器,并且指定网络为none
docker run -d --name my-tomcat-none --network none tomcat
(2)查看ip地址
docker exec -it my-tomcat-none ip a
1: lo: <LOOPBACK,UP,LOWER_UP> mtu 65536 qdisc noqueue state UNKNOWN group default qlen 1000
link/loopback 00:00:00:00:00:00 brd 00:00:00:00:00:00
inet 127.0.0.1/8 scope host lo
valid_lft forever preferred_lft forever
(3)检查none网络
"Containers": {
"bb3f0db4fa76a25b5377da9c3bbf087ac7ef0de0a3f9c37a4ae959983d33105c": {
"Name": "my-tomcat-none",
"EndpointID":
"26055c08c968f9d6d03d10b3b66dfea004c35f5d2bd4067a2306566973e92f9e",
"MacAddress": "",
"IPv4Address": "",
"IPv6Address": ""
}
}
3.6 端口映射及折腾
3.6.1 端口映射
(1)创建一个tomcat容器,名称为port-tomcat
docker run -d --name port-tomcat tomcat
(2)思考一下要访问该tomcat怎么做?肯定是通过ip:port方式
docker exec -it port-tomcat bash
curl localhost:8080
(3)那如果要在centos7上访问呢?
docker exec -it port-tomcat ip a ---->得到其ip地址,比如172.17.0.4
curl 172.17.0.4:8080
小结 :之所以能够访问成功,是因为centos上的docker0连接了port-tomcat的network namespace
(4)那如果要在centos7通过curl localhost方式访问呢?显然就要将port-tomcat的8080端口映射到centos上
docker rm -f port-tomcat
docker run -d --name port-tomcat -p 8090:8080 tomcat
curl localhost:8090
3.6.2 折腾
(1)centos7是运行在win10上的虚拟机,如果想要在win10上通过ip:port方式访问呢?
#此时需要centos和win网络在同一个网段,所以在Vagrantfile文件中
#这种方式等同于桥接网络。也可以给该网络指定使用物理机哪一块网卡,比如
#config.vm.network"public_network",:bridge=>‘en1: Wi-Fi (AirPort)‘
config.vm.network"public_network"
centos7: ip a --->192.168.8.118
win10:浏览器访问 192.168.8.118:9080
(2)如果也想把centos7上的8090映射到win10的某个端口呢?然后浏览器访问localhost:port
#此时需要将centos7上的端口和win10上的端口做映射
config.vm.network"forwarded_port",guest:8098,host:8090
#记得vagrant reload生效一下
win10:浏览器访问 localhost:8098
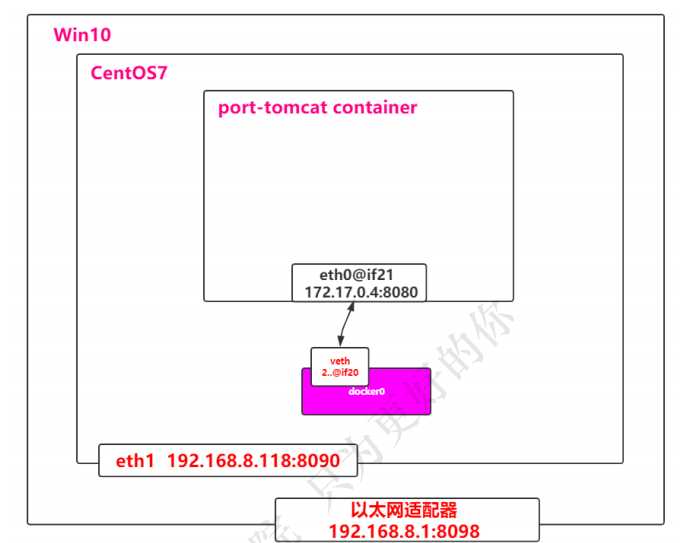
3.6.3 画个图强化一下
什么?上面的过程还是觉得有些难理解?不急,画个图展现一下
3.7 多机之间的container通信[放到Docker Swarm中详细聊]
在同一台centos7机器上,发现无论怎么折腾,我们一定有办法让两个container通信。
那如果是在两台centos7 机器上呢?画个图
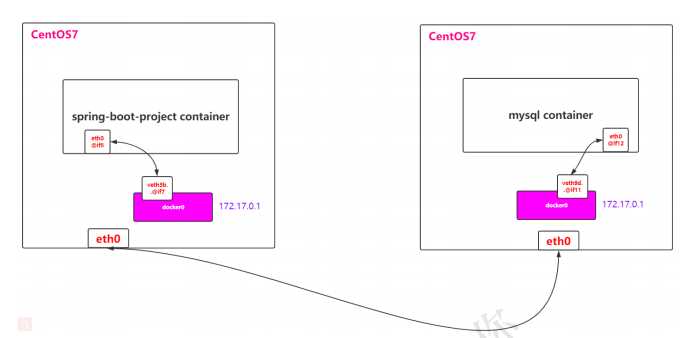
(1)使得两边的eth0能够通信
(2)前提要确保spring-boot-project container和mysql container的IP地址不一样
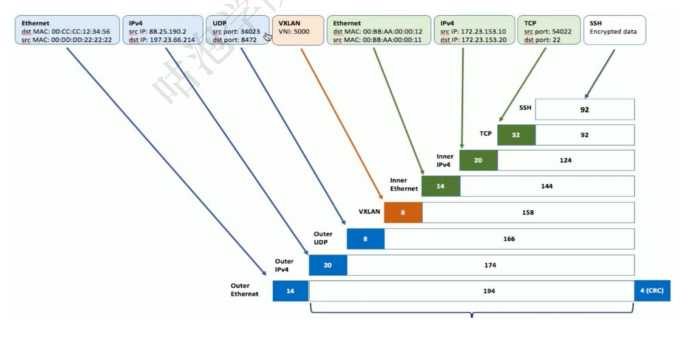
(3)将spring-boot-project中的所有信息当成eth0要传输给另外一端的信息
(4)具体通过vxlan技术实现
www.evoila.de/2015/11/06/what-is-vxlan-and-how-it-works
(5)处在vxlan的底层:underlay
处在xxlan的上层:overlay