标签:异常 web span moc builder 控制台 自动 ble 实例
通俗的说就是,让你感觉不爽的,阻碍你的事都算异常,也就是说不让我们程序正常运行的情况。
方便集中管理,集中定位问题
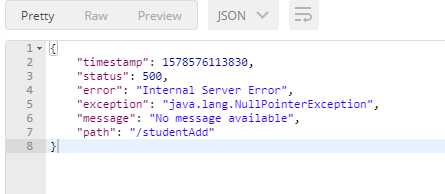
举个例子,还用之前的学生信息那个案例,我们添加一个小于18岁的学生,调用接口,控制台报错如下:

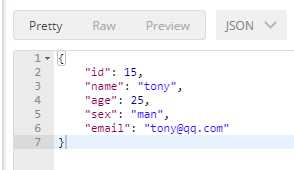
再看接口返回信息,如下图:
添加失败 添加成功
暂且先不说控制台报错,对比下,我们添加成功的接口信息返回情况,明显这给客户端调用我们程序的同学,有些不便,那么我们这里做下优化。
强迫症的我,这里有必要做下统一格式的输出,那么具体怎么做呢?
增加一个外层对象,用于包裹里面对象,具体代码示例如下:
package com.rongrong.springboot.demo.domain;

import lombok.Data;

/**
 * @description: 最外层对象
 * @author rongrong
 * @version 1.0
 * @date 2020/1/9 21:51
 */
@Data
public class Result<T> {
    private Integer code;
    private String msg;
    private T data;
}
针对成功、失败,定制统一的工具类,具体示例代码如下:
package com.rongrong.springboot.demo.utils;

import com.rongrong.springboot.demo.domain.Result;

/**
 * @description: 统一格式化输出json
 * @author rongrong
 * @version 1.0
 * @date 2020/1/9 21:55
 */
public class ResultUtils {

    public static Result success(Object obj){
        Result result = new Result();
        result.setCode(0);
        result.setMsg("success");
        result.setData(obj);
        return result;
    }

    public static Result success(){
        return success(null);
    }

    public static Result error(String msg){
        Result result = new Result();
        result.setCode(-1);
        result.setMsg(msg);
        //result.setMsg("unknown error");
        return result;
    }
}
接着我们需要对添加学生的接口进行改造,将我们封装好的工具类引入,达到统一输出的效果,具体代码如下:
 /**
     * 新增一个学生
     *
     * @return
     */
    @PostMapping("/studentAdd")
    public Result<Student> sudentAdd(@Valid Student student, BindingResult bindingResult) {
        if(bindingResult.hasFieldErrors()){
            Result result = ResultUtils.error(bindingResult.getFieldError().getDefaultMessage());
            //输出错误信息
            //System.out.println(bindingResult.getFieldError().getDefaultMessage());
            return result;
        }
        student.setName(student.getName());
        student.setAge(student.getAge());
        student.setSex(student.getSex());
        student.setEmail(student.getEmail());
        Result result = ResultUtils.success(studentResponstory.save(student));
        //保存和更新都用该方法
        return result;
    }
我们调用接口服务,再来看接口返回,如下图:
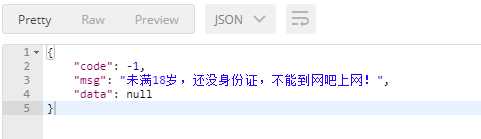
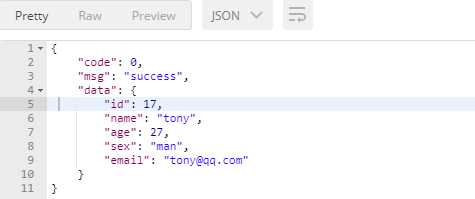
再来看下,明显舒服好多了。
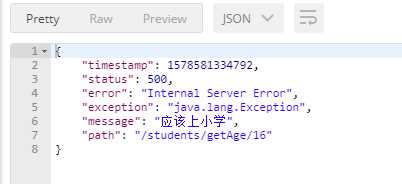
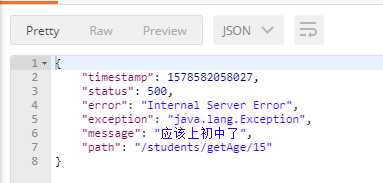
现在我们实现这样一组功能,获取学生的年龄并判断,小于10岁,返回“应该上小学”,大于10岁且小于16岁,返回“应该上初中了”
我们需要在StudentService中写逻辑,供controller调用,具体代码如下:
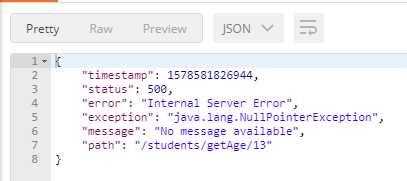
   /**
     * 查询学生年龄
     *
     * @param id
     * @throws Exception
     */
    public void getStudnetAge(Integer id) throws Exception {
        Student student = studentResponstory.findOne(id);
        Integer age = student.getAge();
        //小于10岁,返回“应该上小学”,大于10岁且小于16岁,返回“应该上初中了”
        if (age <= 10) {
            throw new Exception("应该上小学");
        } else if (age > 10 && age < 16) {
            throw new Exception("应该上小学");
        }
    }
接着我们在StudentController中调用,具体代码示例如下:
   /**
     * 获取学生年龄
     * @param id
     * @throws Exception
     */
    @GetMapping("/students/getAge/{id}")
    public void getAge(@PathVariable("id") Integer id) throws Exception {
        studentService.getStudnetAge(id);
    }
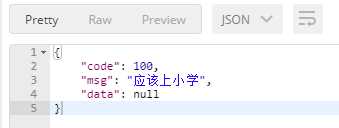
数据库中学生的信息如下:
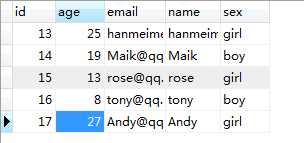
我们先来查询id为13、15、16的学生,查看接口返回信息如下:
异常不一样,我们需要再次进行统一化管理了,输出统一格式化后的json。
显然我们需要把message中的信息及code组合外部对象,在包装内部返回data对象,这时需要我们使用 @ControllerAdvice 进行全局异常处理,配合@ExceptionHandle注解使用,@ExceptionHandle注解可以自动捕获controller层出现的指定类型异常,并对该异常进行相应的异常处理。
我们先来建立一个统一的异常类,继承RuntimeException,因为对于spring boot框架中,只有RuntimeException类的异常才会进行事务回滚,具体示例代码如下:
package com.rongrong.springboot.demo.exception;

/**
 * @author rongrong
 * @version 1.0
 * @description:
 * @date 2020/1/10 0:24
 */
public class StudentException extends RuntimeException{
    //code码
    private Integer code;
    //错误信息
    private String msg;

    public StudentException(Integer code, String msg) {
        this.code = code;
        this.msg = msg;
    }

    public void setCode(Integer code) {
        this.code = code;
    }

    public void setMsg(String msg) {
        this.msg = msg;
    }

    public Integer getCode() {
        return code;
    }

    public String getMsg() {
        return msg;
    }
}
注意:此处必须用getSet方法,不能lombok插件,否则会报错,没有定义getSet方法。
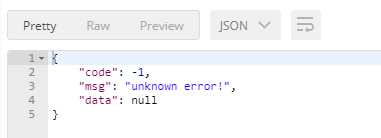
接着我们再来编写全局异常处理,并针对异常类型做出判断,具体示例代码如下:
package com.rongrong.springboot.demo.handle;

import com.rongrong.springboot.demo.domain.Result;
import com.rongrong.springboot.demo.exception.StudentException;
import com.rongrong.springboot.demo.utils.ResultUtils;
import org.springframework.web.bind.annotation.ControllerAdvice;
import org.springframework.web.bind.annotation.ExceptionHandler;
import org.springframework.web.bind.annotation.ResponseBody;

/**
 * @description: 全局异常处理
 * @author rongrong
 * @version 1.0
 * @date 2020/1/10 0:17
 */
@ControllerAdvice
public class ExceptionHandle {

    @ResponseBody
    @ExceptionHandler(Exception.class)
    public Result error(Exception e) {
        if(e instanceof StudentException){
            StudentException studentException=(StudentException)e;
            return ResultUtils.error(studentException.getCode(),studentException.getMsg());
        }else {
            return ResultUtils.error(-1, "unknown error!");
        }
    }
}
同样的,我们需要对StudentService中作出调整,修改为我们自定义的异常,具体示例代码如下:
  /**
     * 查询学生年龄
     *
     * @param id
     * @throws Exception
     */
    public void getStudnetAge(Integer id) throws Exception {
        Student student = studentResponstory.findOne(id);
        Integer age = student.getAge();
        //小于10岁,返回“应该上小学”,大于10岁且小于16岁,返回“应该上初中了”
        if (age <= 10) {
            throw new StudentException(100,"应该上小学");
        } else if (age > 10 && age < 16) {
            throw new StudentException(101,"应该上初中了");
        }
    }
重新启动项目,再次调用查询学生年龄接口,查看返回结果如下所示证明成功。
很明显,现在两个报错对应两个code和msg,那么如果有多种code和msg对应的话这里感觉维护起来就很难了,所以我们要把它拿出来统一集中管理就好,这里使用枚举,来实现code和msg的映射。
具体示例代码如下:
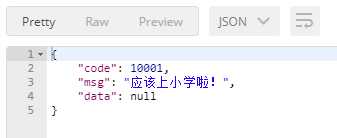
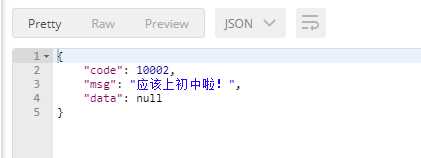
package com.rongrong.springboot.demo.exceptionenum;

/**
 * @author rongrong
 * @version 1.0
 * @description:
 * @date 2020/1/9 23:11
 */

public enum ResultEnum {

    UNKNOW_ERROR(-1,"unknown error!"),
    HIGH_SCHOOL(10001,"应该上小学啦!"),
    PRIMARY_SCHOOL(10002,"应该上初中啦!"),
    SUCCESS(0,"success");
    //code码
    private Integer code;
    //错误信息
    private String msg;

    public Integer getCode() {
        return code;
    }

    public void setCode(Integer code) {
        this.code = code;
    }

    public String getMsg() {
        return msg;
    }

    public void setMsg(String msg) {
        this.msg = msg;
    }

    ResultEnum(Integer code, String msg) {
        this.code = code;
        this.msg = msg;
    }
}
接下来,需要我们在对StudentService中作出调整,修改为我们自定义的异常,传参为我们的枚举对象,具体示例代码如下:
/**
     * 查询学生年龄
     *
     * @param id
     * @throws Exception
     */
    public void getStudnetAge(Integer id) throws Exception {
        Student student = studentResponstory.findOne(id);
        Integer age = student.getAge();
        //小于10岁,返回“应该上小学”,大于10岁且小于16岁,返回“应该上初中了”,其他正常输出
        if (age <= 10) {
            throw new StudentException(ResultEnum.PRIMARY_SCHOOL);
        } else if (age > 10 && age < 16) {
            throw new StudentException(ResultEnum.HIGH_SCHOOL);
        }else {
            throw new StudentException(ResultEnum.SUCCESS);
        }
    }
接着在对,StudentException这个异常构造器,做下调整,具体代码如下:
package com.rongrong.springboot.demo.exception;

import com.rongrong.springboot.demo.exceptionenum.ResultEnum;

/**
 * @author rongrong
 * @version 1.0
 * @description:
 * @date 2020/1/10 0:24
 */
public class StudentException extends RuntimeException{
    //code码
    private Integer code;
    //错误信息
    private String msg;

    public StudentException(ResultEnum resultEnum) {
        this.code = resultEnum.getCode();
        this.msg = resultEnum.getMsg();
    }

    public void setCode(Integer code) {
        this.code = code;
    }

    public void setMsg(String msg) {
        this.msg = msg;
    }

    public Integer getCode() {
        return code;
    }

    public String getMsg() {
        return msg;
    }
}
最后,我们再来启动项目,调用下接口,返回如下信息,证明修改成功!
为了程序能够更好的运行,我们必须要做测试,所以要养成写完程序进行单元测试的好习惯。
那么在这里我们需要对Service、API进行测试。
可以通过自定义创建类,来编写单元测试,也可以通过idea向导来创建,具体操作如下图所示:
具体示例代码如下:
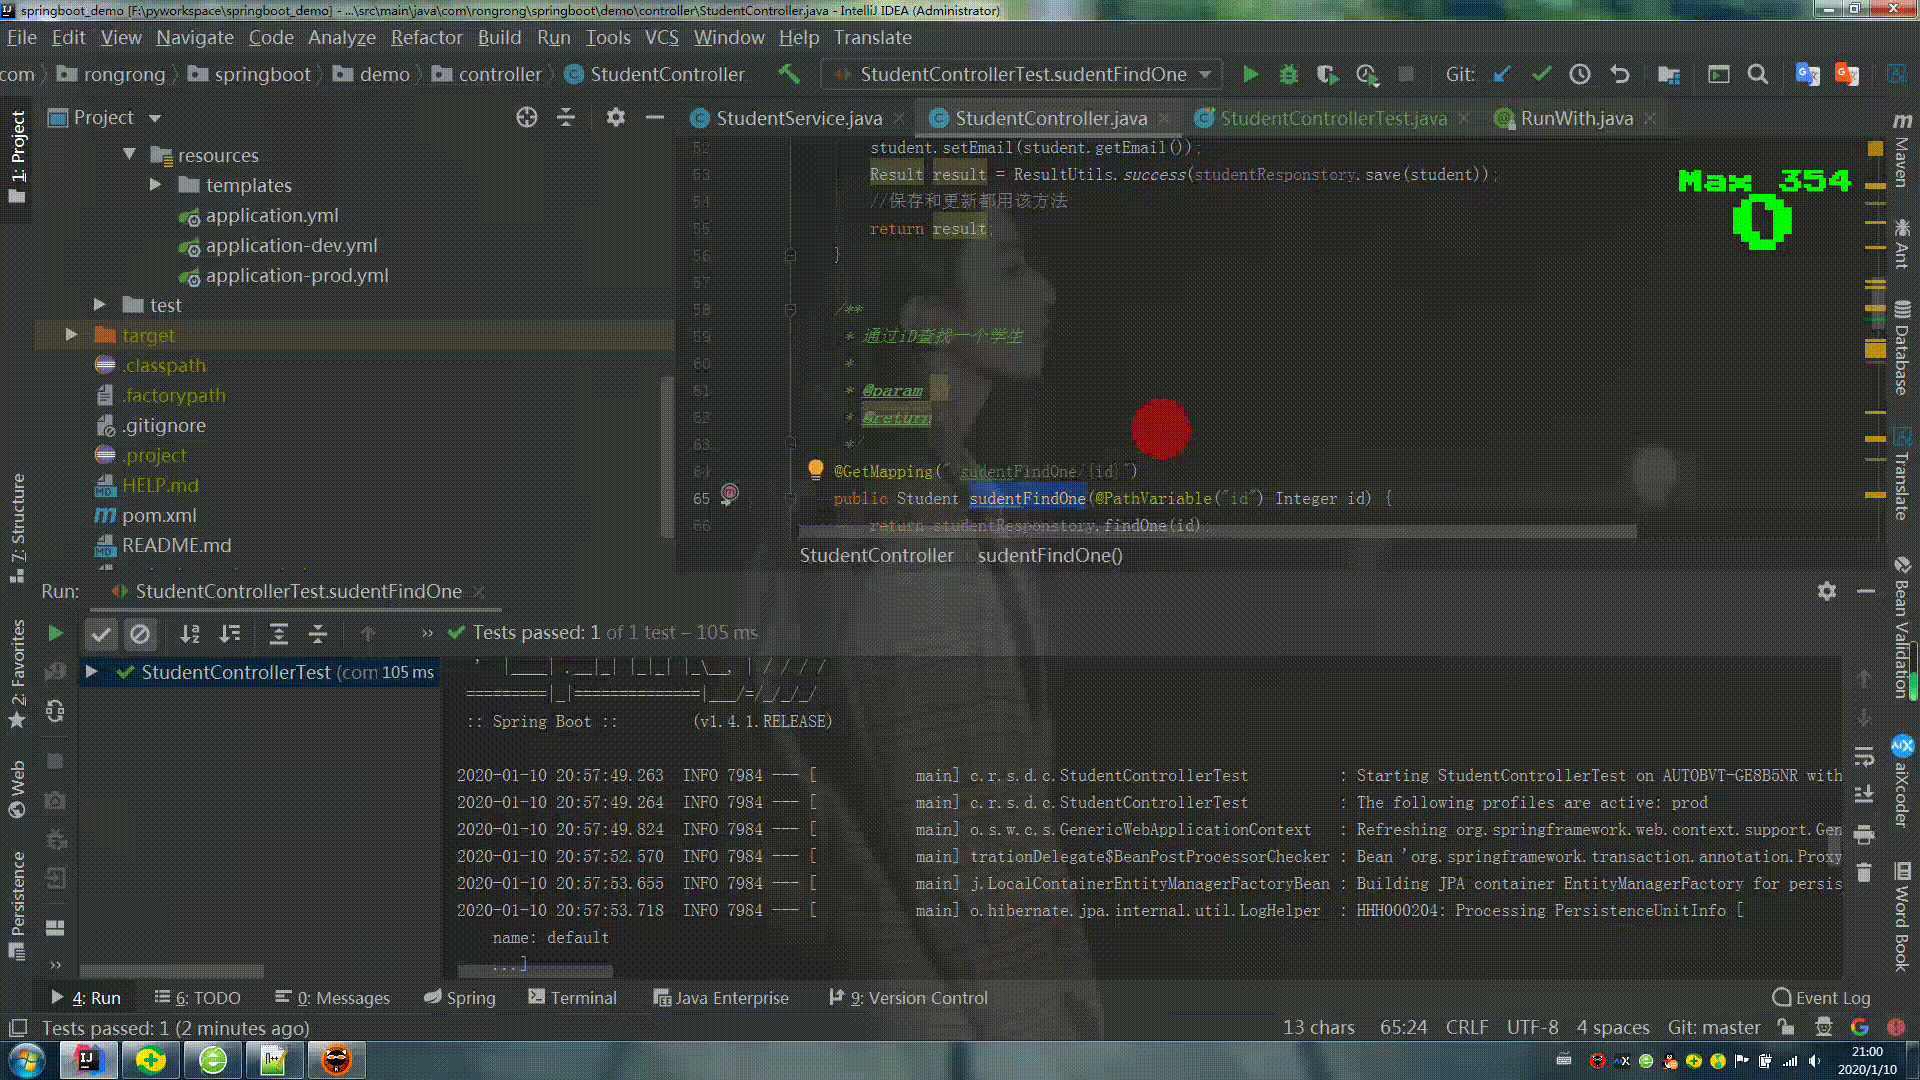
package com.rongrong.springboot.demo.controller;

import com.rongrong.springboot.demo.domain.Student;
import com.rongrong.springboot.demo.responstory.StudentResponstory;
import org.junit.Assert;
import org.junit.Test;
import org.junit.runner.RunWith;
import org.springframework.beans.factory.annotation.Autowired;
import org.springframework.boot.test.context.SpringBootTest;
import org.springframework.test.context.junit4.SpringRunner;

/**
 * @description: 对service进行单元测试
 * @author rongrong
 * @version 1.0
 * @date 2020/1/10 20:52
 */
@RunWith(SpringRunner.class)
@SpringBootTest
public class StudentControllerTest {

    @Autowired
    StudentResponstory studentResponstory;

    @Test
    public void sudentFindOne() {
        Student student = studentResponstory.findOne(13);
        Assert.assertEquals(new Integer(25), student.getAge());
    }
}
使用@AutoConfigureMockMvc注解,配合MockMvcRequestBuilders、MockMvcResultMatchers来测试,具体示例代码如下:
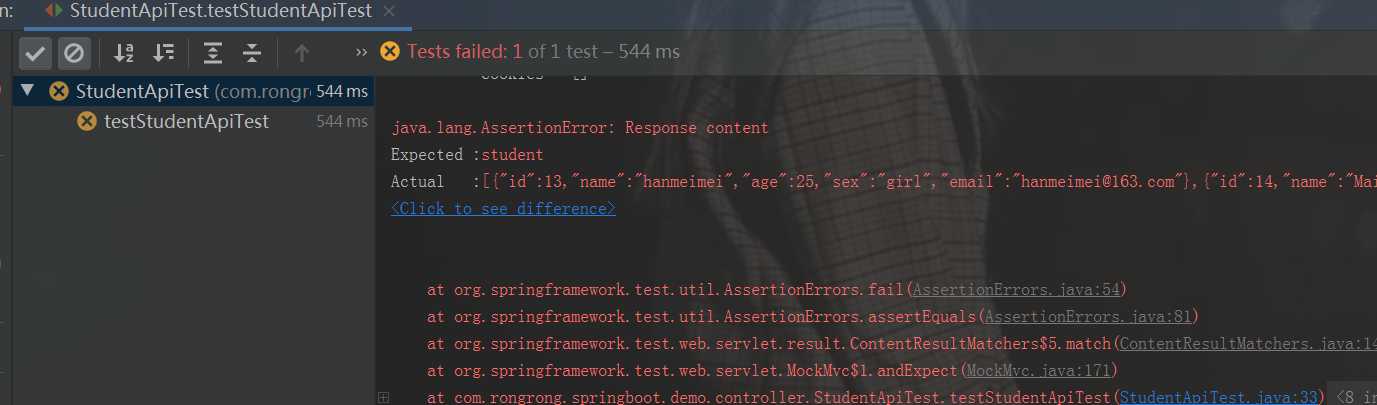
package com.rongrong.springboot.demo.controller;

import com.rongrong.springboot.demo.responstory.StudentResponstory;
import org.junit.Test;
import org.junit.runner.RunWith;
import org.springframework.beans.factory.annotation.Autowired;
import org.springframework.boot.test.autoconfigure.web.servlet.AutoConfigureMockMvc;
import org.springframework.boot.test.context.SpringBootTest;
import org.springframework.test.context.junit4.SpringRunner;
import org.springframework.test.web.servlet.MockMvc;
import org.springframework.test.web.servlet.request.MockMvcRequestBuilders;
import org.springframework.test.web.servlet.result.MockMvcResultMatchers;

/**
 * @description: 对API进行单元测试
 * @author rongrong
 * @version 1.0
 * @date 2020/1/10 21:12
 */
@RunWith(SpringRunner.class)
@SpringBootTest
@AutoConfigureMockMvc
public class StudentApiTest {


    @Autowired
    MockMvc mockMvc;

    @Test
    public void testStudentApiTest() throws Exception {
        mockMvc.perform(MockMvcRequestBuilders.get("/students"))
                .andExpect(MockMvcResultMatchers.status().isOk())
                .andExpect(MockMvcResultMatchers.content().string("student"));
    }

}
运行测试,结果如下:
到此,spring boot 中统一异常处理,AutoConfigureMockMvc这个注解,感觉与powermock很像,其中各种APi,有兴趣的同学自己可以去尝试。
学习他人的优点,对比自己的不足!
标签:异常 web span moc builder 控制台 自动 ble 实例
原文地址:https://www.cnblogs.com/longronglang/p/12174292.html