标签:blog tst tail 左右 mis height 抠图 idt 机器
有时候在页面登录或者注册的时候,为了防止不是机器人操作,会让用户手动来滑动图片验证。我在做项目时用到了这个功能,这里记录一下自己的想法和做法。
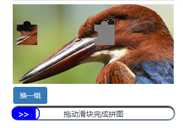
实现的效果如图所示:
好了,现在来说说想法。
关于图片滑动验证一般是要前后端来交互的。首先是要后台处理好图片,然后将处理出来的图片返回到前台。后台随机抽取一张模板图片,也就是完整的图片,然后通过代码来操作将一块区域的图扣出来,将扣掉的地方填成灰色或者黑色,这样,素材就有了。
在返回到前台时,要将图片转码为base编码。在前台接收时,要使用如下方式来讲base64编码的图片显示:
$("#validateImage").attr("src", "data:image/png;base64,"+data.srcImage);
$("#slideImage").attr("src", "data:image/png;base64,"+data.cutImage);
然后前台通过滑动图片来验证。这种情况要存储滑动的距离,也就是像素点。当然,图片生成时也要将抠图的坐标记录,要和滑动后传过来的数据进行验证。
图片处理类如下:我这个图片处理类的半圆型的半径并没有算进那个坐标区域,所以在判断是否拼图正确的情况下必须要将那个半径加上或者减去(专属我自己的项目,符合自己的方式,如果不符合你的,请将想法吃透,然后在我的工具类中提炼出一些关键的技术,自己尝试写吧)。
package news.utils;

import java.awt.Color;
import java.awt.image.BufferedImage;
import java.io.ByteArrayOutputStream;
import java.io.File;
import java.io.IOException;
import java.util.HashMap;
import java.util.Map;
import java.util.Random;

import javax.imageio.ImageIO;

import news.bean.VerifyImage;
import sun.misc.BASE64Encoder;

/**
 * 处理图片的工具类,用于实现前端的滑动验证
 * @author 徐金仁
 */
public class VerifyImageUtils3 {
    //原图片的宽度
    private static int ORI_HEIGHT = 160;
    //原图片的高度
    private static int ORI_WIDTH = 322;
    //抠图上面的半径
    private static int RADIUS = 8;
    //抠图区域的高度
    private static int TAM_HEIGHT = 40;
    //抠图区域的宽度
    private static int TAM_WIDTH = 40;
    //抠图内部矩形填充的大小
    private static int RAN_SIZE = 8;
    //抠图的边框宽度
    private static int BORDER_SIZE = 1;
    //
    private static int XPosition ;
    private static int YPosition ;


    Random random =new Random();


    /**
     * 提供的对外的公共接口,用于获取处理后的图片和抠图的位置
     * @param filePath 存储原始图片的位置
     * @throws Exception
     */
    public VerifyImage getImages(String filePath) throws Exception{
        VerifyImage ve = new VerifyImage();
        //随机获取一张图片
        File imageFile = getRandomImage(filePath);
        BufferedImage oriImage = ImageIO.read(imageFile);
        ORI_HEIGHT = oriImage.getHeight();
        ORI_WIDTH = oriImage.getWidth();
        //获取抠图的坐标,防止不恰当的坐标会出现在图片的边沿,
        XPosition = TAM_WIDTH + random.nextInt(oriImage.getWidth() - TAM_WIDTH * 3);
        YPosition = TAM_HEIGHT + random.nextInt(oriImage.getHeight() - TAM_HEIGHT * 2);
        //获取抠图的区域,将这个图片的坐标传进去,来获取到抠图的位置和大小,就是将抠图给定死
        int[][] blockData = getBlockData(oriImage);
        //处理图片,将得到的两张图片放入map中
        Map<String, BufferedImage> dataMap = createVerifyImage(oriImage,blockData);
        //将那些图片转为base64存储
        String srcImage = ImageBase64(dataMap.get("oriImage"));
        String cutImage = ImageBase64(dataMap.get("cutImage"));
        ve.setCutImage(cutImage);
        ve.setSrcImage(srcImage);
        ve.setXPosition(XPosition);
        ve.setYPosition(YPosition);
        return ve;
    }
    /**
     * 将图片转为base64存储
     * @param bufferedImage 要转化的图片
     * @return
     * @throws IOException
     */
    private String ImageBase64(BufferedImage bufferedImage) throws IOException {
         ByteArrayOutputStream out = new ByteArrayOutputStream();
         ImageIO.write(bufferedImage,"png",out);
            //转成byte数组
            byte[] bytes = out.toByteArray();
            BASE64Encoder encoder = new BASE64Encoder();
            //生成BASE64编码
            return encoder.encode(bytes);
    }
    /**
     * 处理图片,将得到的两张图片放入map中
     * @param oriImage 原图
     * @param blockData 整张布局的区域
     * @return 存储图片的map
     */
    private Map<String, BufferedImage> createVerifyImage(BufferedImage oriImage, int[][] blockData) {
        Map<String, BufferedImage> map = new HashMap<String, BufferedImage>();
        int h = blockData.length;
        int w = blockData[0].length;
        BufferedImage cutImage = new BufferedImage(TAM_WIDTH + 2*RADIUS,TAM_HEIGHT + 2*RADIUS,BufferedImage.TYPE_4BYTE_ABGR);
        int i2,j2;
        for(int i = 0; i < TAM_WIDTH + 2*RADIUS; i ++){
            for(int j = 0; j < TAM_HEIGHT + 2*RADIUS; j ++){
                i2 = i + XPosition - RADIUS;
                j2 = j + YPosition - RADIUS;
                if(blockData[i2][j2] == 2){
                    cutImage.setRGB(i, j, oriImage.getRGB(i2, j2));
                    oriImage.setRGB(i2, j2, Color.gray.getRGB());
                }
            }
        }
        map.put("cutImage", cutImage);
        map.put("oriImage", oriImage);
        return map;
    }
    /**
     * 获取抠图区域,返回一个数组,上面展现了抠图的位置和具体区域
     * @param oriImage
     * @return
     */
    private int[][] getBlockData(BufferedImage oriImage) {
        ORI_HEIGHT = oriImage.getHeight();
        ORI_WIDTH = oriImage.getWidth();
        //要先选择四边中的一条边来选择圆心,1、 2、 3、 4分别代表上下左右
        int chooseR = random.nextInt(4) + 1;
        int[][] blockData = new int[ORI_WIDTH][ORI_HEIGHT];
        //矩形区域处理
        for(int i = 0; i <ORI_WIDTH; i++){
            for(int j = 0; j < ORI_HEIGHT; j ++){
                blockData[i][j] = 0;
                if(i >= XPosition && j>= YPosition && j<= YPosition + TAM_HEIGHT  && i<= XPosition + TAM_WIDTH ){
                    blockData[i][j] = 2;
                }
            }
        }
        //圆型区域凸出块
        //(x - a)^2 + (y - b)^2 = r^2
        int x ;
        int y ;
        //圆形区域的凹陷块
        int x2;
        int y2;
        String sx;
        if(chooseR== 1){//下
            x = (XPosition + TAM_HEIGHT / 2);
            y = YPosition;
            sx = "下";
            x2 = (XPosition);
            y2 = YPosition + TAM_HEIGHT / 2;
        }else if(chooseR == 2){//上
            x = (XPosition + TAM_HEIGHT / 2);
            y = YPosition + TAM_WIDTH ;
            sx = "上";
            x2 = (XPosition + TAM_HEIGHT );
            y2 = YPosition + TAM_HEIGHT / 2;
        }else if(chooseR == 3){//左
            x = (XPosition);
            y = YPosition + TAM_HEIGHT / 2;
            x2 = (XPosition + TAM_HEIGHT / 2);
            y2 = YPosition + TAM_WIDTH ;
            sx = "左";
        }else{//右
            x = (XPosition + TAM_HEIGHT );
            y = YPosition + TAM_HEIGHT / 2;
            sx = "右";
            x2 = (XPosition + TAM_HEIGHT / 2);
            y2 = YPosition;
        }
        //将圆形区域标记上
        for(int i = x-RADIUS; i < x + RADIUS; i ++){
            for(int j = y-RADIUS; j < y + RADIUS; j ++){
                if(Math.pow(Math.abs(x - i), 2) + Math.pow(Math.abs(y - j), 2) <= Math.pow(RADIUS, 2)){
                    //说明在圆内
                    blockData[i][j] = 2;
                }
            }
        }
        for(int i = x2-RADIUS; i < x2 + RADIUS; i ++){
            for(int j = y2-RADIUS; j < y2 + RADIUS; j ++){
                if(Math.pow(Math.abs(x2 - i), 2) + Math.pow(Math.abs(y2 - j), 2) <= Math.pow(RADIUS, 2)){
                    //说明在圆内
                    blockData[i][j] = 0;
                }
            }
        }
        return blockData;
    }
    /**
     * 随机获取一个图片文件
     * @param filePath
     * @return
     * @throws Exception
     */
    private File getRandomImage(String filePath) throws Exception {
        File file = new File(filePath);
        if(!file.exists()){
            throw new Exception("该文件路径不对");
        }
        if(file.isDirectory()){
            File[] files = file.listFiles();
            if(files.length <= 0){
                throw new Exception("该文件夹内没有文件!");
            }else{

                int index = random.nextInt(files.length);
                return files[index];
            }
        }else{
            return file;
        }
    }
}


思路启发来源于网上对于图片滑动验证的原理,技术实现来源于自己对于下面博客的关键技术的提炼:
https://blog.csdn.net/MrSpirit/article/details/100653864
标签:blog tst tail 左右 mis height 抠图 idt 机器
原文地址:https://www.cnblogs.com/1998xujinren/p/12334895.html