标签:遇到 一个 ext 批处理文件 忽略 ali tput builder 处理
由于IOS App需要使用已训练的tensorflow模型进行物体检测,特将此过程记录下来已备不时之需。
TensorFlow Lite 的设计旨在在各种设备上高效执行模型。这种高效部分源于在存储模型时,采用了一种特殊的格式。TensorFlow 模型在能被 TensorFlow Lite 使用前,必须转换成这种格式。
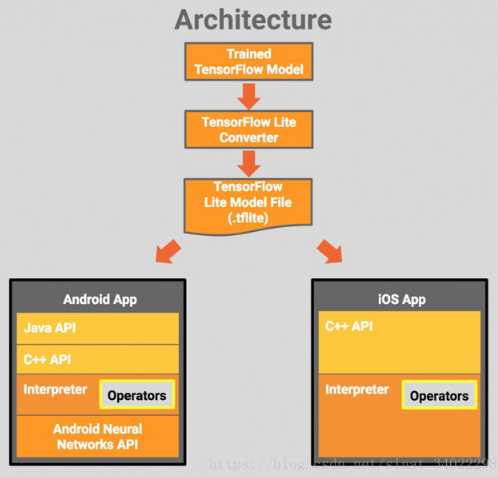
由上图可知:
tflite是从训练的模型转换而来的;
tflite是为了在App设备上使用;
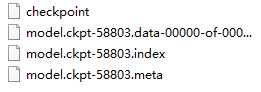
训练过程中产生的文件说明:
Checkpoint——

保留最近几次的训练结果的索引
ckpt.data——
保存模型的中参数的值
ckpt.index——
保存模型中参数的名称和维度,相当于将模型中的参数名称和参数值关联起来
ckpt.meta——
保存计算图
通过/models/research/object_detection/export_tflite_ssd_graph.py得到tflite_graph.pb模型,参数与export_inference_graph.py类似
(1)直接转换
def convertToLite_normal():
    graph_def_file=r‘E:\AI\...\tflite_graph.pb‘;
    input_arrays=["normalized_input_image_tensor"]
    output_arrays=[‘TFLite_Detection_PostProcess‘,‘TFLite_Detection_PostProcess:1‘,‘TFLite_Detection_PostProcess:2‘,‘TFLite_Detection_PostProcess:3‘]
    input_tensor={"normalized_input_image_tensor":[1,300,300,3]}

    converter = tf.lite.TFLiteConverter.from_frozen_graph(graph_def_file, input_arrays, output_arrays,input_tensor)
    converter.allow_custom_ops=True
    tflite_model = converter.convert()
    open(r"E:\AI\...\bbc_normal.tflite", "wb").write(tflite_model)
(2)float16量化
训练后的float16量化减少了TensorFlow Lite模型的尺寸(高达50%),同时牺牲了很少的精度。它量化模型常量(如权重和偏差值)从全精度浮点数(32位)到降低精度浮点数数据类型(IEEE FP16)。
def convertToLite_fp16():
    # 接着实现对tflite_graph.pb模型的fp16量
    # 参考:https://zhuanlan.zhihu.com/p/90690452
    input_arrays = ["normalized_input_image_tensor"]
    output_arrays = [‘TFLite_Detection_PostProcess‘, ‘TFLite_Detection_PostProcess:1‘, ‘TFLite_Detection_PostProcess:2‘,
                     ‘TFLite_Detection_PostProcess:3‘]
    input_tensor = {"normalized_input_image_tensor": [1, 300, 300, 3]}

    converter = tf.lite.TFLiteConverter.from_frozen_graph(r‘E:\AI\...\tflite_graph.pb‘, input_arrays, output_arrays, input_tensor)
    converter.target_ops = [tf.lite.OpsSet.TFLITE_BUILTINS, tf.lite.OpsSet.SELECT_TF_OPS]
    converter.allow_custom_ops = True
    converter.optimizations = [tf.lite.Optimize.DEFAULT]
    converter.target_spec.supported_types = [tf.lite.constants.FLOAT16]

    # converter.post_training_quantize=True
    tflite_fp16_model = converter.convert()
    # open("car_fp16.tflite", "wb").write(tflite_fp16_model)
    open(r"E:\AI\...\bbc_fp16.tflite", "wb").write(tflite_fp16_model)
(3)获取输入、输出的张量
def getTensor():
    gf = tf.GraphDef()
    m_file = open(modelPb, ‘rb‘)
    gf.ParseFromString(m_file.read())

    with open(saveFile, ‘a‘) as the_file:
        for n in gf.node:
            the_file.write(n.name + ‘\n‘)

    file = open(saveFile, ‘r‘)
    data = file.readlines()
    print("output name = "+data[len(data) - 1])


    print("Input name = ")
    file.seek(0)
    print(file.readline())
tflite_convert(tersorflow>=1.9)或者toco (1.9以前)
(1)tflite_convert
参考https://www.tensorflow.org/lite/convert/cmdline_examples
(2)toco

toco ^

--graph_def_file "E:\AI\...\xxx.pb" ^
--output_file=$OUTPUT_DIR/detect.tflite ^
--input_shapes=1,300,300,3 ^
--input_arrays=image_tensor ^
--output_arrays=detection_classes ^
--inference_type=QUANTIZED_UINT8 ^
--mean_values=128 ^
--std_dev_values=128 ^
--change_concat_input_ranges=false ^
--allow_custom_ops
因为下载国外的资源太慢了,安装环境前先配置镜像
# 添加Anaconda的TUNA镜像
conda config --add channels https://mirrors.tuna.tsinghua.edu.cn/anaconda/pkgs/free/
# 设置搜索时显示通道地址
conda config --set show_channel_urls yes
#删除镜像源
conda config --remove-key $channels
https://blog.csdn.net/brazy/article/details/88544505
A、出现错误可切换镜像会多试几次
ERROR: No matching distribution found for tensorboard<2.2.0,>=2.1.0 (from tensorflow==2.1.0)
B、可以忽略某个有问题的依赖包
pip install -U --ignore-installed wrapt enum34 simplejson netaddr
ERROR: Cannot uninstall ‘wrapt‘. It is a distutils installed project and thus we cannot accurately determine which files belong to it which would lead to only a partial uninstall.
conda create -n tensorflow python=3.6.3
conda create -n tensorflow python=3.5.2
activate tensorflow / deactivate
选择合适的版本下载 https://pypi.org/project/tensorflow/#modal-close

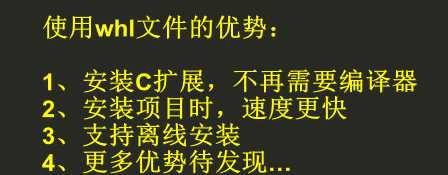
pip install F:\cp35\tensorflow-1.15.2-cp35-cp35m-win_amd64.whl
,安装高版本的需要预留足够多的空间(如2.0大概需要2G)
python》import tensorflow as tf》print(tf.__version__)
activate tensorflow
pip uninstall tensorflow
A、windows tensorflow ImportError: DLL load failed: 找不到指定的模块,Failed to load the native TensorFlow runtime.
方案1:
遇到这个问题需要利用vs的dumpbin.exe来查询dll的依赖情况,然后通过where指令确认哪个库不存在,然后对应下载便可,
D:\developtools\vs2015\VC\bin\dumpbin.exe /dependents D:\developtools\Anaconda3\Lib\site-packages\tensorflow_core\python\_pywrap_tensorflow_internal.pyd
结果:并没有像文章所说的一样发现了错误
https://blog.csdn.net/u011517332/article/details/90743579
方案2:
pillow是python中的一个图像处理库,是anaconda中自带的。但可能因为pillow的版本较老,所以需要更新一下
conda uninstall pillow
conda update pip
pip install pillow
https://blog.csdn.net/weixin_39750084/article/details/85722233
结果:依然没解决
方案3:
最新的tensorflow安装包对于比较老的处理器不再支持
https://blog.csdn.net/lchzh1994/article/details/81223726
结果:然后再安装tensorflow-2.0.1-cp36-cp36m-win_amd64,over了(注意:tensorflow1与2写法都有很大的区别)
B、tensorflow.lite.python.convert.ConverterError 不是内部或外部命令,也不是可运行的程序或批处理文件
错误信息为:
raise ConverterError("See console for info.\n%s\n%s\n" % (stdout, stderr))
tensorflow.lite.python.convert.ConverterError: See console for info.
b"‘toco_from_protos‘ \xb2\xbb\xca\xc7\xc4\xda\xb2\xbf\
处理方式:
安装不同版本的tensorflow及不同的python环境版本(3.6&3.5),中间还采用了pip install tf-nightly,如先安装1.15、tf-nightly、1.14再1.15就突然好了!有时用着用着也出现,重启就好了!(待跟踪)
从github上下载超级慢,推荐https://gitee.com/fearless87/tensorflow_models
比如我的版本为protoc-3.3.0-win32,https://github.com/protocolbuffers/protobuf/releases
在models/research下运行Windows PowerShell(注意,这里必须是PowerShell,运行cmd会报错),输入如下命令:
Get-ChildItem object_detection/protos/*.proto | Resolve-Path -Relative | %{ protoc $_ --python_out=. }
运行完成后,可以检查object_detection/protos/文件夹,如果每个proto文件都成了对应的以py为后缀的python源码,就说明编译成功了。
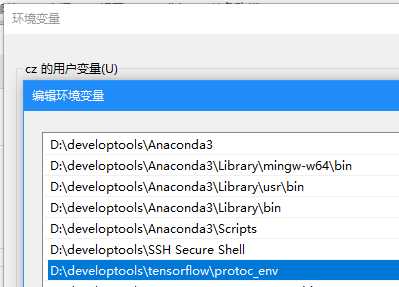
根据解释器的位置找到tensorflow

再加入环境变量文件到对应的位置

tensorflow_model.pth内容为

python setup.py build
python setup.py install
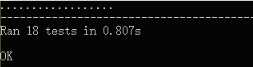
在models/research下运行如下命令:
python object_detection/builders/model_builder_test.py
出现如下信息,说明已安装成功:
>>> import tensorflow as tf
>>> dir(tf.contrib.lite)
[‘DecodeError‘, ‘Interpreter‘, ‘OpHint‘, ‘PY3‘, ‘TocoConverter‘, ‘__builtins__‘, ‘__cached__‘, ‘__doc__‘, ‘__file__‘, ‘__loader__‘, ‘__name__‘, ‘__package__‘, ‘__spec__‘, ‘_freeze_graph‘, ‘_freeze_saved_model‘, ‘_get_tensors_from_tensor_names‘, ‘_global_variables_initializer‘, ‘_graph_pb2‘, ‘_import_graph_def‘, ‘_is_frozen_graph‘, ‘_keras‘, ‘_session‘, ‘_set_tensor_shapes‘, ‘_signature_constants‘, ‘_tag_constants‘, ‘_tensor_name‘, ‘_text_format‘, ‘_tf_graph_util‘, ‘absolute_import‘, ‘build_toco_convert_protos‘, ‘constants‘, ‘convert_op_hints_to_stubs‘, ‘division‘, ‘print_function‘, ‘toco_convert‘, ‘toco_convert_protos‘]
安装Tensorflow windows10
https://blog.csdn.net/lucboll/article/details/94001177
tensorflow下载
https://pypi.org/project/tensorflow/#modal-close
windows10下安装TensorFlow Object Detection API
https://blog.csdn.net/qq_28019591/article/details/82023949
Tensorflow模型量化实践2--量化自己训练的模型
https://zhuanlan.zhihu.com/p/90690452
TensorFlow模型优化工具:float16量化,模型大小轻轻松松减少一半
https://blog.csdn.net/u011984148/article/details/99523526
tensorflow三种加载模型的方法和三种模型保存文件(.ckpt,.pb, SavedModel)
https://www.cnblogs.com/biandekeren-blog/p/11876032.html
TensorFlow中的模型保存文件
https://blog.csdn.net/weixin_39505272/article/details/91350714
Tensorflow 模型转 tflite ,在安卓端使用
Tensorflow 模型转换 .pb convert to .lite实例
https://www.jb51.net/article/180158.htm
tf-nightly
https://download.csdn.net/download/qq_40276310/10878873
开始使用 TensorFlow Lite
https://tensorflow.google.cn/lite/guide/get_started#2_convert_the_model_format
标签:遇到 一个 ext 批处理文件 忽略 ali tput builder 处理
原文地址:https://www.cnblogs.com/hepc/p/12344035.html