标签:mic 控制 多少 mamicode rri s2d repeat string selector
class Scheduler : public Ref
Node 中封装了 Scheduler,以下列出定时器接口:
1. void update(float fDelta)
2. void scheduleUpdate()
3.1. void schedule(SEL_SCHEDULE selector)
3.2. void schedule(SEL_SCHEDULE selector, float interval)
3.3. void schedule(SEL_SCHEDULE selector, float interval, unsigned int repeat, float delay)
4.1. void schedule(const std::function<void(float)> &callback, const std::string &key)
4.2. void schedule(const std::function<void(float)> &callback, float interval, const std::string &key)
4.3. void schedule(const std::function<void(float)>& callback, float interval, unsigned int repeat, float delay, const std::string &key)
5. void scheduleOnce(SEL_SCHEDULE selector, float delay)
6. void scheduleOnce(const std::function<void(float)> &callback, float delay, const std::string &key)
7. void unschedule(SEL_SCHEDULE selector)
8. void unschedule(const std::string &key)
9. void Node::unscheduleAllCallbacks()
使用定时器:
a. 使用 1 和 2:
在场景类中加入代码:
virtual void update(float dt) override { cocos2d::log("update: %d: %f", GetCurrentTime(), dt); }
在 init 中加入代码:
scheduleUpdate();
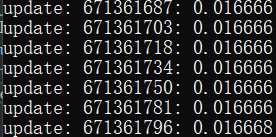
这样,update 就被不断地执行,GetCurrentTime() 获取以毫秒为单位的时间戳,dt 是两次调用 update 的时间间隔。
执行后控制台部分输出为:
b. 使用 3.2 和 7 创建自定义的定时器:
在场景类中加入代码:
void myUpdate(float dt) { cocos2d::log("update: %d: %f", GetCurrentTime(), dt); }
init 中加入代码(令 TestScece 是当前场景类):
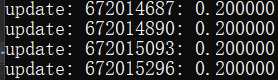
schedule(schedule_selector(TestScene::myUpdate), 0.2f);
第二行代码中,第二个参数是两次调用定时器的时间间隔。
这样,一个定时器就注册成功了,看看输出:
如何取消该定时器?这样即可:
unschedule(schedule_selector(TestScene::myUpdate));
c. 将上述两个应用结合看看:
在 TestScene 类中加入代码:
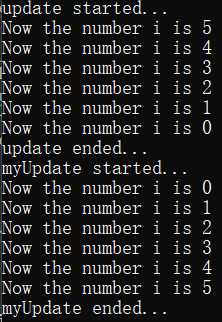
int iTest = 5;
virtual void update(float dt) override
{
    cocos2d::log("Now the number i is %d", TestScene::iTest);
    if (--iTest < 0)
    {
        unscheduleUpdate();
        cocos2d::log("update ended...");
        schedule(schedule_selector(TestScene::myUpdate), 0.2f);
        cocos2d::log("myUpdate started...");
    }
}
void myUpdate(float dt)
{
    ++iTest;
    cocos2d::log("Now the number i is %d", TestScene::iTest);
    if (iTest > 4)
    {
        unschedule(schedule_selector(TestScene::myUpdate));
        cocos2d::log("myUpdate ended...");
    }
}
在 init 中加入:
scheduleUpdate(); cocos2d::log("update started...");
输出:
d. 只想使用一次自定义定时器怎么办?
方法一:
在 TestScene 中加入:
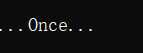
void mySchedule(float dt)
{
    cocos2d::log("...Once...");
    unschedule(schedule_selector(TestScene::mySchedule));
}
在 init 中加入:
schedule(schedule_selector(TestScene::mySchedule), 0.2f);
这样,就能实现单次 定时器。
方法二:
TestScene 中 mySchedule 改为:
void mySchedule(float dt) { cocos2d::log("...Once..."); }
init 中 schedule 改为:
scheduleOnce(schedule_selector(TestScene::mySchedule), 0.2f);
因此,两种方法结果一致:
scheduleOnce 中第二个参数用于确定多少秒后执行。
当然,你还可以直接使用匿名函数,上面的接口 6:
scheduleOnce([](float dt) { cocos2d::log("...Once..."); }, 0.2f, "keyName");
其他接口参见源码注释(注释在声明里而非实现里,请转到声明看注释)。
标签:mic 控制 多少 mamicode rri s2d repeat string selector
原文地址:https://www.cnblogs.com/teternity/p/Cocos2xd__Scheduler.html