标签:download turn pen ade mod data inf net poc
在上一篇博客中,我们实现了用LSTM对单词进行词性判断,本篇博客我们将实现用LSTM对MNIST图片分类。MNIST图片的大小为28*28,我们将其看成长度为28的序列,序列中的每个数据的维度是28,这样我们就可以把它变成一个序列数据了。代码如下。
‘‘‘
本程序实现用LSTM对MNIST进行图片分类
‘‘‘
import torch
import numpy as np
import torch.nn as nn
import torch.utils.data as Data
import torchvision
import matplotlib.pyplot as plt
# Hyper parameter
EPOCH = 1
LR = 0.001 # learning rate
BATCH_SIZE = 50
# Mnist digit dataset
train_data = torchvision.datasets.MNIST(
root=‘/Users/wangpeng/Desktop/all/CS/Courses/Deep Learning/mofan_PyTorch/mnist/‘, # mnist has been downloaded before, use it directly
train=True, # this is training data
transform=torchvision.transforms.ToTensor(), # Converts a PIL.Image or numpy.ndarray to
# torch.FloatTensor of shape (C x H x W) and normalize in the range [0.0, 1.0]
download=False,
)
# print(train_data.data.size()) # (60000, 28, 28)
# print(train_data.targets.size()) # (60000)
# plot one image
# plt.imshow(train_data.data[0].numpy(), cmap=‘gray‘)
# plt.title(‘{:d}‘.format(train_data.targets[0]))
# plt.show()
# Data Loader for easy mini-batch return in training, the image batch shape will be (50, 1, 28, 28)
train_loader = Data.DataLoader(dataset=train_data, batch_size=BATCH_SIZE, shuffle=True)
test_data = torchvision.datasets.MNIST(
root=‘/Users/wangpeng/Desktop/all/CS/Courses/Deep Learning/mofan_PyTorch/mnist/‘,
train=False, # this is training data
)
# print(test_data.data.size()) # (10000, 28, 28)
# print(test_data.targets.size()) # (10000)
# pick 2000 samples to speed up testing
test_x = test_data.data.type(torch.FloatTensor)[:2000]/255 # shape (2000, 28, 28), value in range(0,1)
test_y = test_data.targets[:2000]
class LSTMnet(nn.Module):
def __init__(self, in_dim, hidden_dim, n_layer, n_class):
super(LSTMnet, self).__init__()
self.n_layer = n_layer
self.hidden_dim = hidden_dim
self.lstm = nn.LSTM(in_dim, hidden_dim, n_layer, batch_first=True)
self.linear = nn.Linear(hidden_dim, n_class)
def forward(self, x): # x‘s shape (batch_size, 序列长度, 序列中每个数据的长度)
out, _ = self.lstm(x) # out‘s shape (batch_size, 序列长度, hidden_dim)
out = out[:, -1, :] # 中间的序列长度取-1,表示取序列中的最后一个数据,这个数据长度为hidden_dim,
# 得到的out的shape为(batch_size, hidden_dim)
out = self.linear(out) # 经过线性层后,out的shape为(batch_size, n_class)
return out
model = LSTMnet(28, 64, 2, 10) # 图片大小28*28,lstm的每个隐藏层64个节点,2层隐藏层
if torch.cuda.is_available():
model = model.cuda()
optimizer = torch.optim.Adam(model.parameters(), lr=LR)
criterion = nn.CrossEntropyLoss()
# training and testing
for epoch in range(EPOCH):
for iteration, (train_x, train_y) in enumerate(train_loader): # train_x‘s shape (BATCH_SIZE,1,28,28)
train_x = train_x.squeeze() # after squeeze, train_x‘s shape (BATCH_SIZE,28,28),
# 第一个28是序列长度,第二个28是序列中每个数据的长度。
output = model(train_x)
loss = criterion(output, train_y) # cross entropy loss
optimizer.zero_grad() # clear gradients for this training step
loss.backward() # backpropagation, compute gradients
optimizer.step() # apply gradients
if iteration % 100 == 0:
test_output = model(test_x)
predict_y = torch.max(test_output, 1)[1].numpy()
accuracy = float((predict_y == test_y.numpy()).astype(int).sum()) / float(test_y.size(0))
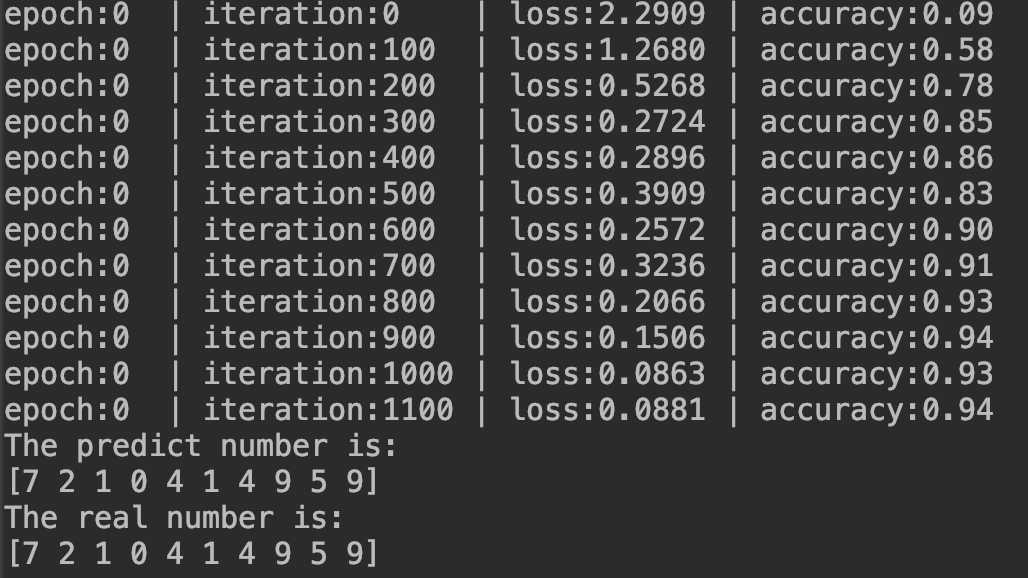
print(‘epoch:{:<2d} | iteration:{:<4d} | loss:{:<6.4f} | accuracy:{:<4.2f}‘.format(epoch, iteration, loss, accuracy))
# print 10 predictions from test data
test_out = model(test_x[:10])
pred_y = torch.max(test_out, dim=1)[1].data.numpy()
print(‘The predict number is:‘)
print(pred_y)
print(‘The real number is:‘)
print(test_y[:10].numpy())
结果如下:
参考资料:
PyTorch LSTM的一个简单例子:实现MNIST图片分类
标签:download turn pen ade mod data inf net poc
原文地址:https://www.cnblogs.com/picassooo/p/12556293.html