标签:测试 uac 命令 映射文件 stream read logs ali event
本文描述如何在一台机器上搭建nginx负载均衡,我将会启动3个nginx的docker,分别是1台前置nginx负责分发,后面2台负责处理请求。
首先我切换到/usr/local/docker/文件夹下,这个文件夹是专门用来做docker映射文件夹用的,docker里的重要的文件夹会映射到这里,在这里执行
mkdir nginx
mkdir nginx01
mkdir nginx02
nginx下存储的是前置nginx的文件
nginx01和nginx02负责存储后边两台nginx服务器的文件
《一、前置nginx配置以及启动》
切换到/usr/local/docker/nginx下
然后执行
mkdir -p conf html logs
切换到conf
vim nginx.conf
user nginx;
worker_processes auto;
error_log /var/log/nginx/error.log;
pid /run/nginx.pid;

# Load dynamic modules. See /usr/share/nginx/README.dynamic.
include /usr/share/nginx/modules/*.conf;

events {
    worker_connections 1024;
}

http {
    log_format  main  ‘$remote_addr - $remote_user [$time_local] "$request" ‘
                      ‘$status $body_bytes_sent "$http_referer" ‘
                      ‘"$http_user_agent" "$http_x_forwarded_for"‘;

    access_log  /var/log/nginx/access.log  main;

    sendfile            on;
    tcp_nopush          on;
    tcp_nodelay         on;
    keepalive_timeout   65;
    types_hash_max_size 2048;

    include             /etc/nginx/mime.types;
    default_type        application/octet-stream;

    # Load modular configuration files from the /etc/nginx/conf.d directory.
    # See http://nginx.org/en/docs/ngx_core_module.html#include
    # for more information.
    include /etc/nginx/conf.d/*.conf;

    server {
        listen       80 default_server;
        root         /usr/share/nginx/html;

        # Load configuration files for the default server block.
        include /etc/nginx/default.d/*.conf;

        location / {
        proxy_pass http://pic;
        }

        error_page 404 /404.html;
            location = /40x.html {
        }

        error_page 500 502 503 504 /50x.html;
            location = /50x.html {
        }
    }

    upstream pic{
                server 172.26.200.89:8088 weight=5;
                server 172.26.200.89:8089 weight=5;
    }

}
配置好以后,保存conf文件
然后启动这个前置nginx
docker run --name mynginx -d -p 82:80 -v /usr/local/docker/nginx/conf/nginx.conf:/etc/nginx/nginx.conf -v /usr/local/docker/nginx/logs:/var/log/nginx -d nginx
《二、nginx01配置以及启动》
切换到/usr/local/docker/nginx01/文件夹
执行
mkdir -p conf html logs
然后切换到conf文件夹
vim nginx.conf
user nginx;
worker_processes auto;
error_log /var/log/nginx/error.log;
pid /run/nginx.pid;

# Load dynamic modules. See /usr/share/nginx/README.dynamic.
include /usr/share/nginx/modules/*.conf;

events {
    worker_connections 1024;
}

http {
    log_format  main  ‘$remote_addr - $remote_user [$time_local] "$request" ‘
                      ‘$status $body_bytes_sent "$http_referer" ‘
                      ‘"$http_user_agent" "$http_x_forwarded_for"‘;

    access_log  /var/log/nginx/access.log  main;

    sendfile            on;
    tcp_nopush          on;
    tcp_nodelay         on;
    keepalive_timeout   65;
    types_hash_max_size 2048;

    include             /etc/nginx/mime.types;
    default_type        application/octet-stream;

    # Load modular configuration files from the /etc/nginx/conf.d directory.
    # See http://nginx.org/en/docs/ngx_core_module.html#include
    # for more information.
    include /etc/nginx/conf.d/*.conf;

    server {

    listen 8088;
    root /usr/share/nginx/html;
        index index.html index.htm;
    }


}
然后保存配置文件,退出
切换到/usr/local/docker/nginx01/html/文件夹下
vim index.html,简单写点东西,如下
8088 port nginx
然后启动docker
docker run --name mynginx01 -d -p 8088:8088 -v /usr/local/docker/nginx01/conf/nginx.conf:/etc/nginx/nginx.conf -v /usr/local/docker/nginx01/logs:/var/log/nginx -v /usr/local/docker/nginx01/html:/usr/share/nginx/html -d nginx
《三、nginx02配置以及启动》
切换到/usr/local/docker/nginx02/文件夹
执行
mkdir -p conf html logs
然后切换到conf文件夹
vim nginx.conf
user nginx;
worker_processes auto;
error_log /var/log/nginx/error.log;
pid /run/nginx.pid;

# Load dynamic modules. See /usr/share/nginx/README.dynamic.
include /usr/share/nginx/modules/*.conf;

events {
    worker_connections 1024;
}

http {
    log_format  main  ‘$remote_addr - $remote_user [$time_local] "$request" ‘
                      ‘$status $body_bytes_sent "$http_referer" ‘
                      ‘"$http_user_agent" "$http_x_forwarded_for"‘;

    access_log  /var/log/nginx/access.log  main;

    sendfile            on;
    tcp_nopush          on;
    tcp_nodelay         on;
    keepalive_timeout   65;
    types_hash_max_size 2048;

    include             /etc/nginx/mime.types;
    default_type        application/octet-stream;

    # Load modular configuration files from the /etc/nginx/conf.d directory.
    # See http://nginx.org/en/docs/ngx_core_module.html#include
    # for more information.
    include /etc/nginx/conf.d/*.conf;

    server {

    listen 8089;
    root /usr/share/nginx/html;
        index index.html index.htm;
    }


}
然后保存配置文件,退出
切换到/usr/local/docker/nginx02/html/文件夹下
vim index.html,简单写点东西,如下
8089 port nginx
然后启动docker
docker run --name mynginx02 -d -p 8089:8089 -v /usr/local/docker/nginx02/conf/nginx.conf:/etc/nginx/nginx.conf -v /usr/local/docker/nginx02/logs:/var/log/nginx -v /usr/local/docker/nginx02/html:/usr/share/nginx/html -d nginx
-------------------------------分割线-----------------------
至此,前置nginx和两台后置nginx都启动了,我们测试一下
在命令行执行
curl 127.0.0.1:82
如下图:
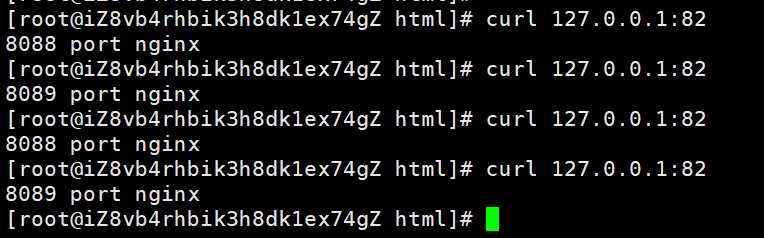
可以看到,由于我们前置nginx上的负载策略是各百分之50,所以出现了第一次请求发送到8088的nginx,第二次请求发送到8089的nginx,第三次又到8088,第四次8089。。。。。。
大家仅供参考,谢谢阅读全文。
标签:测试 uac 命令 映射文件 stream read logs ali event
原文地址:https://www.cnblogs.com/lukairui/p/12571782.html