标签:mode 报错 func tween access address 上传 disable pair
说明:由于自带的阿里云驱动创建的主机不能指定系统盘大小(默认40G),但自定义的镜像系统盘为150G,会创建主机失败,遂自建aliyunecs主机驱动。
https://github.com/docker/machine/releases
# 下载
curl -L https://github.com/docker/machine/releases/download/v0.16.2/docker-machine-`uname -s`-`uname -m` >/usr/bin/docker-machine && chmod +x /usr/bin/docker-machine
# 查看版本
# docker-machine -v
docker-machine version 0.16.2, build bd45ab13
Golang 程序在 Windows 下编译出 Linux 64位可执行 docker-machine-driver-aliyunecs 程序。
阿里云工程师写了一套驱动提供下载:docker-machine-driver-aliyunecs
下载代码存放在D:\GolandProjects\src目录下
1)Goland 软件打开docker-machine-driver-aliyunecs代码,并配置GOROOT环境
2)Settings -> Go -> GOPATH -> Global GOPATH -> D:\GolandProjects
3)找到main.go文件,修改import代码,引入当前程序(相对于$GOPATH\src目录)
import (
	"docker-machine-driver-aliyunecs/aliyunecs"
	"github.com/docker/machine/libmachine/drivers/plugin"
)
4)找到aliyunecs\ecs.go文件,把标红需依赖的文件手动下载存放于对应的目录中。
5)main.go文件右键执行一次:Run ‘go build main.go‘,会报错然后进行下一步
6)Run -> Edit Configurations -> Go Build -> Configuration -> Package
? Output directory:D:\GolandProjects\src\docker-machine-driver-aliyunecs\bin
? Run after build:取消选择
? Environment:CGO_ENABLED=0;GOOS=linux;GOARCH=amd64
7)首次构建:点击右上角 go build docker-machine-driver-aliyunecs 右侧的运行按钮进行构建
8)构建完成,在程序目录会自动创建bin目录,并生成可执行文件
9)可以修改aliyunecs\ecs.go文件中定义的默认值,然后再次进行构建即可。
1)把生成的可执行文件 go_build_docker_machine_driver_aliyunecs_linux 重命名为 docker-machine-driver-aliyunecs,并存放在/opt/rancher-driver目录中
# 赋予权限
chmod +x /opt/rancher-driver/docker-machine-driver-aliyunecs
2)创建脚本
vim create-aliyunecs.sh
#! /bin/bash
export PATH=/opt/rancher-driver:$PATH
export ECS_ACCESS_KEY_ID=‘LTAxxxxxx6KpR0‘
export ECS_ACCESS_KEY_SECRET=‘GAA58xxxxxxxxZOlOsj3zh‘
export ECS_IMAGE_ID=‘m-8vbi4xxxxxxzjlzt3‘
export ECS_REGION=‘cn-zhangjiakou‘
export ECS_VPC_ID=‘vpc-8vbot4xxxxxxxx88237‘
export ECS_VSWITCH_ID=‘vsw-8vxxxxxx5krg0s‘
export ECS_ZONE=‘cn-zhangjiakou-a‘
export ECS_SECURITY_GROUP=‘k8s-develop‘
export ECS_INSTANCE_TYPE=‘ecs.c6.large‘
export ECS_SSH_KEYPAIR=‘主机密钥‘
export ECS_DISK_SIZE=‘0‘
export ECS_SYSTEM_DISK_SIZE=‘150‘
export ECS_SYSTEM_DISK_CATEGORY=‘cloud_ssd‘
export ECS_IO_OPTIMIZED=‘true‘
export ECS_PRIVATE_ADDR_ONLY=‘true‘

docker-machine create -d aliyunecs auto-test-01
安全组(ECS_SECURITY_GROUP)需要指定名称,不能是id,否则会创建新的安全组。
执行该脚本即可验证aliyunecs主机是否创建成功。
注意:
因docker-machine会安装docker服务,但采用的镜像中默认安装了docker服务,启动机器的时候会更新软件花费很长时间,需要再制作一个新的镜像,去除不用的yum源,只保留Centos-Base源。
# 关闭不必要的源,然后重新制作镜像
yum install -y yum-utils
yum repolist
yum-config-manager --disable "repo name"
yum clean all
并且daemon.json文件中不能定义storage-driver参数,会冲突导致docker服务启动不起来。
# cat /etc/docker/daemon.json
{
"registry-mirrors": ["https://mirror.nexus.wmqhealth.com"],
"max-concurrent-downloads": 5,
"max-concurrent-uploads": 5,
"storage-opts": ["overlay2.override_kernel_check=true"],
"log-driver": "json-file",
"log-opts": {
    "max-size": "100m",
    "max-file": "3"
    }
}
验证驱动可以创建主机后,把驱动打成ZIP包,存在OSS中生成外链添加到Rancher UI 中后,不过还需自定义UI URL,要不然界面很乱。
Rancher官网提供了一套自定义UI的JS文件的代码:ui-driver-skel
1)下载ui-driver-skel
git clone https://github.com/rancher/ui-driver-skel.git
mv ui-driver-skel ui-driver-aliyunecs
cd ui-driver-aliyunecs
2)修改name
vim package.json

{
  "name": "ui-driver-aliyunecs",
  ...
}
3)构建
npm install
npm run build
npm start
构建产物为dist目录,里面包含定制UI的component.js文件。
4)发布
把dist目录的文件都上传到OSS中,获取component.js文件的外链。也可以采用nginx进行发布。
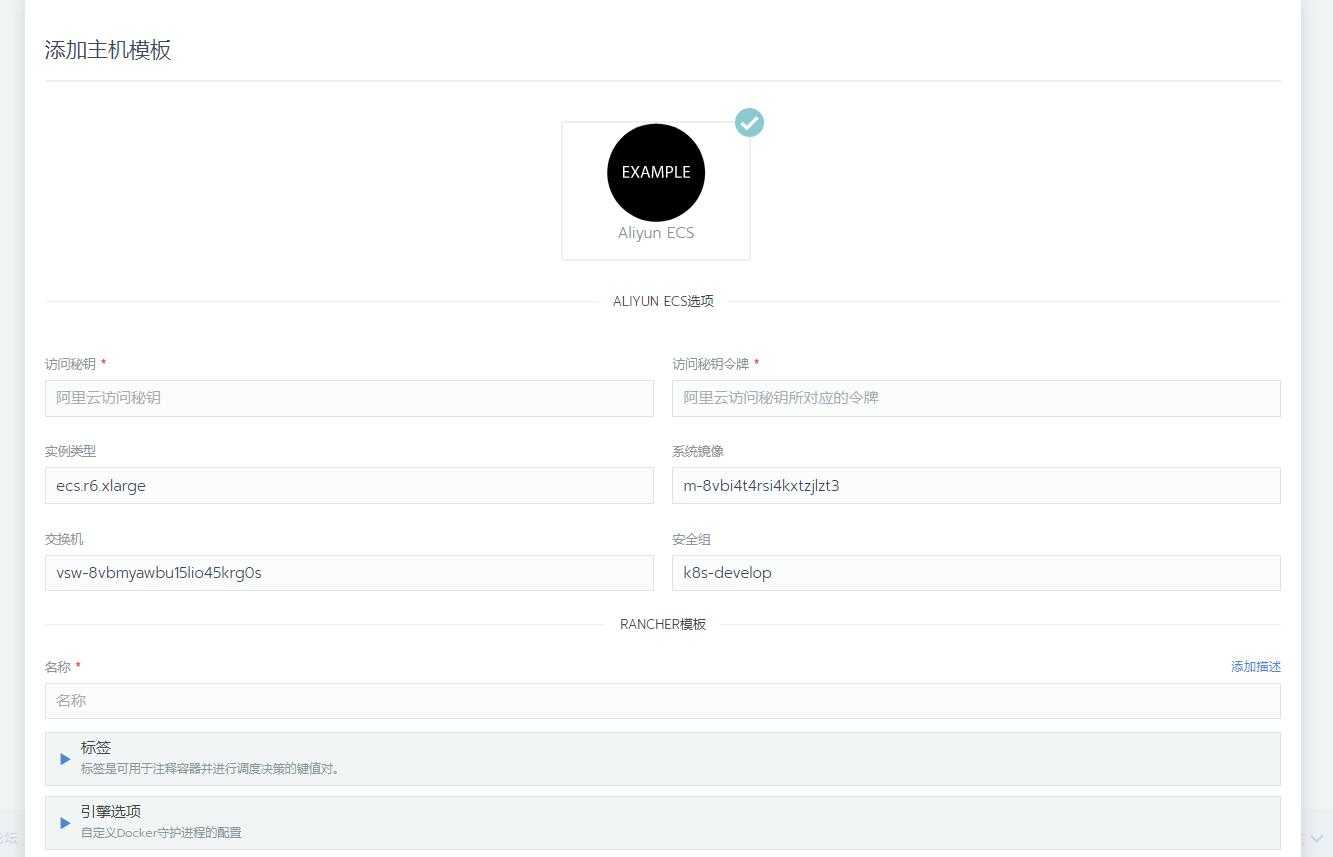
默认的JS显示的界面只有主机的CPU和内存信息,不是我们想要的,需自定义UI界面;可参考Rancher UI官网提供的 driver-aliyunecs 中包含 component.js 和 template.hbs 文件,参照这些文件制作自己的UI界面。
component.js 内容如下:
/*!!!!!!!!!!!Do not change anything between here (the DRIVERNAME placeholder will be automatically replaced at buildtime)!!!!!!!!!!!*/
import NodeDriver from ‘shared/mixins/node-driver‘;

// do not remove LAYOUT, it is replaced at build time with a base64 representation of the template of the hbs template
// we do this to avoid converting template to a js file that returns a string and the cors issues that would come along with that
const LAYOUT;
/*!!!!!!!!!!!DO NOT CHANGE END!!!!!!!!!!!*/

/*!!!!!!!!!!!GLOBAL CONST START!!!!!!!!!!!*/
// EMBER API Access - if you need access to any of the Ember API‘s add them here in the same manner rather then import them via modules, since the dependencies exist in rancher we dont want to expor the modules in the amd def
const computed     = Ember.computed;
const get          = Ember.get;
const set          = Ember.set;
const alias        = Ember.computed.alias;
const service      = Ember.inject.service;

const defaultRadix = 10;
const defaultBase  = 1024;
/*!!!!!!!!!!!GLOBAL CONST END!!!!!!!!!!!*/

/*!!!!!!!!!!!DO NOT CHANGE START!!!!!!!!!!!*/
export default Ember.Component.extend(NodeDriver, {
  driverName: ‘%%DRIVERNAME%%‘,
  config:     alias(‘model.%%DRIVERNAME%%Config‘),
  app:        service(),

  init() {
    // This does on the fly template compiling, if you mess with this :cry:
    const decodedLayout = window.atob(LAYOUT);
    const template      = Ember.HTMLBars.compile(decodedLayout, {
      moduleName: ‘nodes/components/driver-%%DRIVERNAME%%/template‘
    });
    set(this,‘layout‘, template);

    this._super(...arguments);

  },
  /*!!!!!!!!!!!DO NOT CHANGE END!!!!!!!!!!!*/

  // Write your component here, starting with setting ‘model‘ to a machine with your config populated
  bootstrap: function() {
    // bootstrap is called by rancher ui on ‘init‘, you‘re better off doing your setup here rather then the init function to ensure everything is setup correctly
    let config = get(this, ‘globalStore‘).createRecord({
      type: ‘%%DRIVERNAME%%Config‘,
   //   cpuCount: 2,
   //   memorySize: 2048,
   //
      accessKeyId: null,
      accessKeySecret: null,
      region: ‘cn-zhangjiakou‘,
      imageId: ‘m-8vbixxxxxxxxxxzt3‘,
      vpcId: ‘vpc-8vboxxxxxxxxxx8237‘,
      vswitchId: ‘vsw-8vbmxxxxxxxx5krg0s‘,
      zone: ‘cn-zhangjiakou-a‘,
      securityGroup: ‘k8s-develop‘,
      instanceType: ‘ecs.r6.xlarge‘,
      privateAddressOnly: ‘true‘,
      internetMaxBandwidth: ‘0‘,
      diskSize: ‘0‘,
      systemDiskSize: ‘150‘,
      systemDiskCategory: ‘cloud_ssd‘,
      ioOptimized: ‘true‘,

    });
    set(this, ‘model.%%DRIVERNAME%%Config‘, config);
  },

  // Add custom validation beyond what can be done from the config API schema
  validate() {
    // Get generic API validation errors
    this._super();
    var errors = get(this, ‘errors‘)||[];
    if ( !get(this, ‘model.name‘) ) {
      errors.push(‘Name is required‘);
    }

    // Add more specific errors

    // Check something and add an error entry if it fails:
    if ( parseInt(get(this, ‘config.memorySize‘), defaultRadix) < defaultBase ) {
      errors.push(‘Memory Size must be at least 1024 MB‘);
    }

    // Set the array of errors for display,
    // and return true if saving should continue.
    if ( get(errors, ‘length‘) ) {
      set(this, ‘errors‘, errors);
      return false;
    } else {
      set(this, ‘errors‘, null);
      return true;
    }
  },

  // Any computed properties or custom logic can go here
});
template.hbs 内存如下:
<section class="horizontal-form">
  {{#accordion-list showExpandAll=false as | al expandFn |}}
    {{!-- This line shows the driver title which you don‘t have to change it --}}
    <div class="over-hr mb-20"><span>{{driverOptionsTitle}}</span></div>

    {{!-- An example input option --}}

    <div class="row">
      <div class="col span-6">
        <label class="acc-label">
          {{t "nodeDriver.aliyunecs.accessKey.label"}}{{field-required}}
        </label>
          {{input
            type="text"
            class="form-control"
            value=config.accessKeyId
            placeholder=(t "nodeDriver.aliyunecs.accessKey.placeholder")
          }}
      </div>
      <div class="col span-6">
        <label class="acc-label">
          {{t "nodeDriver.aliyunecs.accessKeySecret.label"}}{{field-required}}
        </label>
          {{input
            type="password"
            class="form-control"
            value=config.accessKeySecret
            placeholder=(t "nodeDriver.aliyunecs.accessKeySecret.placeholder")
          }}
      </div>
    </div>

    <div class="row">
      <div class="col span-6">
        <label class="acc-label">
          {{t "nodeDriver.aliyunecs.instanceType.label"}}
        </label>
        {{input
          type="text"
          classNames="form-control"
          content=instanceTypes
          value=config.instanceType
        }}
      </div>
      <div class="col span-6">
        <label class="acc-label">
          {{t "nodeDriver.aliyunecs.systemImage.label"}}
        </label>
        {{input
          type="text"
          classNames="form-control"
          content=images
          optionValuePath="value"
          value=config.imageId
        }}
      </div>
    </div>

    <div class="row">
      <div class="col span-6">
        <label class="acc-label">
          {{t "nodeDriver.aliyunecs.vswitchId.label"}}
        </label>
        {{input
          type="text"
          classNames="form-control"
          content=filteredVSwitches
          value=config.vswitchId
          prompt="nodeDriver.aliyunecs.vswitchId.prompt"
          localizedPrompt=true
        }}
      </div>
      <div class="col span-6">
        <label class="acc-label">
          {{t "nodeDriver.aliyunecs.securityGroup.label"}}
        </label>
        {{input
          type="text"
          classNames="form-control"
          content=securityGroups
          value=config.securityGroup
          prompt="nodeDriver.aliyunecs.securityGroup.prompt"
          localizedPrompt=true
        }}
      </div>
    </div>


    {{!-- This following contains the Name, Labels and Engine Options fields --}}
    <div class="over-hr"><span>{{templateOptionsTitle}}</span></div>

    {{form-name-description
      model=model
      nameRequired=true
    }}

    {{form-user-labels
      initialLabels=labelResource.labels
      setLabels=(action ‘setLabels‘)
      expandAll=expandAll
      expand=(action expandFn)
    }}

    {{form-engine-opts
      machine=model
      showEngineUrl=showEngineUrl
    }}
  {{/accordion-list}}

  {{!-- This component shows errors produced by validate() in the component --}}
  {{top-errors errors=errors}}

  {{!-- This component shows the Create and Cancel buttons --}}
  {{save-cancel save="save" cancel="cancel"}}
</section>
然后构建,生成 dist/component.js 等文件。并上传到OSS中,提供外链下载。
npm run build
npm start
在Rancher主机驱动,禁用自带的 Aliyun ECS 驱动,创建新的主机驱动:
# 下载URL
http://wmqe-static-storage.oss-cn-zhangjiakou.aliyuncs.com/devops-it/rancher/machine-driver/docker-machine-driver-aliyunecs.zip
# 自定义UI URL
https://wmqe-static-storage.oss-cn-zhangjiakou.aliyuncs.com/devops-it/rancher/machine-driver/dist/component.js
# 域名白名单
aliyuncs.com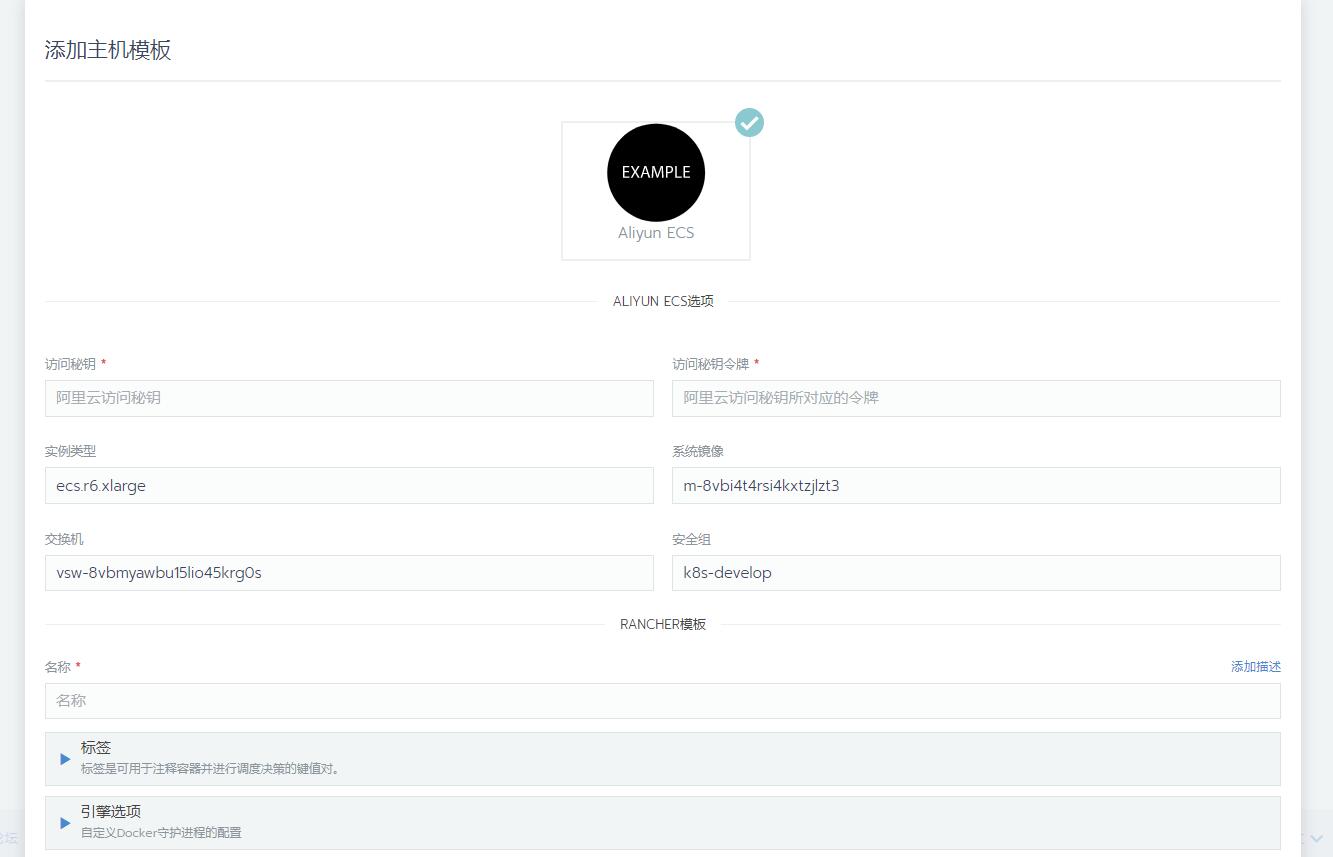
ALIYUNECS选项在 component.js 文件中直接设置了默认值,可修改
Docker安装URL:清空
存储驱动:overlay2(默认为overlay,和我们docker daemon.json文件中定义的storage-opts参数有冲突)
标签:mode 报错 func tween access address 上传 disable pair
原文地址:https://www.cnblogs.com/weavepub/p/12582267.html