标签:date org mes model vim ble this 技术 消息通知
我们在common文件夹下创建一个名为NotifyPropertyChanged.cs的类,该类继承INotifyPropertyChanged接口主要用于消息通知,当UI里的值发生改变的时候,能够触发相应的改变。
 using System;
    using System.Collections.Generic;
    using System.ComponentModel;
    using System.Linq;
    using System.Text;
    using System.Threading.Tasks;

    namespace MVVMtest1.common
    {
    public class NotifyPropertyChanged : INotifyPropertyChanged
    {
    /// <summary>
    /// 用于通知属性改变
    /// </summary>
    public event PropertyChangedEventHandler PropertyChanged;
    public void RaisePropertyChanged(string propertyName)
    {
    if (PropertyChanged != null)
    {
    PropertyChanged(this, new PropertyChangedEventArgs(propertyName));
    }
    }
    }
    }
在Model文件夹下面创建一个FModel.cs,该类为数据模型,存放的是数据的字段。
 using System;
    using System.Collections.Generic;
    using System.Linq;
    using System.Text;
    using System.Threading.Tasks;

    namespace MVVMtest1.Model
    {
    public class FModel
    {
    public string Name { get; set; }
    }
    }
在ViewModel文件夹下创建FViewModel.cs,该类为MVVM里最为重要的VM,主要是执行你的后台业务逻辑。
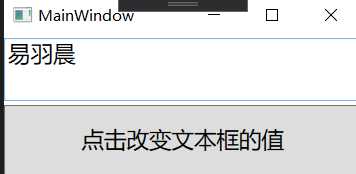
    using System;
    using System.Collections.Generic;
    using System.Linq;
    using System.Text;
    using System.Threading.Tasks;
    using MVVMtest1.common;
    using MVVMtest1.Model;
    namespace MVVMtest1.ViewModel
    {
    public class FViewModel: NotifyPropertyChanged
    {
    FModel fModel;//View跟Model中间隔着VM,所以要在VM里实例化Model
    public FViewModel() //构造函数
    {
    fModel = new FModel() { Name="易羽晨"};
    }

    public string Name
    {
    get { return fModel.Name; }
    set
    {
    if (fModel.Name!=value)
    {
    fModel.Name = value;
    RaisePropertyChanged("Name");//当字段改变时就通知
    }
    }
    }

    }
    }
需要注意的是,VM要继承第一步创建的NotifyPropertyChanged,只有继承之后才能使用RaisePropertyChanged()方法
下面的代码是View的页面代码,其中的TextBox控件的Text绑定了Name字段,当Name字段发生改变的时候,该控件显示的内容也将会改变。
   <Window x:Class="MVVMtest1.MainWindow"
    xmlns="http://schemas.microsoft.com/winfx/2006/xaml/presentation"
    xmlns:x="http://schemas.microsoft.com/winfx/2006/xaml"
    xmlns:d="http://schemas.microsoft.com/expression/blend/2008"
    xmlns:mc="http://schemas.openxmlformats.org/markup-compatibility/2006"
    xmlns:local="clr-namespace:MVVMtest1"
    mc:Ignorable="d"
    Title="MainWindow" Height="150" Width="300">
    <Grid>
    <Grid.RowDefinitions>
    <RowDefinition/>
    <RowDefinition/>
    </Grid.RowDefinitions>
    <TextBox Grid.Row="0" Text="{Binding Name,UpdateSourceTrigger=PropertyChanged,Mode=TwoWay}" Height="50" FontSize="18"/>
    <Button Grid.Row="1" Content="点击改变文本框的值" FontSize="18" Click="Button_Click"/>
    </Grid>
    </Window>
在第四步的时候我们定义了页面,但是此时View还没有和ViewModel和Model联系起来,因此我们需要在该View的后代代码(F.xaml.cs)里加入一些东西
 using System;
    using System.Collections.Generic;
    using System.Linq;
    using System.Text;
    using System.Threading.Tasks;
    using System.Windows;
    using System.Windows.Controls;
    using System.Windows.Data;
    using System.Windows.Documents;
    using System.Windows.Input;
    using System.Windows.Media;
    using System.Windows.Media.Imaging;
    using System.Windows.Navigation;
    using System.Windows.Shapes;
    using MVVMtest1.ViewModel;
    namespace MVVMtest1
    {
    /// <summary>
    /// MainWindow.xaml 的交互逻辑
    /// </summary>
    public partial class MainWindow : Window
    {
        FViewModel f;
    public MainWindow()
    {
        InitializeComponent();
        f = new FViewModel();
        this.DataContext = f;//使View和ViewModel联系在一起
    }

    private void Button_Click(object sender, RoutedEventArgs e)
    {
        f.Name = "值发生改变";
    }
    }
    }
其中的this.DataContext = f;是将Vime和ViewModel联系在了一起,然后我们通过一个按钮点击事件改变Name的值,看看页面的效果是否发生改变。之前说过了,使用MVVM模式的目的就是为了使项目高内聚低耦合,理想状态View的后台代码是不能写按钮点击事件的,但现在只是临时的,下一章将会讲到通过命令的手段实现按钮点击事件,实现低耦合的目标。
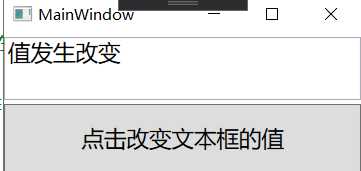
可以看到,我们已经实现了通过NotifyPropertyChanged接口实现了消息的传递,以及UI的更改。下一章将会讲关于命令的内容。
WPF/MVVM模式入门教程(二):实现INotifyPropertyChanged接口
标签:date org mes model vim ble this 技术 消息通知
原文地址:https://www.cnblogs.com/flh1/p/12447188.html