标签:oid let 场景 imp keepaliv exce size 线程创建 locking
ThreadPoolExecutor提供了四个构造方法:

我们以最后一个构造方法(参数最多的那个),对其参数进行解释:
 public ThreadPoolExecutor(int corePoolSize, // 1
                              int maximumPoolSize,  // 2
                              long keepAliveTime,  // 3
                              TimeUnit unit,  // 4
                              BlockingQueue<Runnable> workQueue, // 5
                              ThreadFactory threadFactory,  // 6
                              RejectedExecutionHandler handler ) { //7
        if (corePoolSize < 0 ||
            maximumPoolSize <= 0 ||
            maximumPoolSize < corePoolSize ||
            keepAliveTime < 0)
            throw new IllegalArgumentException();
        if (workQueue == null || threadFactory == null || handler == null)
            throw new NullPointerException();
        this.corePoolSize = corePoolSize;
        this.maximumPoolSize = maximumPoolSize;
        this.workQueue = workQueue;
        this.keepAliveTime = unit.toNanos(keepAliveTime);
        this.threadFactory = threadFactory;
        this.handler = handler;
    }
| 序号 | 名称 | 类型 | 含义 |
| 1 | corePoolSize | int | 核心线程池大小 |
| 2 | maximumPoolSize | int | 最大线程池大小 |
| 3 | keepAliveTime | long | 线程最大空闲时间 |
| 4 | unit | TimeUnit | 时间单位 |
| 5 | workQueue | BlockingQueue<Runnable> | 线程等待队列 |
| 6 | threadFactory | ThreadFactory | 线程创建工厂 |
| 7 | handler | RejectedExecutionHandler | 拒绝策略 |
如果对这些参数作用有疑惑的请看 ThreadPoolExecutor概述。https://www.jianshu.com/p/c41e942bcd64
知道了各个参数的作用后,我们开始构造符合我们期待的线程池。首先看JDK给我们预定义的几种线程池:
1.FixedThreadPool
    public static ExecutorService newFixedThreadPool(int nThreads) {
        return new ThreadPoolExecutor(nThreads, nThreads, 0L, TimeUnit.MILLISECONDS, new LinkedBlockingQueue<Runnable>());
    }
适用场景:可用于Web服务瞬时削峰,但需注意长时间持续高峰情况造成的队列阻塞。
2.CachedThreadPool
     public static ExecutorService newCachedThreadPool() {
        return new ThreadPoolExecutor(0, Integer.MAX_VALUE,60L, TimeUnit.SECONDS, new SynchronousQueue<Runnable>());
    }
2.SingleThreadPool
public static ExecutorService newSingleThreadExecutor() {
        return new FinalizableDelegatedExecutorService
            (new ThreadPoolExecutor(1, 1,0L, TimeUnit.MILLISECONDS, new LinkedBlockingQueue<Runnable>()));
    }
咋一瞅,不就是newFixedThreadPool(1)吗?定眼一看,这里多了一层FinalizableDelegatedExecutorService包装,这一层有什么用呢,写个dome来解释一下:
  public static void main(String[] args) {
        ExecutorService fixedExecutorService = Executors.newFixedThreadPool(1);
        ThreadPoolExecutor threadPoolExecutor = (ThreadPoolExecutor) fixedExecutorService;
        System.out.println(threadPoolExecutor.getMaximumPoolSize());
        threadPoolExecutor.setCorePoolSize(8);

        ExecutorService singleExecutorService = Executors.newSingleThreadExecutor();
//      运行时异常 java.lang.ClassCastException
//      ThreadPoolExecutor threadPoolExecutor2 = (ThreadPoolExecutor) singleExecutorService;
    }
阿里规范中也推荐使用第二种创建线程池的方式:
以下是自定义线程池,使用了有界队列,自定义ThreadFactory和拒绝策略的demo:
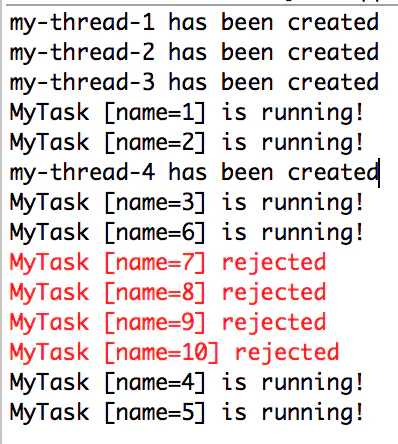
public class ThreadTest {

    public static void main(String[] args) throws InterruptedException, IOException {
        int corePoolSize = 2;
        int maximumPoolSize = 4;
        long keepAliveTime = 10;
        TimeUnit unit = TimeUnit.SECONDS;
        BlockingQueue<Runnable> workQueue = new ArrayBlockingQueue<>(2);
        ThreadFactory threadFactory = new NameTreadFactory();
        RejectedExecutionHandler handler = new MyIgnorePolicy();
        ThreadPoolExecutor executor = new ThreadPoolExecutor(corePoolSize, maximumPoolSize, keepAliveTime, unit,
                workQueue, threadFactory, handler);
        executor.prestartAllCoreThreads(); // 预启动所有核心线程

        for (int i = 1; i <= 10; i++) {
            MyTask task = new MyTask(String.valueOf(i));
            executor.execute(task);
        }

        System.in.read(); //阻塞主线程
    }

    static class NameTreadFactory implements ThreadFactory {

        private final AtomicInteger mThreadNum = new AtomicInteger(1);

        @Override
        public Thread newThread(Runnable r) {
            Thread t = new Thread(r, "my-thread-" + mThreadNum.getAndIncrement());
            System.out.println(t.getName() + " has been created");
            return t;
        }
    }

    public static class MyIgnorePolicy implements RejectedExecutionHandler {

        public void rejectedExecution(Runnable r, ThreadPoolExecutor e) {
            doLog(r, e);
        }

        private void doLog(Runnable r, ThreadPoolExecutor e) {
            // 可做日志记录等
            System.err.println( r.toString() + " rejected");
//          System.out.println("completedTaskCount: " + e.getCompletedTaskCount());
        }
    }

    static class MyTask implements Runnable {
        private String name;

        public MyTask(String name) {
            this.name = name;
        }

        @Override
        public void run() {
            try {
                System.out.println(this.toString() + " is running!");
                Thread.sleep(3000); //让任务执行慢点
            } catch (InterruptedException e) {
                e.printStackTrace();
            }
        }

        public String getName() {
            return name;
        }

        @Override
        public String toString() {
            return "MyTask [name=" + name + "]";
        }
    }
}
输出如下:
原文地址:https://www.jianshu.com/p/f030aa5d7a28
标签:oid let 场景 imp keepaliv exce size 线程创建 locking
原文地址:https://www.cnblogs.com/xiaoxiong2015/p/12706153.html