标签:ati lib 编译安装 prefix jit src nload openssl cat
Nginx+Lua生成最新文件下载链接[root@172-16-1-209 tools]# tar xf nginx-http-concat.tar.gz
[root@172-16-1-209 tools]# tar xf nginx-module-vts.tar.gz
[root@172-16-1-209 tools]# tar xf nginx-vts-exporter-0.10.3.linux-amd64.tar.gz
[root@172-16-1-209 tools]# tar xf ngx_cache_purge.tar.gz
[root@172-16-1-209 tools]# tar xf pcre-8.44.tar.gz
[root@172-16-1-209 tools]# mv {nginx-http-concat,nginx-module-vts,ngx_cache_purge,nginx-vts-exporter-0.10.3.linux-amd64,pcre-8.44} /usr/src/
[root@172-16-1-209 tools]# tar xf echo-nginx-module.tar.gz
[root@172-16-1-209 tools]# mv echo-nginx-module /usr/src/
[root@172-16-1-209 tools]# tar xf nginx-1.14.2.tar.gz
[root@172-16-1-209 tools]# cd nginx-1.14.2
[root@172-16-1-209 nginx-1.14.2]# export LUAJIT_LIB=/usr/local/luajit/lib
[root@172-16-1-209 nginx-1.14.2]# export LUAJIT_INC=/usr/local/luajit/include/luajit-2.0
[root@172-16-1-209 nginx-1.14.2]# ./configure --prefix=/usr/local/nginx --user=www --group=www --with-http_stub_status_module --with-http_v2_module --with-http_ssl_module --with-http_gzip_static_module --with-http_realip_module --with-http_flv_module --with-http_mp4_module --with-pcre=/usr/src/pcre-8.44 --with-pcre-jit --with-ld-opt=-ljemalloc --with-ipv6 --add-module=/usr/src/echo-nginx-module --add-module=/usr/src/nginx-http-concat --add-module=/usr/src/nginx-module-vts --add-module=/usr/src/ngx_cache_purge --add-module=/usr/local/ngx_devel_kit-0.3.0 --add-module=/usr/local/lua-nginx-module-0.10.9rc7
[root@172-16-1-209 nginx-1.14.2]# make
[root@172-16-1-209 nginx-1.14.2]# mv /usr/local/nginx/sbin/nginx{,.old}
[root@172-16-1-209 nginx-1.14.2]# cp -f objs/nginx /usr/local/nginx/sbin/
[root@172-16-1-209 nginx-1.14.2]# echo "/usr/local/LuaJIT/lib" >> /etc/ld.so.conf
[root@172-16-1-209 nginx-1.14.2]# ldconfig
[root@172-16-1-209 nginx-1.14.2]# nginx -V
nginx version: nginx/1.14.2
built by gcc 4.8.5 20150623 (Red Hat 4.8.5-39) (GCC)
built with OpenSSL 1.0.2k-fips 26 Jan 2017
TLS SNI support enabled
configure arguments: --prefix=/usr/local/nginx --user=www --group=www --with-http_stub_status_module --with-http_v2_module --with-http_ssl_module --with-http_gzip_static_module --with-http_realip_module --with-http_flv_module --with-http_mp4_module --with-pcre=/usr/src/pcre-8.44 --with-pcre-jit --with-ld-opt=-ljemalloc --with-ipv6 --add-module=/usr/src/echo-nginx-module --add-module=/usr/src/nginx-http-concat --add-module=/usr/src/nginx-module-vts --add-module=/usr/src/ngx_cache_purge --add-module=/usr/local/ngx_devel_kit-0.3.0 --add-module=/usr/local/lua-nginx-module-0.10.9rc7
[root@172-16-1-209 nginx-1.14.2]# kill -USR2 18789
[root@172-16-1-209 nginx-1.14.2]# kill -WINCH 18789
local shell = require("shell")
local args = {
socket = "unix:/tmp/shell.sock",
}
local status, out, err = shell.execute("ls -lt /usr/local/nginx/html/downloadfile/ |grep -v ‘total‘|head -n 1|awk ‘{print $9}‘", args)
local url="http://10.100.31.18/download/"..out
ngx.say(url)
[root@172-16-1-209 lua]# cd ../
[root@172-16-1-209 conf]# cd ../
[root@172-16-1-209 nginx]# mkdir html/downloadfile
[root@172-16-1-209 nginx]# cp temp-20200421.ta.gz html/downloadfile/
lua_package_path "/usr/local/nginx/conf/lua/?.lua;;";
location /test {
content_by_lua_file conf/lua/url.lua;
}
访问的话会把test下载下来打开看下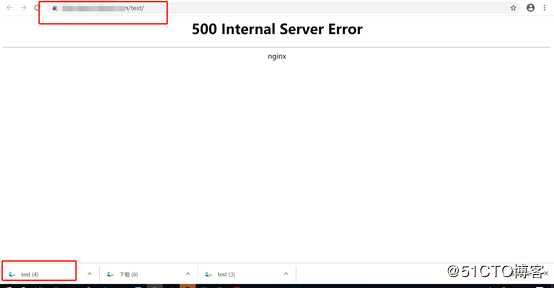

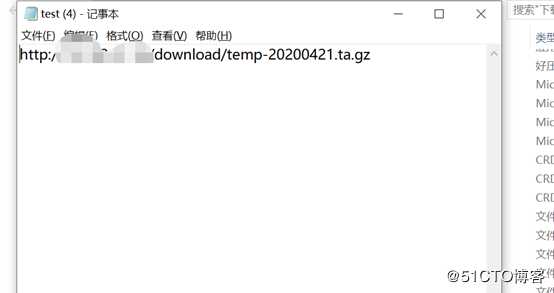
是我们需要的地址,剩下来就简单了,只要跳转到这个地址就可以了


标签:ati lib 编译安装 prefix jit src nload openssl cat
原文地址:https://blog.51cto.com/qingfeng00/2499787