标签:abs 部分 箭头 灰色 log img 场景 get slice
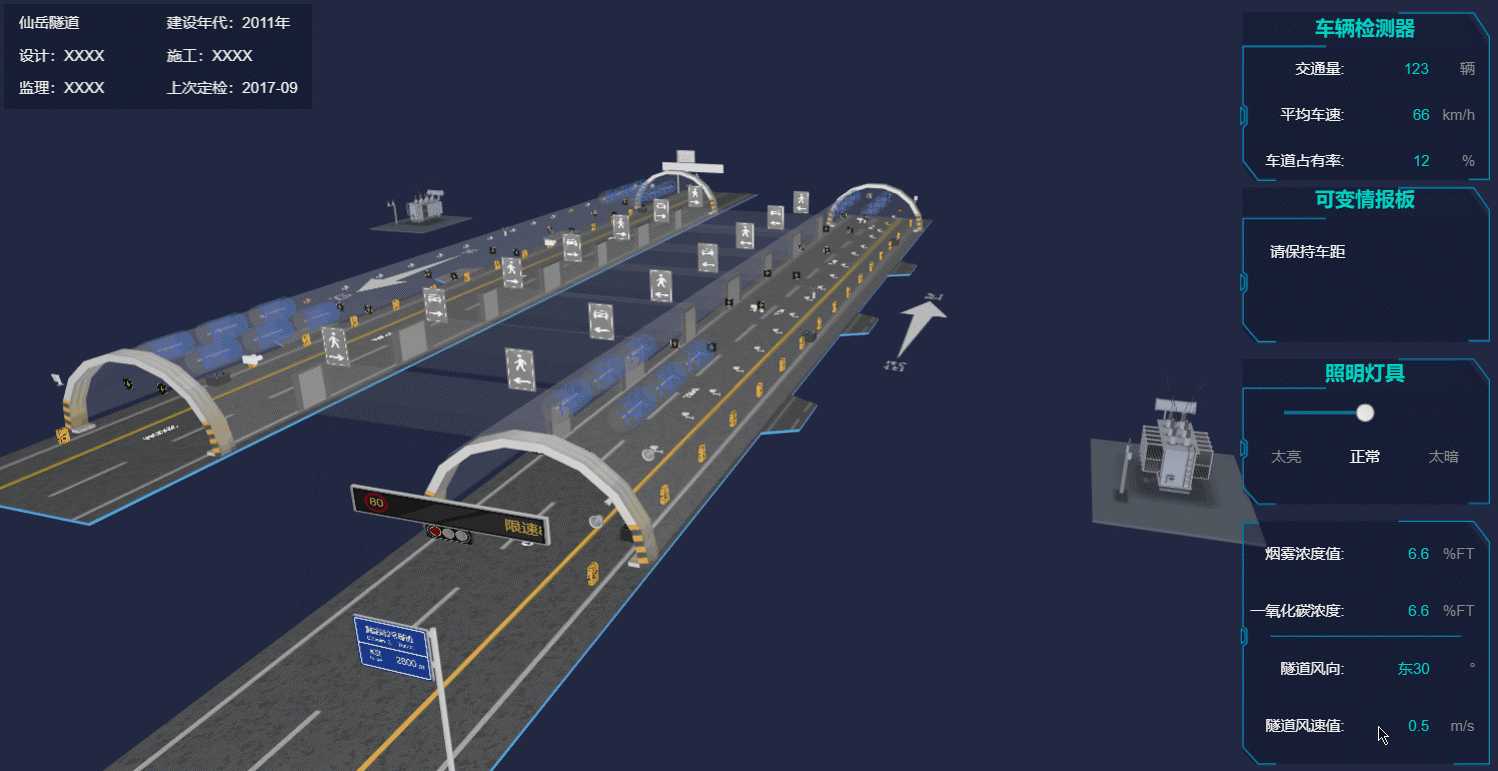
预览链接:http://www.hightopo.com/demo/tunnel2/index.html
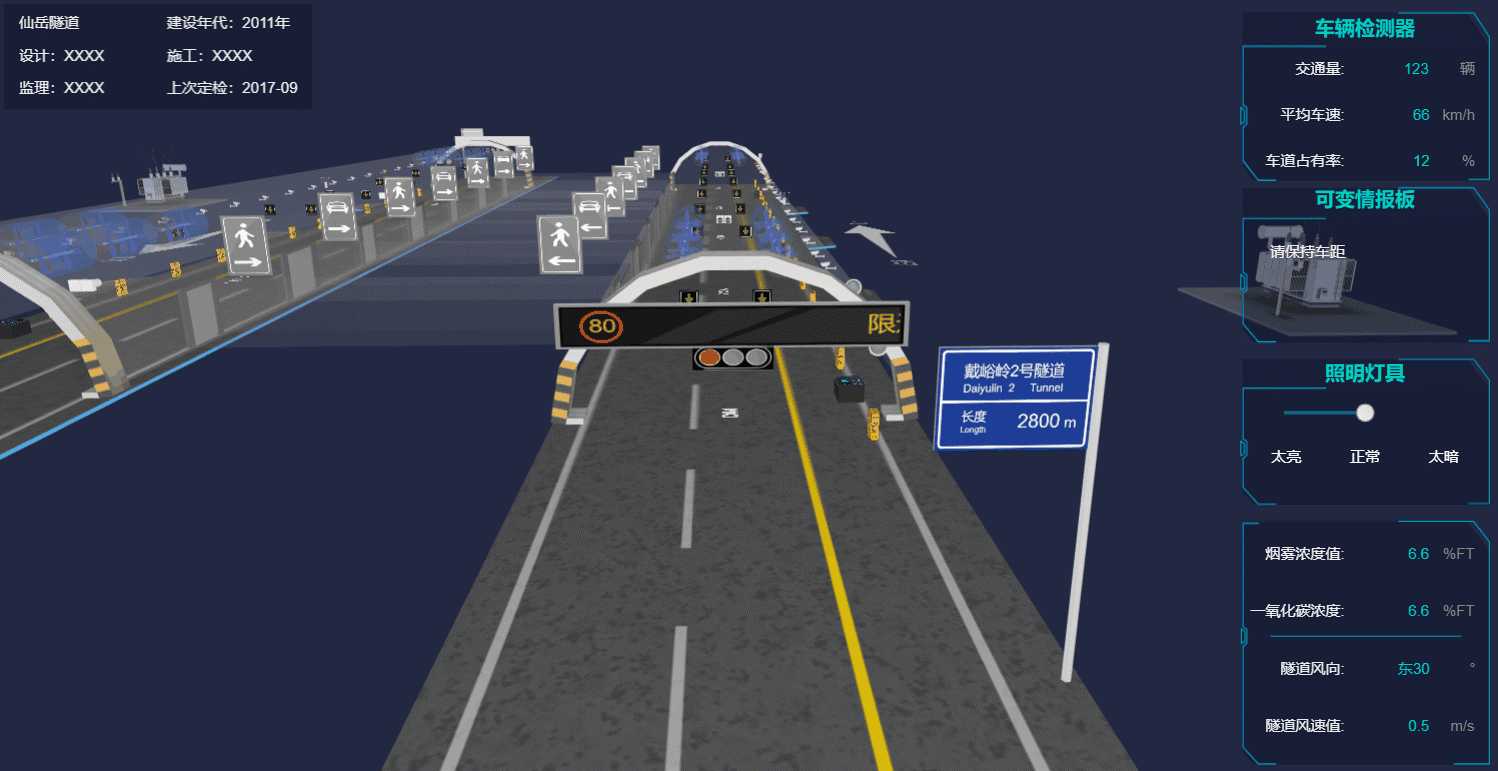
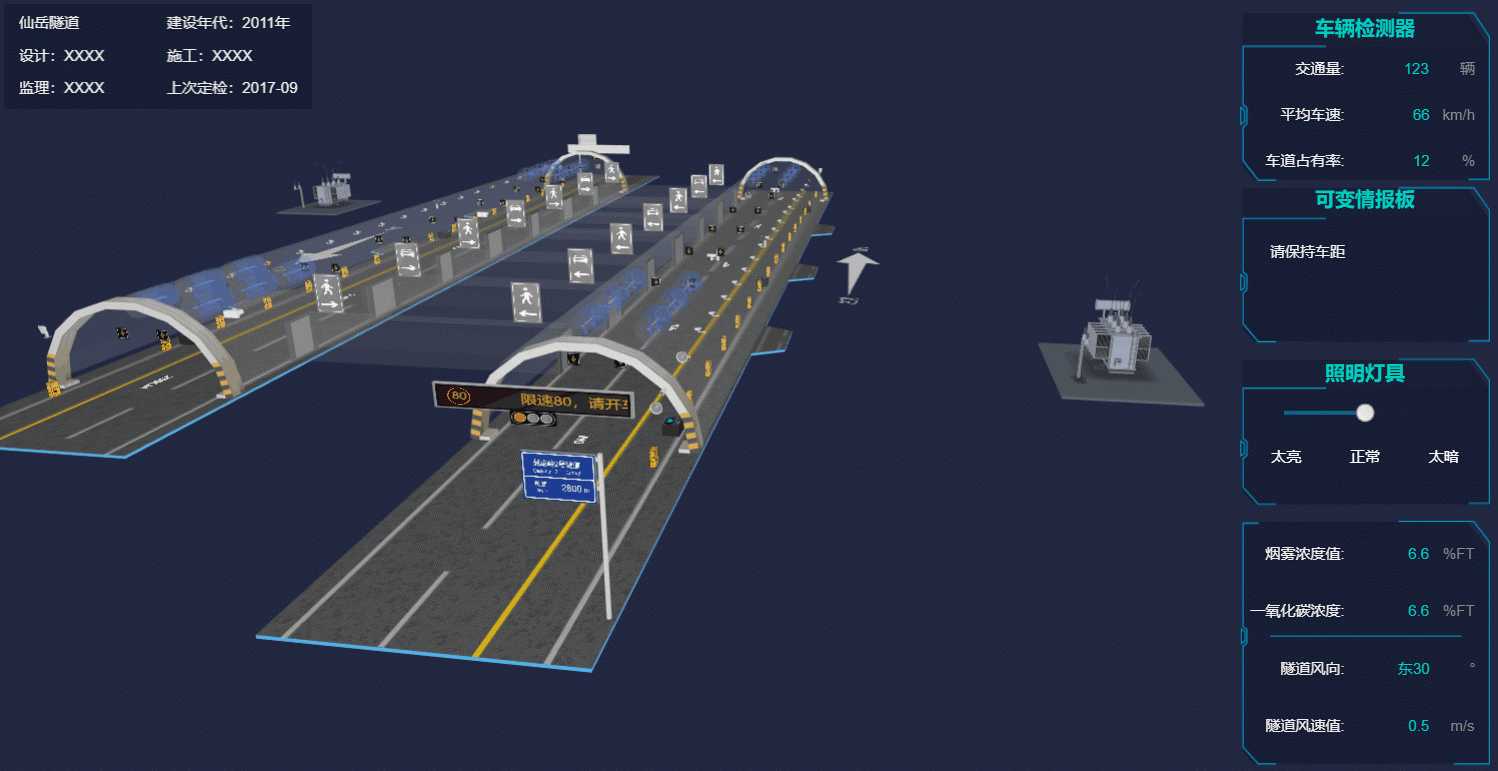
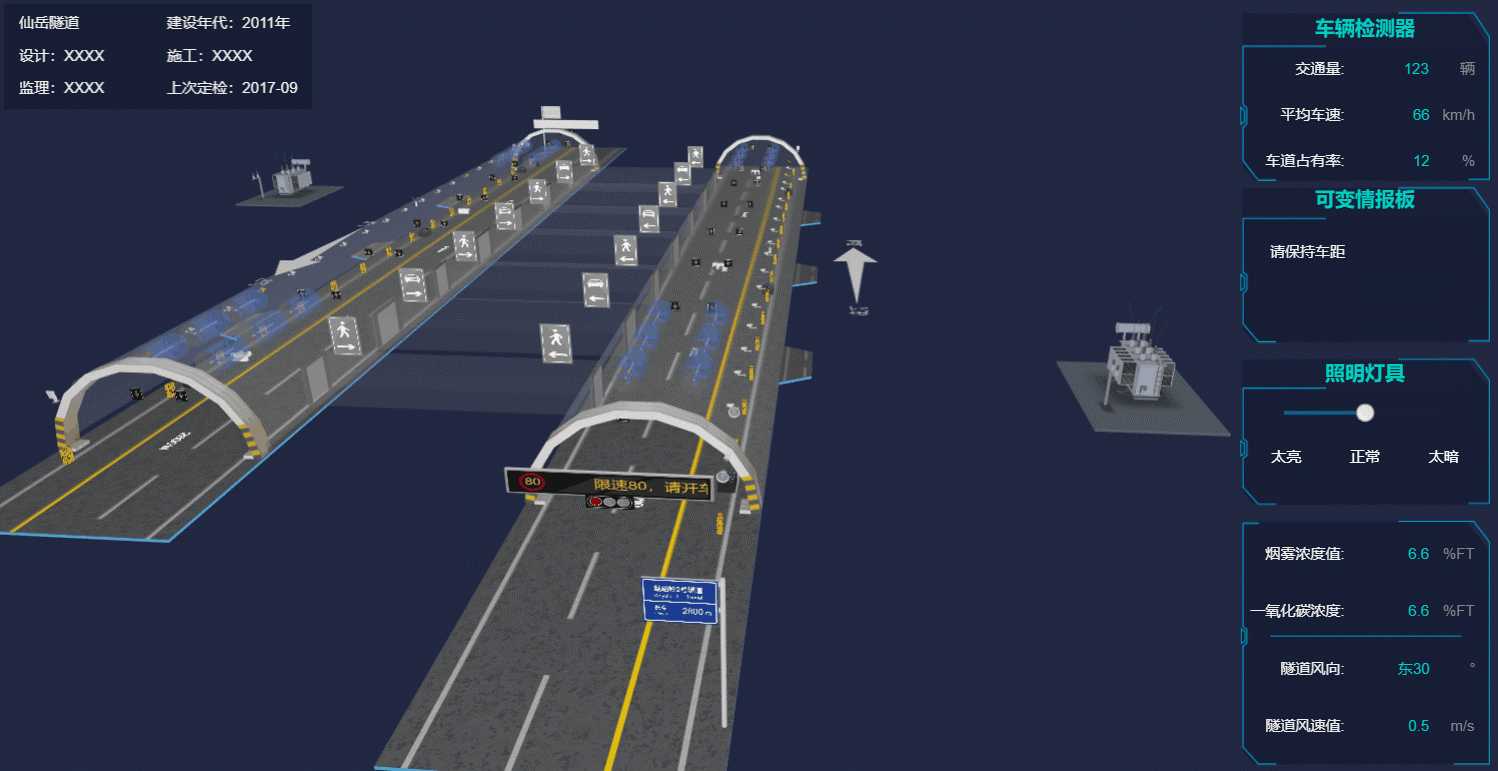
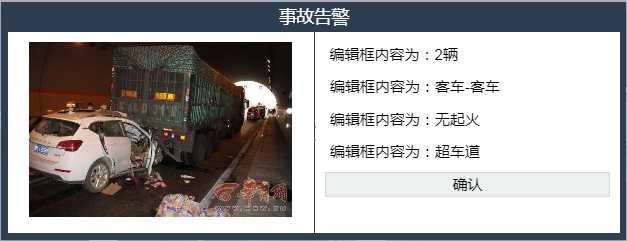
上图中的各种设备都可以双击,此时 camera 的位置会从当前位置移动到双击的设备的正前方;隧道入口的展示牌会自动轮播,出现事故时会展示牌中的内容会由“限速80,请开车灯”变为“超车道两车追尾,请减速慢行”;两隧道中间的逃生通道上方的指示牌是可以点击的,点击切换为蓝绿色激活状态,两旁的逃生通道门也会打开,再单击指示牌变为灰色,门关闭;还有一个事故现场模拟,双击两旁变压器中其中一个,在隧道内会出现一个“事故现场图标”,单击此图标,出现弹出框显示事故等等等等。
// 数据容器
dm = new ht.DataModel();
// 3d 场景
g3d = new ht.graph3d.Graph3dView(dm);
// 将场景添加到 body 中
g3d.addToDOM();
上面代码中的 addToDOM 函数,是一个将组件添加到 body 体中的函数的封装,定义如下:
addToDOM = function(){
    var self = this,
         // 获取组件的底层 div
         view = self.getView(),
         style = view.style;
    // 将组件底层div添加进body中
    document.body.appendChild(view);
    // ht 默认将所有的组件的position都设置为absolute绝对定位
    style.left = ‘0‘;
    style.right = ‘0‘;
    style.top = ‘0‘;
    style.bottom = ‘0‘;
    // 窗口大小改变事件,调用刷新函数
    window.addEventListener(‘resize‘, function () { self.iv(); }, false);
}
// xhrLoad 函数是一个异步加载文件的函数
ht.Default.xhrLoad(‘./scenes/隧道1.json‘, function(text) {
    // 将 json 文件中的文本转为我们需要的 json 格式的内容
    var json = ht.Default.parse(text);
    // 反序列化数据容器,解析用于生成对应的Data对象并添加到数据容器 这里相当于把 json 文件中生成的 ht.Node 节点反序列化到数据容器中,这样数据容器中就有这个节点了
    dm.deserialize(json);
});
由于 xhrLoad 函数是一个异步加载函数,所以如果 dm 数据容器反序列化未完成就直接调用了其中的节点,那么会造成数据获取不到的结果,所以一般来说我是将一些逻辑代码写在这个函数内部,或者给逻辑代码设置 timeout 错开时间差。
首先,由于数据都是存储在 dm 数据容器中的(通过 dm.add(node) 添加的),所以我们要获取数据除了可以通过 id、tag 等独立的方式,还可以通过遍历数据容器来获取多个元素。由于这个场景比较复杂,模型的面也比较多,鉴于设备配置,我将能 Batch 批量的元素都进行了批量。
批量是 HT 实现下的一种特有的机制,批量能提高性能的原理在于,当图元一个个独立绘制模型时性能较差,而当一批图元聚合成一个大模型进行一次性的绘制时, 则会极大提高 WebGL 刷新性能,执行代码如下
dm.each(function(data) {
    // 对“电话”进行批量
    if (data.s(‘front.image‘) === ‘assets/sos电话.png‘){
        data.s(‘batch‘, ‘sosBatch‘);
    }
    // 逃生通道批量(透明度也会影响性能)
    else if (data.s(‘all.color‘) === ‘rgba(222,222,222,0.18)‘) {
        data.s(‘batch‘, ‘emergencyBatch‘);
    }
    else if (data.s(‘shape3d‘) === ‘models/隧道/摄像头.json‘ || data.s(‘shape3d‘) === ‘models/隧道/横洞.json‘ || data.s(‘shape3d‘) === ‘models/隧道/卷帘门.json‘) {
        // 个别摄像头染色了 不做批量
        if(!data.s(‘shape3d.blend‘))
            // 基础批量什么也不做
            data.s(‘batch‘, ‘basicBatch‘);
    }
    else if (data.s(‘shape3d‘) === ‘models/大型变压器/变压器.json‘) {
        data.s(‘batch‘, ‘tileBatch‘);
        data.setToolTip(‘单击漫游,双击车祸地点出现图标‘);
    }
    else if (data.getDisplayName() === ‘地面‘) {
        // 设置隧道“地面”不可选中
        data.s(‘3d.selectable‘, false);
    }
    else if (data.s(‘shape3d‘) === ‘models/隧道/排风.json‘) {
        // 排风扇的模型比较复杂,所以做批量
        data.s(‘batch‘, ‘fanBatch‘);
    }
    else if (data.getDisplayName() === ‘arrow‘) {
        // 隧道两旁的箭头路标
        if (data.getTag() === ‘arrowLeft‘) data.s(‘shape3d.image‘, ‘displays/abc.png‘);
        else data.s(‘shape3d.image‘, ‘displays/abc2.png‘);
        data.s({
            ‘shape3d‘: ‘billboard‘,
            // 缓存,设置了 cache 的代价是需要设置 invalidateShape3dCachedImage
            ‘shape3d.image.cache‘: true,
            // 设置这个值,图片上的锯齿就不会太明显了(若图片类型为 json,则设置 shape3d.dynamic.transparent)
            ‘shape3d.transparent‘: true
        });
        g3d.invalidateShape3dCachedImage(data);
    }
    // 隧道入口处的情报板
    else if (data.getTag() === ‘board‘ || data.getTag() === ‘board1‘) {
        // 业务属性,用来控制文本的位置[x,y,width,height]
        data.a(‘textRect‘, [0, 2, 244, 46]);
        // 业务属性,设置文本内容
        data.a(‘limitText‘, ‘限速80,请开车灯‘);
        var min = -245;
        var name = ‘board‘ + data.getId();
        window[name] = setInterval(function() {
            // 设置情报板中的文字向左滚动,并且当文字全部显示时重复闪烁三次
            circleFunc(data, window[name], min);
        }, 100);
    }

    //给逃生通道上方的指示板 动态设置颜色
    var infos = [‘人行横洞1‘, ‘人行横洞2‘, ‘人行横洞3‘, ‘人行横洞4‘, ‘车行横洞1‘, ‘车行横洞2‘, ‘车行横洞3‘];
    infos.forEach(function(info) {
        if(data.getDisplayName() === info) {
            data.a(‘emergencyColor‘, ‘rgb(138, 138, 138)‘);
        }
    });

    infos = [‘车道指示器‘, ‘车道指示器1‘, ‘车道指示器2‘, ‘车道指示器3‘];
    infos.forEach(function(info) {
        if (data.getDisplayName() === info) {
            // 考虑到性能问题 将六面体变换为 billboard 类型元素
            createBillboard(data, ‘assets/车道信号-过.png‘, ‘assets/车道信号-过.png‘, info);
        }
    });
});
// 设置情报板中的文字向左滚动,并且当文字全部显示时重复闪烁三次
function circleFunc(data, timer, min) {
    // 获取当前业务属性 limitText 的内容
    var text = data.a(‘limitText‘);
    // 设置业务属性 textRect 文本框的坐标和大小
    data.a(‘textRect‘, [data.a(‘textRect‘)[0]-5, 2, 244, 46]);
    if (parseInt(data.a(‘textRect‘)) <= parseInt(min)) {
        data.a(‘textRect‘, [255, 2, 244, 46]);
    }
    else if (data.a(‘textRect‘)[0] === 0) {
        clearInterval(timer);
        var index = 0;
        // 设置多个 timer 是因为能够进入这个函数中的不止一个 data,如果在同一时间多个 data 设置同一个 timer,那肯定只会对最后一个节点进行动画。后面还有很多这种陷阱,要注意
        var testName = ‘testTimer‘ + data.getId();
        window[testName] = setInterval(function() {
            index++;
            // 如果情报板中文本内容为空
            if(data.a(‘limitText‘) === ‘‘) {
                setTimeout(function() {
                    // 设置为传入的 text 值
                    data.a(‘limitText‘, text);
                }, 100);
            }
            else {
                setTimeout(function() {
                    // 若情报板中的文本内容不为空,则设置为空
                    data.a(‘limitText‘, ‘‘);
                }, 100);
            }
            // 重复三次
            if(index === 11) {
                clearInterval(window[testName]);
                data.a(‘limitText‘, text);
            }
        }, 100);

        setTimeout(function() {
            timer = setInterval(function() {
                // 回调函数
                circleFunc(data, timer, min);
            }, 100);
        }, 1500);
    }
}

node.s({
    ‘shape3d‘: ‘billboard‘,
    ‘shape3d.image‘: imageUrl,
    ‘shape3d.image.cache‘: true
});
// 还记得用 shape3d.image.cache 的代价么?
g3d.invalidateShape3dCachedImage(node);
// 设置“目标”位置
function setCenter(center, finish) {
    // 获取当前“目标”位置,为一个数组,而 getCenter 数组会在视线移动的过程中不断变化,所以我们先拷贝一份
    var c = g3d.getCenter().slice(0),
        // 当前x轴位置和目标位置的差值
        dx = center[0] - c[0],
        dy = center[1] - c[1],
        dz = center[2] - c[2];
    // 启动 500 毫秒的动画过度
    ht.Default.startAnim({
        duration: 500,
        action: function(v, t) {
            // 将“目标”位置缓慢从当前位置移动到设置的位置处
            g3d.setCenter([
                c[0] + dx * v,
                c[1] + dy * v,
                c[2] + dz * v
            ]);
        }
    });
};

// 设置“眼睛”位置
function setEye(eye, finish) {
    // 获取当前“眼睛”位置,为一个数组,而 getEye 数组会在视线移动的过程中不断变化,所以我们先拷贝一份
    var e = g3d.getEye().slice(0),
        dx = eye[0] - e[0],
        dy = eye[1] - e[1],
        dz = eye[2] - e[2];
    // 启动 500 毫秒的动画过度
    ht.Default.startAnim({
        duration: 500,
        // 将 Camera 位置缓慢地从当前位置移动到设置的位置
        action: function(v, t) {
            g3d.setEye([
                e[0] + dx * v,
                e[1] + dy * v,
                e[2] + dz * v
            ]);
        }
    });
};
// 获取事件对象的三维坐标
var p3 = e.data.p3(),
    // 获取事件对象的三维尺寸
    s3 = e.data.s3(),
    // 获取事件对象的三维旋转值
    r3 = e.data.r3();
// 设置“目标”位置为当前事件对象的三维坐标值
setCenter(p3);
// 如果节点的 y 轴旋转值 不为 0
if (r3[1] !== 0) {
    // 浮点负数得做转换才能进行比值
    if (parseFloat(r3[1].toFixed(5)) === parseFloat(-3.14159)) {
        // 设置camera 的目标位置
        setEye([p3[0], p3[1]+s3[1], p3[2] * Math.abs(r3[1]*2.3/6)]);
    }
    else if (parseFloat(r3[1].toFixed(4)) === parseFloat(-1.5708)) {
        setEye([p3[0] * Math.abs(r3[1]/1.8), p3[1]+s3[1], p3[2]]);
    }
    else {
        setEye([p3[0] *r3[1], p3[1]+s3[1], p3[2]]);
    }
}
else {
    setEye([p3[0], p3[1]+s3[1]*2, p3[2]+1000]);
}
g3d.addInteractorListener(function(e) {
    if(e.kind === ‘doubleClickData‘) {
        // 有“事故”图标节点存在
        if (e.data.getTag() === ‘jam‘) return;
        // 如果双击对象是变压器
        if (e.data.s(‘shape3d‘) === ‘models/大型变压器/变压器.json‘) {
            index++;
            // 通过唯一标识 tag 标签获取“事故”图标节点对象
            var jam = dm.getDataByTag(‘jam‘);
            if(index === 1){
                var jam = dm.getDataByTag(‘jam‘);
                jam.s({
                    // 设置节点在 3d 上可见
                    ‘3d.visible‘: true,
                    // 设置节点为 billboard 类型
                    ‘shape3d‘: ‘billboard‘,
                    // 设置 billboard 的显示图片
                    ‘shape3d.image‘: ‘assets/车祸.png‘,
                    // 设置 billboard 图片是否缓存
                    ‘shape3d.image.cache‘: true,
                    // 是否始终面向镜头
                    ‘shape3d.autorotate‘: true,
                    // 默认保持图片原本大小,设置为数组模式则可以设置图片显示在界面上的大小
                    ‘shape3d.fixSizeOnScreen‘: [30, 30],
                });
                // cache 的代价是节点需要设置这个函数
                g3d.invalidateShape3dCachedImage(jam);
             }
             else {
                 jam.s({
                     // 第二次双击变压器就将所有一切恢复“事故”之前的状态
                     ‘3d.visible‘: false
                });
                dm.each(function(data) {
                    var p3 = data.p3();
                    if ((p3[2] < jam.p3()[2]) && data.getDisplayName() === ‘车道指示器1‘) {
                        data.s(‘shape3d.image‘, ‘assets/车道信号-过.png‘);
                    }
                    if(data.getTag() === ‘board1‘) {
                        data.a(‘limitText‘, ‘限速80,请开车灯‘);
                    }
                });
                index = 0;
            }
        }
    }
});
// 点击图元
else if (e.kind === ‘clickData‘){
    timer = setTimeout(function() {
        clearTimeout(timer);
        // 如果是“事故”图标节点
        if (e.data.getTag() === ‘jam‘) {
            // 创建一个对话框
            createDialog(e.data);
        }
    }, 200);
}
// 弹出框右边的表单
function createForm4(node, dialog) {
    // 表单组件
    var form = new ht.widget.FormPane();
    // 设置表单组件的宽
    form.setWidth(200);
    // 设置表单组件的高
    form.setHeight(200);
    // 获取表单组件的底层 div
    var view = form.getView();
    // 将表单组件添加到 body 中
    document.body.appendChild(view);

    var infos = [
        ‘编辑框内容为:2辆‘,
        ‘编辑框内容为:客车-客车‘,
        ‘编辑框内容为:无起火‘,
        ‘编辑框内容为:超车道‘
    ];
    infos.forEach(function(info) {
        // 向表单中添加行
        form.addRow([
            info
        // 第二个参数为行宽度,小于1的值为相对值
        ], [0.1]);
    });

    form.addRow([
        {
            // 添加一行的“确认”按钮
            button: {
                label: ‘确认‘,
                // 按钮点击事件触发
                onClicked: function() {
                    // 隐藏对话框
                    dialog.hide();
                    dm.each(function(data) {
                        var p3 = data.p3();
                        // 改变“车道指示器”的显示图片为红色×,这里我是根据“事故”图标节点的坐标来判断“车道显示器”是在前还是在后的
                        if ((p3[2] < node.p3()[2]) && data.getDisplayName() === ‘车道指示器1‘) {
                            data.s(‘shape3d.image‘, ‘assets/车道信号-禁止.png‘);
                        }
                        // 将隧道口的情报板上的文字替换
                        if(data.getTag() === ‘board1‘) {
                            data.a(‘limitText‘, ‘超车道两车追尾,请减速慢行‘);
                        }
                    });
                }
            }
        }
    ], [0.1]);
    return form;
}
标签:abs 部分 箭头 灰色 log img 场景 get slice
原文地址:https://www.cnblogs.com/xhload3d/p/13086799.html