标签:pat log onclick ack ati click 测试结果 exp 描述
1.1app.use([path,] callback [, callback ...])
通过语法结构可以看到Application.use()参数分别有以下几种情形:
app.use(function(){...}); //给全局添加一个中间件
app.use(path,function(){...}); //给指定路由path添加一个中间件
app.use(function(){...}, function(){...}, ...); //给全局添加n个中间件
app.use(path,function(){...},function(){...}, ...); //给指定路由path添加n个中间件
关于path最简单也是最常用的就是字符串类型(例:‘/abcd’);除了字符串Express还提供了模板和正则格式(例:‘/abc?d‘, ‘/ab+cd‘, ‘/ab\*cd‘, ‘/a(bc)?d‘, ‘/\/abc|\/xyz/‘);除了单个的字符串和模板还可以将多个path作为一个数组的元素,然后将这个数组作为use的path,这样就可以同时给多个路由添加中间件,详细内容可以参考官方文档:https://www.expressjs.com.cn/4x/api.html#path-examples。
关于callbakc多个或单个中间件程序这已经再语法结构中直观的体现出来了,这里重点来看看回调函数的参数:
app.use(function(req,res,next){...}); //必须提供的参数
app.use(function(err,req,res,next){...}); //错误中间件需要在最前面添加一个错误参数
关于中间件的简单应用:
let express = require(‘./express‘);
let app = express();
app.use(‘/‘,function(req,res,next){
    console.log("我是一个全局中间件");
    next(); //每个中间件的最末尾必须调用next
});

app.use(‘/‘,function(err,req,res,next){
    console.log("我是一个全局错误中间,当发生错误是调用")
    console.error(err.stack);
    res.status(500).send(‘服务出错误了!‘);
    //由于这个错误处理直接响应了客户端,可以不再调用next,当然后面还需要处理一些业务的话也是可以调用next的
});
1.2简单的模拟Express源码实现Appliction.use()以及各个请求方法的响应注册方法(这里个源码模拟路由概念还比较模糊,所以使用请求方法的响应注册API,而没有使用路由描述):

 1 //文件结构
 2 express
 3     index.js
 4 //源码模拟实现
 5 let http = require("http");
 6 let url = require(‘url‘);
 7 function createApplication(){
 8     //app是一个监听函数
 9     let app = (req,res) =>{
10         //取出每一个层
11         //1.获取请求的方法
12         let m = req.method.toLowerCase();
13         let {pathname} = url.parse(req.url,true);
14
15         //通过next方法进行迭代
16         let index = 0;
17         function next(err){
18             //如果routes迭代完成还没有找到,说明路径不存在
19             if(index === app.routes.length) return res.end(`Cannot ${m} ${pathname}`);
20             let {method, path, handler} = app.routes[index++];//每次调用next就应该取下一个layer
21             if(err){
22                 if(handler.length === 4){
23                     handler(err,req,res,next);
24                 }else{
25                     next(err);
26                 }
27             }else{
28                 if(method === ‘middle‘){ //处理中间件
29                     if(path === ‘/‘ || path === pathname || pathname.startsWith(path+‘/‘)){
30                         handler(req,res,next);
31                     }else{
32                         next();//如果这个中间件没有匹配到,继续通过next迭代路由容器routes
33                     }
34                 }else{ //处理路由
35                     if( (method === m || method ===‘all‘) && (path === pathname || path === ‘*‘)){ //匹配请求方法和请求路径(接口)
36                         handler(req,res);//匹配成功后执行的Callback
37                     }else{
38                         next();
39                     }
40                 }
41             }
42         }
43         next();
44     }
45     app.routes = [];//路由容器
46     app.use = function(path,handler){
47         if(typeof handler !== ‘function‘){
48             handler = path;
49             path = ‘/‘;
50         }
51         let layer = {
52             method:‘middle‘, //method是middle就表示它是一个中间件
53             path,
54             handler
55         }
56         app.routes.push(layer);
57     }
58     app.all = function(path,handler){
59         let layer = {
60             method:‘all‘,
61             path,
62             handler
63         }
64         app.routes.push(layer);
65     }
66     console.log(http.METHODS);
67     http.METHODS.forEach(method =>{
68         method = method.toLocaleLowerCase();
69         app[method] = function (path,handler){//批量生成各个请求方法的路由注册方法
70             let layer = {
71                 method,
72                 path,
73                 handler
74             }
75             app.routes.push(layer);
76         }
77     });
78     //內置中间件,给req扩展path、qury属性
79     app.use(function(req,res,next){
80         let {pathname,query} = url.parse(req.url,true);
81         let hostname = req.headers[‘host‘].split(‘:‘)[0];
82         req.path = pathname;
83         req.query = query;
84         req.hostname = hostname;
85         next();
86     });
87     //通过app.listen调用http.createServer()挂在app(),启动express服务
88     app.listen = function(){
89         let server = http.createServer(app);
90         server.listen(...arguments);
91     }
92     return app;
93 }
94 module.exports = createApplication;
测试模拟实现的Express:
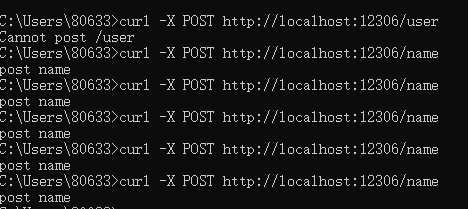
 1 let express = require(‘./express‘);
 2
 3 let app = express();
 4
 5 app.use(‘/‘,function(req,res,next){
 6     console.log("我是一个全局中间件");
 7     next();
 8 });
 9 app.use(‘/user‘,function(req,res,next){
10     console.log("我是user接口的中间件");
11     next();
12 });
13 app.get(‘/name‘,function(req,res){
14     console.log(req.path,req.query,req.hostname);
15     res.end(‘zfpx‘);
16 });
17 app.post(‘/name‘,function(req,res){
18     res.end(‘post name‘);
19 });
20
21
22 app.all("*",function(req,res){
23     res.end(‘all‘);
24 });
25
26 app.use(function(err,req,res,next){
27     console.log(err);
28     next();
29 });
30
31 app.listen(12306);
在windows系统下测试请求:
关于源码的构建详细内容可以参考这个视频教程:app.use()模拟构建视频教程,前面就已经说明过这个模式实现仅仅是从表面的业务逻辑,虽然有一点底层的雏形,但与源码还是相差甚远,这一部分也仅仅只是想帮助理解Express采用最简单的方式表现出来。
1.3如果你看过上面的源码或自己也实现过,就会发现Express关于中间件的添加方式除了app.use()还有app.all()及app.METHOD()。在模拟源码中我并未就use和all的差异做处理,都是采用了请求路径绝对等于path,这种方式是all的特性,use的path实际表示为请求路径的开头:
app.use(path,callback):path表示请求路径的开头部分。
app.all(path,callback):paht表示完全等于请求路径。
app.METHOD(path,callback):并不是真的有METHOD这个方法,而是指HTTP请求方法,实际上表示的是app.get()、app.post()、app.put()等方法,而有时候我们会将这些方法说成用来注册路由,这是因为路由注册的确使用这些方法,但同时这些方法也是可以用作中间的添加,这在前一篇博客中的功能解析中就有说明(Express4.x之API:express),详细见过后面的路由解析就会更加明了。
2.1在实例化一个Application时会实例化一个express.router()实例并被添加到app._router属性上,实际上这个app使用的use、all、METHOD时都是在底层调用了该Router实例上对应的方法,比如看下面这些示例:
 1 let express = require("express");
 2 let app = express();
 3
 4 app._router.use(function(req,res,next){
 5     console.log("--app.router--");
 6     next();
 7 });
 8
 9 app._router.post("/csJSON",function(req,res,next){
10     res.writeHead(200);
11     res.write(JSON.stringify(req.body));
12     res.end();
13 });
14
15 app.listen(12306);
上面示例中的app._router.use、app._router.post分别同等与app.use、app.post,这里到这里也就说明了上一篇博客中的路由与Application的关系Express4.x之API:express。
2.2Express中的Router除了为Express.Application提供路由功能以外,Express也将它作为一个独立的路由工具分离了出来,也就是说Router自身可以独立作为一个应用,如果我们在实际应用中有相关业务有类似Express.Application的路由需求,可以直接实例化一个Router使用,应用的方式如下:
let express = require(‘/express‘);
let router = express.Router();
//这部分可以详细参考官方文档有详细的介绍
2.3由于这篇博客主要是分析Express的中间件及路由的底层逻辑,所以就不在这里详细介绍某个模块的应用,如果有时间我再写一篇关于Router模块的应用,这里我直接上一份模拟Express路由的代码以供参考:
文件结构:
express //根路径
    index.js //express主入口文件
    application.js //express应用构造模块
    router //路由路径
        index.js //路由主入口文件
        layer.js //构造层的模块
        route.js //子路由模块
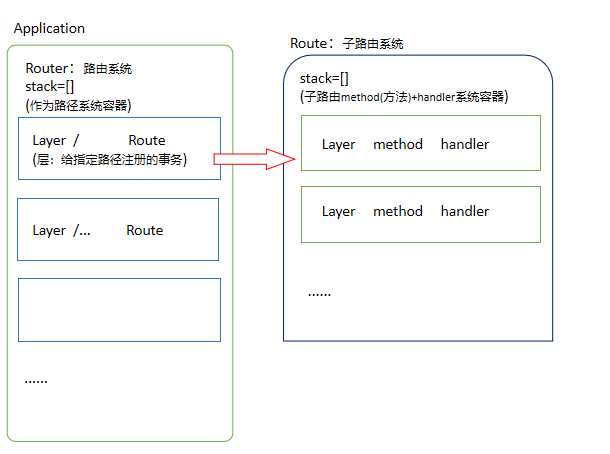
Express路由系统的逻辑结构图:
模拟代码(express核心源码模拟):
1 //express主入口文件
2 let Application = require(‘./application.js‘);
3
4 function createApplication(){
5     return new Application();
6 }
7
8 module.exports = createApplication;
 1 //用来创建应用app
 2 let http = require(‘http‘);
 3 let url = require(‘url‘);
 4
 5 //导入路由系统模块
 6 let Router = require(‘./router‘);
 7
 8 const methods = http.METHODS;
 9
10 //Application ---- express的应用系统
11 function Application(){
12     //创建一个內置的路由系统
13     this._router = new Router();
14 }
15
16 //app.get ---- 实现路由注册业务
17 // Application.prototype.get = function(path,...handlers){
18 //     this._router.get(path,‘use‘,handlers);
19 // }
20
21 methods.forEach(method => {
22     method = method.toLocaleLowerCase();
23     Application.prototype[method] = function(path,...handlers){
24         this._router[method](path,handlers);
25     }
26 });
27
28 //app.use ---- 实现中间件注册业务
29 //这里模拟处理三种参数模式:
30 // -- 1个回调函数:callback
31 // -- 多个回调函数:[callback,] callback [,callback...]
32 // -- 指定路由的中间件:[path,] callback [,callback...]
33 // -- 注意源码中可以处理这三种参数形式还可以处理上面数据的数组形式,以及其他Application(直接将其他app上的中间件添加到当前应用上)
34 Application.prototype.use = function(fn){
35     let path = ‘/‘;
36     let fns = [];
37     let arg = [].slice.call(arguments);
38     if(typeof fn !== ‘function‘ && arg.length >= 2){
39         if(typeof arg[0] !== ‘string‘){
40             fns = arg;
41         }else{
42             path = arg[0];
43             fns = arg.slice(1);
44         }
45     }else{
46         fns = arg;
47     }
48     this._router.use(path,‘use‘,fns);
49 }
50
51 Application.prototype.all = function(fn){
52     let path = ‘/‘;
53     let fns = [];
54     let arg = [].slice.call(arguments);
55     if(typeof fn !== ‘function‘ && arg.length >= 2){
56         if(typeof arg[0] !== ‘string‘){
57             fns = arg;
58         }else{
59             path = arg[0];
60             fns = arg.slice(1);
61         }
62       }else{
63         fns = arg;
64     }
65     this._router.use(path,‘all‘,fns);
66 }
67
68 //将http的listen方法封装到Application的原型上
69 Application.prototype.listen = function(){
70     let server = http.createServer((req,res)=>{
71         //done 用于当路由无任何可匹配项时调用的处理函数
72         function done(){
73             res.end(`Cannot ${req.url} ${req.method}`);
74         }
75         this._router.handle(req,res,done); //调用路由系统的handle方法处理请求
76     });
77     server.listen(...arguments);
78 };
79
80 module.exports = Application;
 1 //express路由系统
 2 const Layer = require(‘./layer.js‘);
 3 const Route = require(‘./route.js‘);
 4
 5 const http = require(‘http‘);
 6 const methods = http.METHODS;
 7
 8 const url = require(‘url‘);
 9
10
11 //路由对象构造函数
12 function Router(){
13     this.stack = [];
14 }
15
16 //router.route ---- 用于创建子路由对象route与主路由上层(layer)的关系
17 //并将主路由上的层缓存到路由对象的stack容器中,该层建立路径与子路由处理请求的关系
18 Router.prototype.route = function(path){
19     let route = new Route();
20     let layer = new Layer(path,route.dispatch.bind(route));
21     this.stack.push(layer);
22     return route;
23 }
24
25 //router.get ---- 实现路由注册
26 //实际上这个方法调用router.route方法分别创建一个主路由系统层、一个子路由系统,并建立两者之间的关系,详细见Router.prototype.route
27 //然后获取子路由系统对象,并将回调函数和请求方法注册在这个子路由系统上
28
29
30 // Router.prototype.get = function(path,handlers){
31 //     let route = this.route(path);
32 //     route.get(handlers);
33 // }
34
35 methods.forEach(method =>{
36     method = method.toLocaleLowerCase();
37     //注意下面这个方法会出现内存泄漏问题,有待改进
38     Router.prototype[method] = function(path, handlers){
39         let route = this.route(path);
40         route[method](handlers);
41     }
42 });
43
44 //router.use ---- 实现中间件注册(按照路由开头的路径匹配,即相对路由匹配)
45 Router.prototype.use = function(path,routerType,fns){
46     let router = this;
47     fns.forEach(function(fn){
48         let layer = new Layer(path,fn);
49         layer.middle = true; //标记这个层为相对路由中间件
50         layer.routerType = routerType;
51         router.stack.push(layer);
52     });
53 }
54
55 //调用路由处理请求
56 Router.prototype.handle = function(req,res,out){
57     let {pathname} = url.parse(req.url);
58     let index = 0;
59     let next = () => {
60         if(index >= this.stack.length) return out();
61         let layer = this.stack[index++];
62         if(layer.middle && (layer.path === ‘/‘ || pathname === layer.path || pathname.startsWith(layer.path + ‘/‘))){
63             //处理中间件
64             if(layer.routerType === ‘use‘){
65                 layer.handle_request(req,res,next);
66             }else if(layer.routerType === ‘all‘ && layer.path === pathname){
67                 layer.handle_request(req,res,next);
68             }else{
69                 next();
70             }
71         }else if(layer.match(pathname)){
72             //处理响应--更准确的说是处理具体请求方法上的中间件或响应
73             layer.handle_request(req,res,next);
74         }else{
75             next();
76         }
77     }
78     next();
79 }
80
81 module.exports = Router;
 1 //Layer的构造函数
 2 function Layer(path,handler){
 3     this.path = path; //当前层的路径
 4     this.handler = handler;  //当前层的回调函数
 5 }
 6
 7 //判断请求方法与当前层的方法是否一致
 8 Layer.prototype.match = function(pathname){
 9     return this.path === pathname;
10 }
11
12 //调用当前层的回调函数handler
13 Layer.prototype.handle_request = function(req,res,next){
14     this.handler(req,res,next);
15 }
16
17 module.exports = Layer;
测试代码:
 1 let express = require(‘./express‘);
 2 let app = express();
 3
 4
 5 app.use(‘/name‘,function(req,res,next){
 6     console.log(‘use1‘);
 7     next();
 8 });
 9 app.use(function(req,res,next){
10     console.log(‘use2-1‘);
11     next();
12 },function(req,res,next){
13     console.log(‘use2-2‘);
14     next();
15 });
16
17 app.all(‘/name‘,function(req,res,next){
18     console.log(‘all-1‘);
19     next();
20 });
21 app.all(‘/name/app‘,function(req,res,next){
22     console.log(‘all-2‘);
23     next();
24 });
25
26 app.get(‘/name/app‘,function(req,res){
27     res.end(req.url);
28 });
29 // console.log(app._router.stack);
30 app.listen(12306);
测试结果:


标签:pat log onclick ack ati click 测试结果 exp 描述
原文地址:https://www.cnblogs.com/ZheOneAndOnly/p/12808601.html
