标签:als def ext outer https only webp map username
<template>
  <div id="app">
    <Login></Login>
  </div>
</template>

<script>
  import Login from ‘./components/Login‘
  export default {
    name: ‘App‘,
    components: {
      ‘Login‘: Login
    },
    data() {
      return {}
    }
  }
</script>
<style>
  #app {
    text-align: center;
    margin-top:200px ;
  }
</style>
<template>
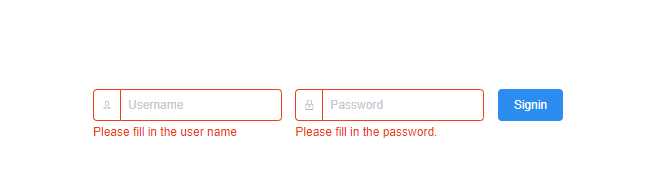
<Form ref="formInline" :model="formInline" :rules="ruleInline" inline>
<FormItem prop="userName">
<Input type="text" v-model="formInline.userName" placeholder="Username">
<Icon type="ios-person-outline" slot="prepend"></Icon>
</Input>
</FormItem>
<FormItem prop="password">
<Input type="password" v-model="formInline.password" placeholder="Password">
<Icon type="ios-lock-outline" slot="prepend"></Icon>
</Input>
</FormItem>
<FormItem>
<Button type="primary" @click="handleSubmit(‘formInline‘)">Signin</Button>
</FormItem>
</Form>
</template>
<script>
export default {
data() {
return {
formInline: {
userName: ‘‘,
password: ‘‘
},
ruleInline: {
userName: [
{required: true, message: ‘Please fill in the user name‘, trigger: ‘blur‘}
],
password: [
{required: true, message: ‘Please fill in the password.‘, trigger: ‘blur‘},
{
type: ‘string‘,
min: 6,
message: ‘The password length cannot be less than 6 bits‘,
trigger: ‘blur‘
}
]
}
}
},
methods: {
handleSubmit(name) {
this.$refs[name].validate((valid) => {
if (valid) {
this.$axios({
url: ‘/rest/login‘,//请求的地址
method: ‘post‘,//请求的方式
data: this.formInline//请求的表单数据
}).then(res => {
console.info(‘后台返回的数据‘, res.data);
}).catch(err => {
console.info(‘报错的信息‘, err.response.message);
});
} else {
this.$Message.error(‘表单校验失败!‘);
}
})
}
}
}
</script>
<template>
  <div class="hello">
    <h1>{{ msg }}</h1>
    <h2>Essential Links</h2>
    <ul>
      <li>
        <a
          href="https://vuejs.org"
          target="_blank"
        >
          Core Docs
        </a>
      </li>
      <li>
        <a
          href="https://forum.vuejs.org"
          target="_blank"
        >
          Forum
        </a>
      </li>
      <li>
        <a
          href="https://chat.vuejs.org"
          target="_blank"
        >
          Community Chat
        </a>
      </li>
      <li>
        <a
          href="https://twitter.com/vuejs"
          target="_blank"
        >
          Twitter
        </a>
      </li>
      <br>
      <li>
        <a
          href="http://vuejs-templates.github.io/webpack/"
          target="_blank"
        >
          Docs for This Template
        </a>
      </li>
    </ul>
    <h2>Ecosystem</h2>
    <ul>
      <li>
        <a
          href="http://router.vuejs.org/"
          target="_blank"
        >
          vue-router
        </a>
      </li>
      <li>
        <a
          href="http://vuex.vuejs.org/"
          target="_blank"
        >
          vuex
        </a>
      </li>
      <li>
        <a
          href="http://vue-loader.vuejs.org/"
          target="_blank"
        >
          vue-loader
        </a>
      </li>
      <li>
        <a
          href="https://github.com/vuejs/awesome-vue"
          target="_blank"
        >
          awesome-vue
        </a>
      </li>
    </ul>
  </div>
</template>

<script>
export default {
  name: ‘HelloWorld‘,
  data () {
    return {
      msg: ‘Welcome to Your Vue.js App‘
    }
  }
}
</script>

<!-- Add "scoped" attribute to limit CSS to this component only -->
<style scoped>
h1, h2 {
  font-weight: normal;
}
ul {
  list-style-type: none;
  padding: 0;
}
li {
  display: inline-block;
  margin: 0 10px;
}
a {
  color: #42b983;
}
</style>
 dev: {

    // Paths
    assetsSubDirectory: ‘static‘,
    assetsPublicPath: ‘/‘,
    proxyTable: {
      ‘/rest‘:{
        target:"http://localhost:8081",
        changeOrigin:true,
        pathRewrite: {
          ‘^/rest‘:‘/rest‘
        }
      }
    },
// The Vue build version to load with the `import` command
// (runtime-only or standalone) has been set in webpack.base.conf with an alias.
import Vue from ‘vue‘
import App from ‘./App‘
import router from ‘./router‘
import axios from ‘axios‘

import iView from ‘iview‘
import ‘iview/dist/styles/iview.css‘
Vue.use(iView)


Vue.prototype.$axios = axios
Vue.config.productionTip = false

/* eslint-disable no-new */
new Vue({
  el: ‘#app‘,
  router,
  components: { App },
  template: ‘<App/>‘
})
import Vue from ‘vue‘
import Router from ‘vue-router‘
import HelloWorld from ‘@/components/HelloWorld‘

Vue.use(Router)

export default new Router({
  routes: [
    {
      path: ‘/‘,
      name: ‘HelloWorld‘,
      component: HelloWorld
    }
  ]
})
server.port=8081
package com.example.demo;
import javax.persistence.Entity;
/**
 * @Author 杜坡
 * @Date 2020/6/18 17:33
 * @Version 1.0
 */
public class User {
    //用户名
    private String userName;
    //密码
    private String password;
    public String getUserName() {
        return userName;
    }
    public void setUserName(String userName) {
        this.userName = userName;
    }
    public String getPassword() {
        return password;
    }
    public void setPassword(String password) {
        this.password = password;
    }

    @Override
    public String toString() {
        return "User{" +
                "userName=‘" + userName + ‘\‘‘ +
                ", password=‘" + password + ‘\‘‘ +
                ‘}‘;
    }
}
package com.example.demo;
import org.springframework.web.bind.annotation.RequestBody;
import org.springframework.web.bind.annotation.RequestMapping;
import org.springframework.web.bind.annotation.RequestMethod;
import org.springframework.web.bind.annotation.RestController;
/**
* @Author 杜坡
* @Date 2020/6/18 17:33
* @Version 1.0
*/
@RestController
@RequestMapping("/rest")
public class LoginController {
@RequestMapping(value = "/login", method = RequestMethod.POST)
public String Login(@RequestBody User user) {
String userName=user.getUserName();
String passWord=user.getPassword();
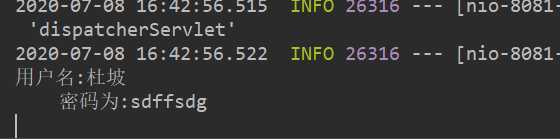
System.out.println("用户名:"+userName+"\n"+"\t"+"密码为:"+passWord);
return "用户名:"+userName+"\n"+"\t"+"密码为:"+passWord;
}
}


标签:als def ext outer https only webp map username
原文地址:https://www.cnblogs.com/dp06134816-login/p/13267817.html