标签:输出 干货 ref bash ring port for tree require
我们在开发企业应用时,通常业务人员的一个操作实际上是对数据库读写的多步操作的结合。由于数据操作在顺序执行的过程中,任何一步操作都有可能发生异常,异常会导致后续操作无法完成,此时由于业务逻辑并未正确的完成,之前成功操作的数据并不可靠,如果要让这个业务正确的执行下去,通常有实现方式:
事务就是针对上述方式2的实现。事务,一般是指要做的或所做的事情,就是上面所说的业务人员的一个操作(比如电商系统中,一个创建订单的操作包含了创建订单、商品库存的扣减两个基本操作。如果创建订单成功,库存扣减失败,那么就会出现商品超卖的问题,所以最基本的最发就是需要为这两个操作用事务包括起来,保证这两个操作要么都成功,要么都失败)。
这样的场景在实际开发过程中非常多,所以今天就来一起学习一下Spring Boot中的事务管理如何使用!
在Spring Boot中,当我们使用了spring-boot-starter-jdbc或spring-boot-starter-data-jpa依赖的时候,框架会自动默认分别注入DataSourceTransactionManager或JpaTransactionManager。所以我们不需要任何额外配置就可以用@Transactional注解进行事务的使用。
我们以之前实现的《使用Spring Data JPA访问MySQL》的示例作为基础工程进行事务的使用学习。在该样例工程中(若对该数据访问方式不了解,可先阅读该前文),我们引入了spring-data-jpa,并创建了User实体以及对User的数据访问对象UserRepository,在单元测试类中实现了使用UserRepository进行数据读写的单元测试用例,如下:
@Slf4j
@RunWith(SpringRunner.class)
@SpringBootTest
public class ApplicationTests {

	@Autowired
	private UserRepository userRepository;

	@Test
	public void test() throws Exception {

		// 创建10条记录
		userRepository.save(new User("AAA", 10));
		userRepository.save(new User("BBB", 20));
		userRepository.save(new User("CCC", 30));
		userRepository.save(new User("DDD", 40));
		userRepository.save(new User("EEE", 50));
		userRepository.save(new User("FFF", 60));
		userRepository.save(new User("GGG", 70));
		userRepository.save(new User("HHH", 80));
		userRepository.save(new User("III", 90));
		userRepository.save(new User("JJJ", 100));

		// 省略后续的一些验证操作
	}

}
可以看到,在这个单元测试用例中,使用UserRepository对象连续创建了10个User实体到数据库中,下面我们人为的来制造一些异常,看看会发生什么情况。
通过@Max(50)来为User的age设置最大值为50,这样通过创建时User实体的age属性超过50的时候就可以触发异常产生。
@Entity
@Data
@NoArgsConstructor
public class User {

    @Id
    @GeneratedValue
    private Long id;
    private String name;
    @Max(50)
    private Integer age;

    public User(String name, Integer age) {
        this.name = name;
        this.age = age;
    }

}
执行测试用例,可以看到控制台中抛出了如下异常,关于age字段的错误:
2020-07-09 11:55:29.581 ERROR 24424 --- [           main] o.h.i.ExceptionMapperStandardImpl        : HHH000346: Error during managed flush [Validation failed for classes [com.didispace.chapter310.User] during persist time for groups [javax.validation.groups.Default, ]
List of constraint violations:[
	ConstraintViolationImpl{interpolatedMessage=‘最大不能超过50‘, propertyPath=age, rootBeanClass=class com.didispace.chapter310.User, messageTemplate=‘{javax.validation.constraints.Max.message}‘}
]]
此时查数据库中的User表:
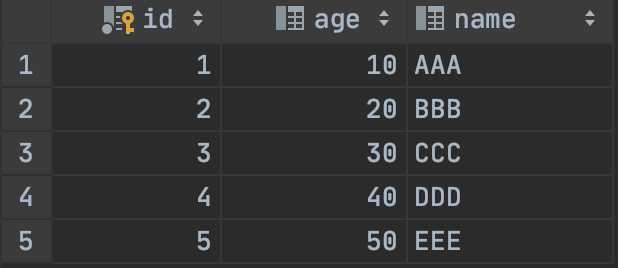
可以看到,测试用例执行到一半之后因为异常中断了,前5条数据正确插入而后5条数据没有成功插入,如果这10条数据需要全部成功或者全部失败,那么这时候就可以使用事务来实现,做法非常简单,我们只需要在test函数上添加@Transactional注解即可。
@Test
@Transactional
public void test() throws Exception {

    // 省略测试内容

}
再来执行该测试用例,可以看到控制台中输出了回滚日志(Rolled back transaction for test context),
2020-07-09 12:48:23.831  INFO 24889 --- [           main] o.s.t.c.transaction.TransactionContext   : Began transaction (1) for test context [DefaultTestContext@f6efaab testClass = Chapter310ApplicationTests, testInstance = com.didispace.chapter310.Chapter310ApplicationTests@60816371, testMethod = test@Chapter310ApplicationTests, testException = [null], mergedContextConfiguration = [WebMergedContextConfiguration@3c19aaa5 testClass = Chapter310ApplicationTests, locations = ‘{}‘, classes = ‘{class com.didispace.chapter310.Chapter310Application}‘, contextInitializerClasses = ‘[]‘, activeProfiles = ‘{}‘, propertySourceLocations = ‘{}‘, propertySourceProperties = ‘{org.springframework.boot.test.context.SpringBootTestContextBootstrapper=true}‘, contextCustomizers = set[org.springframework.boot.test.context.filter.ExcludeFilterContextCustomizer@34cd072c, org.springframework.boot.test.json.DuplicateJsonObjectContextCustomizerFactory$DuplicateJsonObjectContextCustomizer@528931cf, org.springframework.boot.test.mock.mockito.MockitoContextCustomizer@0, org.springframework.boot.test.web.client.TestRestTemplateContextCustomizer@2353b3e6, org.springframework.boot.test.autoconfigure.properties.PropertyMappingContextCustomizer@0, org.springframework.boot.test.autoconfigure.web.servlet.WebDriverContextCustomizerFactory$Customizer@7ce6a65d], resourceBasePath = ‘src/main/webapp‘, contextLoader = ‘org.springframework.boot.test.context.SpringBootContextLoader‘, parent = [null]], attributes = map[‘org.springframework.test.context.web.ServletTestExecutionListener.activateListener‘ -> true, ‘org.springframework.test.context.web.ServletTestExecutionListener.populatedRequestContextHolder‘ -> true, ‘org.springframework.test.context.web.ServletTestExecutionListener.resetRequestContextHolder‘ -> true]]; transaction manager [org.springframework.orm.jpa.JpaTransactionManager@4b85edeb]; rollback [true]
2020-07-09 12:48:24.011  INFO 24889 --- [           main] o.s.t.c.transaction.TransactionContext   : Rolled back transaction for test: [DefaultTestContext@f6efaab testClass = Chapter310ApplicationTests, testInstance = com.didispace.chapter310.Chapter310ApplicationTests@60816371, testMethod = test@Chapter310ApplicationTests, testException = javax.validation.ConstraintViolationException: Validation failed for classes [com.didispace.chapter310.User] during persist time for groups [javax.validation.groups.Default, ]
List of constraint violations:[
	ConstraintViolationImpl{interpolatedMessage=‘最大不能超过50‘, propertyPath=age, rootBeanClass=class com.didispace.chapter310.User, messageTemplate=‘{javax.validation.constraints.Max.message}‘}
], mergedContextConfiguration = [WebMergedContextConfiguration@3c19aaa5 testClass = Chapter310ApplicationTests, locations = ‘{}‘, classes = ‘{class com.didispace.chapter310.Chapter310Application}‘, contextInitializerClasses = ‘[]‘, activeProfiles = ‘{}‘, propertySourceLocations = ‘{}‘, propertySourceProperties = ‘{org.springframework.boot.test.context.SpringBootTestContextBootstrapper=true}‘, contextCustomizers = set[org.springframework.boot.test.context.filter.ExcludeFilterContextCustomizer@34cd072c, org.springframework.boot.test.json.DuplicateJsonObjectContextCustomizerFactory$DuplicateJsonObjectContextCustomizer@528931cf, org.springframework.boot.test.mock.mockito.MockitoContextCustomizer@0, org.springframework.boot.test.web.client.TestRestTemplateContextCustomizer@2353b3e6, org.springframework.boot.test.autoconfigure.properties.PropertyMappingContextCustomizer@0, org.springframework.boot.test.autoconfigure.web.servlet.WebDriverContextCustomizerFactory$Customizer@7ce6a65d], resourceBasePath = ‘src/main/webapp‘, contextLoader = ‘org.springframework.boot.test.context.SpringBootContextLoader‘, parent = [null]], attributes = map[‘org.springframework.test.context.web.ServletTestExecutionListener.activateListener‘ -> true, ‘org.springframework.test.context.web.ServletTestExecutionListener.populatedRequestContextHolder‘ -> true, ‘org.springframework.test.context.web.ServletTestExecutionListener.resetRequestContextHolder‘ -> true]]
再看数据库中,User表就没有AAA到EEE的用户数据了,成功实现了自动回滚。
这里主要通过单元测试演示了如何使用@Transactional注解来声明一个函数需要被事务管理,通常我们单元测试为了保证每个测试之间的数据独立,会使用@Rollback注解让每个单元测试都能在结束时回滚。而真正在开发业务逻辑时,我们通常在service层接口中使用@Transactional来对各个业务逻辑进行事务管理的配置,例如:
public interface UserService {

    @Transactional
    User update(String name, String password);

}
上面的例子中我们使用了默认的事务配置,可以满足一些基本的事务需求,但是当我们项目较大较复杂时(比如,有多个数据源等),这时候需要在声明事务时,指定不同的事务管理器。对于不同数据源的事务管理配置可以见《Spring Data JPA的多数据源配置》中的设置。在声明事务时,只需要通过value属性指定配置的事务管理器名即可,例如:@Transactional(value="transactionManagerPrimary")。
除了指定不同的事务管理器之后,还能对事务进行隔离级别和传播行为的控制,下面分别详细解释:
隔离级别是指若干个并发的事务之间的隔离程度,与我们开发时候主要相关的场景包括:脏读取、重复读、幻读。
我们可以看org.springframework.transaction.annotation.Isolation枚举类中定义了五个表示隔离级别的值:
public enum Isolation {
    DEFAULT(-1),
    READ_UNCOMMITTED(1),
    READ_COMMITTED(2),
    REPEATABLE_READ(4),
    SERIALIZABLE(8);
}
DEFAULT:这是默认值,表示使用底层数据库的默认隔离级别。对大部分数据库而言,通常这值就是:READ_COMMITTED。READ_UNCOMMITTED:该隔离级别表示一个事务可以读取另一个事务修改但还没有提交的数据。该级别不能防止脏读和不可重复读,因此很少使用该隔离级别。READ_COMMITTED:该隔离级别表示一个事务只能读取另一个事务已经提交的数据。该级别可以防止脏读,这也是大多数情况下的推荐值。REPEATABLE_READ:该隔离级别表示一个事务在整个过程中可以多次重复执行某个查询,并且每次返回的记录都相同。即使在多次查询之间有新增的数据满足该查询,这些新增的记录也会被忽略。该级别可以防止脏读和不可重复读。SERIALIZABLE:所有的事务依次逐个执行,这样事务之间就完全不可能产生干扰,也就是说,该级别可以防止脏读、不可重复读以及幻读。但是这将严重影响程序的性能。通常情况下也不会用到该级别。指定方法:通过使用isolation属性设置,例如:
@Transactional(isolation = Isolation.DEFAULT)
所谓事务的传播行为是指,如果在开始当前事务之前,一个事务上下文已经存在,此时有若干选项可以指定一个事务性方法的执行行为。
我们可以看org.springframework.transaction.annotation.Propagation枚举类中定义了6个表示传播行为的枚举值:
public enum Propagation {
    REQUIRED(0),
    SUPPORTS(1),
    MANDATORY(2),
    REQUIRES_NEW(3),
    NOT_SUPPORTED(4),
    NEVER(5),
    NESTED(6);
}
REQUIRED:如果当前存在事务,则加入该事务;如果当前没有事务,则创建一个新的事务。SUPPORTS:如果当前存在事务,则加入该事务;如果当前没有事务,则以非事务的方式继续运行。MANDATORY:如果当前存在事务,则加入该事务;如果当前没有事务,则抛出异常。REQUIRES_NEW:创建一个新的事务,如果当前存在事务,则把当前事务挂起。NOT_SUPPORTED:以非事务方式运行,如果当前存在事务,则把当前事务挂起。NEVER:以非事务方式运行,如果当前存在事务,则抛出异常。NESTED:如果当前存在事务,则创建一个事务作为当前事务的嵌套事务来运行;如果当前没有事务,则该取值等价于REQUIRED。指定方法:通过使用propagation属性设置,例如:
@Transactional(propagation = Propagation.REQUIRED)
本文的相关例子可以查看下面仓库中的chapter3-10目录:
如果您觉得本文不错,欢迎Star支持,您的关注是我坚持的动力!
本文首发:Spring Boot 2.x基础教程:事务管理入门,转载请注明出处。
欢迎关注我的公众号:程序猿DD,获得独家整理的学习资源和日常干货推送。
标签:输出 干货 ref bash ring port for tree require
原文地址:https://www.cnblogs.com/didispace/p/13278494.html