标签:线程 作用 操作 cto jackson alt utf-8 mamicode 键值
RabbitMq教程
Rabbit的window安装:https://www.cnblogs.com/cxxjohnson/p/8734720.html
一.什么是MQ?
MQ全称为Message Queue, 消息队列(MQ)是一种应用程序对应用程序的通信方法。MQ是消费-生产者模型的一个典型的代表,一端往消息队列中不断写入消息,而另一端则可以读取队列中的消息。
他能做什么?
RabbitMQ是MQ的一种。下面详细介绍一下RabbitMQ的基本概念。
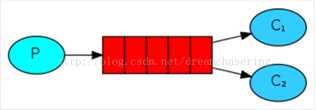
1、队列、生产者、消费者
队列是RabbitMQ的内部对象,用于存储消息。生产者(下图中的P)生产消息并投递到队列中,消费者(下图中的C)可以从队列中获取消息并消费。

多个消费者可以订阅同一个队列,这时队列中的消息会被平均分摊给多个消费者进行处理,而不是每个消费者都收到所有的消息并处理。
2、Exchange、Binding
刚才我们看到生产者将消息投递到队列中,实际上这在RabbitMQ中这种事情永远都不会发生。实际的情况是,生产者将消息发送到Exchange(交换器,下图中的X),再通过Binding将Exchange与Queue关联起来。
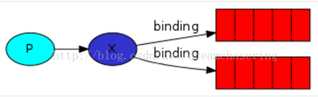
3、Exchange Type、Bingding key、routing key
消费者在绑定(Binding)Exchange与Queue的同时,一般会指定一个binding key。在绑定多个Queue到同一个Exchange的时候,这些Binding允许使用相同的binding key。
生产者在将消息发送给Exchange的时候,一般会指定一个routing key,来指定这个消息的路由规则,生产者就可以在发送消息给Exchange时,通过指定routing key来决定消息流向哪些队列。
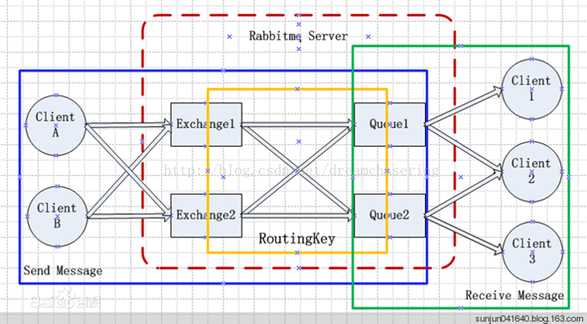
RabbitMQ常用的Exchange Type有三种: direct、fanout、topic、Header
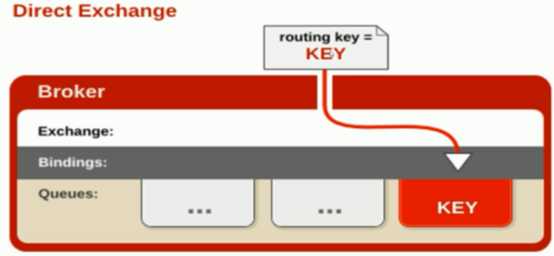
l direct:把消息投递到那些binding key与routing key完全匹配的队列中。
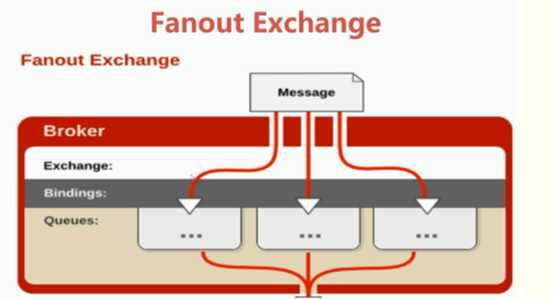
l fanout:把所有发送到该Exchange的消息投递到所有与它绑定的队列中。
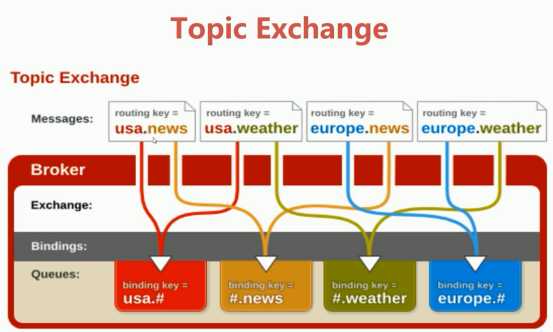
l topic:将消息路由到binding key与routing key模式匹配的队列中。
附上一张RabbitMQ的结构图:
最后来具体解析一下几个问题:
1、可以自动创建队列,也可以手动创建队列,如果自动创建队列,那么是谁负责创建队列呢?是生产者?还是消费者?
如果队列不存在,当然消费者不会收到任何的消息。但是如果队列不存在,那么生产者发送的消息就会丢失。所以,为了数据不丢失,消费者和生产者都可以创建队列。那么如果创建一个已经存在的队列呢?那么不会有任何的影响。需要注意的是没有任何的影响,也就是说第二次创建如果参数和第一次不一样,那么该操作虽然成功,但是队列属性并不会改变。
队列对于负载均衡的处理是完美的。对于多个消费者来说,RabbitMQ使用轮询的方式均衡的发送给不同的消费者。
2. RabbitMQ 为什么需要信道?为什么不是 TCP 直接通信?
#. Channel 中文叫做信道,是 TCP 里面的虚拟链接。例如:电缆相当于 TCP,信道是
一个独立光纤束,一条 TCP 连接上创建多条信道是没有问题的。
#TCP 的创建和销毁开销特别大。创建需要 3 次握手,销毁需要 4 次分手。
#. 如果不用信道,那应用程序就会以 TCP 链接 Rabbit,高峰时每秒成千上万条链接
会造成资源巨大的浪费,而且操作系统每秒处理 TCP 链接数也是有限制的,必定造成性能
瓶颈。
#. 信道的原理是一条线程一条通道,多条线程多条通道同用一条 TCP 链接。一条 TCP
链接可以容纳无限的信道,即使每秒成千上万的请求也不会成为性能的瓶颈。
3、RabbitMQ的消息确认机制
默认情况下,如果消息已经被某个消费者正确的接收到了,那么该消息就会被从队列中移除。当然也可以让同一个消息发送到很多的消费者。
如果一个队列没有消费者,那么,如果这个队列有数据到达,那么这个数据会被缓存,不会被丢弃。当有消费者时,这个数据会被立即发送到这个消费者,这个数据被消费者正确收到时,这个数据就被从队列中删除。
可以将消息进行持久化。要将消息持久化,前提是:队列、Exchange都持久化
那么什么是正确收到呢?通过ack。每个消息都要被acknowledged(确认,ack)。我们可以显示的在程序中去ack,也可以自动的ack。如果有数据没有被ack,那么:
RabbitMQ Server会把这个信息发送到下一个消费者。
如果这个app有bug,忘记了ack,那么RabbitMQServer不会再发送数据给它,因为Server认为这个消费者处理能力有限。
而且ack的机制可以起到限流的作用(Benefitto throttling):在消费者处理完成数据后发送ack,甚至在额外的延时后发送ack,将有效的均衡消费者的负载。
二.Java中使用rabbitmq
Rabbitmq有几种类型的交换机。direct、fanout、topic、header等等,下面就这几种分别测试。
2.1先来写一个不指定交换机的测试,(其实是有只是rabbitmq默认的交换机)
1)新建两个项目,rabbitmq-producer和rabbitmq-consumer的maven工程,都导入下面jar
<dependency>
<groupId>com.rabbitmq</groupId>
<artifactId>amqp-client</artifactId>
<version>4.0.3</version>
</dependency>
<dependency>
<groupId>org.slf4j</groupId>
<artifactId>slf4j-simple</artifactId>
<version>1.7.25</version>
<scope>compile</scope>
</dependency>
2)生产方producer代码
public class ProduceTest {

    public static void main(String[] args) throws IOException, TimeoutException {

        ConnectionFactory connectionFactory = new ConnectionFactory();

        connectionFactory.setHost("127.0.0.1");

        connectionFactory.setPort(5672);

        connectionFactory.setUsername("guest");

        connectionFactory.setPassword("guest");

        connectionFactory.setVirtualHost("/");//rabbitmq默认虚拟机名称为“/”,虚拟机相当于一个独立的mq服

        Connection connection = null;

        Channel channel = null;

        try {

            //创建与RabbitMQ服务的TCP连接

             connection = connectionFactory.newConnection();

            channel = connection.createChannel();


            //默认交换器

            String queue_name = "queue_test";

             for (int i=0;i<10;i++) {

                 String message = "消息》》" + i;

                 /**

                  * 消息发布方法

                  * param1:Exchange的名称,如果没有指定,则使用Default Exchange

                  * param2:routingKey,消息的路由Key,是用于Exchange(交换机)将消息转发到指定的消息队列 ,默认交换机的key是队列名

                  * param3:消息包含的属性

                  * param4:消息体

                  * */

                  channel.basicPublish("",queue_name,null,message.getBytes());


             }
   }catch (Exception e){

            e.printStackTrace();

        }finally {

            if (channel!=null){

                channel.close();

            }

            if(connection!=null){

                connection.close();

            }

        }

    }

}
3)消费方
public class ConsumerTest {

    public static void main(String[] args) throws IOException, TimeoutException, InterruptedException {

        ConnectionFactory connectionFactory = new ConnectionFactory();

        connectionFactory.setHost("127.0.0.1");

        connectionFactory.setPort(5672);

        connectionFactory.setUsername("guest");

        connectionFactory.setPassword("guest");

        connectionFactory.setVirtualHost("/");//rabbitmq默认虚拟机名称为“/”,虚拟机相当于一个独立的mq服

        Connection connection = connectionFactory.newConnection();

        Channel channel = connection.createChannel();


        //使用默认交换器

        String queue_name = "queue_test";

        /**

         * 声明队列,如果Rabbit中没有此队列将自动创建

         * param1:队列名称

         * param2:是否持久化

         * param3:队列是否独占此连接

         * param4:队列不再使用时是否自动删除此队列

         * param5:队列参数

         */

        channel.queueDeclare(queue_name,true,false,false,null);

        /**

         * 监听队列String queue, boolean autoAck,Consumer callback

         * 参数明细

         * 1、队列名称

         * 2、是否自动回复,设置为true为表示消息接收到自动向mq回复接收到了,mq接收到回复会删除消息,设置

         为false则需要手动回复

         * 3、消费消息的方法,消费者接收到消息后调用此方法

         */


        channel.basicConsume(queue_name,true,new DefaultConsumer(channel){

            @Override

            public void handleDelivery(String consumerTag, Envelope envelope, AMQP.BasicProperties properties, byte[] body) throws IOException {

                System.out.println(new String(body,"utf-8"));

        }

        });
}
4)测试,运行生产方,再运行消费方
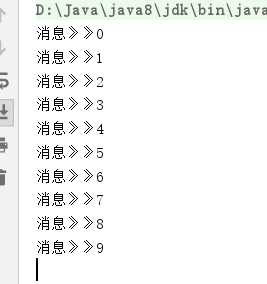
总结:
#生产方操作流程
创建连接》创建通道》声明交换机》发送消息
#消费方操作流程
创建连接》创建通道》声明交换机》声明队列》绑定
2.2 Direct Exchange(发布于订阅,完全匹配)
,完全匹配路由key,binding key和routing key必须完全一致才能接收消息
#生产方代码
public class ProduceTest {

    public static void main(String[] args) throws IOException, TimeoutException {

        ConnectionFactory connectionFactory = new ConnectionFactory();

        connectionFactory.setHost("127.0.0.1");

        connectionFactory.setPort(5672);

        connectionFactory.setUsername("guest");

        connectionFactory.setPassword("guest");

        connectionFactory.setVirtualHost("/");//rabbitmq默认虚拟机名称为“/”,虚拟机相当于一个独立的mq服

        Connection connection = null;

        Channel channel = null;

        try {

            //创建与RabbitMQ服务的TCP连接

             connection = connectionFactory.newConnection();

            channel = connection.createChannel();
//direct交换机

String directExchangeName = "direct_exchange_inform";

String directQqRoutKey = "direct_qq_key";

 String directMessage = "direct消息";

//声明交换机

channel.exchangeDeclare(directExchangeName,BuiltinExchangeType.DIRECT);

//发布消息

channel.basicPublish(directExchangeName,directQqRoutKey,null,directMessage.getBytes());
  }catch (Exception e){

            e.printStackTrace();

        }finally {

            if (channel!=null){

                channel.close();

            }

            if(connection!=null){

                connection.close();

            }

        }

    }

}
#消费方代码
public class ConsumerTest {

    public static void main(String[] args) throws IOException, TimeoutException, InterruptedException {

        ConnectionFactory connectionFactory = new ConnectionFactory();

        connectionFactory.setHost("127.0.0.1");

        connectionFactory.setPort(5672);

        connectionFactory.setUsername("guest");

        connectionFactory.setPassword("guest");

        connectionFactory.setVirtualHost("/");//rabbitmq默认虚拟机名称为“/”,虚拟机相当于一个独立的mq服

        Connection connection = connectionFactory.newConnection();

        Channel channel = connection.createChannel();
//direct交换器

String directExchangexchangeName = "direct_exchange_inform";

String directQqQueueName = "direct_qq_queue";

String directQqRoutKey = "direct_qq_key";

//表示声明了qq队列

channel.queueDeclare(directQqQueueName,true,false,false,null);

//建立一个绑定关系

channel.queueBind(directQqQueueName,directExchangexchangeName,directQqRoutKey,null);

channel.basicConsume(directQqQueueName,true,new DefaultConsumer(channel){

    @Override

    public void handleDelivery(String consumerTag, Envelope envelope, AMQP.BasicProperties properties, byte[] body) throws IOException {

        System.out.println("qq收到消息:"+new String(body,"utf-8"));

    }

});
}

}
2.3 Fanout Exchange(广播)
不设置路由键,只需要简单的将队列绑定到交换机上;发送到交换机的消息都会被转发到与该交换机绑定的所有队列上
#生产方代码
public class ProduceTest {

    public static void main(String[] args) throws IOException, TimeoutException {

        ConnectionFactory connectionFactory = new ConnectionFactory();

        connectionFactory.setHost("127.0.0.1");

        connectionFactory.setPort(5672);

        connectionFactory.setUsername("guest");

        connectionFactory.setPassword("guest");

        connectionFactory.setVirtualHost("/");//rabbitmq默认虚拟机名称为“/”,虚拟机相当于一个独立的mq服

        Connection connection = null;

        Channel channel = null;

        try {

            //创建与RabbitMQ服务的TCP连接

             connection = connectionFactory.newConnection();

            channel = connection.createChannel();
//fanout

String fanoutExchangeName = "exchange_fanout_inform";

//路由键为空

 String fanoutRoutKey = "";

 String fanoutMessage = "fanout消息";

channel.exchangeDeclare(fanoutExchangeName,BuiltinExchangeType.FANOUT);

channel.basicPublish(fanoutExchangeName,fanoutRoutKey,null,fanoutMessage.getBytes());
}catch (Exception e){

            e.printStackTrace();

        }finally {

            if (channel!=null){

                channel.close();

            }

            if(connection!=null){

                connection.close();

            }

        }

    }

}
#消费方代码
public class ConsumerTest {

    public static void main(String[] args) throws IOException, TimeoutException, InterruptedException {

        ConnectionFactory connectionFactory = new ConnectionFactory();

        connectionFactory.setHost("127.0.0.1");

        connectionFactory.setPort(5672);

        connectionFactory.setUsername("guest");

        connectionFactory.setPassword("guest");

        connectionFactory.setVirtualHost("/");//rabbitmq默认虚拟机名称为“/”,虚拟机相当于一个独立的mq服

        Connection connection = connectionFactory.newConnection();

        Channel channel = connection.createChannel();
//fanout交换器 qq和email都会收到消息

String fanoutExchangexchangeName = "exchange_fanout_inform";

String fanoutQueueNameEmail = "queue_fanout_email";

String fanoutQueueNameQq = "queue_fanout_qq";

String fanoutRoutKey = "";

//表示声明了一个队列

channel.queueDeclare(fanoutQueueNameEmail,true,false,false,null);

//建立一个绑定关系

channel.queueBind(fanoutQueueNameEmail,fanoutExchangexchangeName,fanoutRoutKey,null);

//email接收消息

channel.basicConsume(fanoutQueueNameEmail,true,new DefaultConsumer(channel){

    @Override

    public void handleDelivery(String consumerTag, Envelope envelope, AMQP.BasicProperties properties, byte[] body) throws IOException {

        System.out.println("email收到消息:"+new String(body,"utf-8"));

    }

});

//qq接收消息

channel.queueDeclare(fanoutQueueNameQq,true,false,false,null);

//建立一个绑定关系

channel.queueBind(fanoutQueueNameQq,fanoutExchangexchangeName,fanoutRoutKey,null);

channel.basicConsume(fanoutQueueNameQq,true,new DefaultConsumer(channel){

    @Override

    public void handleDelivery(String consumerTag, Envelope envelope, AMQP.BasicProperties properties, byte[] body) throws IOException {

        System.out.println("qq收到消息:"+new String(body,"utf-8"));

    }

});
  }

}
2.4 Topic Exchange(主题,规则匹配)
所有发送到Topic Exchange的消息被转发到所有关系RouteKey中指定Topic的Queue上
Exchange将RouteKey和某Topic进行模糊匹配,此时队列需要绑定一个Topic
注意:可以使用通配符进行模糊匹配
符号:“#” 匹配一个或者多个词
符号:“*” 匹配不多不少一个词
列如:
“log.#” 能够匹配到 “log.info.oa”
“log.*” 能够匹配到 “log.err”
#生产方代码
public class ProduceTest {

    public static void main(String[] args) throws IOException, TimeoutException {

        ConnectionFactory connectionFactory = new ConnectionFactory();

        connectionFactory.setHost("127.0.0.1");

        connectionFactory.setPort(5672);

        connectionFactory.setUsername("guest");

        connectionFactory.setPassword("guest");

        connectionFactory.setVirtualHost("/");//rabbitmq默认虚拟机名称为“/”,虚拟机相当于一个独立的mq服

        Connection connection = null;

        Channel channel = null;

        try {

            //创建与RabbitMQ服务的TCP连接

             connection = connectionFactory.newConnection();

            channel = connection.createChannel();
//topic

String topicExchangeName = "exchange_topic_inform";

String topicRoutKey1 = "info.email";

String topicRoutKey2 = "info.qq";

String topicMessage1 = "topic的email消息消息";

String topicMessage2 = "topic的qq消息";

channel.exchangeDeclare(topicExchangeName,BuiltinExchangeType.TOPIC);

channel.basicPublish(topicExchangeName,topicRoutKey1,null,topicMessage1.getBytes());

channel.basicPublish(topicExchangeName,topicRoutKey2,null,topicMessage2.getBytes());
}catch (Exception e){

            e.printStackTrace();

        }finally {

            if (channel!=null){

                channel.close();

            }

            if(connection!=null){

                connection.close();

            }

        }

    }

}
#消费方代码
public class ConsumerTest {

    public static void main(String[] args) throws IOException, TimeoutException, InterruptedException {

        ConnectionFactory connectionFactory = new ConnectionFactory();

        connectionFactory.setHost("127.0.0.1");

        connectionFactory.setPort(5672);

        connectionFactory.setUsername("guest");

        connectionFactory.setPassword("guest");

        connectionFactory.setVirtualHost("/");//rabbitmq默认虚拟机名称为“/”,虚拟机相当于一个独立的mq服

        Connection connection = connectionFactory.newConnection();

        Channel channel = connection.createChannel();
//topic

String topicExchangeName = "exchange_topic_inform";

String topicQueueNameEmail = "queue_fanout_email";

String topicQueueNameQq = "queue_fanout_qq";

String topicQueueNameAll = "queue_fanout_All";

String topicRoutKey1 = "#.email";  //接收email为后缀的路由键消息

String topicRoutKey2 = "#.qq";  //匹配qq为尾的消息

String topicRoutKey3 = "info.#"; //匹配info开头的消息

//声明队列

channel.queueDeclare(topicQueueNameEmail,true,false,false,null);

//建立一个绑定关系

channel.queueBind(topicQueueNameEmail,topicExchangeName,topicRoutKey1,null);

//email接收消息

channel.basicConsume(topicQueueNameEmail,true,new DefaultConsumer(channel){

    @Override

    public void handleDelivery(String consumerTag, Envelope envelope, AMQP.BasicProperties properties, byte[] body) throws IOException {

        System.out.println("email收到消息:"+new String(body,"utf-8"));

    }

});

//qq接收消息

channel.queueDeclare(topicQueueNameQq,true,false,false,null);

//建立一个绑定关系

channel.queueBind(topicQueueNameQq,topicExchangeName,topicRoutKey2,null);

//email接收消息

channel.basicConsume(topicQueueNameQq,true,new DefaultConsumer(channel){

    @Override

    public void handleDelivery(String consumerTag, Envelope envelope, AMQP.BasicProperties properties, byte[] body) throws IOException {

        System.out.println("qq收到消息:"+new String(body,"utf-8"));

    }

});

//接收所有消息

channel.queueDeclare(topicQueueNameAll,true,false,false,null);

//建立一个绑定关系

channel.queueBind(topicQueueNameAll,topicExchangeName,topicRoutKey3,null);

//email接收消息

channel.basicConsume(topicQueueNameAll,true,new DefaultConsumer(channel){

    @Override

    public void handleDelivery(String consumerTag, Envelope envelope, AMQP.BasicProperties properties, byte[] body) throws IOException {

        System.out.println("all收到消息:"+new String(body,"utf-8"));

    }

});
  }

}
2.5Header交换机Header Exchange
header模式与routing不同的地方在于,header模式取消routingkey,使用header中的 key/value(键值对)匹配队列。
#生产方代码
public class ProduceTest {

    public static void main(String[] args) throws IOException, TimeoutException {

        ConnectionFactory connectionFactory = new ConnectionFactory();

        connectionFactory.setHost("127.0.0.1");

        connectionFactory.setPort(5672);

        connectionFactory.setUsername("guest");

        connectionFactory.setPassword("guest");

        connectionFactory.setVirtualHost("/");//rabbitmq默认虚拟机名称为“/”,虚拟机相当于一个独立的mq服

        Connection connection = null;

        Channel channel = null;

        try {

            //创建与RabbitMQ服务的TCP连接

             connection = connectionFactory.newConnection();

            channel = connection.createChannel();
//header

String headerExchangeName = "exchange_header_inform";

//发送email

Map<String,Object> emailMap  = new Hashtable<>();

emailMap.put("info_type","email");

String headMessage1 = "header的email消息";

channel.exchangeDeclare(headerExchangeName,BuiltinExchangeType.HEADERS);

Builder builder = new BasicProperties().builder();

builder.headers(emailMap);

channel.basicPublish(headerExchangeName,"",builder.build(),headMessage1.getBytes());

//发送qq

Map<String,Object> qqMap  = new Hashtable<>();

qqMap.put("info_type","qq");

String headMessage2 = "header的qq消息";

channel.exchangeDeclare(headerExchangeName,BuiltinExchangeType.HEADERS);

Builder builderQQ = new BasicProperties().builder();

builderQQ.headers(qqMap);

channel.basicPublish(headerExchangeName,"",builderQQ.build(),headMessage2.getBytes());
}catch (Exception e){

            e.printStackTrace();

        }finally {

            if (channel!=null){

                channel.close();

            }

            if(connection!=null){

                connection.close();

            }

        }

    }

}
#消费方代码
public class ConsumerTest {

    public static void main(String[] args) throws IOException, TimeoutException, InterruptedException {

        ConnectionFactory connectionFactory = new ConnectionFactory();

        connectionFactory.setHost("127.0.0.1");

        connectionFactory.setPort(5672);

        connectionFactory.setUsername("guest");

        connectionFactory.setPassword("guest");

        connectionFactory.setVirtualHost("/");//rabbitmq默认虚拟机名称为“/”,虚拟机相当于一个独立的mq服

        Connection connection = connectionFactory.newConnection();

        Channel channel = connection.createChannel();
//header
String headerExchangeName = "exchange_header_inform";
//email接收消息
String headerQueueNameEmail = "queue_header_email";
Map<String,Object> emailMap = new Hashtable<>();
emailMap.put("info_type","email");
channel.queueDeclare(headerQueueNameEmail,true,false,false,null);
channel.queueBind(headerQueueNameEmail,headerExchangeName,"",emailMap);
channel.basicConsume(headerQueueNameEmail,true,new DefaultConsumer(channel){
@Override
public void handleDelivery(String consumerTag, Envelope envelope, AMQP.BasicProperties properties, byte[] body) throws IOException {
System.out.println("email收到消息:"+new String(body,"utf-8"));
  }

});
String headerQueueNameQq = "queue_header_qq";
Map<String,Object> qqMap = new Hashtable<>();
qqMap.put("info_type","qq");
channel.queueDeclare(headerQueueNameQq,true,false,false,null);
channel.queueBind(headerQueueNameQq,headerExchangeName,"",qqMap);
channel.basicConsume(headerQueueNameQq,true,new DefaultConsumer(channel){
@Override
public void handleDelivery(String consumerTag, Envelope envelope, AMQP.BasicProperties properties, byte[] body) throws IOException {
System.out.println("qq收到消息:"+new String(body,"utf-8"));
}
});
}
}
三.Spring整合rabbitmq
这里以topic交换机为例,其他类似。
3.1新建spring-rabbitmq项目,导入spring和spring-rabbit包
3.2配置spring-rabbit.xml
3.2.1生产方配置
<?xml version="1.0" encoding="UTF-8"?>

<beans xmlns="http://www.springframework.org/schema/beans"

       xmlns:xsi="http://www.w3.org/2001/XMLSchema-instance"

       xmlns:context="http://www.springframework.org/schema/context"

       xmlns:aop="http://www.springframework.org/schema/aop"

       xmlns:rabbit="http://www.springframework.org/schema/rabbit"

       xsi:schemaLocation="http://www.springframework.org/schema/beans http://www.springframework.org/schema/beans/spring-beans.xsd

       http://www.springframework.org/schema/context http://www.springframework.org/schema/context/spring-context.xsd

       http://www.springframework.org/schema/aop http://www.springframework.org/schema/aop/spring-aop.xsd

        http://www.springframework.org/schema/rabbit

          http://www.springframework.org/schema/rabbit/spring-rabbit.xsd">

    <!-- 1. 配置连接 -->

    <rabbit:connection-factory  id="connectionFactory" host="127.0.0.1"

                                port="5672" username="guest" password="guest" virtual-host="/"/>

    <!-- 2. 配置队列

    durable:是否持久化

exclusive: 仅创建者可以使用的私有队列,断开后自动删除

auto_delete: 当所有消费客户端连接断开后,是否自动删除队列-->

    <rabbit:queue name="myQueue" durable="true" auto-declare="false" exclusive="false"/>

    <!-- 3.配置rabbitAdmin -->

    <rabbit:admin connection-factory="connectionFactory"/>

    <!-- 4. 配置topic类型exchange;队列绑定到交换机durable:是否持久化 auto_delete: 当所有消费客户端连接断开后,是否自动删除队列 -->

    <rabbit:topic-exchange name="myExchange" auto-delete="false" durable="true">

        <rabbit:bindings>

            <rabbit:binding  queue="myQueue" pattern="msg.#"/>

        </rabbit:bindings>

    </rabbit:topic-exchange>

    <!-- 5. 配置消息对象json转换类 -->

    <bean id="jsonMessageConverter" class="org.springframework.amqp.support.converter.Jackson2JsonMessageConverter" />

    <!-- 6. 配置RabbitTemplate -->

    <rabbit:template id="rabbitTemplate"

                     connection-factory="connectionFactory"

                     exchange="myExchange"

                     message-converter="jsonMessageConverter"/>

   </beans>
<!-- 1. 配置连接 -->
<rabbit:connection-factory
id="connectionFactory"
host="127.0.0.1"
port="5672"
username="pomelo"
password="pomelo"
virtual-host="/pomelo"
/>
<!-- 2. 配置队列 -->
<rabbit:queue name="myQueue"/>
<!-- 3.配置rabbitAdmin -->
<rabbit:admin connection-factory="connectionFactory"/>
<!-- 4. 配置topic类型exchange;队列绑定到交换机 -->
<rabbit:topic-exchange name="myExchange">
<rabbit:bindings>
<rabbit:binding queue="myQueue" pattern="msg.#"></rabbit:binding>
</rabbit:bindings>
</rabbit:topic-exchange>
<!-- 5. 配置消息对象json转换类 -->
<bean id="jsonMessageConverter" class="org.springframework.amqp.support.converter.Jackson2JsonMessageConverter" />
<!-- 6. 配置RabbitTemplate -->
<rabbit:template
id="rabbitTemplate"
connection-factory="connectionFactory"
exchange="myExchange"
message-converter="jsonMessageConverter"
/>
3.2.2 发送消息
@RunWith(value = SpringJUnit4ClassRunner.class)

@ContextConfiguration(locations = {"classpath:spring-rabbit.xml"})

public class Test {

    @Autowired

    private RabbitTemplate rabbitTemplate;

    @org.junit.Test

    public void test(){

        Map<String,String> map = new HashMap<>();

        map.put("name","zhouyang");

        rabbitTemplate.convertAndSend("msg.qq",map);

    }

}
3.3.4 消费方新建一个监听器
@Component

public class ConsumerListenner implements MessageListener {

    @Override

    public void onMessage(Message message) {

        System.out.println(message.toString());

    }

}
3.3.5配置消费方的监听器xml
<!---消费端配置监听,队列信息-->

<rabbit:listener-container connection-factory="connectionFactory" acknowledge="auto">

    <rabbit:listener ref="consumerListenner" queues="myQueue"/>

</rabbit:listener-container>


    <context:component-scan base-package="com.zy"/>
3.4测试
四.Springboot整合rabbitmq
4.1新建rabbitmq-producer
#导包
<dependency> <groupId>org.springframework.boot</groupId>

    <artifactId>spring-boot-starter-amqp</artifactId>

</dependency>
#配置application.yml
server:

  port: 8481

spring:

  application:

    name: rabbit-producer

  rabbitmq:

    host: localhost

    port: 5672

    virtual-host: /

    username: guest

    password: guest
#新建RabbitmqProducerConfig,配置生产方信息
@Configuration

public class RabbitmqProducerConfig
{

    //交换机配置

    @Bean

    public Exchange testExchange(){

        return ExchangeBuilder.topicExchange("topic_exchange").durable(true).build();

    }

    //声明一个队列

    @Bean

    public Queue testQueue(){

        return new Queue("qqQueue",true,false,false);

    }

    //绑定队列和交换机

    @Bean

    public Binding tesBinding(){

        return BindingBuilder.bind(testQueue()).to(testExchange()).with("info.#").noargs();

    }

}
#测试
@SpringBootTest

class RabbitmqProducerApplicationTests {

@Autowired

private RabbitTemplate rabbitTemplate;

    @Test

    void contextLoads() {

    }

    @Test

    void testProducer(){

        Map<String,String> map = new HashMap<>();

        map.put("name","zhouyang");

    rabbitTemplate.convertAndSend("topic_exchange","info.qq",map);

}

}
4.2新建rabbitmq-consumer
#导包
<dependency> <groupId>org.springframework.boot</groupId>

    <artifactId>spring-boot-starter-amqp</artifactId>

</dependency>
#配置application.yml
server:

  port: 8482

spring:

  application:

    name: rabbit-consumer

  rabbitmq:

    host: localhost

    port: 5672

    virtual-host: /

    username: guest

    password: guest
#新建RabbitmqConsumerConfig配置类(消费者单纯的使用,其实可以不用添加这个配置,直接建后面的监听就好,使用注解来让监听器监听对应的队列即可。配置上了的话,其实消费者也是生成者的身份,也能推送该消息。)
@Configuration

public class RabbitmqConsumerConfig {

    //交换机配置

    @Bean

    public Exchange testExchange(){

        return ExchangeBuilder.topicExchange("topic_exchange").durable(true).build();

    }

    //声明一个队列

    @Bean

    public Queue testQueue(){

        return new Queue("qqQueue",true,false,false);

    }

    //绑定队列和交换机

    @Bean

    public Binding tesBinding(){

        return BindingBuilder.bind(testQueue()).to(testExchange()).with("info.#").noargs();

    }

}
#新建监听器
@Component

@RabbitListener(queues = "qqQueue")

public class MyRabbitListenner {

    @RabbitHandler

    public void getMessage(Map map){

        System.out.println("qq接收到的消息"+map);

    }

}
测试,启动了producer项目,然后启动consumer项目,得到结果

其他类型的交换机配置差不多,这里就不举例了
标签:线程 作用 操作 cto jackson alt utf-8 mamicode 键值
原文地址:https://www.cnblogs.com/zhouyanger/p/13334066.html