标签:form log status ide out for max 虚拟机 isp
1.编译安装tengine,配置虚拟机,实现api.x.com代理9001端口1.1 下载tengine
[root@localhost ~]# wget http://tengine.taobao.org/download/tengine-2.1.2.tar.gz
--2020-07-22 21:50:00--  http://tengine.taobao.org/download/tengine-2.1.2.tar.gz
Resolving tengine.taobao.org (tengine.taobao.org)... 106.11.186.45, 203.119.245.120, 106.11.208.21, ...
Connecting to tengine.taobao.org (tengine.taobao.org)|106.11.186.45|:80... connected.
HTTP request sent, awaiting response... 200 OK
Length: 2137295 (2.0M) [application/octet-stream]
Saving to: ‘tengine-2.1.2.tar.gz’

100%[=====================================================================================================>] 2,137,295    383KB/s   in 5.5s

2020-07-22 21:50:06 (378 KB/s) - ‘tengine-2.1.2.tar.gz’ saved [2137295/2137295]
1.2 编译安装tengine
[root@localhost ~]# cd /usr/local/src
[root@localhost src]# cp /root/tengine-2.1.2.tar.gz .
[root@localhost src]# ls
tengine-2.1.2.tar.gz
[root@localhost src]# tar -xf tengine-2.1.2.tar.gz
[root@localhost src]# ls
tengine-2.1.2  tengine-2.1.2.tar.gz
[root@localhost src]# ln -sv tengine-2.1.2 tengine
‘tengine’ -> ‘tengine-2.1.2’
[root@localhost src]# cd tengine
[root@localhost tengine]# ./configure
[root@localhost tengine]# make -j 4 && make install
root@localhost sbin]# /usr/local/nginx/sbin/nginx
[root@localhost sbin]# ss -tnl
State       Recv-Q Send-Q                          Local Address:Port                                         Peer Address:Port
LISTEN      0      128                                         *:80                                                      *:*
LISTEN      0      128                                         *:22                                                      *:*
LISTEN      0      100                                 127.0.0.1:25                                                      *:*
LISTEN      0      128                                        :::22                                                     :::*
LISTEN      0      100                                       ::1:25                                                     :::*
1.3 配置环境变量,方便启动nginx
[root@localhost sbin]# export PATH="/usr/local/nginx/sbin:$PATH"1.4 修改nginx配置文件
[root@localhost nginx]# vim /usr/local/nginx/conf/nginx.conf  ###在配置文件增加如下一行
include       /usr/local/nginx/conf.d/*.conf;
[root@localhost conf.d]# pwd
/usr/local/nginx/conf.d
[root@localhost conf.d]# cat proxy.conf
server {
    server_name api.x.com;
    location / {
    proxy_pass http://localhost:9001;
    }
}

server {
    listen 9001;
    server_name _;
    root /data/nginx;
    index index.html;
}
1.5 准备测试网页
[root@localhost ~]# mkdir -p /data/nginx/
[root@localhost ~]# echo proxypass > /data/nginx/index.html
1.6 测试
1.6.1 修改/etc/hosts文件
[root@c2 ~]# cat /etc/hosts
127.0.0.1   localhost localhost.localdomain localhost4 localhost4.localdomain4
::1         localhost localhost.localdomain localhost6 localhost6.localdomain6
10.1.1.245  api.x.com
1.6.2 在c2服务器上测试
[root@c2 conf.d]# curl api.x.com
proxypass
[root@c2 conf.d]# curl api.x.com
proxypass
[root@c2 conf.d]# curl api.x.com
proxypass
[root@c2 conf.d]# curl api.x.com
proxypass
[root@c2 conf.d]# curl api.x.com
proxypass
2.配置haproxy,实现7层代理,/a路径代理转发到a集群,/b路径代理转发到b集群
2.1 安装haproxy
[root@localhost ~]# yum install haproxy -y2.2 修改配置文件
[root@localhost ~]# grep -v "#" /etc/haproxy/haproxy.cfg

global
    log         127.0.0.1 local2

    chroot      /var/lib/haproxy
    pidfile     /var/run/haproxy.pid
    maxconn     4000
    user        haproxy
    group       haproxy
    daemon

    stats socket /var/lib/haproxy/stats

defaults
    mode                    http
    log                     global
    option                  httplog
    option                  dontlognull
    option http-server-close
    option forwardfor       except 127.0.0.0/8
    option                  redispatch
    retries                 3
    timeout http-request    10s
    timeout queue           1m
    timeout connect         10s
    timeout client          1m
    timeout server          1m
    timeout http-keep-alive 10s
    timeout check           10s
    maxconn                 3000

listen statistics
bind *:9090
stats enable
stats auth admin:admin
stats uri /admin?stats
stats hide-version
stats refresh 30s
stats admin if TRUE
stats realm Hapadmin

listen web_host
    bind 10.0.1.245:80
    mode http
    balance roundrobin
    log global
    option httplog
    acl static_path1 path_beg -i /a
    use_backend static_path_host1 if static_path1
    acl static_path2 path_beg -i /b
    use_backend static_path_host2 if static_path2

backend static_path_host1
    mode http
    server web1 10.0.1.242:80 check inter 2000 fall 3 rise 5
backend static_path_host2
    mode http
    server web2 10.0.1.243:80 check inter 2000 fall 3 rise 5
2.3 启动haproxy
[root@localhost ~]# systemctl start haproxy.service2.4 安装a集群和b集群的nginx
[root@c1 ~]# yum install nginx -y
[root@c1 ~]# grep -v "#" /etc/nginx/nginx.conf
user nginx;
worker_processes auto;
error_log /var/log/nginx/error.log;
pid /run/nginx.pid;
include /usr/share/nginx/modules/*.conf;
events {
worker_connections 1024;
}
http {
log_format main ‘$remote_addr - $remote_user [$time_local] "$request" ‘
‘$status $body_bytes_sent "$http_referer" ‘
‘"$http_user_agent" "$http_x_forwarded_for"‘;
access_log /var/log/nginx/access.log main;
sendfile on;
tcp_nopush on;
tcp_nodelay on;
keepalive_timeout 65;
types_hash_max_size 2048;
include /etc/nginx/mime.types;
default_type application/octet-stream;
include /etc/nginx/conf.d/*.conf;
server {
listen 80;
server_name _;
root /usr/share/nginx/html;
include /etc/nginx/default.d/*.conf;
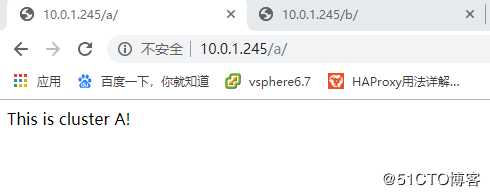
location /a {
index index.html;
root /data/nginx;
}
error_page 404 /404.html;
location = /40x.html {
}
error_page 500 502 503 504 /50x.html;
location = /50x.html {
}
}
}
[root@c1 ~]# mkdir -p /data/nginx/a
[root@c1 ~]# echo ‘This is cluster A!‘ > /data/nginx/a/index.html
[root@c1 ~]#nginx
[root@c2 ~]# yum install nginx -y
[root@c2 ~]# grep -v "#" /etc/nginx/nginx.conf
user nginx;
worker_processes auto;
error_log /var/log/nginx/error.log;
pid /run/nginx.pid;
include /usr/share/nginx/modules/*.conf;
events {
worker_connections 1024;
}
http {
log_format main ‘$remote_addr - $remote_user [$time_local] "$request" ‘
‘$status $body_bytes_sent "$http_referer" ‘
‘"$http_user_agent" "$http_x_forwarded_for"‘;
access_log /var/log/nginx/access.log main;
sendfile on;
tcp_nopush on;
tcp_nodelay on;
keepalive_timeout 65;
types_hash_max_size 2048;
include /etc/nginx/mime.types;
default_type application/octet-stream;
include /etc/nginx/conf.d/*.conf;
server {
listen 80;
server_name _;
root /usr/share/nginx/html;
include /etc/nginx/default.d/*.conf;
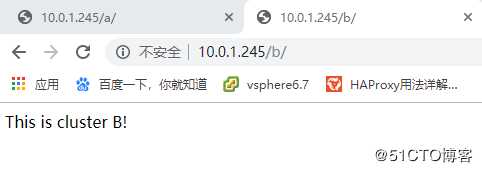
location /b {
index index.html;
root /data/nginx;
}
error_page 404 /404.html;
location = /40x.html {
}
error_page 500 502 503 504 /50x.html;
location = /50x.html {
}
}
}
[root@c2 ~]# mkdir -p /data/nginx/b
[root@c2 ~]# echo ‘This is cluster B!‘ > /data/nginx/b/index.html
[root@c2 ~]#nginx2.5 测试
标签:form log status ide out for max 虚拟机 isp
原文地址:https://blog.51cto.com/rickzhu/2513415