标签:man debug 查看 amp sites attribute 增加 moni lca
一、pre-installer ldap系统:CentOS 7
Openldap:2.4.44
Freeradius:3.0.13
Ldapadmin:1.8.3(win64)
Phpldapadmin:1.2.3关闭防火墙:
systemctl stop firewalld.service && systemctl disable firewalld.service 关闭NetworkManager:
systemctl stop NetworkManager && systemctl disable NetworkManager 关闭selinux:
sed -i ‘s/SELINUX=permissive/SELINUX=disabled/g‘ /etc/selinux/config
rebootyum -y install openldap compat-openldap openldap-clients openldap-servers openldap-servers-sql openldap-develsystemctl start slapd
systemctl enable slapdLDAP的管理员根密码,使用slappasswd命令生成,用于整个安装过程
[root@ldap ~]# slappasswd
New password:
Re-enter new password:
{SSHA}xAKjntY/5z3bK+ad3gZpxNHjPpR9uPzi/etc/openldap/slapd.d/cn\=config/olcDatabase\=\{2\}hdb.ldif 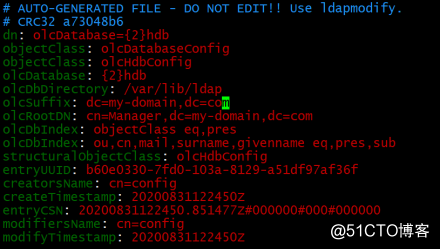
可以在任意目录下创建db.ldif配置文件,此处在/opt/alex/目录下创建此配置文件
mkdir -pv /opt/alex
vim /opt/alex/db.ldif
dn: olcDatabase={2}hdb,cn=config
changetype: modify
replace: olcSuffix
olcSuffix: dc=alex,dc=localhost

dn: olcDatabase={2}hdb,cn=config
changetype: modify
replace: olcRootDN
olcRootDN: cn=Manager,dc=alex,dc=localhost

dn: olcDatabase={2}hdb,cn=config
changetype: modify
add: olcRootPW
olcRootPW: {SSHA}xAKjntY/5z3bK+ad3gZpxNHjPpR9uPzi
Ps:配置文件需修改字段
olcSuffix:保存域信息
olcRootDN:根的唯一标识名,根管理员在此节点下管理
olcRootPW:管理员根密码,填写2.3生成的根密码在此处
ldapmodify命令可在运行环境中直接修改配置文件并且不需要重启就生效的命令,具体请看ldapmodify官方使用文档。
ldapmodify -Y EXTERNAL -H ldapi:/// -f /opt/alex/db.ldif 执行成功后会打印出三次修改的条目,如下图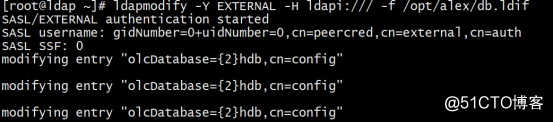
vim /opt/alex/monitor.ldif
dn: olcDatabase={1}monitor,cn=config
changetype: modify
replace: olcAccess
olcAccess: {0}to * by dn.base="gidNumber=0+uidNumber=0,cn=peercred,cn=external, cn=auth" read by dn.base="cn=Manager ,dc=alex,dc=localhost"
ldapmodify -Y EXTERNAL -H ldapi:/// -f /opt/alex/monitor.ldif
这里创建的是一个基础库,用于保存数据。安装ldap后会有一个example配置,需要我们复制一份配置文件并赋予它所有权限。
cp /usr/share/openldap-servers/DB_CONFIG.example /var/lib/ldap/DB_CONFIG
chown ldap:ldap /var/lib/ldap/*schemas就是数据库表的定义文件,相当于关系数据库中的表定义。当然稍有区别。具体可以参考文档说明:https://ldap.com/understanding-ldap-schema/
ldapadd -Y EXTERNAL -H ldapi:/// -f /etc/openldap/schema/cosine.ldif
ldapadd -Y EXTERNAL -H ldapi:/// -f /etc/openldap/schema/nis.ldif
ldapadd -Y EXTERNAL -H ldapi:/// -f /etc/openldap/schema/inetorgperson.ldif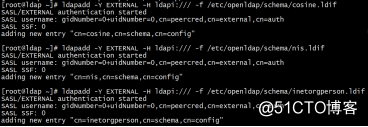
vim /opt/alex/base.ldif
dn: dc=alex,dc=localhost
dc: alex
objectClass: top
objectClass: domain
dn: cn=Manager ,dc=alex,dc=localhost
objectClass: organizationalRole
cn: Manager
description: LDAP Manager
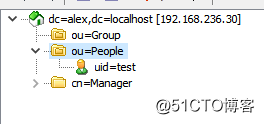
dn: ou=People,dc=alex,dc=localhost
objectClass: organizationalUnit
ou: People
dn: ou=Group,dc=alex,dc=localhost
objectClass: organizationalUnit
ou: Groupldapadd -x -W -D "cn=Manager,dc=alex,dc=localhost" -f /opt/alex/base.ldif 需输入2.3输入的密码
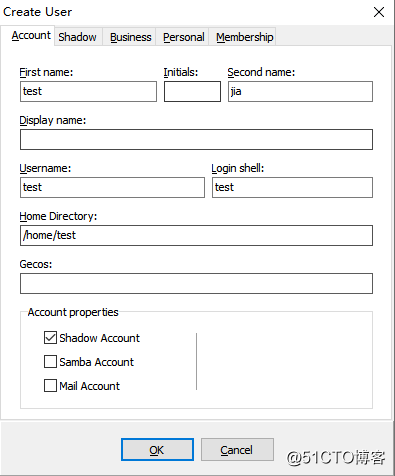
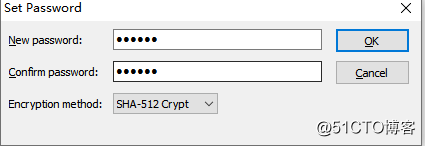
slaptest -u官网:http://www.ldapadmin.org/download/index.html

[root@ldap ~]# yum install -y httpd
[root@ldap ~]# mv /etc/httpd/conf.d/welcome.conf /etc/httpd/conf.d/welcome.conf_bak
[root@ldap ~]# cp /etc/httpd/conf/httpd.conf{,.bak}
[root@ldap ~]# vim /etc/httpd/conf/httpd.conf
95行下面加一行 ServerName www.alex.cn
152行 AllowOverride All
165行 DirectoryIndex index.html index.php index.cgi
最后加入
ServerTokens Prod
KeepAlive On
[root@ldap ~]# systemctl start httpd
[root@ldap ~]# systemctl enable httpd.servicewget -O /etc/yum.repos.d/epel7.repo https://mirrors.aliyun.com/repo/epel-7.repo
yum clean all&& yum makecacheyum install php php-mbstring php-pear -y
systemctl restart httpd
yum --enablerepo=epel -y install phpldapadminvim /etc/phpldapadmin/config.php
397行取消注释,398行注释

vim /etc/httpd/conf.d/phpldapadmin.conf
12行添加网段信息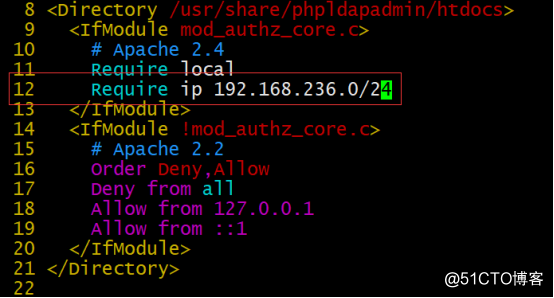
systemctl restart httpd浏览器访问http://192.168.236.30/ldapadmin/ #替换为ldap机器的ip
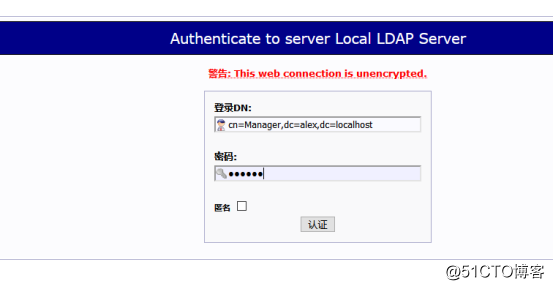
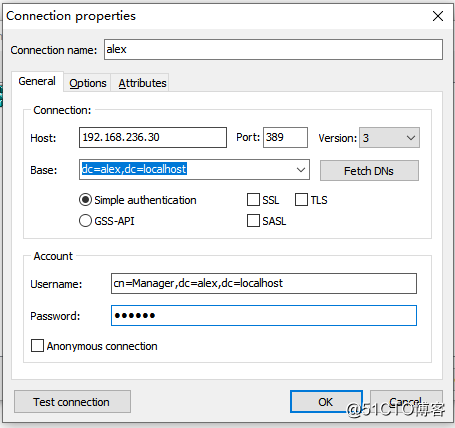
Ps:登录DN为2.4.2中的olcRootDN值,密码为2.3中创建的根密码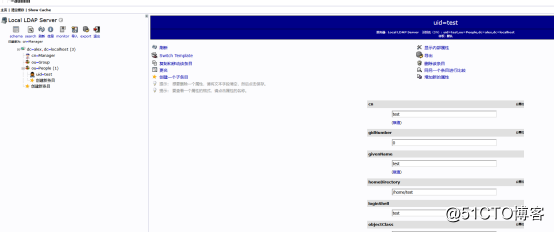
yum -y install freeradius freeradius-utils freeradius-ldapsystemctl start radiusd
systemctl enable radiusd编辑/etc/raddb/users文件,取消测试用户相关信息的注释
sed -i ‘73,81s/^#//g‘ /etc/raddb/users
#################################################
steve   Cleartext-Password := "testing"
        Service-Type = Framed-User,
        Framed-Protocol = PPP,
        Framed-IP-Address = 172.16.3.33,
        Framed-IP-Netmask = 255.255.255.0,
        Framed-Routing = Broadcast-Listen,
        Framed-Filter-Id = "std.ppp",
        Framed-MTU = 1500,
        Framed-Compression = Van-Jacobsen-TCP-IP
#################################################先关闭服务
systemctl stop radiusd启动测试模式
radiusd -X新打开一个终端,使用root身份登录,执行测试命令
radtest steve testing localhost 0 testing123Ps:radtest [账号] [密码] [认证位址] [NAS端口] [秘钥]
“testing123”是FreeRADIUS和NAS的共享密钥,client.conf中有定义
如果输出"Access-Accept packet" 表示成功了,"Access-Reject" 表示失败了。
Note:测试后/etc/raddb/users中的测试相关配置注释,然后启动systemctl start radiusd
ldap {
    server = ‘192.168.236.30‘
    port = 389
    identity = ‘cn=Manager,dc=alex,dc=localhost‘
    password = 111111
    base_dn = ‘dc=alex,dc=localhost‘
    sasl {
    }
    update {
        control:Password-With-Header    += ‘userPassword‘
        control:            += ‘radiusControlAttribute‘
        request:            += ‘radiusRequestAttribute‘
        reply:              += ‘radiusReplyAttribute‘
    }
    user {
        base_dn = "${..base_dn}"
        filter = "(uid=%{%{Stripped-User-Name}:-%{User-Name}})"
        sasl {
        }
    }
    group {
        base_dn = "${..base_dn}"
        filter = ‘(objectClass=posixGroup)‘
        membership_attribute = ‘memberOf‘
    }
    profile {
    }
    client {
        base_dn = "${..base_dn}"
        filter = ‘(objectClass=radiusClient)‘
        template {
        }
        attribute {
            ipaddr              = ‘radiusClientIdentifier‘
            secret              = ‘radiusClientSecret‘
        }
    }
    accounting {
        reference = "%{tolower:type.%{Acct-Status-Type}}"
        type {
            start {
                update {
                    description := "Online at %S"
                }
            }
            interim-update {
                update {
                    description := "Last seen at %S"
                }
            }
            stop {
                update {
                    description := "Offline at %S"
                }
            }
        }
    }
    post-auth {
        update {
            description := "Authenticated at %S"
        }
    }
    options {
        chase_referrals = yes
        rebind = yes
        res_timeout = 10
        srv_timelimit = 3
        net_timeout = 1
        idle = 60
        probes = 3
        interval = 3
        ldap_debug = 0x0028
    }
    tls {
    }
    pool {
        start = ${thread[pool].start_servers}
        min = ${thread[pool].min_spare_servers}
        max = ${thread[pool].max_servers}
        spare = ${thread[pool].max_spare_servers}
        uses = 0
        retry_delay = 30
        lifetime = 0
        idle_timeout = 60
    }
}server site_ldap {
listen {
ipaddr = 0.0.0.0
port = 1833
type = auth
}
authorize {
update {
control:Auth-Type := ldap
}
}
authenticate {
Auth-Type ldap {
ldap
}
}
post-auth {
Post-Auth-Type Reject {
}
}
}ln -s /etc/raddb/sites-available/site_ldap? /etc/raddb/sites-enabled/
ln -s /etc/raddb/mods-available/ldap /etc/raddb/mods-enabled/systemctl restart radiusd测试3.2.2中创建的ldap test用户连接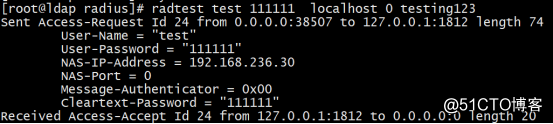
Refer:
https://www.cnblogs.com/xiaoshou/p/12337620.html LDAP部署
https://blog.csdn.net/oLinBSoft/article/details/85775603 freeradius安装与LDAP的连接
CentOS 7 部署OpenLDAP+FreeRadius
标签:man debug 查看 amp sites attribute 增加 moni lca
原文地址:https://blog.51cto.com/jiayimeng/2526625