标签:tag 增加 后台 The adt pass test 重试 nohup
注意:这种方式报警采用的是邮件方式,并不包含微信报警方式,因为采用的是国外的docker镜像,主要作用是在kibana中安装配置插件,图形化配置rule告警规则,其实就跟直接编辑告警规则类似
逻辑梳理:
1.启动的容器就是ElastAlert Server,开放3030端口给kibana插件连接使用,这个服务中内含ElastAlert服务
2.安装kibana插件,连接上ElastAlert Server
ElastAlert Server网址:
https://github.com/bitsensor/elastalert/
kibana插件网址:
https://github.com/bitsensor/elastalert-kibana-plugin/
ElastAlert服务网址:
https://github.com/Yelp/elastalert
1.创建几个文件夹保存ElastAlert相关配置信息,用来挂载到容器中使用
mkdir -p /mnt/elastalert/{config,rules,rule_templates}
之后我们定义路径: ${ELASTALERT}=/mnt/elastalert=/mnt/elastalert
| 文件(夹) | 用途 |
|---|---|
| config | 存放所有相关配置文件 |
| rules | 存放路由规则 |
| rule_templates | (可选)存放规则模板 |
| config.yaml | ElastAlert核心配置,配置规则的执行时机、重试、缓存等规则。 |
| config.json | 配置Docker ElastAlert的启动参数 |
| rule.yaml | 单条规则的详细配置 |
| smtp_auth.yaml | 邮箱smtp认证配置 |
2.编写核心配置,创建 ${ELASTALERT}/config/config.yaml用来存储核心配置:
# 路由规则存放的文件路径
rules_folder: rules

# 每间隔run_every时间运行一次
run_every:
#  seconds: 30
  minutes: 1

# ElastAlert使用ES进行过滤查询的结果将被缓存的时间
buffer_time:
  minutes: 15

# 服务连接地址
es_host: 192.168.75.21

# Elasticsearch 端口
es_port: 9200

# Elasticsearch 认证配置
es_username: elastic
es_password: elastic

# ElastAlert默认在ES上创建的索引,由于存放ElastAlert运行日志
writeback_index: elastalert_status
writeback_alias: elastalert_alerts

# 2天内报警失败,进行重试
alert_time_limit:
  days: 2
3.ElastAlert的启动参数配置,创建 ${ELASTALERT}/config/config.json启动参数配置文件:
{
  "appName": "elastalert-server",
  "port": 3030,
  "wsport": 3333,
  "elastalertPath": "/opt/elastalert",
  "verbose": true,
  "es_debug": false,
  "debug": false,
  "rulesPath": {
    "relative": true,
    "path": "/rules"
  },
  "templatesPath": {
    "relative": true,
    "path": "/rule_templates"
  },
  "es_host": "192.168.75.21",
  "es_port": 9200,
  "writeback_index": "elastalert_status"
}
| 参数 | 用途 |
|---|---|
| elastalertPath | 根ElastAlert文件夹的路径。它是包含“ setup.py”脚本的文件夹。(容器中的路径,并不是宿主机的路径) |
| verbose | 将增加日志记录的详细程度,使您可以查看有关查询状态的信息。 |
| es_debug | ES debug日志。 |
| debug | 不能与verbose同时开启,verbose符合规则时进行报警,而debug只打印报警日志。 |
| rulesPath | 规则配置文件存放路径。 |
| relative | 是否使用相对于“elastalertPath”文件夹的路径。 |
| writeback_index | 启动时创建的用于标识ElastAlert状态的索引名。 |
4.编写一条报警规则
编写一条,模糊匹配的规则,规则满足的条件如下:
filebeat-*开头的ES索引;创建 ${ELASTALERT}/config/xxx_server_rule.yaml用来存储规则配置:
es_host: 192.168.75.21
es_port: 9200
#use_ssl: True
es_username: elastic
es_password: elastic
name: xxx_server_rule
# 规则类型,默认支持的规则:https://github.com/Yelp/elastalert#overview
# frequency:匹配Y时间中至少有X个事件的地方。
type: frequency

# 不进行重复提醒的(ES索引)字段,和realert联合使用,30分钟内这个query_key只告警一次
query_key:
  - message

# 聚合2分钟内的结果。设置一个时长,则该时长内,所有的报警(同一个配置文件内的报警)最终合并在一起发送。默认值为警报间隔一分钟。
aggregation:
  minutes: 5

# 同一规则的两次警报之间的最短时间。在此时间内发生的任何符合相同规则的警报都将被丢弃。默认值为一分钟(去重)。
# 如果你希望听到不断的“叮咚”声,可以将它配置为 0。
realert:
 minutes: 5

# ES索引名称,支持模糊匹配
index: "filebeat-*"
# 与规则匹配的日志出现次数
num_events: 1
#threshold: 1

# 与num_events配合,表示在timeframe时间内出现num_events次与规则匹配的日志,将会触发报警。
timeframe:
    minutes: 5

# 以下编写了一条Lucene格式的过滤规则
filter:
- query:
    query_string:
        query: "message: ERROR"
- query:
    query_string:
        query: "NOT message: INFO"
- query:
    query_string:
        query: "NOT message: Read timed out"

# 告警方式
#alert: post
# 告警连接接口,更多信息参考:https://elastalert.readthedocs.io/en/latest/ruletypes.html?highlight=http_post_url#alerta
#http_post_url: "http://localhost:8088/alertapi"

alert:
- "email"

# Email格式
email_format: html

# 如果这个去掉,那么发送alert_text的同时,也会发送默认模板内容
alert_text_type: alert_text_only

#主题模板
alert_text: "<div style=‘display:block;background-color: red;padding: 10px;border-radius: 5px;color: white;font-weight: bold;‘><p>紧急!XXX日志报警通知。</p></div><br><a href=‘http://192.168.0.123:5601/app/kibana‘target=‘_blank‘style=‘padding: 8px 16px;background-color: #46bc99;text-decoration:none;color: white;border-radius: 5px;‘>立马前往Kibana查看</a><br><h3>告警详情</h3><table><tr><td style=‘padding:5px;text-align: right;font-weight: bold;border-radius: 5px;background-color: #eef;‘>@timestamp:</td><td style=‘padding:5px;border-radius: 5px;background-color: #eef;‘>{}</td></tr><tr><td style=‘padding:5px;text-align: right;font-weight: bold;border-radius: 5px;background-color: #eef;‘>@version:</td><td style=‘padding:5px;border-radius: 5px;background-color: #eef;‘>{}</td></tr><tr><td style=‘padding:5px;text-align: right;font-weight: bold;border-radius: 5px;background-color: #eef;‘>_id:</td><td style=‘padding:5px;border-radius: 5px;background-color: #eef;‘>{}</td></tr><tr><td style=‘padding:5px;text-align: right;font-weight: bold;border-radius: 5px;background-color: #eef;‘>_index:</td><td style=‘padding:5px;border-radius: 5px;background-color: #eef;‘>{}</td></tr><tr><td style=‘padding:5px;text-align: right;font-weight: bold;border-radius: 5px;background-color: #eef;‘>_type:</td><td style=‘padding:5px;border-radius: 5px;background-color: #eef;‘>{}</td></tr><tr><td style=‘padding:5px;text-align: right;font-weight: bold;border-radius: 5px;background-color: #eef;‘>host:</td><td style=‘padding:5px;border-radius: 5px;background-color: #eef;‘>{}</td></tr><tr><td style=‘padding:5px;text-align: right;font-weight: bold;border-radius: 5px;background-color: #eef;‘>message:</td><td style=‘padding:10px 5px;border-radius: 5px;background-color: #F8F9FA;‘>{}</td></tr><tr><td style=‘padding:5px;text-align: right;font-weight: bold;border-radius: 5px;background-color: #eef;‘>规则命中条数:</td><td style=‘padding:5px;border-radius: 5px;background-color: #eef;‘>{}</td></tr><tr><td style=‘padding:5px;text-align: right;font-weight: bold;border-radius: 5px;background-color: #eef;‘>匹配触发告警数:</td><td style=‘padding:5px;border-radius: 5px;background-color: #eef;‘>{}</td></tr><tr><td style=‘padding:5px;text-align: right;font-weight: bold;border-radius: 5px;background-color: #eef;‘>日志位置:</td><td style=‘padding:5px;border-radius: 5px;background-color: #eef;‘>{}</td></tr></table>"

# 邮箱模板参数
alert_text_args:
- "@timestamp"
- "@version"
- _id
- _index
- _type
- host
- message
- num_hits
- num_matches
- path
# 标题
alert_subject: "紧急!XXX日志报警通知。"

# 可配置多个接收方(Team)
email:
- "zhangsan@163.com"
- "lisi@qq.com"

# 为了安全起见,最好自建邮箱服务器
smtp_host: "smtp.126.com"
smtp_port: 465
# 邮箱认证配置文件
smtp_auth_file: /opt/elastalert/rules/smtp_auth.yaml
# 设置邮箱Reply-To标头。默认值为收件人地址。
email_reply_to: "syslog@126.com"
# 作为发送方的系统邮箱地址
from_addr: "syslog@126.com"
# https 证书
smtp_ssl: true
5.邮箱认证配置
创建 ${ELASTALERT}/rules/smtp_auth.yaml用来存储规则配置:
user: "syslog@126.com"
password: "xxxxxxxxxxxxxxxxxx" # 授权码
6.拉取镜像
docker pull bitsensor/elastalert:3.0.0-beta.1
7.容器编排运行
docker run -d -p 3030:3030 -p 3333:3333 -v /mnt/elastalert/config/config.yaml:/opt/elastalert/config.yaml -v /mnt/elastalert/config/config.json:/opt/elastalert-server/config/config.json -v /mnt/elastalert/rules:/opt/elastalert/rules -v /mnt/elastalert/rule_templates:/opt/elastalert/rule_templates -v /etc/localtime:/etc/localtime:ro -e TZ=Asia/Shanghai --name elastalert bitsensor/elastalert:3.0.0-beta.1
8.告警规则测试
容器运行,文件路径为镜像内路径,挂载后为/opt/elastalert/opt/elastalert。
docker exec -i elastalert python -m elastalert.elastalert --verbose --config /opt/elastalert/config.yaml --rule /opt/elastalert/rules/xxx_server_rule.yaml
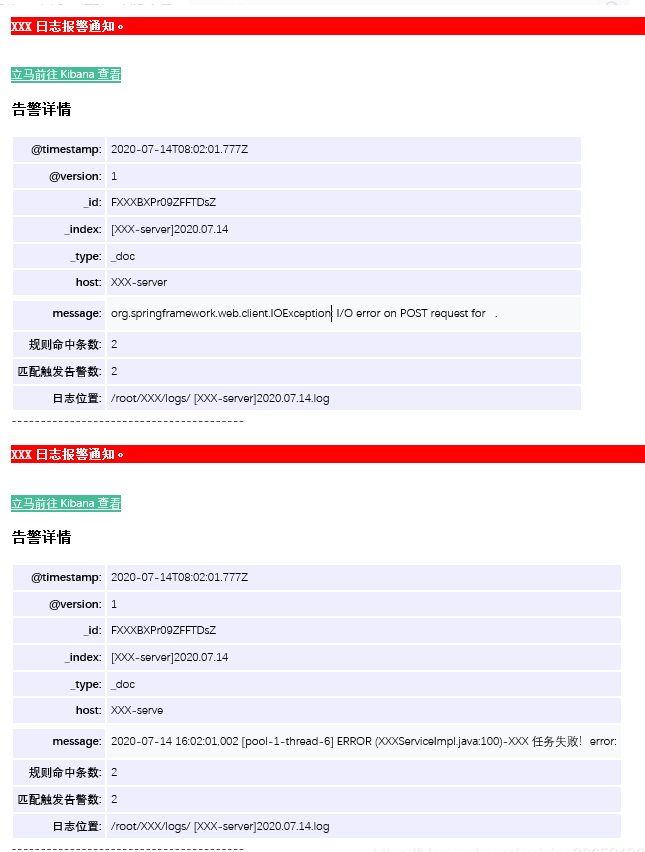
若无异常,你收到的报警邮箱大概是这样一份聚合后的结果:
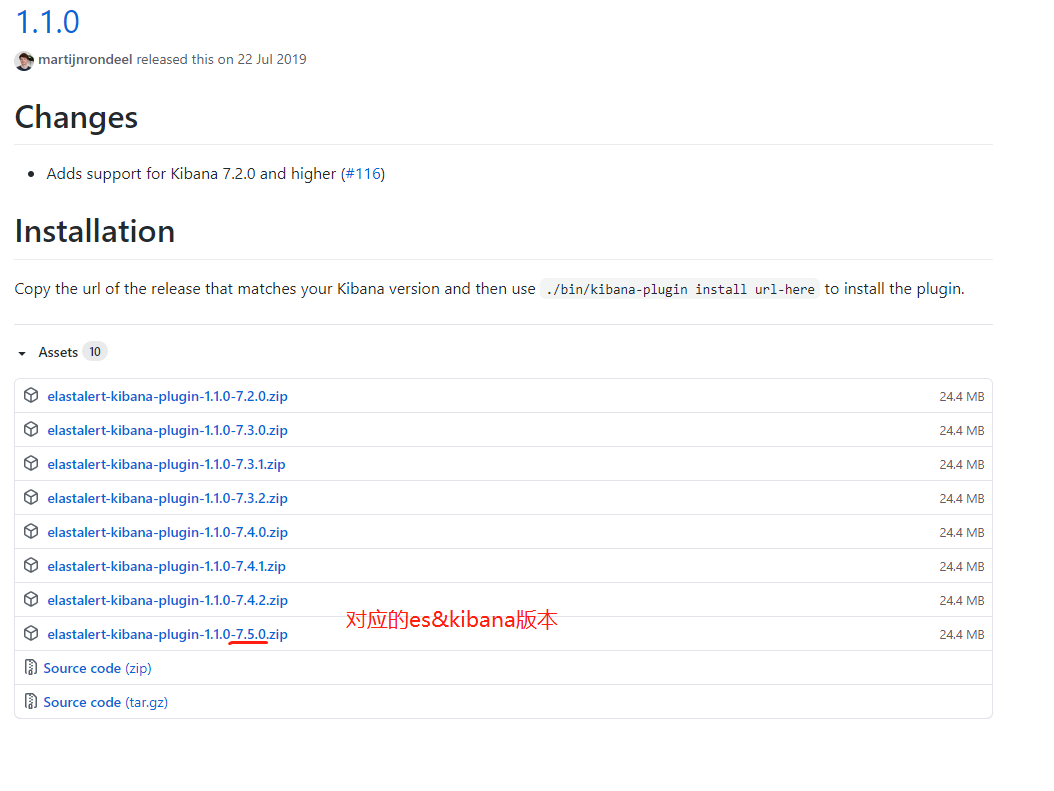
Kibana 7.5对应的ElastAlert plugin版本为v1.1.0
对应网址: https://github.com/bitsensor/elastalert-kibana-plugin/
https://github.com/bitsensor/elastalert-kibana-plugin/releases/tag/1.1.0
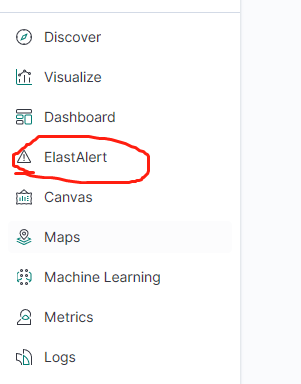
kibana安装插件
su - kibana
cd /opt/kibana-7.5.0-linux-x86_64
./bin/kibana-plugin install https://github.com/bitsensor/elastalert-kibana-plugin/releases/download/1.1.0/elastalert-kibana-plugin-1.1.0-7.5.0.zip
修改kibana配置
vim config/kibana.yml
elastalert-kibana-plugin.serverHost: 192.168.75.21
elastalert-kibana-plugin.serverPort: 3030
保存重启kibana
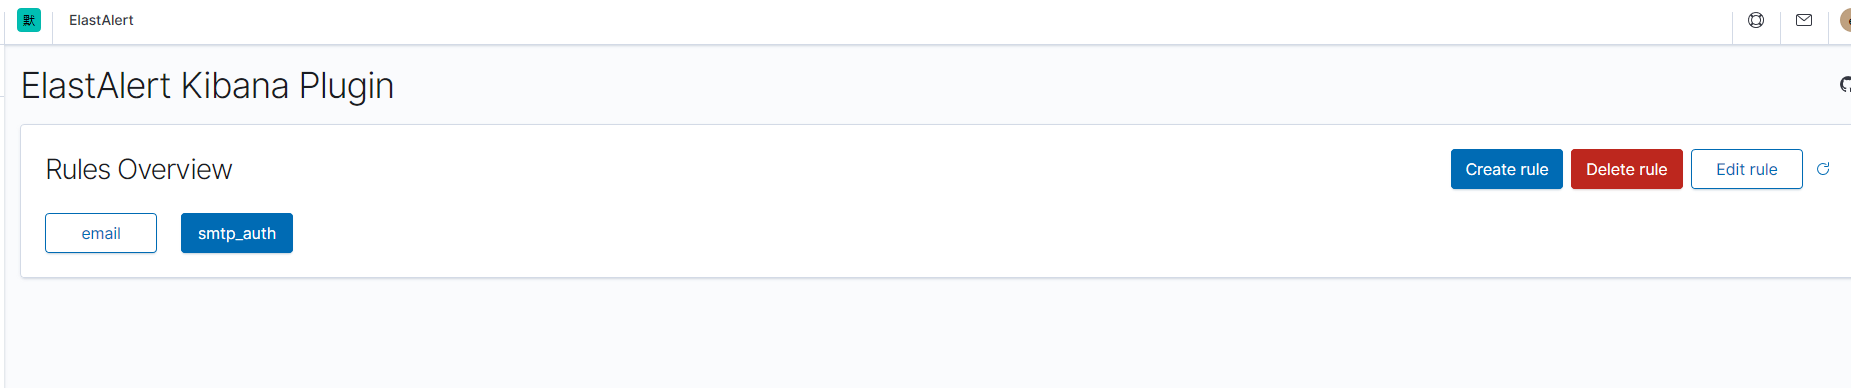
查看效果
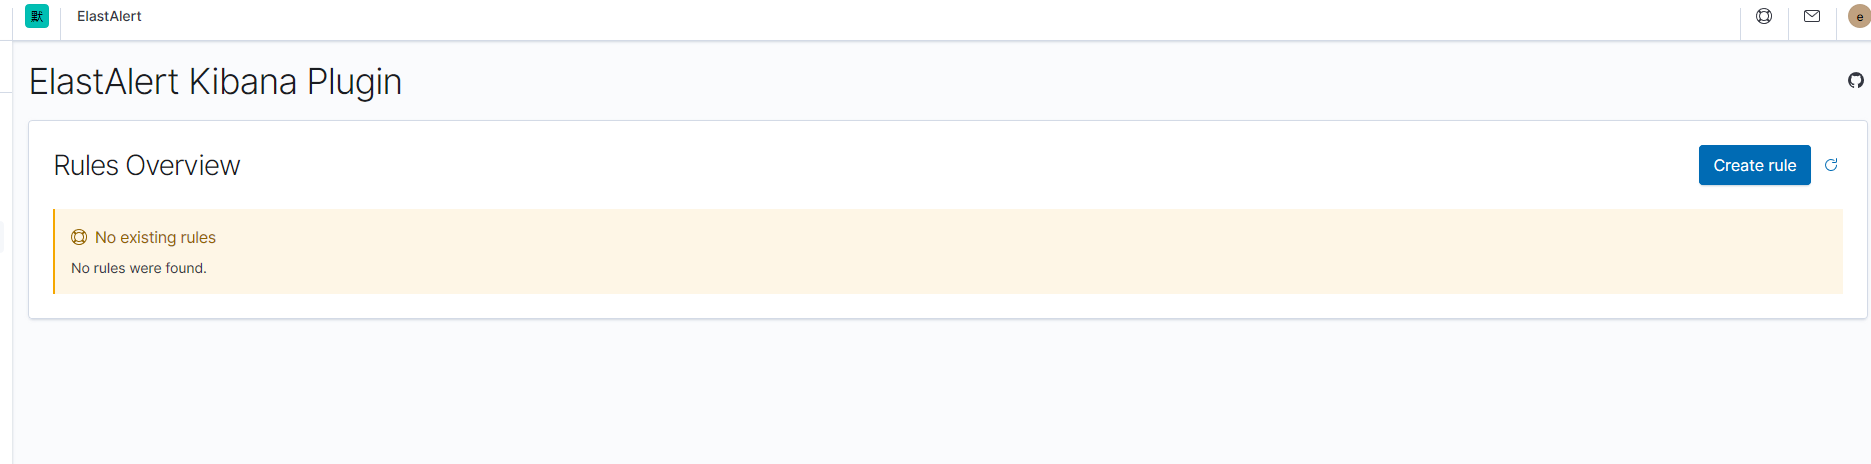
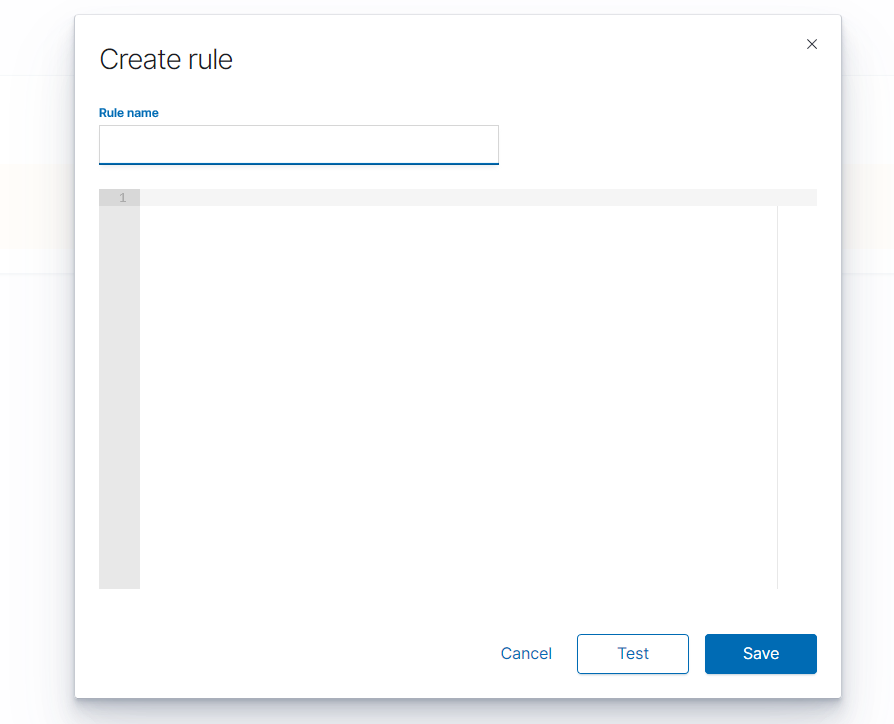
随便填写一个告警规则,保存的时候报错:
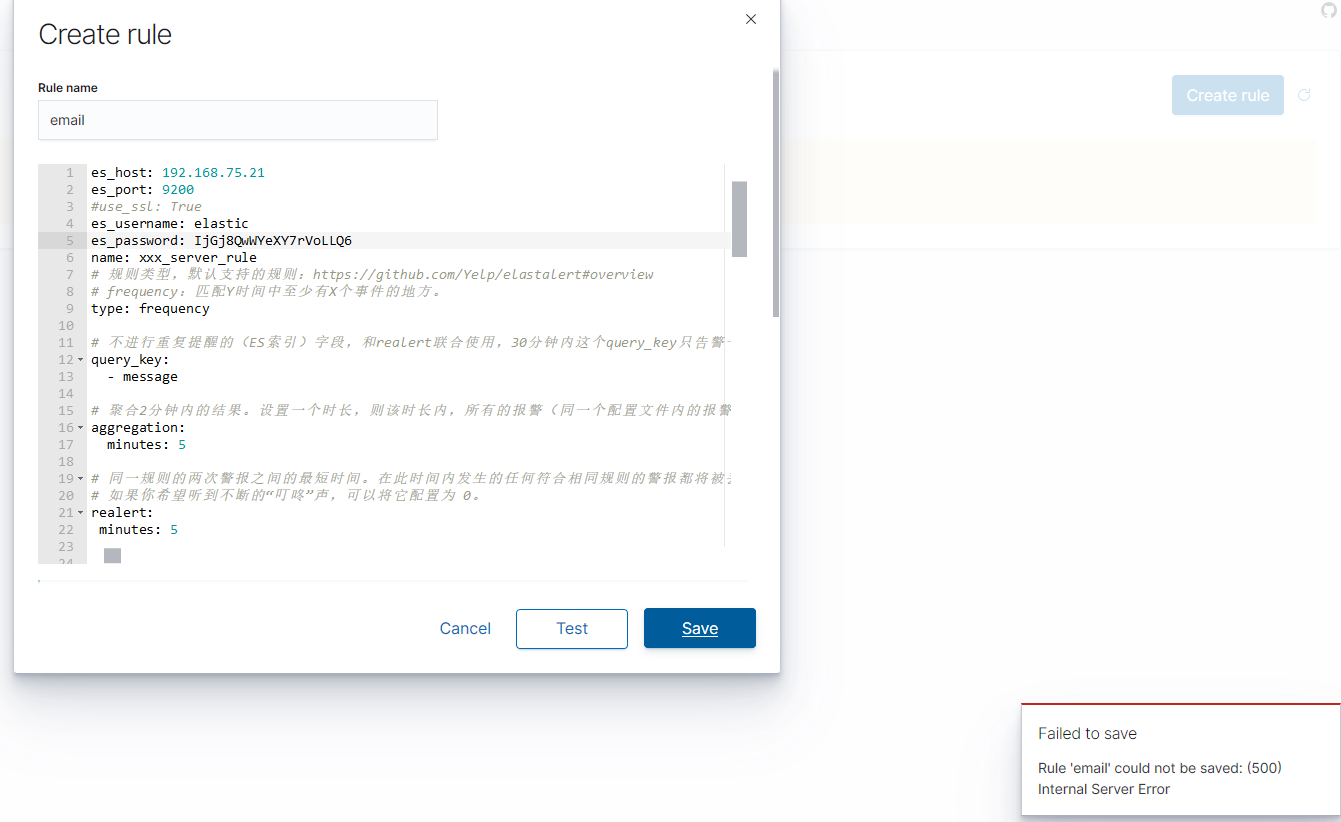
容器日志报错提示:
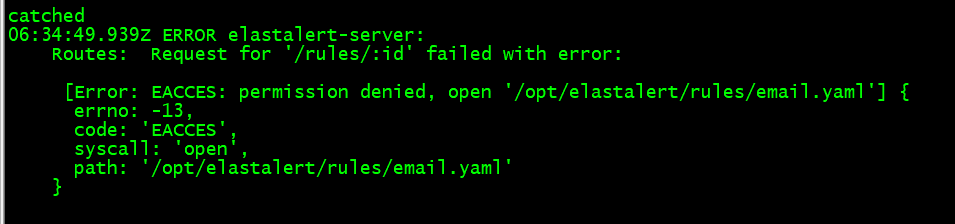
登陆进去容器查看,目录/opt/elastalert/rules和/opt/elastalert/rule_templates是在容器启动时挂载进去的,具体权限如下:
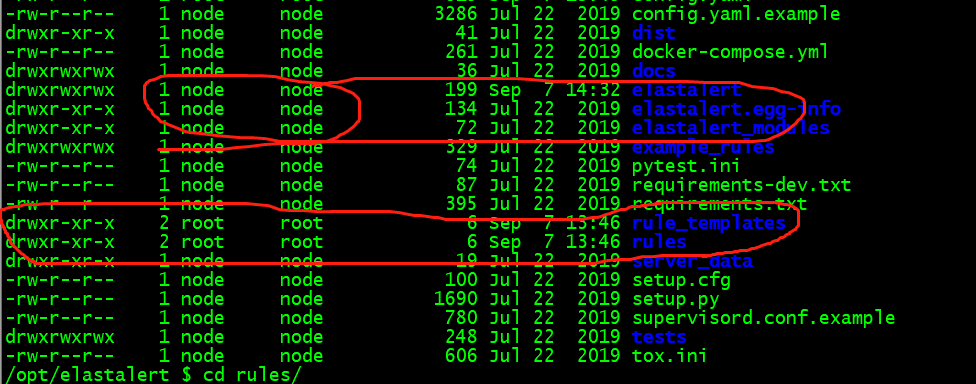
考虑到这一点,查看文章开头创建的那几个配置文件目录权限/mnt/elastalert/{config,rules,rule_templates}
给这几个目录其他用户操作的权限就可以了,比如:chmod -R 777 /mnt/elastalert/
然后再在kibana上添加,就会看到已经可以保存成功了
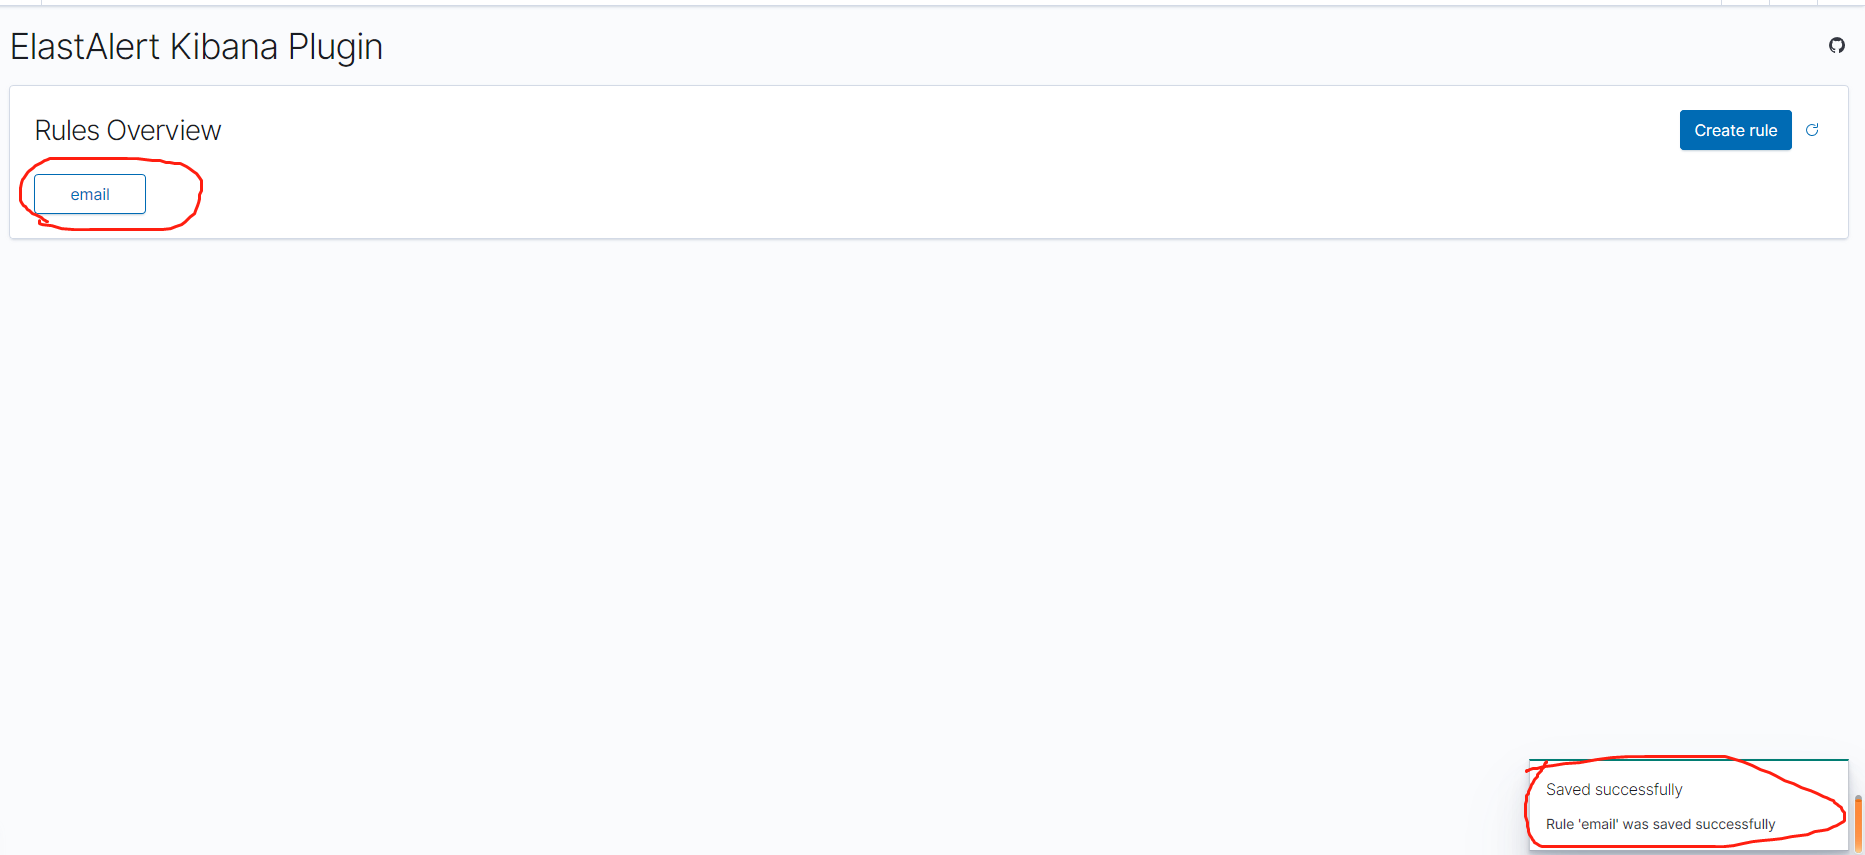
容器日志显示:

实际查看宿主机上的目录,该文件是使用es的用户创建的

1.编写start_el_rule.sh用以后台运行特定ElastAlert规则:
#!/bin/bash

nohup docker exec -i elastalert python -m elastalert.elastalert --verbose --config /opt/elastalert/config.yaml --rule /opt/elastalert/rules/xxx_server_rule.yaml  > logs/xxx_server_rule.log 2>&1 &
echo "ps -aux|grep ‘docker exec -i elastalert python -m‘"
ps -aux|grep "docker exec -i elastalert python -m"
2.编写stop.sh用以停止所有规则的运行:
#!/bin/bash

PIDS=`ps -ef |grep "python -m elastalert.elastalert --verbose --config /opt/elastalert/config.yaml" |grep -v grep | awk ‘{print $2}‘`
kill -15 $PIDS
echo ‘Kill %s success.‘ $PIDS
采用docker方式安装ElastAlert,图形化配置告警规则
标签:tag 增加 后台 The adt pass test 重试 nohup
原文地址:https://www.cnblogs.com/sanduzxcvbnm/p/13626892.html