标签:自动 网上 sudo smtp centos strong enable linux 7 top
1.安装和配置必要的依赖
在CentOS 7 (and RedHat/Oracle/Scientific Linux 7),下面这些命令是在防火墙中开放HTTP和SSH的访问
sudo yum install -y curl policycoreutils-python openssh-server
sudo systemctl enable sshd
sudo systemctl start sshd
sudo firewall-cmd --permanent --add-service=http
sudo firewall-cmd --permanent --add-service=https
sudo systemctl reload firewalld
接着,安装Postfix来实现邮件通知的功能,如果你想使用其他的邮件服务器,可以跳过下面这些命令,你可以再GitLab安装完毕后自行安装其他的邮件服务器.如何配置其他的邮件服务器文档地址
sudo yum install postfix
sudo systemctl enable postfix
sudo systemctl start postfix
添加仓库地址
curl https://packages.gitlab.com/install/repositories/gitlab/gitlab-ee/script.rpm.sh | sudo bash
安装GitLab
sudo EXTERNAL_URL="https://gitlab.example.com" yum install -y gitlab-ee
正常来说,执行完这步之后,会帮我们安装和自动配置GitLab相关的信息的.如果没有启动GitLab可以再执行一下这句命令。
gitlab-ctl reconfigure # 启动服务;
运行时可能报错:
There was an error running gitlab-ctl reconfigure
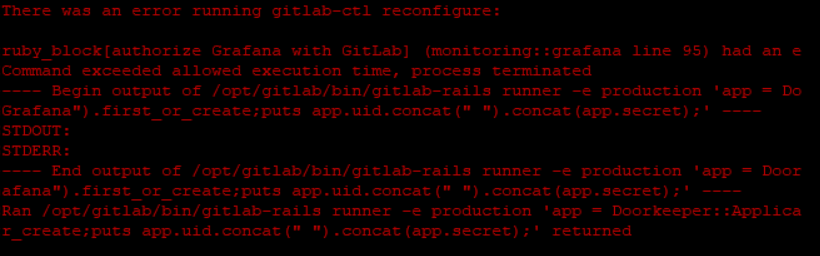
解决:
gitlab-ctl stop
chmod 755 /var/opt/gitlab/postgresql/
systemctl restart gitlab-runsvdir
gitlab-ctl reconfigure
gitlab-ctl restart
相关操作:
sudo gitlab-ctl start # 启动所有 gitlab 组件;
sudo gitlab-ctl stop # 停止所有 gitlab 组件;
sudo gitlab-ctl restart # 重启所有 gitlab 组件;
sudo gitlab-ctl status # 查看服务状态;
sudo gitlab-ctl reconfigure # 启动服务;
sudo vim /etc/gitlab/gitlab.rb # 修改默认的配置文件;
gitlab-rake gitlab:check SANITIZE=true --trace # 检查gitlab;
sudo gitlab-ctl tail # 查看日志;
标签:自动 网上 sudo smtp centos strong enable linux 7 top
原文地址:https://www.cnblogs.com/l-zl/p/13800055.html