标签:data 生效 ide 访问 dir templates 获取 nohup 后缀
一.Confd介绍二.confd的部署
1.本次测试部署架构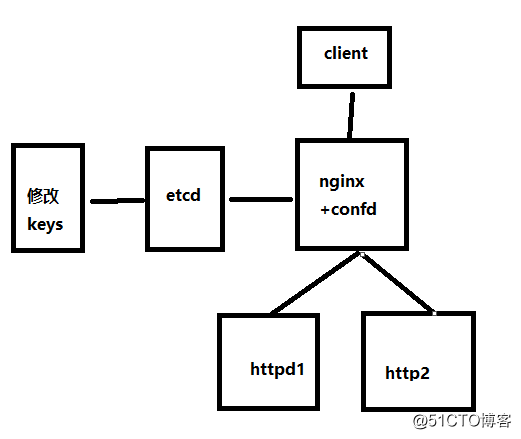
etcd保存配置数据
confd:confd有一个watch功能,通过HTTP API定期监测对应的etcd中目录变化,获取最新的Value,然后渲染模板,更新配置文件
通过修改etcd中的配置文件达到自动更新nginx的服务配置
本次资源规划
nginx confd 服务节点 190.168.3.250
httpd1 190.168.3.251
httpd2 190.168.3.252
域名:www.test.com
2-3个httpd节点web节点
2.安装nginx
测试通过安装扩展源,yum install -y nginx
3.安装etcd并启动
tar zxvf etcd-v3.3.25-linux-amd64.tar.gz
cd /root/etcd-v3.3.25-linux-amd64
mv etcd etcdctl /usr/bin/
[root@server1 ~]# nohup etcd --data-dir /root/etcd/data.etcd --listen-client-urls http://190.168.3.250:2379 --advertise-client-urls http://190.168.3.250:2379 &>/root/etcd/etcd.log &
4.安装confd
cp confd-0.16.0-linux-amd64 /usr/bin/confd
mkdir -p /etc/confd/{conf.d,templates}
conf.d # 资源模板,下面文件必须以toml后缀
templates # 配置文件模板,下面文件必须以tmpl后缀
cd /etc/confd/conf.d
配置资源模版
[root@server1 templates]# vi test.conf.toml
[template]
src = "test.conf.tmpl" 配置资源模版名
dest = "/etc/nginx/conf.d/test.conf" #生成文件的位置
keys = [
"/nginx", #在etcd里监控的keys,在本次的测试中nginx下有好几个key值,这里匹配了这个nginx的目录
]
reload_cmd ="/usr/sbin/nginx -s reload" #变化后重新加载配置文件
cd /etc/confd/templates
[root@server1 templates]# vi test.conf.tmpl
upstream www.{{getv "/nginx/test/server_name"}} {
{{range getvs "/nginx/test/upstream/*"}}
server {{.}};
{{end}}
}
server {
server_name www.{{getv "/nginx/test/server_name"}};
location / {
proxy_pass http://www.{{getv "/nginx/test/server_name"}};
proxy_redirect off;
proxy_set_header Host $host;
proxy_set_header X-Real-IP $remote_addr;
proxy_set_header X-Forwarded-For $proxy_add_x_forwarded_for;
}
}
5.先给etcd写入数据
etcdctl -C http://190.168.3.250:2379 set /nginx/test/server_name "test.com"
etcdctl -C http://190.168.3.250:2379 set /nginx/test/upstream/server01 "190.168.3.251:80"
tcdctl -C http://190.168.3.250:2379 set /nginx/test/upstream/server02 "190.168.3.252:80"
查看写入的配置文件
6.启动 confd watch功能,通过HTTP API定期监测对应的etcd中目录变化,获取最新的Value,然后渲染模板,更新配置文件
[root@server1 ~]# confd -watch -backend etcd -node http://190.168.3.250:2379
另开一个窗口查看生成的配置文件
[root@server1 conf.d]# vi test.conf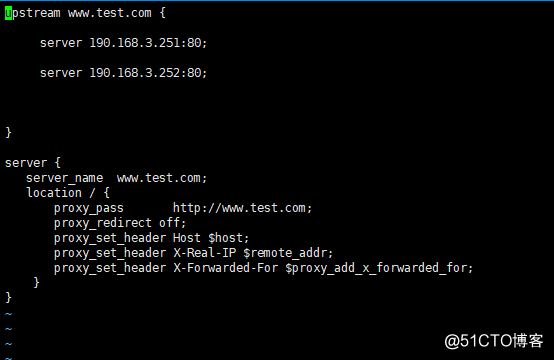 ![]
![]
绑定一个www.test.com进行访问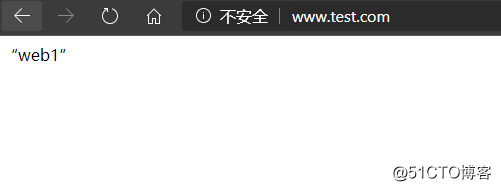

三.测试
我们通过etcd的接口新添加一台节点,写入数据
etcdctl -C http://190.168.3.250:2379 set /nginx/test/upstream/server03 "190.168.3.253:80"
通过监控etcd的nginx keys,重新渲染模版
查看nginx配置文件
[root@server1 conf.d]# vi test.conf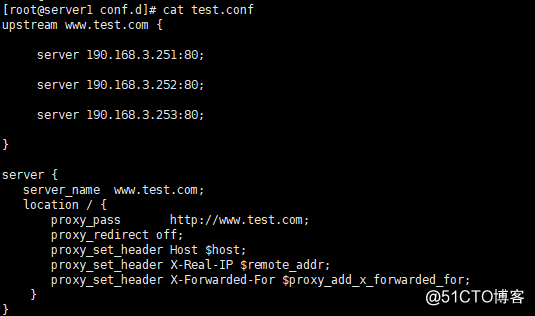
实现自动更新配置,服务立即生效,负载均衡已经有第三个节点了
这个可以在生产环境中项目采用灰度发布方式,每次项目升级,都要手动先从Nginx下摘掉一组,然后再升级这组,当项目快速迭代时,手动做这些操作显然会增加部署时间,于是就想通过脚本实现自动化管理Nginx配置文件。
confd使用文档:
https://github.com/kelseyhightower/confd/blob/master/docs/quick-start-guide.md
资源模板其他参数:
https://github.com/kelseyhightower/confd/blob/master/docs/template-resources.md
标签:data 生效 ide 访问 dir templates 获取 nohup 后缀
原文地址:https://blog.51cto.com/anfishr/2542158