标签:exec 均衡 nbu ret pac cto getname uil com
负载均衡框架,支持可插拔式的负载均衡规则
支持多种协议,如HTTP、UDP等
提供负载均衡客户端
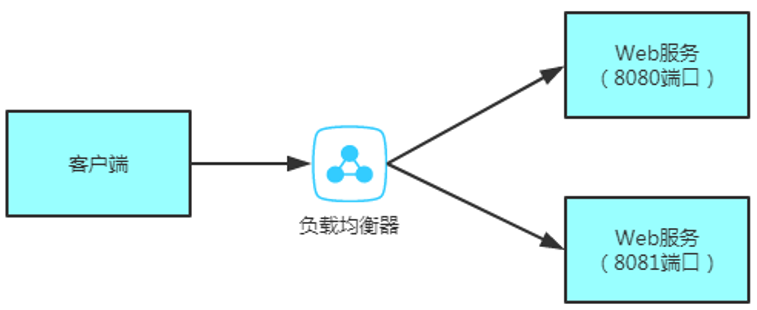
一个负载均衡器,至少提供以下功能:
为了实现基本的负载均衡功能,Ribbon的负载均衡器有三大子模块:
创建项目:ribbon-service
pom.xml:
<project xmlns="http://maven.apache.org/POM/4.0.0" xmlns:xsi="http://www.w3.org/2001/XMLSchema-instance"
    xsi:schemaLocation="http://maven.apache.org/POM/4.0.0 http://maven.apache.org/xsd/maven-4.0.0.xsd">
    <modelVersion>4.0.0</modelVersion>
    <groupId>org.crazyit.cloud</groupId>
    <artifactId>ribbon-service</artifactId>
    <version>0.0.1-SNAPSHOT</version>

    <dependencies>
        <dependency>
            <groupId>org.springframework.boot</groupId>
            <artifactId>spring-boot-starter-web</artifactId>
            <version>1.5.7.RELEASE</version>
        </dependency>
    </dependencies>

</project>
Person:
package org.crazyit.cloud;

public class Person {

    private Integer id;
    private String name;
    private String message;
    public Integer getId() {
        return id;
    }
    public void setId(Integer id) {
        this.id = id;
    }
    public String getName() {
        return name;
    }
    public void setName(String name) {
        this.name = name;
    }
    public String getMessage() {
        return message;
    }
    public void setMessage(String message) {
        this.message = message;
    }

}
MyController:
package org.crazyit.cloud;

import javax.servlet.http.HttpServletRequest;

import org.springframework.http.MediaType;
import org.springframework.web.bind.annotation.RequestMapping;
import org.springframework.web.bind.annotation.RequestMethod;
import org.springframework.web.bind.annotation.RestController;

@RestController
public class MyController {

    @RequestMapping(value = "/person", method = RequestMethod.GET,
            produces = MediaType.APPLICATION_JSON_VALUE)
    public Person getPerson(HttpServletRequest request) {
        Person p = new Person();
        p.setId(1);
        p.setName("angus");
        p.setMessage(request.getRequestURL().toString());
        return p;
    }
}
ServiceApp:
package org.crazyit.cloud;

import java.util.Scanner;

import org.springframework.boot.autoconfigure.SpringBootApplication;
import org.springframework.boot.builder.SpringApplicationBuilder;

@SpringBootApplication
public class ServiceApp {

    public static void main(String[] args) throws Exception {
        Scanner scan = new Scanner(System.in);
        String port = scan.nextLine();
        new SpringApplicationBuilder(ServiceApp.class).properties(
                "server.port=" + port).run(args);
    }

}
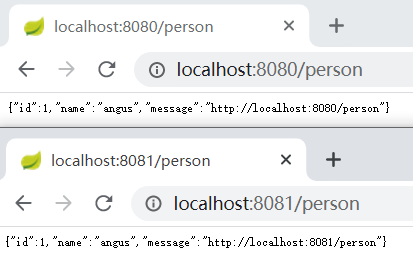
启动两个服务:控制台输入8080和8081:
然后创建一个客户端ribbon-client项目:
pom:
<project xmlns="http://maven.apache.org/POM/4.0.0" xmlns:xsi="http://www.w3.org/2001/XMLSchema-instance"
    xsi:schemaLocation="http://maven.apache.org/POM/4.0.0 http://maven.apache.org/xsd/maven-4.0.0.xsd">
    <modelVersion>4.0.0</modelVersion>
    <groupId>org.crazyit.cloud</groupId>
    <artifactId>ribbon-client</artifactId>
    <version>0.0.1-SNAPSHOT</version>

    <dependencies>
        <dependency>
            <groupId>com.netflix.ribbon</groupId>
            <artifactId>ribbon-core</artifactId>
            <version>2.2.2</version>
        </dependency>
        <dependency>
            <groupId>com.netflix.ribbon</groupId>
            <artifactId>ribbon-httpclient</artifactId>
            <version>2.2.2</version>
        </dependency>
    </dependencies>

</project>
TestRibbon:
package org.crazyit.cloud;

import com.netflix.client.ClientFactory;
import com.netflix.client.http.HttpRequest;
import com.netflix.client.http.HttpResponse;
import com.netflix.config.ConfigurationManager;
import com.netflix.niws.client.http.RestClient;

public class TestRibbon {

    public static void main(String[] args) throws Exception {
        ConfigurationManager.getConfigInstance().setProperty(
                  "my-client.ribbon.listOfServers", "localhost:8080,localhost:8081");
        RestClient client = (RestClient) ClientFactory.getNamedClient("my-client");
        HttpRequest request = HttpRequest.newBuilder().uri("/person").build();
        for(int i = 0; i < 10; i++) {
            HttpResponse response = client.executeWithLoadBalancer(request);
            String json = response.getEntity(String.class);
            System.out.println(json);
        }
    }

}
然后运行:
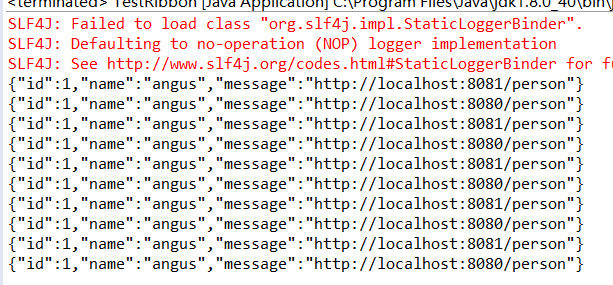
实现了负载均衡了。
标签:exec 均衡 nbu ret pac cto getname uil com
原文地址:https://www.cnblogs.com/liuhui0308/p/13904842.html