标签:backward Owner 排队 设置 ast rop unit 生活 compare
前言前段时间在面试,发现面试官都有问到同步器AQS的相关问题。AQS为Java中几乎所有的锁和同步器提供一个基础框架,派生出如ReentrantLock、Semaphore、CountDownLatch等AQS全家桶。本文基于AQS原理的几个核心点,谈谈对AbstractQueuedSynchronizer的理解,并实现一个自定义同步器。
AQS全称是AbstractQueuedSynchronizer,即抽象同步队列。下面看一下AQS的类图结构: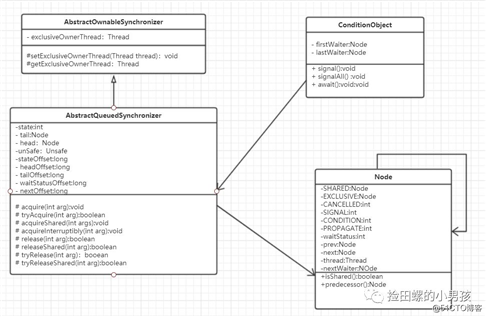
为了方便下面几个关键点的理解,大家先熟悉一下AQS的类图结构。
在
AQS
中维持了一个单一的共享状态
state
,来实现同步器同步。看一下
state
的相关代码如下:/**
* The synchronization state.
*/
private
volatile
int
state
;
/**
* Returns the current value of synchronization state.
* This operation has memory semantics of a {@code volatile} read.
* @return current state value
*/
protected
final
int
getState
()
{
return
state
;
}
/**
* Sets the value of synchronization state.
* This operation has memory semantics of a {@code volatile} write.
* @param newState the new state value
*/
protected
final
void
setState
(
int
newState
)
{
state
=
newState
;
}
/**
* Atomically sets synchronization state to the given updated
* value if the current state value equals the expected value.
* This operation has memory semantics of a {@code volatile} read
* and write.
*
* @param expect the expected value
* @param update the new value
* @return {@code true} if successful. False return indicates that the actual
* value was not equal to the expected value.
*/
protected
final
boolean
compareAndSetState
(
int
expect
,
int
update
)
{
// See below for intrinsics setup to support this
return
unsafe
.
compareAndSwapInt
(
this
,
stateOffset
,
expect
,
update
);
}谈到CLH队列,我们结合以上state状态,先来看一下AQS原理图:
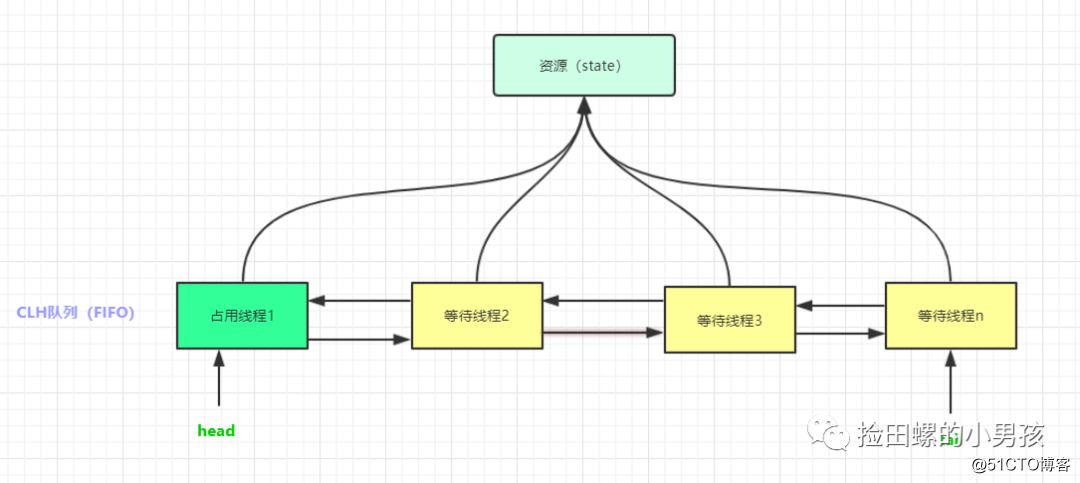
CLH(Craig, Landin, and Hagersten locks) 同步队列 是一个FIFO双向队列,其内部通过节点head和tail记录队首和队尾元素,队列元素的类型为Node。AQS依赖它来完成同步状态state的管理,当前线程如果获取同步状态失败时,AQS则会将当前线程已经等待状态等信息构造成一个节点(Node)并将其加入到CLH同步队列,同时会阻塞当前线程,当同步状态释放时,会把首节点唤醒(公平锁),使其再次尝试获取同步状态。
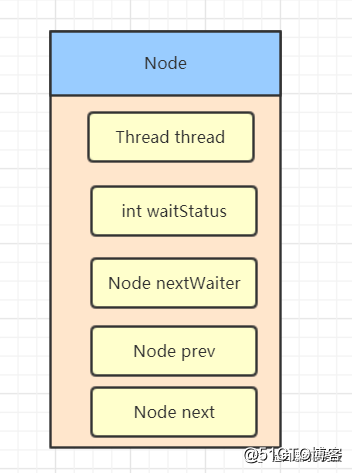
CLH同步队列中,一个节点表示一个线程,它保存着线程的引用(thread)、状态(waitStatus)、前驱节点(prev)、后继节点(next),condition队列的后续节点(nextWaiter)如下图:
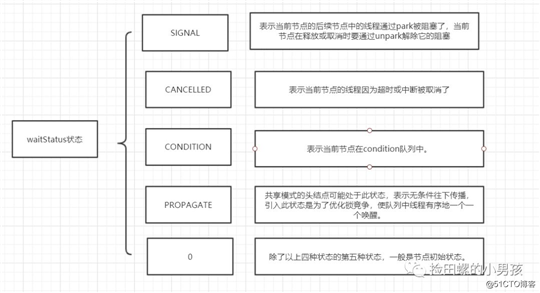
waitStatus几种状态状态:
我们再看一下CLH队列入列以及出列的代码:
CLH队列入列就是tail指向新节点、新节点的prev指向当前最后的节点,当前最后一个节点的next指向当前节点。addWaiter方法如下:
//构造Node
private

Node
 addWaiter
(
Node
 mode
)

{

Node
 node
=

new

Node
(
Thread
.
currentThread
(),
 mode
);

// Try the fast path of enq; backup to full enq on failure(快速尝试添加尾节点)

Node
 pred
=
 tail
;

if

(
pred
!=

null
)

{
            node
.
prev
=
 pred
;

//CAS设置尾节点

if

(
compareAndSetTail
(
pred
,
 node
))

{
                pred
.
next
=
 node
;

return
 node
;

}

}

//多次尝试
        enq
(
node
);

return
 node
;

}
由以上代码可得,addWaiter设置尾节点失败的话,调用enq(Node node)方法设置尾节点,enq方法如下:
private

Node
 enq
(
final

Node
 node
)

{

//死循环尝试,知道成功为止

for

(;;)

{

Node
 t
=
 tail
;

//tail 不存在,设置为首节点

if

(
t
==

null
)

{

// Must initialize

if

(
compareAndSetHead
(
new

Node
()))
                    tail
=
 head
;

}

else

{
                node
.
prev
=
 t
;

if

(
compareAndSetTail
(
t
,
 node
))

{
                    t
.
next
=
 node
;

return
 t
;

}

}

}

}首节点的线程释放同步状态后,将会唤醒它的后继节点(next),而后继节点将会在获取同步状态成功时将自己设置为首节点。可以看一下以下两段源码:
Node
 h
=
 head
;

if

(
h
!=

null

&&
 h
.
waitStatus
!=

0
)
  unparkSuccessor
(
h
);

private

void
 unparkSuccessor
(
Node
 node
)

{

/*
         * If status is negative (i.e., possibly needing signal) try
         * to clear in anticipation of signalling.  It is OK if this
         * fails or if status is changed by waiting thread.
         */

int
 ws
=
 node
.
waitStatus
;

if

(
ws
<

0
)
            compareAndSetWaitStatus
(
node
,
 ws
,

0
);

/*
         * Thread to unpark is held in successor, which is normally
         * just the next node.  But if cancelled or apparently null,
         * traverse backwards from tail to find the actual
         * non-cancelled successor.
         */

Node
 s
=
 node
.
next
;

if

(
s
==

null

||
 s
.
waitStatus
>

0
)

{
            s
=

null
;

for

(
Node
 t
=
 tail
;
 t
!=

null

&&
 t
!=
 node
;
 t
=
 t
.
prev
)

if

(
t
.
waitStatus
<=

0
)
                    s
=
 t
;

}

if

(
s
!=

null
)

LockSupport
.
unpark
(
s
.
thread
);

}CAS算法,可以看一下我工作实战中仿造CAS算法解决并发问题的实现https://juejin.im/post/5d0616ade51d457756536791
我们都知道,synchronized控制同步的时候,可以配合Object的wait()、notify(),notifyAll() 系列方法可以实现等待/通知模式。而Lock呢?它提供了条件Condition接口,配合await(),signal(),signalAll() 等方法也可以实现等待/通知机制。ConditionObject实现了Condition接口,给AQS提供条件变量的支持 。
我们先来看一下图:

ConditionObject队列与CLH队列的爱恨情仇:
区别:
AQS支持两种同步模式:独占式和共享式。
同一时刻仅有一个线程持有同步状态,如ReentrantLock。又可分为公平锁和非公平锁。
公平锁: 按照线程在队列中的排队顺序,有礼貌的,先到者先拿到锁。
非公平锁: 当线程要获取锁时,无视队列顺序直接去抢锁,不讲道理的,谁抢到就是谁的。
acquire(int arg)是独占式获取同步状态的方法,我们来看一下源码:
public

final

void
 acquire
(
long
 arg
)

{

if

(!
tryAcquire
(
arg
)

&&
            acquireQueued
(
addWaiter
(
Node
.
EXCLUSIVE
),
 arg
))
            selfInterrupt
();

}//构造Node
private
Node
addWaiter
(
Node
mode
)
{
Node
node
=
new
Node
(
Thread
.
currentThread
(),
mode
);
// Try the fast path of enq; backup to full enq on failure(快速尝试添加尾节点)
Node
pred
=
tail
;
if
(
pred
!=
null
)
{
node
.
prev
=
pred
;
//CAS设置尾节点
if
(
compareAndSetTail
(
pred
,
node
))
{
pred
.
next
=
node
;
return
node
;
}
}
//多次尝试
enq
(
node
);
return
node
;
}final
boolean
acquireQueued
(
final
Node
node
,
long
arg
)
{
boolean
failed
=
true
;
try
{
boolean
interrupted
=
false
;
for
(;;)
{
final
Node
p
=
node
.
predecessor
();
if
(
p
==
head
&&
tryAcquire
(
arg
))
{
setHead
(
node
);
p
.
next
=
null
;
// help GC
failed
=
false
;
return
interrupted
;
}
if
(
shouldParkAfterFailedAcquire
(
p
,
node
)
&&
parkAndCheckInterrupt
())
interrupted
=
true
;
}
}
finally
{
if
(
failed
)
cancelAcquire
(
node
);
}
}static
void
selfInterrupt
()
{
Thread
.
currentThread
().
interrupt
();
}结合源代码,可得acquire(int arg)方法流程图,如下: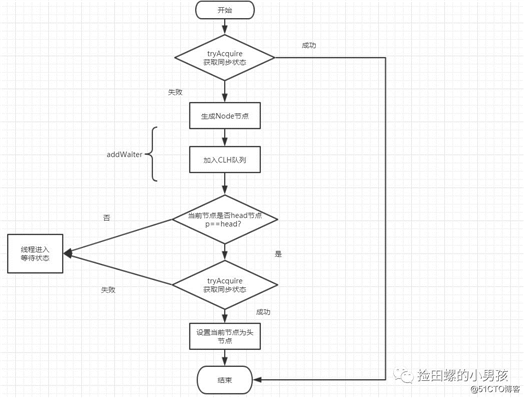
多个线程可同时执行,如Semaphore/CountDownLatch等都是共享式的产物。
acquireShared(long arg)是共享式获取同步状态的方法,可以看一下源码:
public

final

void
 acquireShared
(
long
 arg
)

{

if

(
tryAcquireShared
(
arg
)

<

0
)
            doAcquireShared
(
arg
);

}
由上可得,先调用tryAcquireShared(int arg)方法尝试获取同步状态,如果获取失败,调用doAcquireShared(int arg)自旋方式获取同步状态,方法源码如下:
private

void
 doAcquireShared
(
long
 arg
)

{

final

Node
 node
=
 addWaiter
(
Node
.
SHARED
);

boolean
 failed
=

true
;

try

{

boolean
 interrupted
=

false
;

for

(;;)

{

final

Node
 p
=
 node
.
predecessor
();

if

(
p
==
 head
)

{

long
 r
=
 tryAcquireShared
(
arg
);

if

(
r
>=

0
)

{
                        setHeadAndPropagate
(
node
,
 r
);
                        p
.
next

=

null
;

// help GC

if

(
interrupted
)
                            selfInterrupt
();
                        failed
=

false
;

return
;

}

}

if

(
shouldParkAfterFailedAcquire
(
p
,
 node
)

&&
                    parkAndCheckInterrupt
())
                    interrupted
=

true
;

}

}

finally

{

if

(
failed
)
                cancelAcquire
(
node
);

}

}模板方法模式: 在一个方法中定义一个算法的骨架,而将一些步骤延迟到子类中。模板方法使得子类可以在不改变算法结构的情况下,重新定义算法中的某些步骤。
模板方法模式生活中的例子: 假设我们要去北京旅游,那么我们可以坐高铁或者飞机,或者火车,那么定义交通方式的抽象类,可以有以下模板:买票->安检->乘坐xx交通工具->到达北京。让子类继承该抽象类,实现对应的模板方法。
AQS定义的一些模板方法如下:
isHeldExclusively()//该线程是否正在独占资源。只有用到condition才需要去实现它。
tryAcquire(int)//独占方式。尝试获取资源,成功则返回true,失败则返回false。
tryRelease(int)//独占方式。尝试释放资源,成功则返回true,失败则返回false。tryAcquireShared(int)//共享方式。尝试获取资源。负数表示失败;0表示成功,但没有剩余可用资源;正数表示成功,且有剩余资源。
tryReleaseShared(int)//共享方式。尝试释放资源,成功则返回true,失败则返回false。
简言之,就是AQS提供tryAcquire,tryAcquireShared等模板方法,给子类实现自定义的同步器。
基于以上分析,我们都知道state,CLH队列,ConditionObject队列 等这些关键点,你要实现自定义锁的话,首先需要确定你要实现的是独占锁还是共享锁,定义原子变量state的含义,再定义一个内部类去继承AQS,重写对应的模板方法。
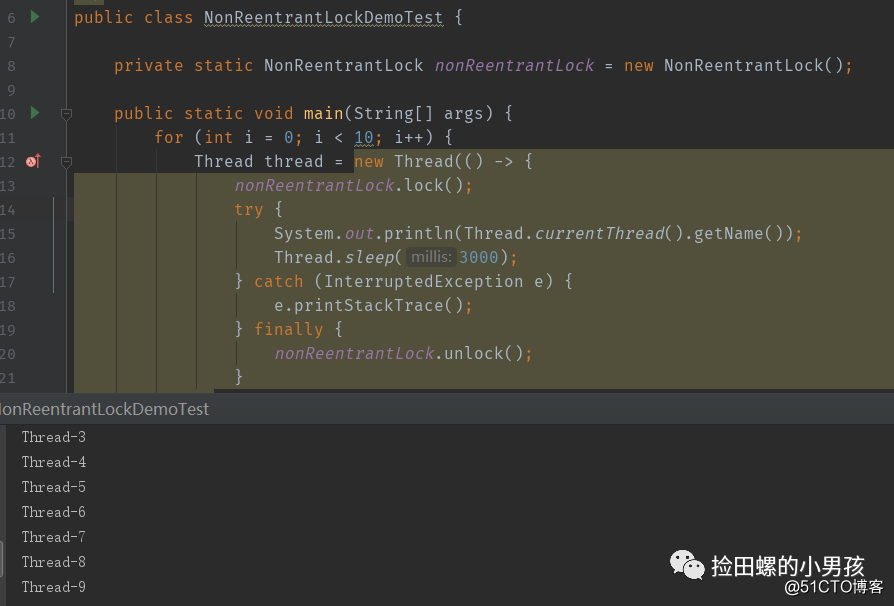
我们来看一下基于 AQS 实现的不可重入的独占锁的demo,来自《Java并发编程之美》:
public

class

NonReentrantLock

implements

Lock
,
Serializable
{

//内部类,自定义同步器

static

class

Sync

extends

AbstractQueuedSynchronizer

{

//是否锁已经被持有

public

boolean
 isHeldExclusively
()

{

return
 getState
()

==

1
;

}

//如果state为0 则尝试获取锁

public

boolean
 tryAcquire
(
int
 arg
)

{

assert
 arg
==

1

;

//CAS设置状态,能保证操作的原子性,当前为状态为0,操作成功状态改为1

if
(
compareAndSetState
(
0
,

1
)){

//设置当前独占的线程
                setExclusiveOwnerThread
(
Thread
.
currentThread
());

return

true
;

}

return

false
;

}

//尝试释放锁,设置state为0

public

boolean
 tryRelease
(
int
 arg
)

{

assert
 arg
==
1
;

//如果同步器同步器状态等于0,则抛出监视器非法状态异常

if
(
getState
()

==

0
)

throw

new

IllegalMonitorStateException
();

//设置独占锁的线程为null
            setExclusiveOwnerThread
(
null
);

//设置同步状态为0
            setState
(
0
);

return

true
;

}

//返回Condition,每个Condition都包含了一个Condition队列

Condition
 newCondition
(){

return

new

ConditionObject
();

}

}

//创建一个Sync来做具体的工作

private

final

Sync
 sync
=

new

Sync

();

@Override

public

void
 lock
()

{
        sync
.
acquire
(
1
);

}

public

boolean
 isLocked
()

{

return
 sync
.
isHeldExclusively
();

}

@Override

public

void
 lockInterruptibly
()

throws

InterruptedException

{
        sync
.
acquireInterruptibly
(
1
);

}

@Override

public

boolean
 tryLock
()

{

return
 sync
.
tryAcquire
(
1
);

}

@Override

public

boolean
 tryLock
(
long
 time
,

TimeUnit
 unit
)

throws

InterruptedException

{

return
 sync
.
tryAcquireNanos
(
1
,
 unit
.
toNanos
(
time
));

}

@Override

public

void
 unlock
()

{
        sync
.
release
(
1
);

}

@Override

public

Condition
 newCondition
()

{

return
 sync
.
newCondition
();

}

}
NonReentrantLockDemoTest:
public

class

NonReentrantLockDemoTest

{

private

static

NonReentrantLock
 nonReentrantLock
=

new

NonReentrantLock
();

public

static

void
 main
(
String
[]
 args
)

{

for

(
int
 i
=

0
;
 i
<

10
;
 i
++)

{

Thread
 thread
=

new

Thread
(()

->

{
                nonReentrantLock
.
lock
();

try

{

System
.
out
.
println
(
Thread
.
currentThread
().
getName
());

Thread
.
sleep
(
3000
);

}

catch

(
InterruptedException
 e
)

{
                    e
.
printStackTrace
();

}

finally

{
                    nonReentrantLock
.
unlock
();

}

});
            thread
.
start
();

}

}
}
运行结果:
AQS派生出如ReentrantLock、Semaphore等AQS全家桶,接下来可以看一下它们的使用案例。
使用ReentrantLock来实现个简单线程安全的list,如下:
public

class

ReentrantLockList

{

// 线程不安全的list

private

ArrayList
<
String
>
 array
=

new

ArrayList
<>();

//独占锁

private

volatile

ReentrantLock

lock

=

new

ReentrantLock
();

//添加元素

public

void
 add
(
String
 e
){

lock
.
lock
();

try

{
            array
.
add
(
e
);

}
finally

{

lock
.
unlock
();

}

}

//删除元素

public

void
 remove
(
String
 e
){

lock
.
lock
();

try

{
            array
.
remove
(
e
);

}
finally

{

lock
.
unlock
();

}

}

//获取元素

public

String

get
(
int
 index
){

lock
.
lock
();

try

{

return
 array
.
get
(
index
);

}
finally

{

lock
.
unlock
();

}

}
}Java多线程有一到比较经典的面试题:ABC三个线程顺序输出,循环10遍。
public

class

ABCSemaphore

{

private

static

Semaphore
 A
=

new

Semaphore
(
1
);

private

static

Semaphore
 B
=

new

Semaphore
(
1
);

private

static

Semaphore
 C
=

new

Semaphore
(
1
);

static

class

ThreadA

extends

Thread

{

@Override

public

void
 run
()

{

try

{

for

(
int
 i
=

0
;
 i
<

10
;
 i
++)

{
                    A
.
acquire
();

System
.
out
.
print
(
"A"
);
                    B
.
release
();

}

}

catch

(
InterruptedException
 e
)

{
                e
.
printStackTrace
();

}

}

}

static

class

ThreadB

extends

Thread

{

@Override

public

void
 run
()

{

try

{

for

(
int
 i
=

0
;
 i
<

10
;
 i
++)

{
                    B
.
acquire
();

System
.
out
.
print
(
"B"
);
                    C
.
release
();

}

}

catch

(
InterruptedException
 e
)

{
                e
.
printStackTrace
();

}

}

}

static

class

ThreadC

extends

Thread

{

@Override

public

void
 run
()

{

try

{

for

(
int
 i
=

0
;
 i
<

10
;
 i
++)

{
                    C
.
acquire
();

System
.
out
.
print
(
"C"
);
                    A
.
release
();

}

}

catch

(
InterruptedException
 e
)

{
                e
.
printStackTrace
();

}

}

}

public

static

void
 main
(
String
[]
 args
)

throws

InterruptedException

{

// 开始只有A可以获取, BC都不可以获取, 保证了A最先执行
        B
.
acquire
();
        C
.
acquire
();

new

ThreadA
().
start
();

new

ThreadB
().
start
();

new

ThreadC
().
start
();

}标签:backward Owner 排队 设置 ast rop unit 生活 compare
原文地址:https://blog.51cto.com/14989534/2547613