标签:否则 cti module pcl string col sim put apply
1、新建maven工程
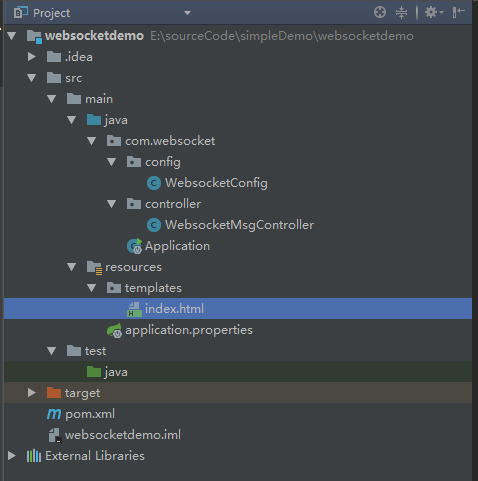
工程结构如下:
完整的pom.xml如下:
<?xml version="1.0" encoding="UTF-8"?>
<project xmlns="http://maven.apache.org/POM/4.0.0"
         xmlns:xsi="http://www.w3.org/2001/XMLSchema-instance"
         xsi:schemaLocation="http://maven.apache.org/POM/4.0.0 http://maven.apache.org/xsd/maven-4.0.0.xsd">
    <modelVersion>4.0.0</modelVersion>

    <groupId>com.websocket.demo</groupId>
    <artifactId>websocket-demo</artifactId>
    <version>1.0-SNAPSHOT</version>
    <parent>
        <groupId>org.springframework.boot</groupId>
        <artifactId>spring-boot-starter-parent</artifactId>
        <version>1.4.1.RELEASE</version>
    </parent>
    <dependencies>
        <!-- thymeleaf 模板的配置 -->
        <dependency>
            <groupId>org.springframework.boot</groupId>
            <artifactId>spring-boot-starter-thymeleaf</artifactId>
        </dependency>
        <dependency>
            <groupId>org.springframework.boot</groupId>
            <artifactId>spring-boot-starter-web</artifactId>
        </dependency>
        <!-- spring websocket的配置 -->
        <dependency>
            <groupId>org.springframework.boot</groupId>
            <artifactId>spring-boot-starter-websocket</artifactId>
        </dependency>
        <dependency>
            <groupId>org.springframework.boot</groupId>
            <artifactId>spring-boot-devtools</artifactId>
            <scope>runtime</scope>
        </dependency>
        <dependency>
            <groupId>org.springframework.boot</groupId>
            <artifactId>spring-boot-autoconfigure</artifactId>
            <version>1.4.5.RELEASE</version>
        </dependency>
    </dependencies>
    <build>
        <plugins>
            <plugin>
                <groupId>org.springframework.boot</groupId>
                <artifactId>spring-boot-maven-plugin</artifactId>
            </plugin>
        </plugins>
    </build>
</project>
2、application.properties 的配置如下
#thymeleaf start
#spring.thymeleaf.mode=HTML5
spring.thymeleaf.encoding=UTF-8
spring.thymeleaf.content-type=text/html
#开发时关闭缓存,不然没法看到实时页面
spring.thymeleaf.cache=false
spring.thymeleaf.prefix=classpath:/templates/
#thymeleaf end


server.port=8082
3、启动类
package com.websocket;

import org.springframework.boot.SpringApplication;
import org.springframework.boot.autoconfigure.SpringBootApplication;

/**
 * @author Administrator
 * @date 2018/08/18
 */
@SpringBootApplication
public class Application {
    public static void main(String[] args) throws Exception {
        SpringApplication.run(Application.class, args);
    }
}
4、WebsocketConfig 类进行了websocket的配置
package com.websocket.config;

import org.springframework.context.annotation.Configuration;
import org.springframework.messaging.simp.config.MessageBrokerRegistry;
import org.springframework.web.socket.config.annotation.AbstractWebSocketMessageBrokerConfigurer;
import org.springframework.web.socket.config.annotation.EnableWebSocketMessageBroker;
import org.springframework.web.socket.config.annotation.StompEndpointRegistry;

/**
 * @author hzb
 * @date 2018/09/30
 */
@Configuration
@EnableWebSocketMessageBroker
public class WebsocketConfig extends AbstractWebSocketMessageBrokerConfigurer {

    @Override
    public void configureMessageBroker(MessageBrokerRegistry config) {
        //启用/userTest,/topicTest,两个消息前缀
        config.enableSimpleBroker("/userTest","/topicTest");
        //如果不设置下面这一句,用convertAndSendToUser来发送消息,前端订阅只能用/user开头。
        config.setUserDestinationPrefix("/userTest");
        //客户端(html等)向服务端发送消息的前缀
        config.setApplicationDestinationPrefixes("/app");
    }
    @Override
    public void registerStompEndpoints(StompEndpointRegistry stompEndpointRegistry) {
        //客户端和服务端进行连接的endpoint
        stompEndpointRegistry.addEndpoint("/websocket-endpoint").setAllowedOrigins("*").withSockJS();
    }
}
5、消息管理实现类
package com.websocket.controller;

import org.springframework.beans.factory.annotation.Autowired;
import org.springframework.messaging.handler.annotation.MessageMapping;
import org.springframework.messaging.handler.annotation.SendTo;
import org.springframework.messaging.simp.SimpMessagingTemplate;
import org.springframework.scheduling.annotation.EnableScheduling;
import org.springframework.scheduling.annotation.Scheduled;
import org.springframework.stereotype.Controller;
import org.springframework.web.bind.annotation.GetMapping;

import java.text.DateFormat;
import java.text.SimpleDateFormat;
import java.util.Date;

/**
 * @author hzb
 * @date 2018/09/30
 */
@Controller
@EnableScheduling
public class WebsocketMsgController {

    @Autowired
    private SimpMessagingTemplate messagingTemplate;

    @GetMapping("/")
    public String index() {
        return "index";
    }

    /**
     * index.html将message发送给后端,后端再将消息重组后发送到/topicTest/web-to-server-to-web
     * @param message
     * @return
     * @throws Exception
     */
    @MessageMapping("/send")
    @SendTo("/topicTest/web-to-server-to-web")
    public String send(String message) throws Exception {
        DateFormat df = new SimpleDateFormat("yyyy-MM-dd HH:mm:ss");
        return "服务器将原消息返回: "+df.format(new Date())+" :" + message;
    }

    /**
     * 最基本的服务器端主动推送消息给前端
     * @return
     * @throws Exception
     */
    @Scheduled(fixedRate = 1000)
    public String serverTime() throws Exception {
        // 发现消息
        DateFormat df = new SimpleDateFormat("yyyy-MM-dd HH:mm:ss");
        messagingTemplate.convertAndSend("/topicTest/servertime", df.format(new Date()));
        return "servertime";
    }

    /**
     * 以下面这种方式发送消息,前端订阅消息的方式为: stompClient.subscribe(‘/userTest/hzb/info‘
     * @return
     * @throws Exception
     */
    @Scheduled(fixedRate = 1000)
    public String serverTimeToUser() throws Exception {
        // 发现消息
        DateFormat df = new SimpleDateFormat("yyyy-MM-dd HH:mm:ss");
        //这里虽然没有指定发送前缀为/userTest,但是在WebsocketConfig.java中设置了config.setUserDestinationPrefix("/userTest"),
        //否则默认为/user
        messagingTemplate.convertAndSendToUser("hzb","/info", df.format(new Date()));
        return "serverTimeToUser";
    }
}
前端代码:index.html
<!DOCTYPE html>
<html>
<head>
    <title>玩转spring boot——websocket</title>
    <script src="//cdn.bootcss.com/angular.js/1.5.6/angular.min.js"></script>
    <script src="https://cdn.bootcss.com/sockjs-client/1.1.4/sockjs.min.js"></script>
    <script src="https://cdn.bootcss.com/stomp.js/2.3.3/stomp.min.js"></script>
    <script type="text/javascript">
        var stompClient = null;

        var app = angular.module(‘app‘, []);
        app.controller(‘MainController‘, function($rootScope, $scope, $http) {

            $scope.data = {
                connected : false,
                sendMessage : ‘‘,
                receivMessages : []
            };

            //连接
            $scope.connect = function() {
                var socket = new SockJS(‘/websocket-endpoint‘);
                stompClient = Stomp.over(socket);
                stompClient.connect({}, function(frame) {
                    // 订阅后端主动推消息到前端的topic
                    stompClient.subscribe(‘/topicTest/servertime‘, function(r) {
                        $scope.data.time = ‘当前服务器时间:‘ + r.body;
                        $scope.data.connected = true;
                        $scope.$apply();
                    });
                    // 阅后端主动推消息到前端的topic,只有指定的用户(hzb)收到的的消息
                    stompClient.subscribe(‘/userTest/hzb/info‘, function(r) {
                        $scope.data.hzbtime = ‘当前服务器时间:‘ + r.body;
                        $scope.data.connected = true;
                        $scope.$apply();
                    });
                    // 订阅前端发到后台,后台又将消息返回前台的topic
                    stompClient.subscribe(‘/topicTest/web-to-server-to-web‘, function(msg) {
                        $scope.data.receivMessages.push(msg.body);
                        $scope.data.connected = true;
                        $scope.$apply();
                    });


                    $scope.data.connected = true;
                    $scope.$apply();
                });
            };

            $scope.disconnect = function() {
                if (stompClient != null) {
                    stompClient.disconnect();
                }
                $scope.data.connected = false;
            }

            $scope.send = function() {
                stompClient.send("/app/send", {}, JSON.stringify({
                    ‘message‘ : $scope.data.sendMessage
                }));
            }
        });
    </script>
</head>
<body ng-app="app" ng-controller="MainController">

  <h2>websocket示例</h2>
  <label>WebSocket连接状态:</label>
  <button type="button" ng-disabled="data.connected" ng-click="connect()">连接</button>
  <button type="button" ng-click="disconnect()" ng-disabled="!data.connected">断开</button>
  <br/>
  <br/>
  <div ng-show="data.connected">
    <h4>以下是websocket的服务端主动推送消息到页面的例子</h4>
        <label>{{data.time}}</label> <br/> <br/>
    </div>
  <div ng-show="data.connected">
    <h4>以下是websocket的服务端主动推送消息到页面的例子,只有hzb这个用户收到</h4>
        <label>{{data.hzbtime}}</label> <br/> <br/>
    </div>
  <div ng-show="data.connected">
    <h4>以下是websocket的客户端发消息到服务端,服务端再将该消息返回到客户端(页面)的例子</h4>
            <input type="text" ng-model="data.sendMessage" placeholder="请输入内容..." />
        <button ng-click="send()" type="button">发送</button>
        <br/>
        <table>
          <thead>
        <tr>
            <th>消息内容:</th>
          </tr>
          </thead>
          <tbody>
        <tr ng-repeat="messageContent in data.receivMessages">
              <td>{{messageContent}}</td>
          </tr>
          </tbody>
        </table>
    </div>
</body>
</html>
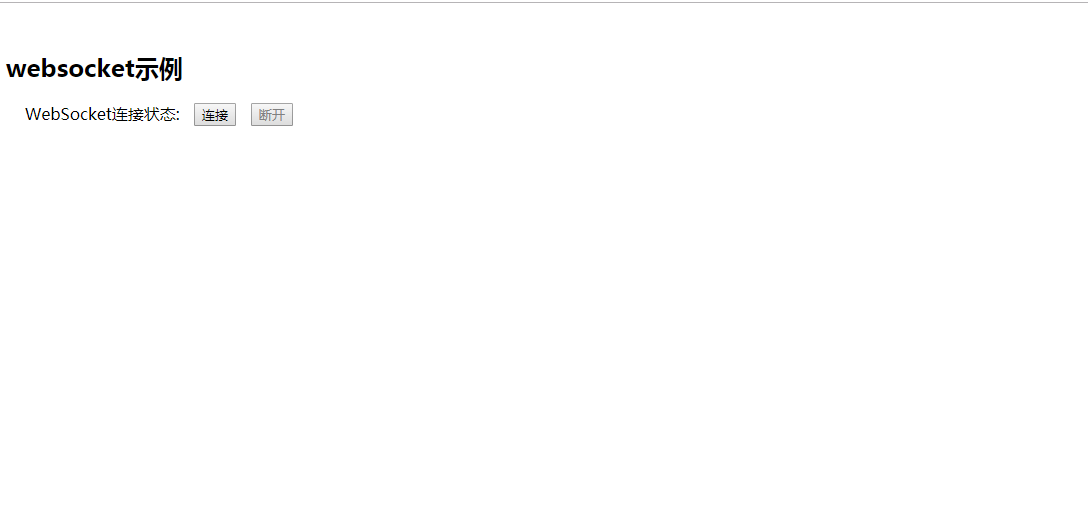
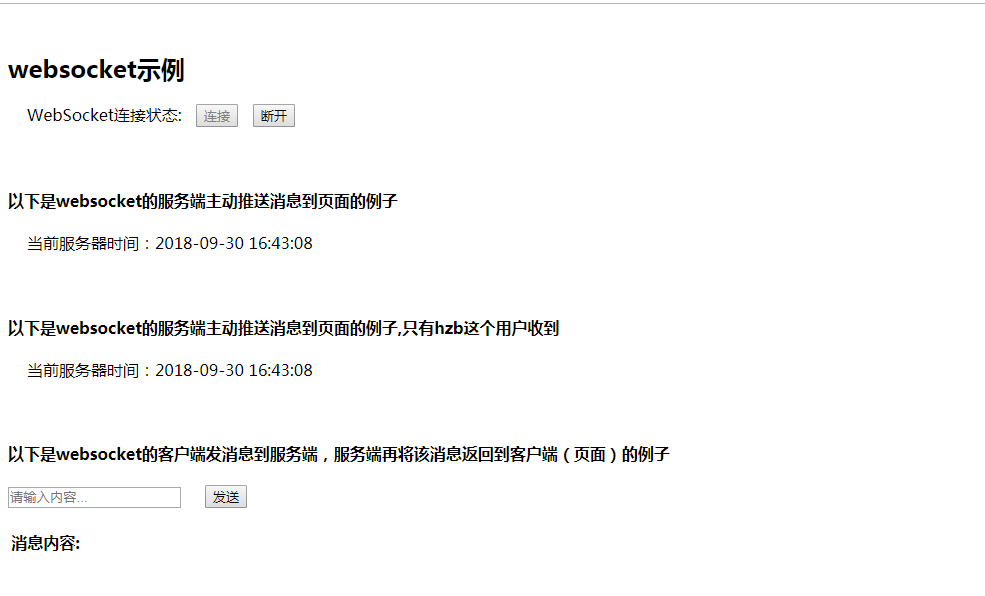
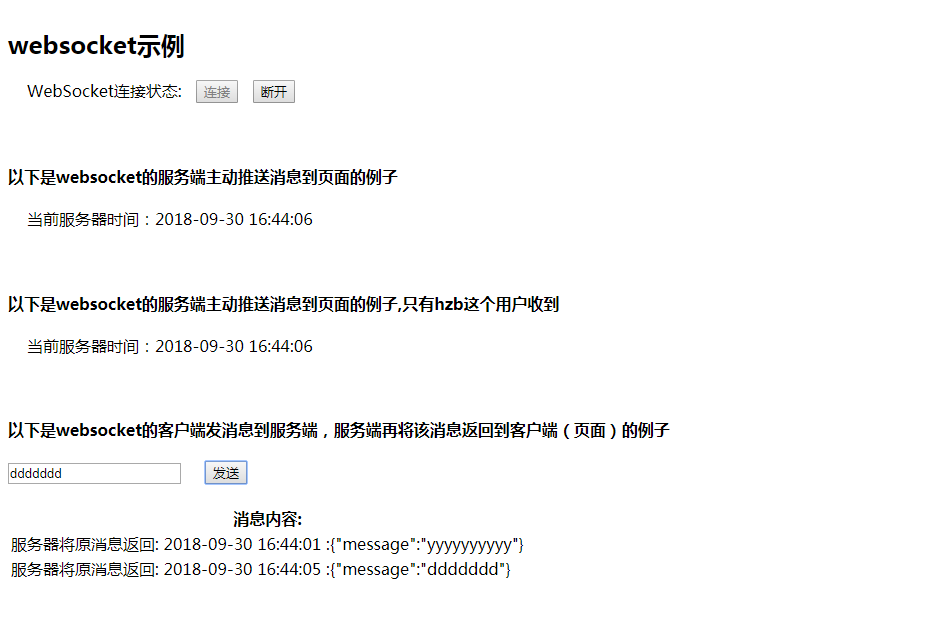
运行效果
没有点“连接”之前
点了“连接”之后
输入内容:点击发送
标签:否则 cti module pcl string col sim put apply
原文地址:https://www.cnblogs.com/Javastudy-note/p/13818174.html