标签:mic http log dev 字符串 单元 variable 隐藏 optimizer
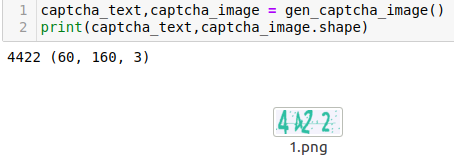
from captcha.image import ImageCaptcha  #生产验证码图片
from PIL import Image
import numpy as np
import matplotlib.pyplot as plt
import random
import sys
numbers = [‘0‘,‘1‘,‘2‘,‘3‘,‘4‘,‘5‘,‘6‘,‘7‘,‘8‘,‘9‘] # a ..  z  A  .. Z
max_captcha = 4
char_set_len = 10
image_height = 60
image_width = 160
def random_captcha_text(charSet=numbers,charLen=4):
    """
    charSet:候选字符串
    charLen:验证码长度
    """
    cs = ""
    for i in range(charLen):
        cs+=random.choice(charSet)
    return cs

def gen_captcha_image():
    image = ImageCaptcha()
    captcha_text = random_captcha_text()
    captcha = image.generate(captcha_text)
    #print(captcha) #<_io.BytesIO object at 0x7f87d2a343b8>
    #image.write(captcha_text,"./1.png")
    captcha_image = Image.open(captcha) #获取图片数据
    #print(captcha_image.convert("L")) #转灰度
    captcha_image = np.array(captcha_image)
    return captcha_text,captcha_image
#图片转灰度图
def convert2gray(img):
    if len(img.shape)>2:
        r,b,g=img[:,:,0],img[:,:,1],img[:,:,2]
        gray = 0.2989*r+0.5870*g+0.1140*b
        return gray
    return img
#处理标签,转40维one_hot
def text2vec(text):
    vec = np.zeros(max_captcha*char_set_len)
    for i,ch in enumerate(text):
        idx = i*char_set_len+int(ch)
        vec[idx] = 1
    return vec

#按批次生成数据
def get_next_batch(batch_size=128):
    batch_x = np.zeros((batch_size,image_height*image_width))
    batch_y = np.zeros((batch_size,max_captcha*char_set_len))

    def correct_gen_captcha_text_image():
        while True:
            text,image = gen_captcha_image()
            if image.shape == (60,160,3):
                return text,image

    for i in range(batch_size):
        text,image = correct_gen_captcha_text_image()
        image = convert2gray(image)
        batch_x[i,:] = image.flatten()/255
        batch_y[i,:] = text2vec(text)

    return batch_x,batch_y

#初始化权值
def weight_variable(shape):
    init = tf.truncated_normal(shape,stddev=0.1)
    return tf.Variable(init)

#初始化偏执单元对应权值
def bias_variable(shape):
    init = tf.constant(0.1,shape=shape)
    return tf.Variable(init)

#实现卷积层
def conv2d(x,W):
    #input : 输入的要做卷积的图片,要求为一个张量,shape为 [ batch, in_height, in_weight, in_channel ],其中batch为图片的数量,in_height 为图片高度,in_weight 为图片宽度,in_channel 为图片的通道数,灰度图该值为1,彩色图为3。(也可以用其它值,但是具体含义不是很理解)
    #filter: 卷积核,要求也是一个张量,shape为 [ filter_height, filter_weight, in_channel, out_channels ],其中 filter_height 为卷积核高度,filter_weight 为卷积核宽度,in_channel 是图像通道数 ,和 input 的 in_channel 要保持一致,out_channel 是卷积核数量。
    #strides: 卷积时在图像每一维的步长,这是一个一维的向量,[ 1, strides, strides, 1],第一位和最后一位固定必须是1
    #padding: string类型,值为“SAME” 和 “VALID”,表示的是卷积的形式,是否考虑边界。"SAME"是考虑边界,不足的时候用0去填充周围,"VALID"则不考虑
    #use_cudnn_on_gpu: bool类型,是否使用cudnn加速,默认为true
    return tf.nn.conv2d(x,W,strides=[1,1,1,1],padding="SAME")

#实现池化层
def max_pool_2x2(x):
    #value : 需要池化的输入,一般池化层接在卷积层后面,所以输入通常是feature map,依然是[batch_size, height, width, channels]这样的shape
    #k_size : 池化窗口的大小,取一个四维向量,一般是[1, height, width, 1],因为我们不想在batch和channels上做池化,所以这两个维度设为了1
    #strides : 窗口在每一个维度上滑动的步长,一般也是[1, stride,stride, 1]
    #padding: 填充的方法,SAME或VALID
    return tf.nn.max_pool(x,[1,2,2,1],strides=[1,2,2,1],padding="SAME")
X = tf.placeholder(tf.float32,[None,image_height*image_width])
Y = tf.placeholder(tf.float32,[None,char_set_len*max_captcha])
keep_drop = tf.placeholder(tf.float32)
x = tf.reshape(X,[-1,image_height,image_width,1])

#初始化的一个卷基层的权值和偏执
W_conv1 = weight_variable([3,3,1,32]) #3*3的采样窗口,1表示输入通道为1,黑白。32表示输出的通道数--表示使用了32个卷积核(最终会获得32个特征平面)
b_conv1 = bias_variable([32]) #每一个卷积核都需要一个偏执,所以我们这里要32个偏置值

#获取第一层卷积之后的激活值,以及池化层处理以后的隐藏层信息
h_conv1 = tf.nn.relu(conv2d(x,W_conv1)+b_conv1)
h_pool1 = max_pool_2x2(h_conv1)
h_pool1_drop = tf.nn.dropout(h_pool1,keep_drop)

#----conv (60,160,32)----max_pool (30,80,32)

#第二层卷积池化
W_conv2 = weight_variable([3,3,32,64]) #3*3的采样窗口,1表示输入通道为1,黑白。64表示输出的通道数--表示使用了64个卷积核(最终会获得64个特征平面)
b_conv2 = bias_variable([64]) #每一个卷积核都需要一个偏执,所以我们这里要64个偏置值

#获取第二层卷积之后的激活值,以及池化层处理以后的隐藏层信息
h_conv2 = tf.nn.relu(conv2d(h_pool1_drop,W_conv2)+b_conv2)
h_pool2 = max_pool_2x2(h_conv2)
h_pool2_drop = tf.nn.dropout(h_pool2,keep_drop)

#----conv (30,80,64)----max_pool (15,40,64)

#第三层卷积池化
W_conv3 = weight_variable([3,3,64,128]) #3*3的采样窗口,1表示输入通道为1,黑白。128表示输出的通道数--表示使用了128个卷积核(最终会获得128个特征平面)
b_conv3 = bias_variable([128]) #每一个卷积核都需要一个偏执,所以我们这里要128个偏置值

#获取第二层卷积之后的激活值,以及池化层处理以后的隐藏层信息
h_conv3 = tf.nn.relu(conv2d(h_pool2_drop,W_conv3)+b_conv3)
h_pool3 = max_pool_2x2(h_conv3)
h_pool3_drop = tf.nn.dropout(h_pool3,keep_drop)

#----conv (15,40,128)----max_pool (8,20,128)

#开始全链接层

#先将第3池化层处理后的数据扁平化
h_pool3_flat = tf.reshape(h_pool3_drop,[-1,8*20*128])

#初始化第一个全链接层权值
W_fc1 = weight_variable([8*20*128,1024]) #设置第一个全链接层单元数量为1024
b_fc1 = bias_variable([1024]) #共有1024个目标单元

#求得第一个全链接层的输出
h_fc1 = tf.nn.relu(tf.matmul(h_pool3_flat,W_fc1)+b_fc1)
h_fc1_drop = tf.nn.dropout(h_fc1,keep_drop)

#初始化第二个全链接层权值
W_fc2 = weight_variable([1024,max_captcha*char_set_len]) #开始要进行输出了
b_fc2 = bias_variable([max_captcha*char_set_len])

#prediction = tf.nn.softmax(tf.matmul(h_fc1_drop,W_fc2)+b_fc2)
#prediction = tf.nn.sigmoid(tf.matmul(h_fc1_drop,W_fc2)+b_fc2)
prediction = tf.matmul(h_fc1_drop,W_fc2)+b_fc2

#交叉熵处理获取损失
loss = tf.reduce_mean(tf.nn.sigmoid_cross_entropy_with_logits(logits=prediction,labels=Y))

#根据损失函数进行优化
train_step = tf.train.AdamOptimizer(1e-3).minimize(loss)

#转换结果格式,开始对比
pred = tf.reshape(prediction,[-1,max_captcha,char_set_len])
max_pred_idx = tf.argmax(pred,2)
max_lable_idx = tf.arg_max(tf.reshape(Y,[-1,max_captcha,char_set_len]),2)

#返回预测结果到bool列表
correct_pred = tf.equal(max_pred_idx,max_lable_idx)
#返回准确率tf.cast强制转换
accuracy = tf.reduce_mean(tf.cast(correct_pred,tf.float32))
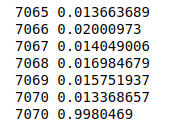
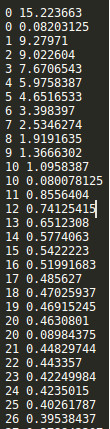
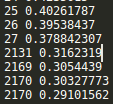
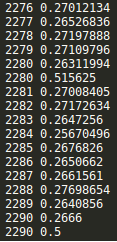
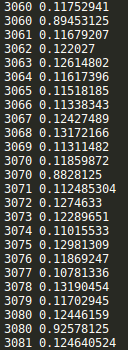
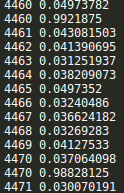
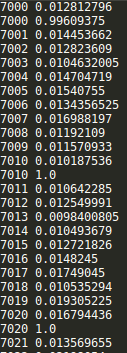
saver = tf.train.Saver()

with tf.Session() as sess:
    sess.run(tf.global_variables_initializer())
    step = 0
    while True:
        batch_x,batch_y = get_next_batch()
        #hpd = sess.run(h_pool2_drop,feed_dict={X:batch_x,Y:batch_y,keep_drop:0.75})
        #print(hpd)
        _,loss_ = sess.run([train_step,loss],feed_dict={X:batch_x,Y:batch_y,keep_drop:0.75})
        print(step,loss_)
        if step % 10 == 0:
            batch_x,batch_y = get_next_batch()
            acc = sess.run(accuracy,feed_dict={X:batch_x,Y:batch_y,keep_drop:1})
            print(step,acc)
            if acc > 0.99:
                saver.save(sess, ‘./captcha/models/cnn_pic_captcha.model‘,global_step=step)
                break
        step += 1

CNN网络结构不变
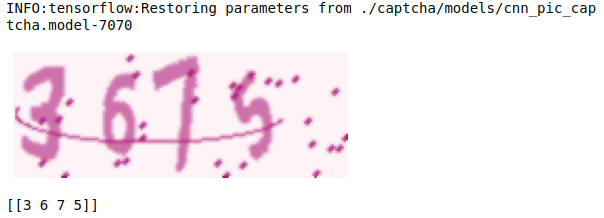
saver = tf.train.Saver()

with tf.Session() as sess:
    saver.restore(sess,"./captcha/models/cnn_pic_captcha.model-7070")

    text,image = gen_captcha_image()
    plt.figure()
    plt.imshow(image)
    plt.axis("off")
    plt.show()

    image = convert2gray(image)
    image = image.flatten()/255

    idx = sess.run(max_pred_idx,feed_dict={X:[image],keep_drop:1})
    print(idx)
标签:mic http log dev 字符串 单元 variable 隐藏 optimizer
原文地址:https://www.cnblogs.com/ssyfj/p/13964721.html