标签:文件夹 cos sub ref update 最小 并且 转发 cisco asa
来源 https://blog.51cto.com/380531251/1702308
https://www.cisco.com/c/en/us/products/security/adaptive-security-appliance-asa-software/index.html
https://www.cisco.com/c/zh_cn/products/security/asa-next-generation-firewall-services/index.html
https://www.cisco.com/c/en/us/support/security/adaptive-security-appliance-asa-software/series.html
https://www.cisco.com/c/en/us/support/security/adaptive-security-appliance-asa-software/products-installation-and-configuration-guides-list.html
https://www.cisco.com/c/en/us/td/docs/security/asa/roadmap/asaroadmap.html
https://www.cisco.com/c/zh_cn/td/docs/security/asa/asa912/asav/quick-start-book/asav-912-qsg/asav-912-qsg_chapter_0110.html
https://shvechkov.tripod.com/nptp_setup.zip
http://f.usht.ru/Cisco/IOS/ASA-PIX/KGen/Cisco%20ASA%20Keygen.exe
所需软件
Vmware worksataion虚拟机;
ASAv931,Cisco的ASAv即Vmware workstation版的ASA;
nptp软件,用于创建连接虚拟机的端口,相当于中间键;
Cisco ASA Keygen.exe,密钥机,用于创建ASA的授权License,永久激活ASA;
tftpd32.400,用于上传asdm软件到ASAv;
jre-7u45-windows-i586,使用ASDM需要安装java环境;
二.安装及初始化
1.安装ASAv
首先,下载完ASAv931.zip后,解压出来。
打开Vmware Workstation,点击【文件】--【打开】,找到ASAv931所在位置,点击里面的ASAv.vmx打开虚拟机
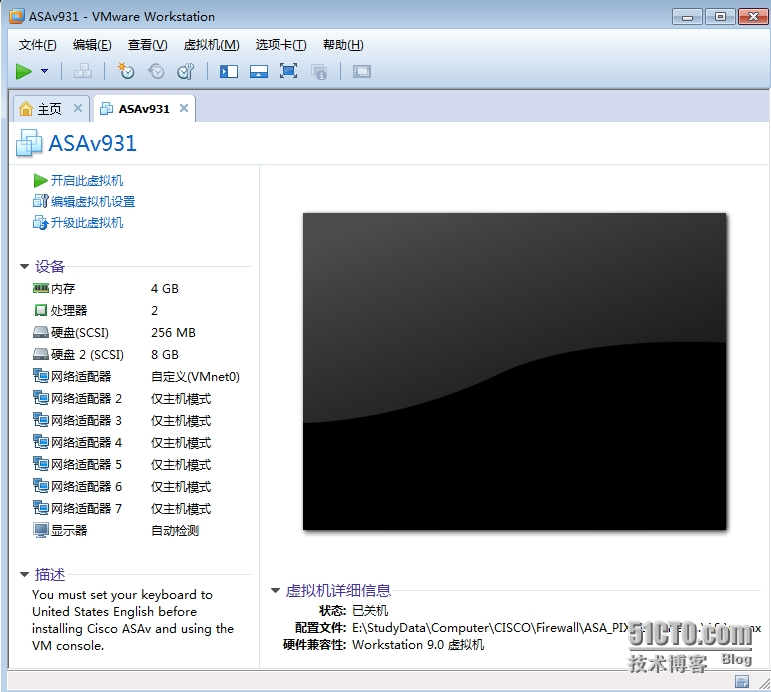
以上都是默认参数。
内存建议2G及以上,防止后期使用ASDM连接时出错;
建议添加几个网卡,方便后面的实验。每个网卡相当于一个防火墙的接口;以上网卡,第一个为管理端口:manmagement0/0;其余依次为GigabitEthernet0/0、GigabitEthernet0/1……………..
打开之后,需要为虚拟机添加一个串行接口,用于CRT或shell等软件通过telnet连接虚拟机。相当于真实设备上的Console口。
点击【编辑虚拟机设置】
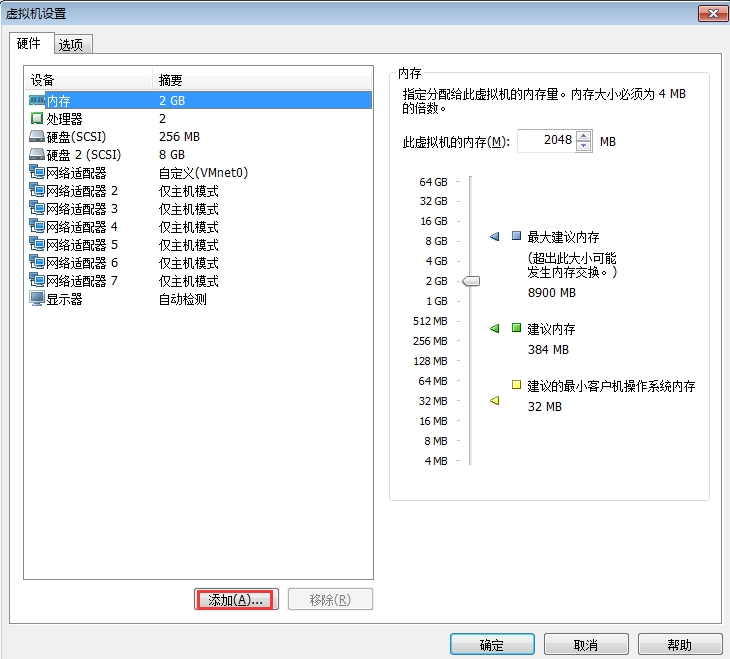
点击【添加】
选择【串行端口】
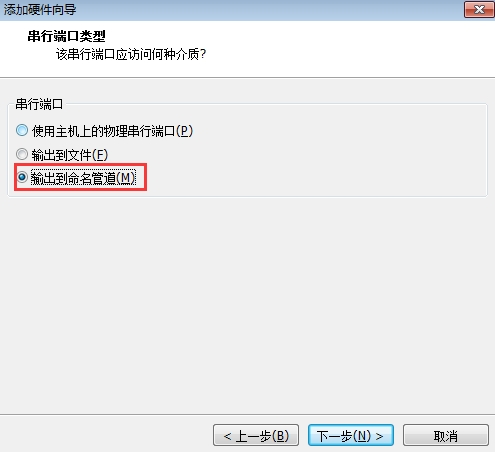
选择【输出到命名管道】
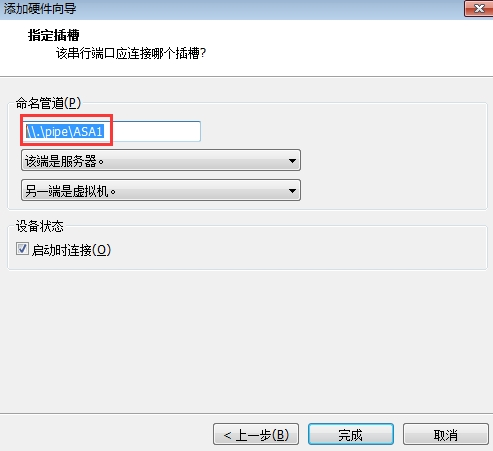
复制命名管道的内容,然后点击完成,最后点击确定创建串行端口。
打开虚拟机,启动并开始初始化
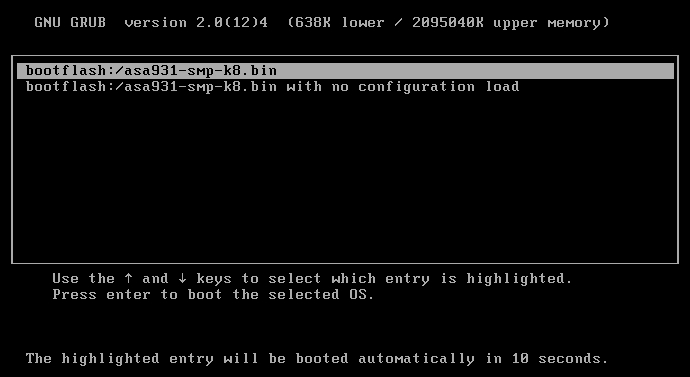
选择第一行,回车开始启动
注:
启动过程中,有的一次就能启动进入系统,有的则一直重启;如果遇到后一种情况,请多重启几次;如果还是不行,建议删除重新安装。
成功进入系统。
2.系统初始化
虽然添加了串行端口,并且进入了系统,但此时串行端口并没有打开。解压ASAv931之后,得到的文件夹里也有提示文件,内容如下
|
ASAv 虚拟化防火墙中,默认的serial口是没有打开的,根据思科的官方文档,打开serial口的方法如下: 导入了ASAv的vmware中,启动ASAv,启动完毕之后运行下列命令: ciscoasa(config)# cd coredumpinfo ciscoasa(config)# copy coredump.cfg disk0:/use_ttyS0 |
所以还需要根据提示来打开串行端口
|
ciscosa>enable Password: //默认没有密码,直接回车即可 ciscosa>config t ciscoasa(config)# cd coredumpinfo ciscoasa(config)# copy coredump.cfg disk0:/use_ttyS0 ciscos#wr ciscosa#reload //打开串行端口之后,保存配置并重启生效 |
有了串行口,还需要有一个连接的端口。此时就需要用到准备好的nptp软件;此软件相当于中间键,创建一个真机与虚拟机连接的端口。具体操作如下:
双击nptp.exe安装,得到piped.exe,然后点击打开

点击【Edit】--【new】来新建连接端口

【Pipe】处填写创建串行口时产生的【命名管道】符;
【Port】为自定义项;
填写完后,点击【Add】添加
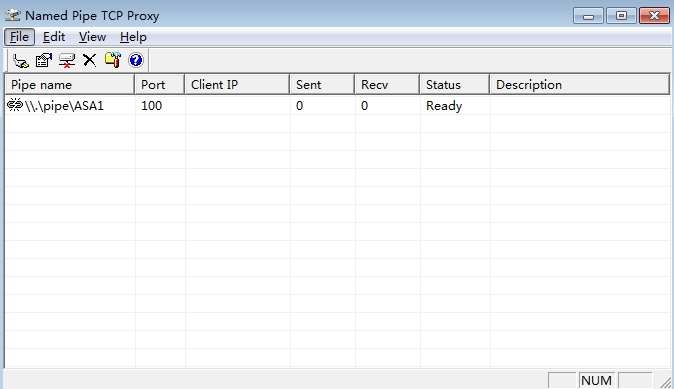
注:连接虚拟机期间,此界面不要关闭,否则不能使用CRT&shell类软件连接ASA虚拟防火墙。最小化即可。
然后打开CRT,新建会话
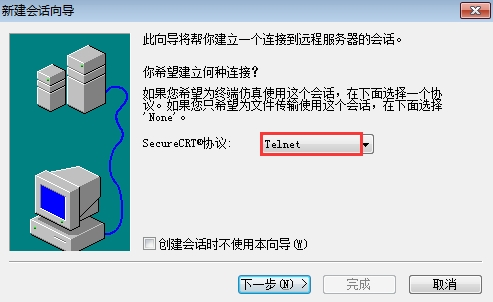
使用telnet协议。
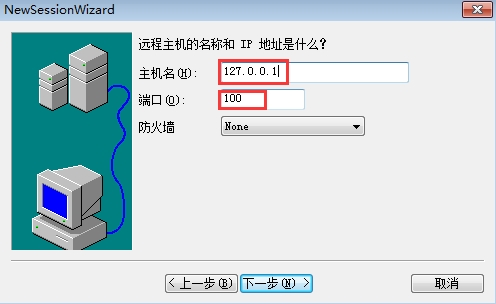
【主机名】填写如上地址
端口号填写在nptp里面设置的
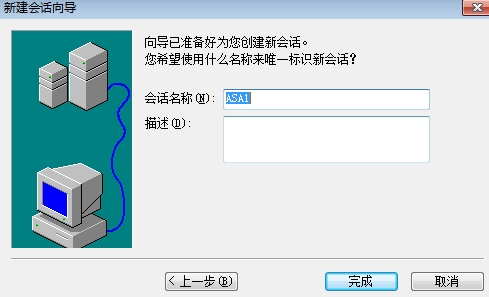
点击完成,创建会话,然后连接即可。
默认安装的ASA系统是没有授权的。很多功能需要授权之后才能使用。
使用show version查看激活状态
|
ciscoasa# show version Cisco Adaptive Security Appliance Software Version 9.3(1) //ASAv版本 Device Manager Version 7.3(1) //DM版本,版本号是ASAv版本号减2,两者要匹配
Compiled on Wed 23-Jul-14 18:16 PDT by builders System p_w_picpath file is "boot:/asa931-smp-k8.bin" Config file at boot was "startup-config"
ciscoasa up 1 min 48 secs //系统已经启动1分钟48秒
Hardware: ASAv, 2048 MB RAM, CPU Xeon 5600 series 2600 MHz, 1 CPU (2 cores) //介绍内存,CPU型号 Internal ATA Compact Flash, 256MB Slot 1: ATA Compact Flash, 8192MB BIOS Flash Firmware Hub @ 0x0, 0KB
0: Ext: Management0/0 : address is 000c.2986.4a11, irq 10 1: Ext: GigabitEthernet0/0 : address is 000c.2986.4a1b, irq 5 2: Ext: GigabitEthernet0/1 : address is 000c.2986.4a25, irq 9 3: Ext: GigabitEthernet0/2 : address is 000c.2986.4a2f, irq 10 4: Ext: GigabitEthernet0/3 : address is 000c.2986.4a39, irq 5 5: Ext: GigabitEthernet0/4 : address is 000c.2986.4a43, irq 9 6: Ext: GigabitEthernet0/5 : address is 000c.2986.4a4d, irq 11
ASAv Platform License State: Unlicensed //显示未授权 *Install 1219410848 vCPU ASAv platform license for full functionality the Running Activation Key is not valid,using default setting Licensed features for this platform: Virtual CPUs : 0 perpetual //无虚拟CPU Maximum Physical Interfaces : 10 perpetual //最大物理接口10个 Maximum VLANs : 100 perpetual //最大VLAN数 Inside Hosts : Unlimited perpetual Failover : Active/Standby perpetual //支持防火墙的备份 Encryption-DES : Enabled perpetual Encryption-3DES-AES : Enabled perpetual Security Contexts : 0 perpetual//不支持安全虚拟防火墙 GTP/GPRS : Disabled perpetual//定位未开启 AnyConnect Premium Peers : 2 perpetual AnyConnect Essentials : Disabled perpetual Other ××× Peers : 250 perpetual Total ××× Peers : 250 perpetual Shared License : Disabled perpetual AnyConnect for Mobile : Disabled perpetual AnyConnect for Cisco ××× Phone : Disabled perpetual Advanced Endpoint Assessment : Disabled perpetual UC Phone Proxy Sessions : 2 perpetual Total UC Proxy Sessions : 2 perpetual Botnet Traffic Filter : Enabled perpetual Intercompany Media Engine : Disabled perpetual Cluster : Disabled perpetual
This platform has an ASAv ××× Premium license. Serial Number: 9AGRB5FHKDK Running Permanent Activation Key: 0x00000000 0x00000000 0x00000000 0x00000000 0x00000000
Image type : Release Key version : A |
如上,只是开启了部分功能。
用Cisco ASA Keygen为系统授权
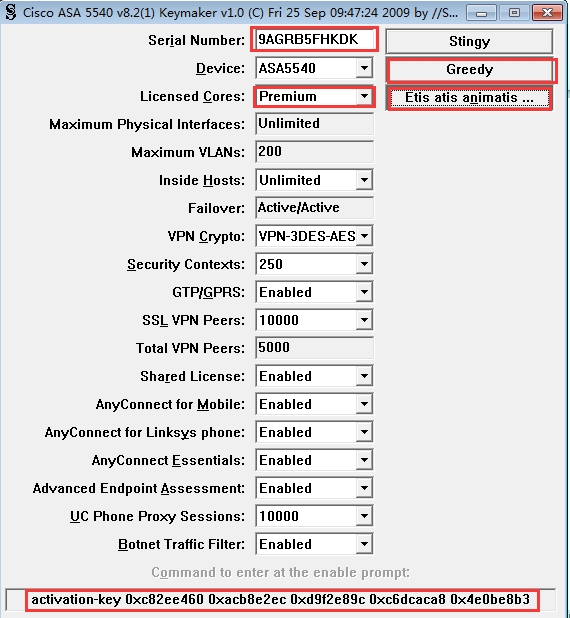
说明:
Serial Number:系统的序列号,show version可以查看系统序列号;
Licensed Cores:选择Premium,为系统永久授权。
使用步骤:
填写序列号,点击【Greedy 】--【Licensed Cores】选择【Premium】,即永久授权。点击【Etis atis animatis】…得到图片最下面的授权码。直接复制即可。
提示
如果想直接复制激活码并粘贴,请先完成CRT连接操作,否则直接在ASAv中敲命令,需手动输入。所以建议先设置好串行口的连接。
激活,直接把激活器产生的命令在ASA的全局配置模式输入即可
|
ciscoasa(config)# activation-key 0xc82ee460 0xacb8e2ec 0xd9f2e89c 0xc6dcaca8 0activation-key 0xc82ee460 0xacb8e2ec 0xd9f2e89c 0xc6dcaca8 0$ Validating activation key. This may take a few minutes... Failed to retrieve permanent activation key.
ASAv platform license state is Compliant.
********************************************************************** WARNING: AnyConnect Essentials license active. Basic ××× support is in effect. For specific details, please refer to Cisco AnyConnect ××× Client Administrator Guide. **********************************************************************
Both Running and Flash permanent activation key was updated with the requested key, and will become active after the next reload. ciscoasa(config)# wr //保存 Building configuration... Cryptochecksum: b2a5d3fb 7b56f4cf ca578695 5c26009d
3348 bytes copied in 0.40 secs [OK] |
激活之后查看
|
ciscoasa(config)# show version
Cisco Adaptive Security Appliance Software Version 9.3(1) Device Manager Version 7.3(1)
Compiled on Wed 23-Jul-14 18:16 PDT by builders System p_w_picpath file is "boot:/asa931-smp-k8.bin" Config file at boot was "startup-config"
ciscoasa up 1 min 48 secs
Hardware: ASAv, 2048 MB RAM, CPU Xeon 5600 series 2600 MHz, 1 CPU (2 cores) Internal ATA Compact Flash, 256MB Slot 1: ATA Compact Flash, 8192MB BIOS Flash Firmware Hub @ 0x0, 0KB
0: Ext: Management0/0 : address is 000c.2986.4a11, irq 10 1: Ext: GigabitEthernet0/0 : address is 000c.2986.4a1b, irq 5 2: Ext: GigabitEthernet0/1 : address is 000c.2986.4a25, irq 9 3: Ext: GigabitEthernet0/2 : address is 000c.2986.4a2f, irq 10 4: Ext: GigabitEthernet0/3 : address is 000c.2986.4a39, irq 5 5: Ext: GigabitEthernet0/4 : address is 000c.2986.4a43, irq 9 6: Ext: GigabitEthernet0/5 : address is 000c.2986.4a4d, irq 11
ASAv Platform License State: Compliant The Running Activation Key feature: 10000 AnyConnect Premium sessions exceed the limit on the platform, reduced to 250 AnyConnect Premium sessions. The Running Activation Key feature: 10000 UC Proxy sessions exceed the limit on the platform, reduced to 500 UC Proxy sessions.
Licensed features for this platform: Virtual CPUs : 3 perpetual Maximum Physical Interfaces : 10 perpetual Maximum VLANs : 100 perpetual Inside Hosts : Unlimited perpetual Failover : Active/Standby perpetual Encryption-DES : Enabled perpetual Encryption-3DES-AES : Enabled perpetual Security Contexts : 0 perpetual GTP/GPRS : Enabled perpetual AnyConnect Premium Peers : 250 perpetual AnyConnect Essentials : 250 perpetual Other ××× Peers : 250 perpetual Total ××× Peers : 250 perpetual Shared License : Enabled perpetual AnyConnect for Mobile : Enabled perpetual AnyConnect for Cisco ××× Phone : Enabled perpetual Advanced Endpoint Assessment : Enabled perpetual UC Phone Proxy Sessions : 500 perpetual Total UC Proxy Sessions : 500 perpetual Botnet Traffic Filter : Enabled perpetual Intercompany Media Engine : Disabled perpetual Cluster : Disabled perpetual
This platform has an ASAv ××× Premium license.
Serial Number: 9A65V2SMUFT Running Permanent Activation Key: 0x4037f240 0xe879e34c 0x5d922cd8 0xf1500454 0x8b30da9b
Image type : Release Key version : A
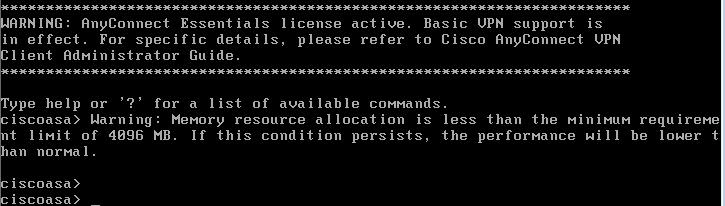
Configuration has not been modified since last system restart. ciscoasa(config)# Warning: Memory resource allocation is less than the minimum requirement limit of 4096 MB. If this condition persists, the performance will be lower than normal. |
激活成功。
3.安装图形化管理界面ASDM
Cisco的ASA也有图形化管理界面,是cisco官方出版的软件—asdm图形化管理界面。最为安全产品,各大厂商都支持图形化界面,Cisco也不例外,图形化与CLI均可实现配置。下面简单介绍符合安装图形化管理界面ASDM
安装图形化管理界面,要保证ASA有asdm这款软件,当然,对应不同的ASA,asdm也是不同的,前面介绍过,asdm的版本号是ASA的版本号减2得到,所以此处需要asdm-731.bin这个版本。
那么ASA中有没有这个软件呢?可以查看flash
|
ciscoasa# show disk0: --#-- --length-- -----date/time------ path 9 4096 Jun 14 2014 22:55:44 log 10 4096 Jun 14 2014 22:57:46 coredumpinfo 11 59 Jun 14 2014 22:57:46 coredumpinfo/coredump.cfg 86 25088760 Nov 22 2014 18:50:26 asdm-731.bin 8 59 Oct 12 2015 15:09:16 use_ttyS0 87 12378114 Nov 22 2014 18:40:58 anyconnect-linux-64-4.0.00048-k9.pkg 88 2241667 Nov 22 2014 18:41:58 anyconnect-macosx-i386-compliance-3.6.9492.2.pkg 89 16202135 Nov 22 2014 18:42:30 anyconnect-win-4.0.00048-k9.pkg 90 15328888 Nov 22 2014 18:45:18 anyconnect-macosx-i386-4.0.00048-k9.pkg 91 4700062 Nov 22 2014 18:47:36 anyconnect-win-compliance-3.6.9492.2.pkg
8571076608 bytes total (8483897344 bytes free) |
存在此软件。直接激活即可。
在激活之前,需要介绍下,当没有这个软件时,如何上传到ASAv中。此时,就要用到准备的tftpd32软件。此软件可以把本地计算机模拟为tftp服务器。可以实现上传与下载。
当然,要实现上传与下载,需要本地机与ASAv之间能够通信。所以需要把ASAv与本地机进行桥接。直接把ASAv的管理口即第一块网卡与本地进行桥接即可。
然后,修改虚拟防火墙的管理端口的地址,与本地敲击网卡在同一个网段即可
|
ciscoasa# config t ciscoasa(config)# inter management 0/0 ciscoasa(config-if)# ip add 192.168.10.100 255.255.255.0 Waiting for the earlier web*** instance to terminate... Previous instance shut down. Starting a new one. ciscoasa(config-if)# show ip add System IP Addresses: Interface Name IP address Subnet mask Method Management0/0 mgmt 192.168.10.100 255.255.255.0 manual Current IP Addresses: Interface Name IP address Subnet mask Method Management0/0 mgmt 192.168.10.100 255.255.255.0 manual |
注:防火墙的管理端口缺省只用于管理,不能实现与其他端口之间的流量转发。如果想让管理端口实现与其他端口之间的流量转发,需要在管理端口中使用命令:no management-only.但是此命令需要授权之后才能使用。
开始上传asdm软件
打开之前准备的tftpd文件,把asdm软件放入此文件夹
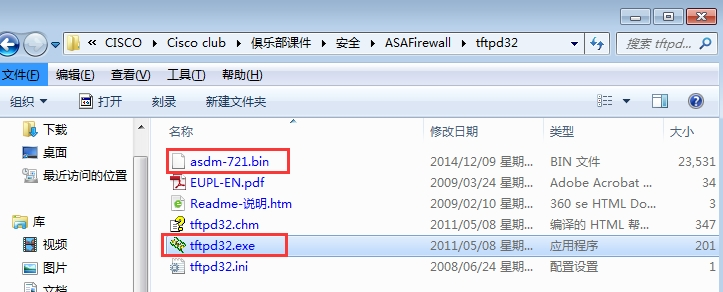
(上传到ASA的软件必须与tftp软件在同一个文件夹)
打开tftpd32软件
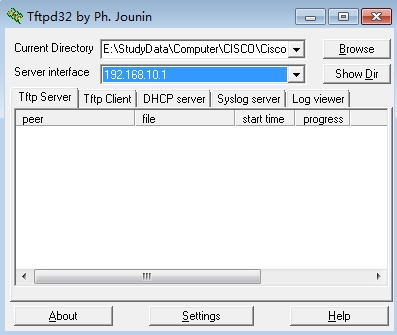
选择路径并选择本机IP(安装此软件是把本机当成了TFTP服务器,所以地址应该是本机的地址)
然后打开CRT登录界面,做如下操作
|
ciscoasa# copy tftp flash:
Address or name of remote host []? 192.168.10.100 <ASAv的地址> Source filename []? asdm-721.bin <源文件名> Destination filename [asdm-721.bin]? <目的文件名保持不变> Accessing tftp://192.168.10.1/asdm-721.bin...!!!!!!!!!!!!!!!!!!!!!!!!!!!!!!!!!!!!!!!!!!!!!!!!!!!!!!!!!!!!!!!!!!!!!!!!!!!!!!!!!!!!!!!!!!!!!!!!!!!!!!!!!!!!!!! Writing file disk0:/asdm-721.bin... !!!!!!!!!!!!!!!!!!!!!!!!!!!!!!!!!!!!!!!!!!!!!!!!!!!!!!!!!!!!!!!!!!!!!!!!!!!!!!!!!!!!!!!!!!!!!!!!!!!!!!!!!!!!!!!!!!!!!!!!!!!!!!!!!!!!!!!!!!!!!!!!!!!!!!!!!!!! 24095116 bytes copied in 12.590 secs (2007926 bytes/sec) |
安装(或说激活)ASDM软件
|
ciscoasa(config)# asdm p_w_picpath disk0:/asdm-731.bin <此命令安装asdm软件,但不会提示> |
开启http服务并设置允许连接的远程主机
|
ciscoasa(config)# http server enable ciscoasa(config)# http 192.168.10.0 255.255.255.0 mgmt |
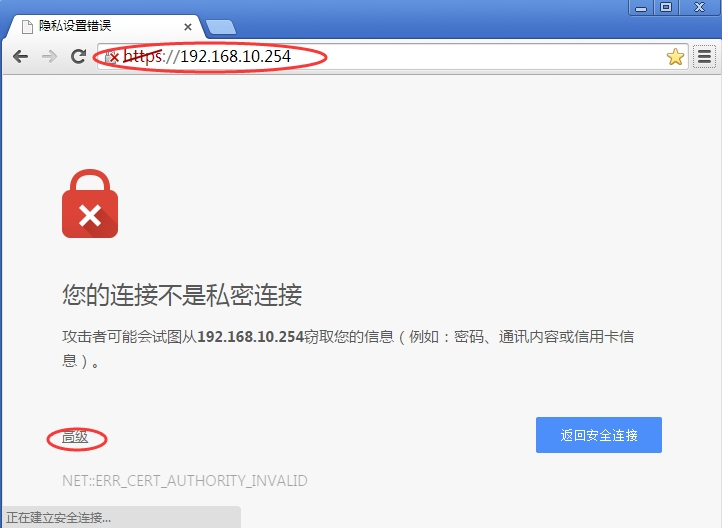
注:虽然是http服务,但是web连接使用的是https协议。安全产品的web登录都是https协议。
创建登录账户并设置http登录本地验证
|
ciscoasa(config)# username user1 password woaimsj privilege 15 ciscoasa(config)# aaa authentication http console LOCAL |
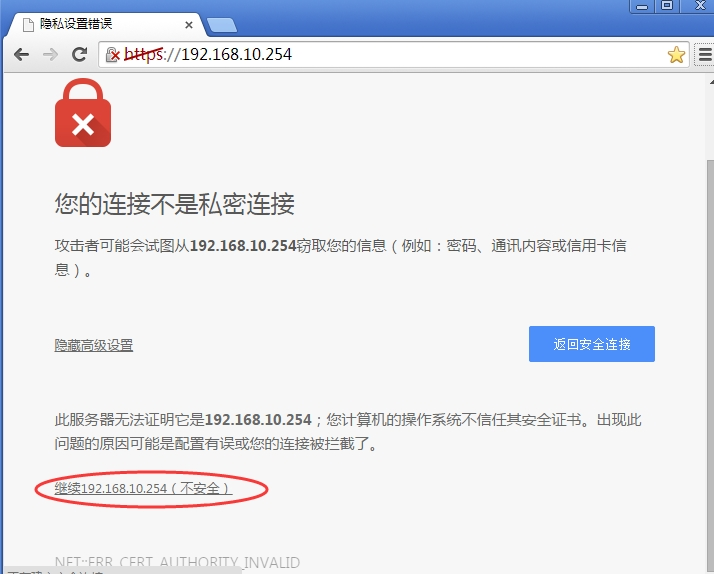
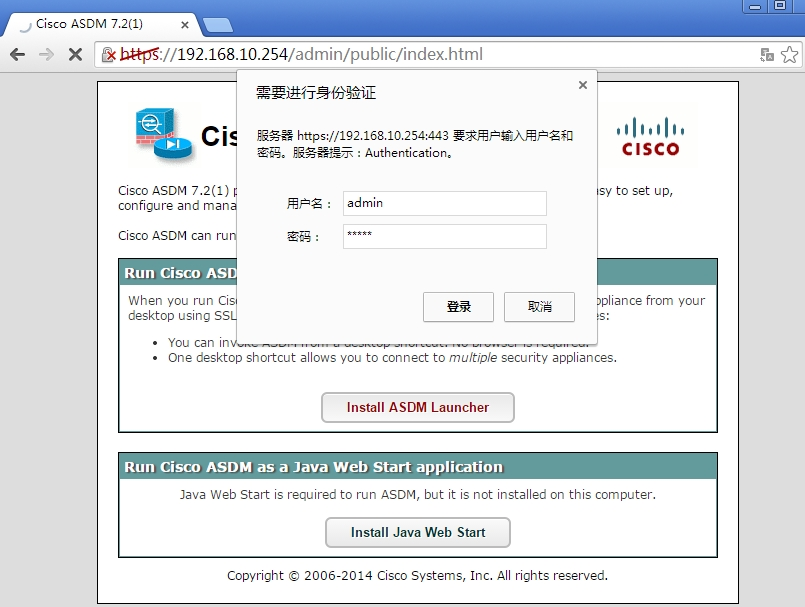
打开浏览器访问ASA虚拟机

如图:图形化管理界面要安装两个软件:ASDM Launcher、JAVA软件
ASDM的安装,必须是基于JAVA环境的,所以需要安装JAVA。
首先安装准备好的JAVA软件,安装过程略。
然后点击安装ASDM Launcher,点击后输入ASA上创建的账户登陆
登录后,会直接提示运行。点击运行,然后下一步直至完成即可。安装完成后会在桌面上生成一个图标,直接打开,如下:
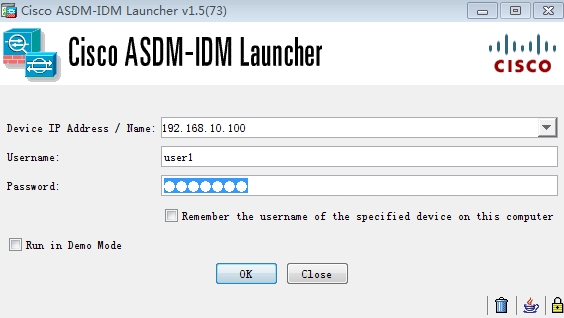
输入ASAv的地址及账户,点击OK登录即可
登录后的界面如下:
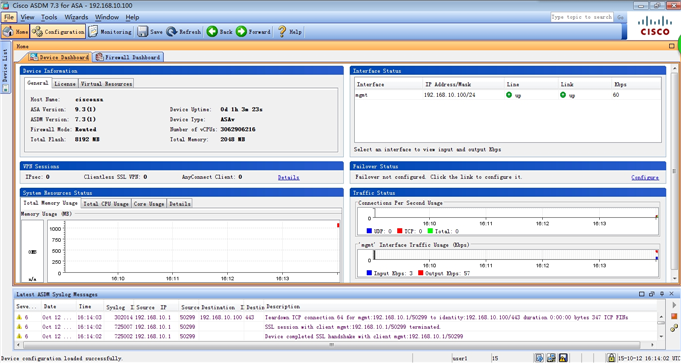
以后的登录就是使用此软件,不在使用web登录。如需登录,直接点击桌面上的图标即可。
============== End
标签:文件夹 cos sub ref update 最小 并且 转发 cisco asa
原文地址:https://www.cnblogs.com/lsgxeva/p/14288791.html