标签:log 一个 nta encoding initial block lazy ica 单元格
?简介
Tablelayout 类以行和列的形式对控件进行管理,每一行为一个 TableRow 对象,或一个 View 控件。
当为 TableRow 对象时,可在 TableRow 下添加子控件,默认情况下,每个子控件占据一列。
当为View时,该 View 将独占一行。
?TableLayout行列数的确定
如果我们直接往TableLayout中添加组件的话,那么这个组件将占满一行;
如果我们想一行上有多个组件的话,就要添加一个 TableRow 的容器,把组件都丢到里面;
TableRow 中的组件个数就决定了该行有多少列,而列的宽度由含有最多子控件的 TableRow 决定;
TableRow 的 layout_width 属性,默认是 martch_parent 的,我们自己设置成其他的值也不会生效;
但是 layout_height 默认是 wrap_content 的,我们可以自己设置大小;
整个表格布局的宽度取决于父容器的宽度(占满父容器本身)
有多少行就要自己数啦,一个 TableRow 占一行,一个单独的 View 也占一行;
多少列则是看 TableRow 中的组件个数,组件最多的就是 TableLayout 的列数;
比如第一TableRow含2个子控件,第二个TableRow含3个,第三个TableRow含4个,那么该TableLayout的列数为4;
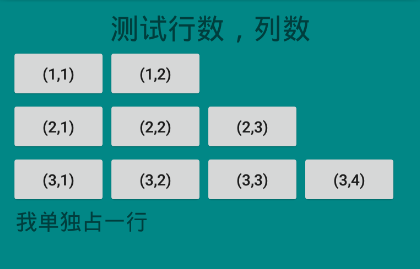
<?xml version="1.0" encoding="utf-8"?>
<LinearLayout xmlns:android="http://schemas.android.com/apk/res/android"
    android:layout_width="match_parent"
    android:layout_height="match_parent"
    android:orientation="vertical"
    android:padding="10dp"
    android:background="@color/teal_700">

    <TextView
        android:layout_width="match_parent"
        android:layout_height="wrap_content"
        android:gravity="center"
        android:text="测试行数,列数"
        android:textSize="26sp"/>
    <TableLayout
        android:layout_width="match_parent"
        android:layout_height="wrap_content">

        <TableRow
            android:layout_height="match_parent">

            <Button
                android:text="(1,1)"/>
            <Button
                android:text="(1,2)"/>
        </TableRow>
        <TableRow
            android:layout_height="match_parent">

            <Button
                android:text="(2,1)"/>
            <Button
                android:text="(2,2)"/>
            <Button
                android:text="(2,3)"/>
        </TableRow>
        <TableRow
            android:layout_height="match_parent">

            <Button
                android:text="(3,1)"/>
            <Button
                android:text="(3,2)"/>
            <Button
                android:text="(3,3)"/>
            <Button
                android:text="(3,4)"/>
        </TableRow>
        <TextView
            android:layout_marginLeft="5dp"
            android:text="我单独占一行"
            android:textSize="20sp"/>
    </TableLayout>
</LinearLayout>
运行效果:
行数 = 三个<TableRow> + 一个<TextView> = 4行
列数 = max{2,3,4} = 4列;
?简介
- android:stretchColumns : 设置运行被拉伸的列的列序号
- android:shrinkColumns : 设置允许被收缩的列的列序号
- android:collapseColumns : 设置需要被隐藏的列的序号
以上这三个属性的列号都是从 0 开始算的,比如 stretchColunmns = "2",对应的是第 3 列;
可以设置多个,用逗号隔开比如 stretchColunmns = "0,2";
如果是所有列都生效,则用"*"号即可;
?stretchColumns
android:stretchColumns : 设置可伸展的列,该列可以向行方向伸展,最多可占据一整行。
先写出一个基础布局,在此基础上测试 strechColumns:
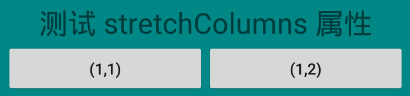
<?xml version="1.0" encoding="utf-8"?>
<LinearLayout xmlns:android="http://schemas.android.com/apk/res/android"
    android:layout_width="match_parent"
    android:layout_height="match_parent"
    android:orientation="vertical"
    android:padding="10dp"
    android:background="@color/teal_700">

    <TextView
        android:layout_width="match_parent"
        android:layout_height="wrap_content"
        android:gravity="center"
        android:text="测试 stretchColumns 属性"
        android:textSize="26sp"/>

    <TableLayout
        android:layout_width="match_parent"
        android:layout_height="wrap_content">
        <TableRow
            android:layout_height="match_parent">
            <Button
                android:layout_width="wrap_content"
                android:text="(1,1)"/>
            <Button
                android:layout_width="wrap_content"
                android:text="(1,2)"/>
        </TableRow>

    </TableLayout>
</LinearLayout>
运行效果:
如图可知,这两个 Button 并没有占满整行,如何通过设置将这两个控件均匀占满整行呢?
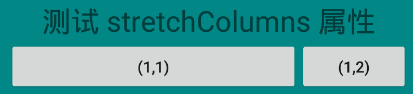
添加语句 android:stretchColumns="0,1" :
<?xml version="1.0" encoding="utf-8"?>
<LinearLayout xmlns:android="http://schemas.android.com/apk/res/android"
    android:layout_width="match_parent"
    android:layout_height="match_parent"
    android:orientation="vertical"
    android:padding="10dp"
    android:background="@color/teal_700">

    <TextView
        android:layout_width="match_parent"
        android:layout_height="wrap_content"
        android:gravity="center"
        android:text="测试 stretchColumns 属性"
        android:textSize="26sp"/>

    <TableLayout
        android:layout_width="match_parent"
        android:layout_height="wrap_content"
        android:stretchColumns="0,1">
        <TableRow
            android:layout_height="match_parent">
            <Button
                android:layout_width="wrap_content"
                android:text="(1,1)"/>
            <Button
                android:layout_width="wrap_content"
                android:text="(1,2)"/>
        </TableRow>

    </TableLayout>
</LinearLayout>
运行效果:
当然,你也可以单独拉伸 (1,1);
修改语句: android:stretchColumns="0" ;
运行效果:
?shrinkColumns
同样先写出一个基础布局,在此基础上测试 shrinkColumns:
<?xml version="1.0" encoding="utf-8"?>
<LinearLayout xmlns:android="http://schemas.android.com/apk/res/android"
    android:layout_width="match_parent"
    android:layout_height="match_parent"
    android:orientation="vertical"
    android:padding="10dp"
    android:background="@color/teal_700">

    <TextView
        android:layout_width="match_parent"
        android:layout_height="wrap_content"
        android:gravity="center"
        android:text="测试 shrinkColumns 属性"
        android:textSize="26sp"/>

    <TableLayout
        android:layout_width="match_parent"
        android:layout_height="wrap_content"
        android:stretchColumns="0"
        android:shrinkColumns="2">
        <TableRow
            android:layout_height="match_parent">
            <Button
                android:id="@+id/btn_0"
                android:layout_width="wrap_content"
                android:text="(1,1)"/>
            <Button
                android:id="@+id/btn_1"
                android:layout_width="wrap_content"
                android:text="(1,2)"/>
            <Button
                android:id="@+id/btn_2"
                android:layout_width="wrap_content"
                android:text="(1,3)"/>
            <Button
                android:id="@+id/btn_3"
                android:layout_width="wrap_content"
                android:text="(1,4)"/>
        </TableRow>

    </TableLayout>
</LinearLayout>
可以看到,通过 android:stretchColumns="0" 将 btn_0 设置成 stretchColumns;
通过 android:shrinkColumns="2" 将 btn_2 设置成 shrinkColumns;
运行效果:
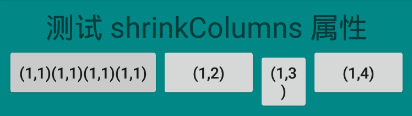
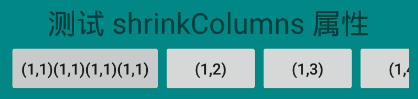
现在,我将 btn_0 设置的 Text 改为 (1,1)(1,1)(1,1)(1,1):
<?xml version="1.0" encoding="utf-8"?>
<LinearLayout xmlns:android="http://schemas.android.com/apk/res/android"
    android:layout_width="match_parent"
    android:layout_height="match_parent"
    android:orientation="vertical"
    android:padding="10dp"
    android:background="@color/teal_700">

    <TextView
        android:layout_width="match_parent"
        android:layout_height="wrap_content"
        android:gravity="center"
        android:text="测试 shrinkColumns 属性"
        android:textSize="26sp"/>

    <TableLayout
        android:layout_width="match_parent"
        android:layout_height="wrap_content"
        android:stretchColumns="0"
        android:shrinkColumns="2">
        <TableRow
            android:layout_height="match_parent">
            <Button
                android:id="@+id/btn_0"
                android:layout_width="wrap_content"
                android:text="(1,1)(1,1)(1,1)(1,1)"/>
            <Button
                android:id="@+id/btn_1"
                android:layout_width="wrap_content"
                android:text="(1,2)"/>
            <Button
                android:id="@+id/btn_2"
                android:layout_width="wrap_content"
                android:text="(1,3)"/>
            <Button
                android:id="@+id/btn_3"
                android:layout_width="wrap_content"
                android:text="(1,4)"/>
        </TableRow>

    </TableLayout>
</LinearLayout>
运行效果:
如果将 android:shrinkColumns="2" 这个语句去掉呢?
运行效果:
对比一下,是不是很容易得知 shrinkColunms 的作用?
如果不给 btn_2 设置这个属性,那么在 btn_0 拉伸的时候,将优先占用 btn_3 的空间;
如果给 btn_2 设置这个属性,那么优先占用 btn_2 的空间。
?collapseColumns
同样,还是先写出一个基础布局:
<?xml version="1.0" encoding="utf-8"?>
<LinearLayout xmlns:android="http://schemas.android.com/apk/res/android"
    android:layout_width="match_parent"
    android:layout_height="match_parent"
    android:orientation="vertical"
    android:padding="10dp"
    android:background="@color/teal_700">

    <TextView
        android:layout_width="match_parent"
        android:layout_height="wrap_content"
        android:gravity="center"
        android:text="测试 collapseColumns 属性"
        android:textSize="26sp"/>

    <TableLayout
        android:layout_width="match_parent"
        android:layout_height="wrap_content"
        android:stretchColumns="*">
        <TableRow
            android:layout_height="match_parent">
            <Button
                android:id="@+id/btn_0"
                android:layout_width="wrap_content"
                android:text="(1,1)"/>
            <Button
                android:id="@+id/btn_1"
                android:layout_width="wrap_content"
                android:text="(1,2)"/>
            <Button
                android:id="@+id/btn_2"
                android:layout_width="wrap_content"
                android:text="(1,3)"/>
            <Button
                android:id="@+id/btn_3"
                android:layout_width="wrap_content"
                android:text="(1,4)"/>
        </TableRow>

    </TableLayout>
</LinearLayout>
运行效果:
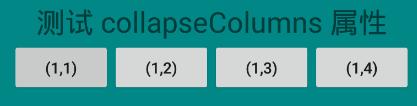
在上述代码中添加语句: android:collapseColumns="1,3" ,也即是隐藏 btn_1,btn_3:
<?xml version="1.0" encoding="utf-8"?>
<LinearLayout xmlns:android="http://schemas.android.com/apk/res/android"
    android:layout_width="match_parent"
    android:layout_height="match_parent"
    android:orientation="vertical"
    android:padding="10dp"
    android:background="@color/teal_700">

    <TextView
        android:layout_width="match_parent"
        android:layout_height="wrap_content"
        android:gravity="center"
        android:text="测试 collapseColumns 属性"
        android:textSize="26sp"/>

    <TableLayout
        android:layout_width="match_parent"
        android:layout_height="wrap_content"
        android:stretchColumns="*"
        android:collapseColumns="1,3">
        <TableRow
            android:layout_height="match_parent">
            <Button
                android:id="@+id/btn_1"
                android:layout_width="wrap_content"
                android:text="(1,1)"/>
            <Button
                android:id="@+id/btn_2"
                android:layout_width="wrap_content"
                android:text="(1,2)"/>
            <Button
                android:id="@+id/btn_3"
                android:layout_width="wrap_content"
                android:text="(1,3)"/>
            <Button
                android:id="@+id/btn_4"
                android:layout_width="wrap_content"
                android:text="(1,4)"/>
        </TableRow>

    </TableLayout>
</LinearLayout>
运行效果:
由图可知,虽然设置了 android:stretchColumns="*" 属性,但是btn_0,btn_2 并没有占据整个空间;
这就充分说明了 android:collapseColumns="1,3" 仅仅是让 btn_1,btn_3 隐藏了,并没有销毁;
?简介
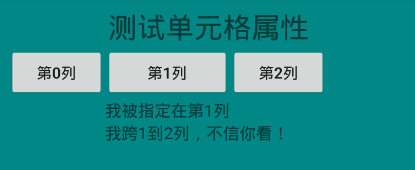
- android:layout_column : 指定该单元格在第几列显示
- android:layout_span : 指定该单元格占据的列数(未指定时,为1)
?布局代码
<LinearLayout xmlns:android="http://schemas.android.com/apk/res/android"
    android:layout_width="match_parent"
    android:layout_height="match_parent"
    android:orientation="vertical"
    android:padding="10dp"
    android:background="@color/teal_700">


    <TextView
        android:layout_width="match_parent"
        android:layout_height="wrap_content"
        android:gravity="center"
        android:text="测试单元格属性"
        android:textSize="26sp"/>

    <TableLayout
        android:layout_width="match_parent"
        android:layout_height="wrap_content">
        <TableRow>
            <Button android:text="第0列"/>
            <Button android:text="第1列"/>
            <Button android:text="第2列"/>
        </TableRow>

        <TableRow>
            <TextView
                android:layout_column="1"
                android:text="我被指定在第1列"
                android:textSize="15sp"
                />
        </TableRow>

        <TableRow>
            <TextView
                android:layout_column="1"
                android:layout_span="2"
                android:text="我跨1到2列,不信你看!"
                android:textSize="15sp"
                />
        </TableRow>
    </TableLayout>

</LinearLayout>
?运行效果
标签:log 一个 nta encoding initial block lazy ica 单元格
原文地址:https://www.cnblogs.com/hyacinthLJP/p/14356263.html