标签:退出 pool 有一个 text 实践 缩放 opera email oid
最近一段时间在对卷积神经网络进行量化的过程中,阅读了部分论文,其中对于谷歌在CVPR2018上发表的论文“Quantization and Training of Neural Networks for Efficient Integer-Arithmetic-Only Inference”印象深刻,在工程的应用上由于和tensorflow官方的代码有密切相关,在实际的工程实践上拥有一个良好的框架平台。首先笔者对谷歌发表的论文进行了详细的解读,同时对于其中推理部分原理进行了分析,了解到谷歌的量化方式存储方式为输入特征图input和卷积核filter均为8bit无符号整形存储方式,对于偏置bias为32bit有符号整形存储。典型的应用是在MobileNet网络上的量化,并且官方还提供了相应的模型文件,比如tflite。这种存储方式其实在大部分的推理中已经可以实现足够的精度优势了,但是这里面存在着一些问题,正常来讲tflite的运行是基于现有Tensorflow框架的,官方提供的示意demo包括了基于C++,Java,IOS等平台,依然没能脱离已有的平台限制。
但是实际的应用中,比如在嵌入式微处理器或者微控制器,以及笔者一直研究的FPGA平台加速器等领域,不可能搭建一个Tensorflow框架来运行tflite模型,这样在一定程度上限制了算法的应用领域。所以例如像意法半导体在STM32 Cube里面提供的Cube AI工具包,以及Xilinx提供的DPU完整开发框架,都在某些方面扩展了人工智能算法的适用范围。那么如果从学术、教育、研究的角度去考虑这些问题,我们希望能够基于现有的优秀成果,去理解内部的运行机理,从而提高我们对算法的深层次理解。
然而,目前从网上查阅到的资料里面,对于tflite权重数据提取方面的内容都比较零碎,也没有一个比较系统的介绍,因此笔者结合前段时间的一些开发经验,对tflite的数据提取和推理过程做一个简单的演示与总结,同时也希望能够起到一个抛砖引玉的作用。
本篇随笔的主要内容如下:首先我们以MobileNetV1的tflite模型文件为例,介绍基于Tensorflow框架如何调用与运行;然后,我们介绍如何提取权重的参数,这里面包含了卷积核filter、偏置bias、量化系数(需要结合论文来说明);最后,我们再借助提取到的数据模拟MobileNet的前向推理,实现对输入图片的分类。
相关源码与文件将在文末提供。
先介绍下我们使用的模型文件,以MobileNetV1为例,Tensorflow官方提供的量化后模型文件有很多,详细的信息可以参考https://github.com/tensorflow/models/blob/master/research/slim/nets/mobilenet_v1.md,里面提供了不同尺度大小的性能和模型文件下载。笔者选用的是里面最简单、规模最小的网络MobileNet_v1_0.25_128_quant,这样便于数据的加载和分析。
接着我们可以在Python里面直接调用tflite文件,对输入图片进行一次分类,对应的运行环境为Ubuntu18.04,Python中所用到的库版本opencv==3.4.2.17,tensorflow==1.12.0 或者使用tf_nightly替代tensorflow。具体代码如下:
 1 import time
 2 import cv2
 3 import numpy as np
 4 import tensorflow as tf
 5
 6 model_path = "mobilenet_v1_0.25_128_quant.tflite"
 7 inter = tf.contrib.lite.Interpreter(model_path=model_path)
 8 inter.allocate_tensors()
 9 input_details = inter.get_input_details()
10 output_details = inter.get_output_details()
11
12 img = cv2.imread(‘test2.png‘)
13 img = cv2.resize(img, (128, 128))
14
15 img_exp = np.expand_dims(img, axis=0)
16 print(img_exp.shape)
17
18 inter.set_tensor(input_details[0][‘index‘], img_exp)
19
20 time_start =time.time()
21 inter.invoke()
22 time_end = time.time()
23 print(time_end-time_start)
24
25 output_data = inter.get_tensor(output_details[0][‘index‘])
26 print(output_data.shape)
27 result = np.squeeze(output_data)
28 print(‘np.argmax(result):‘,np.argmax(result))
其中输入图片是test2.png,此处也可以用其他的图片来代替,最终输出的是图片分类所需要的时间和分类结果。
此处笔者有个不明白的地方,通过查阅网络资料,发现tflite是Tensorflow面向移动设备应用的数据格式,官方给出的应用示例包括Python、Java、C++等,也就是面向树莓派(Linux)、安卓、苹果等平台,貌似并不支持tflite在GPU上运行。截至目前,笔者使用的电脑端GPU和JetsonNano的嵌入式GPU均无法运行,只能在CPU上执行。
接下来就是如何提取tflite中经过训练以后的参数了,在提取权重参数前需要了解Tensorflow在量化方面的相关理论知识,这里参考《Quantization and Training of Neural Networks for Efficient Integer-Arithmetic-Only Inference》这篇论文,其中对于8bit量化感知训练给出了详细的理论推导是具体实现过程。笔者在此处只对其前向推理部分做介绍,对于训练部分没做深入研究。
首先对量化的理论做一个简单的介绍,假设输入数据为A,权重数据为W,输出数据为O,偏置为B,以上数据均为浮点型。那么根据公式可得:
O=A*W+B (1)
上述公式可以分别对其进行量化操作,若采用定点量化方法,量化前与量化后数据如下所示:
A=(input-Z1)*S1
W=(weight-Z2)*S2 (2)
O=(output-Z3)*S3
其中Z1、Z2、Z3分别为输入、权重、输出的零点偏移;S1、S2、S3分别为输入、权重、输出的尺度系数(缩放系数);input、weight、output分别为量化后的输入、权重、输出的结果,一般为8bit量化;
上述量化当然在一定程度上存在损失,但是随着量化感知训练可以将网络最终的精度下降控制在很小的范围内,甚至可以做到没有精度损失。
那么将公式(2)代入到公式(1)中,并且对于公式(1)的B进行32bit量化,量化后结果表示为bias,缩放系数为S1*S2/S3,那么公式(1)可以表示为:
output = Z3+(S1*S2/S3)[(input-Z1)x(weight-Z2)+bias] (3)
而在Tensorflow的tflite网络压缩中,通常采用Relu6作为激活函数,那么input通常用无符号8bit,对应的取值范围为0~255;weight通常用有符号8bit,对应的取值范围为-128~127;同理output通常采用无符号8bit,对应取值范围为0~255。
上述情况存在一种特例,也就是第一层网络,输入的为原始RGB图像,需要转换为有符号型数据,而其他网络在Relu6激活函数的作用下,均可使用无符号型数据。因此,只有第一层网络中Z1=128,而其他剩余网络中Z1=0。对于每一层网络的输出,在Relu6激活函数的作用下,Z3=0。因此公式(3)可简化为如下表达式:
output = (S1*S2/S3)[(input)x(weight-Z2)+bias] (4)
如果对上述的尺度因子做统一表示,则公式(4)可进一步简化为:
output = scale*[(input)x(weight-Z2)+bias]
scale=S1*S2/S3 (5)
而在文章《Quantization and Training of Neural Networks for Efficient Integer-Arithmetic-Only Inference》中,对于公式(5)中的scale进行分析,完成单层网络的卷积操作后,在层间数据类型的转换中,依然存在浮点计算操作,因此在文章中进一步采用了32bit定点加移位的表示方法,这样对于不带浮点处理单元的微处理,或对于计算资源敏感的FPGA单元,可以进一步提升计算性能。该方法笔者已在STM32和FPGA上进行了验证,将在后续的博客中单独对此进行介绍,同样完成代码的开源,和不同平台的性能测试结果对比。
权重参数的提取需要借助工具netron,在此处非常感谢原作者能够提供这么好的工具。安装方法可以基于Python,也可直接在Windows端安装。笔者采用Ubuntu下Python的pip安装方法。在安装完成以后进入命令行,输入netron -b,此时不要退出命令行,浏览器将会自动打开一个网页,如果网页没有打开,可以自行打开浏览器,输入localhost:8080,进入网页界面,并加载mobilenet_v1_0.25_128_quant.tflite文件。
单击其中的逐个网络层,截图如下:
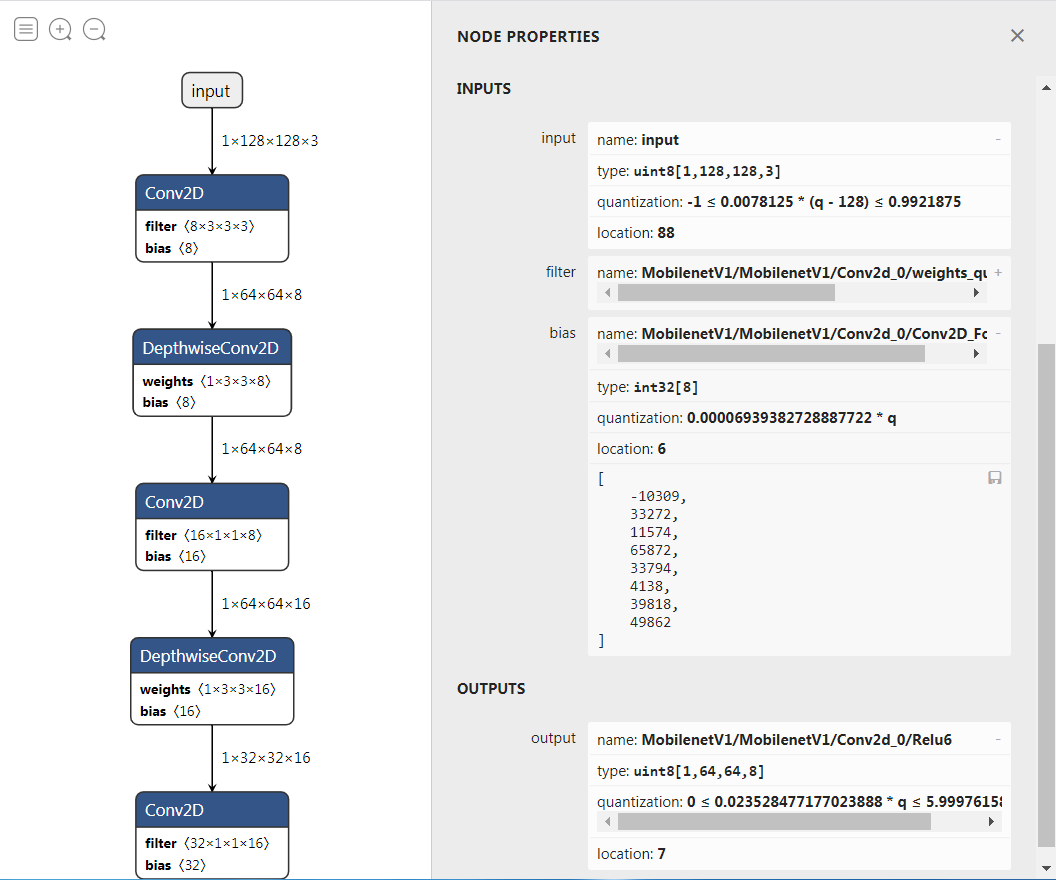
在图中可以直接看到量化后的权重,同时也可以在网页中直接将权重数据保存到本地。
当然上述方法一种比较简单的做法,而笔者为了能够做理论性验证,需要复现网络的模拟计算过程,因此需要做进一步的深入研究。
在上述截图中需要注意的是每一层网络中input和output对应的location编号,需要记下来,后续用得着。
具体python程序如下:
  1 # -*- coding: utf-8 -*-
  2 # @Time    : 2020.12.13
  3 # @Author  : wuruidong
  4 # @Email   : wuruidong@hotmail.com
  5 # @FileName: mobilenet_tf.py
  6 # @Software: python
  7 # @Cnblogs : https://www.cnblogs.com/ruidongwu
  8
  9 import cv2
 10 import numpy as np
 11 import tensorflow as tf
 12
 13 ‘‘‘
 14 Library Version:
 15 python-opencv==3.4.2.17
 16 tensorflow==1.12.0 or tf_nightly
 17
 18 ‘‘‘
 19
 20 ‘‘‘
 21 Location number is obtained by netron (https://github.com/lutzroeder/netron).
 22 Thanks the authors for providing such a wonderful tool.
 23 # stage 1 (install): pip3 install netron
 24 # stage 2 (start with brower): netron -b
 25 # stage 3 (enter local ip): http://localhost:8080/
 26 # stage 4 (open tflite file): mobilenet_v1_0.25_128_quant.tflite
 27 # stage 5 (record location number)
 28 ‘‘‘
 29 input_location =    np.array([88, 7,  33, 37, 39, 43, 45, 49, 51, 55, 57, 61, 63, 67, 69, 73, 75, 79, 81, 85, 9,  13, 15, 19, 21, 25, 27, 0], dtype=np.int)
 30 weight_location =   np.array([8,  35, 38, 41, 44, 47, 50, 53, 56, 59, 62, 65, 68, 71, 74, 77, 80, 83, 86, 11, 14, 17, 20, 23, 26, 29, 32, 3], dtype=np.int)
 31 bias_location =     np.array([6,  34, 36, 40, 42, 46, 48, 52, 54, 58, 60, 64, 66, 70, 72, 76, 78, 82, 84, 10, 12, 16, 18, 22, 24, 28, 30, 2], dtype=np.int)
 32 output_location =   np.array([7,  33, 37, 39, 43, 45, 49, 51, 55, 57, 61, 63, 67, 69, 73, 75, 79, 81, 85, 9,  13, 15, 19, 21, 25, 27, 31, 1], dtype=np.int)
 33
 34 ‘‘‘
 35 load tflite model from local file.
 36 ‘‘‘
 37 def load_tflite(model_path=‘‘):
 38     inter = tf.contrib.lite.Interpreter(model_path=model_path)
 39     #inter = tf.lite.Interpreter(model_path=model_path) # pip install tf-nightly
 40     inter.allocate_tensors()
 41     return inter
 42
 43 ‘‘‘
 44 load image with img_file name
 45 ‘‘‘
 46 def load_img(img_file=‘‘):
 47     img = cv2.imread(img_file)
 48     img = cv2.resize(img, (128, 128))
 49     img = np.expand_dims(img, axis=0)
 50     return img
 51
 52 ‘‘‘
 53 This function is network inference with tensorflow library.
 54 But it is a black box for education,
 55 and I want to analysis the principle of quantization with inference.
 56 If the filter/weight/bias/quantization could be exported in cunstom format with tables,
 57 so we can deploy user network or basic network on other platforms,
 58 not only Android/IOS/Raspberry,
 59 but also stm32/FPGA and so on.
 60 ‘‘‘
 61 def tflite_inference(model, img):
 62     # get input node information
 63     input_details = model.get_input_details()
 64     # get output node information
 65     output_details = model.get_output_details()
 66     # set input data
 67     model.set_tensor(input_details[0][‘index‘], img)
 68     # start inference
 69     model.invoke()
 70     # get output data
 71     output_data = model.get_tensor(output_details[0][‘index‘])
 72     return output_data
 73
 74 ‘‘‘
 75 This function refers the paper of "Quantization and Training of Neural Networks for Efficient Integer-Arithmetic-Only Inference".
 76 Thanks for the contribution of tensorflow.
 77
 78 In this function, I will implement the quantitative inference.
 79 According to the network structure of mobilenet_v1,
 80 this function supports depthwise/pointwise/standard convolution,
 81 but the stride is only support 1 and 2.
 82
 83 The main principle is the following equation(1) in the reference paper:
 84 output = Z3+(S1*S2/S3)[(input-Z1)x(weight-Z2)+bias]     (1)
 85
 86 "(input-Z1)x(weight-Z2)" is the operation of depthwise/pointwise/standard convolution,
 87 Zi is the value of zero offset.
 88 Generally, Z3=0, Z1=128(layer0) Z1=0(other layers), Z2>0.
 89 If the activation function is relu6, S1=S3.
 90 so the equation(1) can be written as:
 91 output = (S1*S2/S3)[(input)x(weight-Z2)+bias]           (2)
 92
 93 If scale=(S1*S2/S3) or scale=S2, and the equation(1) can be simplified as:
 94 output = scale*[(input)x(weight-Z2)+bias]               (3)
 95
 96 In equation(3), the data type of scale is float32, input is uin8(other layers) or int8(layer0), weight is uint8,
 97 (weight-Z2) is int16 or int32.
 98 ‘‘‘
 99 def my_conv(model, input, layer_index, layer_type=‘depthwise‘, strides=1):
100     input_index = input_location[layer_index]
101     weight_index = weight_location[layer_index]
102     bias_index = bias_location[layer_index]
103     output_index = output_location[layer_index]
104
105     # input_quant[0]=>S1, input_quant[1]=>Z1
106     input_quant = model._interpreter.TensorQuantization(int(input_index))
107     # img_tensor = input-Z1
108     img_tensor = input - tf.constant(input_quant[1], dtype=tf.float32)
109
110     # weight_quant[0]=>S2, weight_quant[1]=>Z2
111     weight_quant = model._interpreter.TensorQuantization(int(weight_index))
112     t_w = model.get_tensor(int(weight_index))
113     t_w = np.transpose(t_w, (1, 2, 3, 0))
114     weight_tensor = tf.convert_to_tensor(t_w)
115     weight_tensor = tf.cast(weight_tensor, dtype=tf.float32)
116     # weight_tensor = weight-Z2
117     weight_tensor = weight_tensor - tf.constant(weight_quant[1], dtype=tf.float32)
118     # bias_tensor = bias
119     bias_tensor = tf.convert_to_tensor(model.get_tensor(int(bias_index)), dtype=tf.float32)
120     # output_quant[0]=>S3(S3=0), output_quant[1]=>Z3
121     output_quant = model._interpreter.TensorQuantization(int(output_index))
122     # scale=(S1*S2/S3) Note: If the activation function is relu6, then scale=S2.
123     scale = input_quant[0] * weight_quant[0] / output_quant[0]
124
125     if layer_type==‘depthwise‘:
126         conv_res = tf.nn.depthwise_conv2d(img_tensor, weight_tensor, strides=[1, strides, strides, 1], padding=‘SAME‘)
127     elif layer_type==‘pointwise‘:
128         conv_res = tf.nn.conv2d(img_tensor, weight_tensor, strides=[1, 1, 1, 1], padding=‘SAME‘)
129     elif layer_type==‘standard‘:
130         conv_res = tf.nn.conv2d(img_tensor, weight_tensor, strides=[1, strides, strides, 1], padding=‘SAME‘)
131     else:
132         print(‘layer_type = depthwise? pointwise? standard?‘)
133     conv_bias = tf.nn.bias_add(conv_res, bias_tensor)
134     conv_scale = conv_bias * tf.constant(scale, dtype=tf.float32)
135
136     return tf.clip_by_value(tf.round(conv_scale), 0, 255)
137
138
139 ‘‘‘
140 Classifier of MobileNet
141 ‘‘‘
142 def my_fc(model, input, layer_index):
143     input_index = input_location[layer_index]
144     weight_index = weight_location[layer_index]
145     bias_index = bias_location[layer_index]
146     output_index = output_location[layer_index]
147
148     weight_quant = model._interpreter.TensorQuantization(int(weight_index))
149     t_w = model.get_tensor(int(weight_index))
150     t_w = np.transpose(t_w, (1, 2, 3, 0))
151     weight_tensor = tf.convert_to_tensor(t_w)
152     weight_tensor = tf.cast(weight_tensor, dtype=tf.float32)
153     weight_tensor = weight_tensor - tf.constant(weight_quant[1], dtype=tf.float32)
154
155     return tf.matmul(input, weight_tensor)
156
157
158 model = load_tflite("mobilenet_v1_0.25_128_quant.tflite")
159 img = load_img(‘test2.png‘)
160
161 print(‘***********************TFLite inference**************************‘)
162 tf_res = tflite_inference(model, img)
163 tf_res = np.squeeze(tf_res)
164 print(‘TFLite result is‘, np.argmax(tf_res))
165
166 print(‘**********Custom inference for principle verification************‘)
167
168 layer_index=0
169
170 img_tensor = tf.convert_to_tensor(img)
171 img_tensor = tf.cast(img_tensor, dtype=tf.float32)
172 conv0 = my_conv(model, img_tensor, layer_index, layer_type=‘standard‘, strides=2)
173 layer_index = layer_index+1
174
175 conv1 = my_conv(model, conv0, layer_index, layer_type=‘depthwise‘, strides=1)
176 layer_index = layer_index+1
177 conv2 = my_conv(model, conv1, layer_index, layer_type=‘pointwise‘, strides=1)
178 layer_index = layer_index+1
179
180 conv3 = my_conv(model, conv2, layer_index, layer_type=‘depthwise‘, strides=2)
181 layer_index = layer_index+1
182 conv4 = my_conv(model, conv3, layer_index, layer_type=‘pointwise‘, strides=1)
183 layer_index = layer_index+1
184
185 conv5 = my_conv(model, conv4, layer_index, layer_type=‘depthwise‘, strides=1)
186 layer_index = layer_index+1
187 conv6 = my_conv(model, conv5, layer_index, layer_type=‘pointwise‘, strides=1)
188 layer_index = layer_index+1
189
190 conv7 = my_conv(model, conv6, layer_index, layer_type=‘depthwise‘, strides=2)
191 layer_index = layer_index+1
192 conv8 = my_conv(model, conv7, layer_index, layer_type=‘pointwise‘, strides=1)
193 layer_index = layer_index+1
194
195 conv9 = my_conv(model, conv8, layer_index, layer_type=‘depthwise‘, strides=1)
196 layer_index = layer_index+1
197 conv10 = my_conv(model, conv9, layer_index, layer_type=‘pointwise‘, strides=1)
198 layer_index = layer_index+1
199
200 conv11 = my_conv(model, conv10, layer_index, layer_type=‘depthwise‘, strides=2)
201 layer_index = layer_index+1
202 conv12 = my_conv(model, conv11, layer_index, layer_type=‘pointwise‘, strides=1)
203 layer_index = layer_index+1
204
205 conv13 = my_conv(model, conv12, layer_index, layer_type=‘depthwise‘, strides=1)
206 layer_index = layer_index+1
207 conv14 = my_conv(model, conv13, layer_index, layer_type=‘pointwise‘, strides=1)
208 layer_index = layer_index+1
209
210 conv15 = my_conv(model, conv14, layer_index, layer_type=‘depthwise‘, strides=1)
211 layer_index = layer_index+1
212 conv16 = my_conv(model, conv15, layer_index, layer_type=‘pointwise‘, strides=1)
213 layer_index = layer_index+1
214
215 conv17 = my_conv(model, conv16, layer_index, layer_type=‘depthwise‘, strides=1)
216 layer_index = layer_index+1
217 conv18 = my_conv(model, conv17, layer_index, layer_type=‘pointwise‘, strides=1)
218 layer_index = layer_index+1
219
220 conv19 = my_conv(model, conv18, layer_index, layer_type=‘depthwise‘, strides=1)
221 layer_index = layer_index+1
222 conv20 = my_conv(model, conv19, layer_index, layer_type=‘pointwise‘, strides=1)
223 layer_index = layer_index+1
224
225 conv21 = my_conv(model, conv20, layer_index, layer_type=‘depthwise‘, strides=1)
226 layer_index = layer_index+1
227 conv22 = my_conv(model, conv21, layer_index, layer_type=‘pointwise‘, strides=1)
228 layer_index = layer_index+1
229
230 conv23 = my_conv(model, conv22, layer_index, layer_type=‘depthwise‘, strides=2)
231 layer_index = layer_index+1
232 conv24 = my_conv(model, conv23, layer_index, layer_type=‘pointwise‘, strides=1)
233 layer_index = layer_index+1
234
235 conv25 = my_conv(model, conv24, layer_index, layer_type=‘depthwise‘, strides=1)
236 layer_index = layer_index+1
237 conv26 = my_conv(model, conv25, layer_index, layer_type=‘pointwise‘, strides=1)
238 layer_index = layer_index+1
239
240 pooling_res = tf.nn.avg_pool(conv26, ksize=[1, 4, 4, 1], strides=[1, 4, 4, 1], padding="SAME")
241 pooling_res = tf.round(pooling_res)
242
243 fc_res = my_fc(model, pooling_res, layer_index)
244
245 with tf.Session() as sess:
246     layer_res = sess.run(fc_res)
247     print(layer_res.shape)
248     print(‘Custom result is‘, np.argmax(layer_res))
实际的运行理论过程和3.1的分析基本一致。需要注意的是,在tensorflow的padding操作中,正常的padding是上下左右均添加,但是如果在stride为2时,padding并不是在输入特征图上添加一圈的数据,有可能是只有半圈,在tensorflow中的半圈padding中,针对于特征图的右边和下边;而在pytorch中的半圈padding中,针对于特征图的上边和左边。笔者一开始使用的pytorch函数进行前向推理的模拟,因为没有注意到这个问题,导致最终分类的结果错误,最后才发现是tensorflow和pytorch中对与padding的操作方式不同所导致的。
根据本文提供的Python脚本,可以很方便的完成权重数据的提取,同时对tflite,尤其是量化后数据的运行过程有一个原理性认识,这样其实可以脱离原有的tensorflow框架,能够将训练后的神经网络运行在任何的平台上。
后续笔者将继续介绍tflite下mobilenet_v1网络在STM32上的实现过程,虽然Tensorflow官方已经发布了相关的源码,并包含有示例,但是官方采用的是C++的编程方法,不利于网络的移植,笔者将分享自己的移植过程。当然啦,性能比不上ARM官方的CMSIS_NN库,代码里面还有待进一步的提升,笔者也希望能够起到一个抛砖引玉的作用,希望能够使得那些想在微处理器上运行神经网络的开发者能够多一种选择。
最后附上源码:点我下载
Tensorflow中tflite权重参数提取与推理过程示意
标签:退出 pool 有一个 text 实践 缩放 opera email oid
原文地址:https://www.cnblogs.com/ruidongwu/p/14294009.html