标签:fast tran 控制台 恢复 包管理 alt+ 开源 华为手机 可见
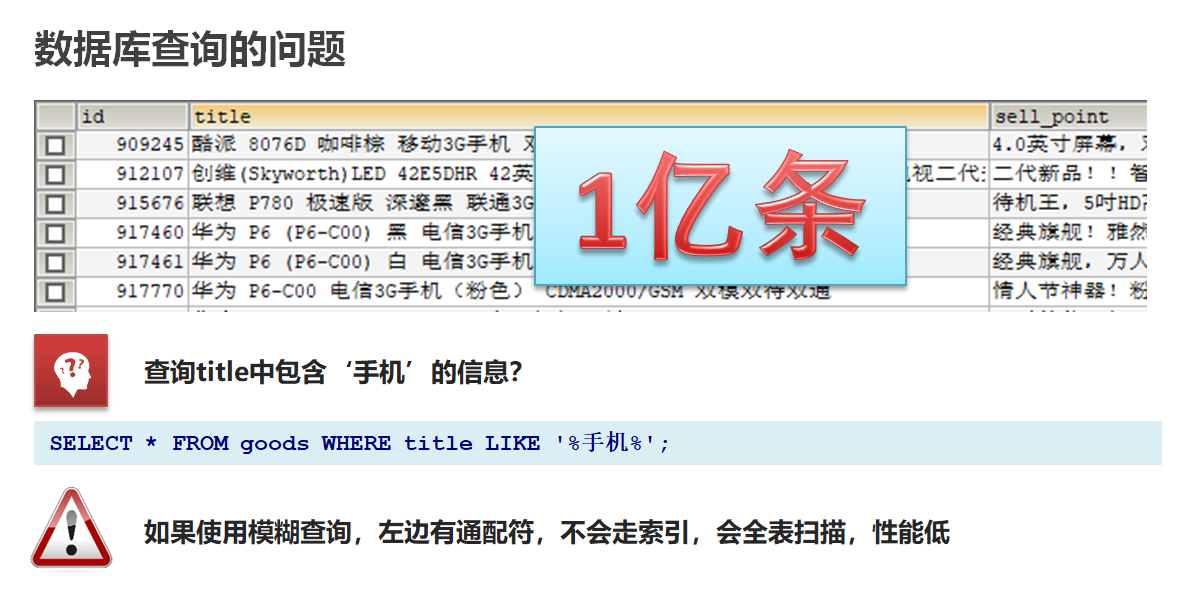
数据库查询存在的问题:
性能低:使用模糊查询,左边有通配符,不会走索引,会全表扫描,性能低
功能弱:
对于如下的数据如果以”华为手机“作为条件,查询不出来数据
select * from goods where title like ‘%华为手机%‘
华为手机需要拆分成华为和手机两个词然后分别查询,但是MySQL等关系型数据库没有拆分词语的功能
select * from goods where title like ‘%华为%‘ or title like ‘%手机%‘
Es通过倒排索引解决这些问题,比如京东的商品信息就保存在ElasticSearch中,可以很快速的得到搜索结果
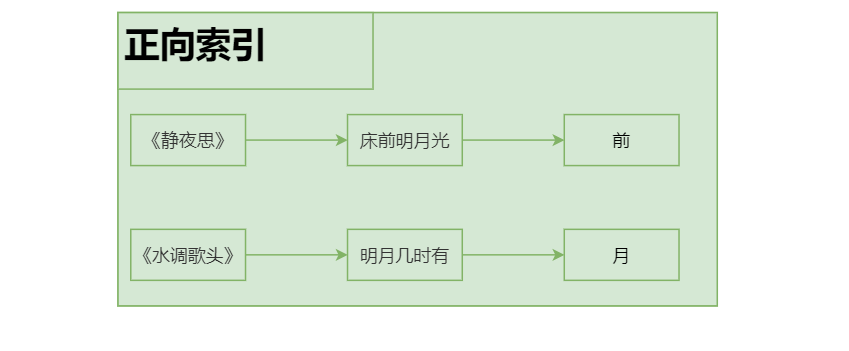
正向索引:由《静夜思》-->床前明月光--->“前”字
分词:将华为手机拆分成华为和手机两个词,这个动作简称为分词
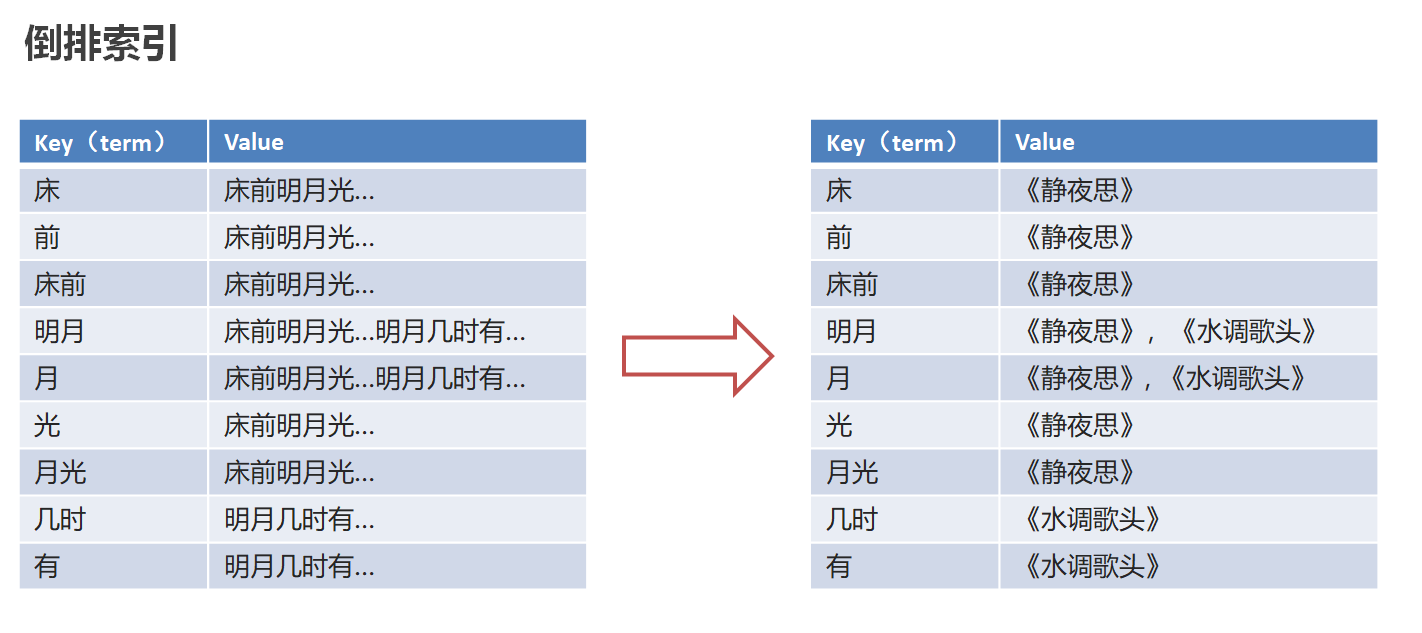
倒排索引(反向索引):将文档进行分词,形成词条和id的对应关系即为反向索引。
先对“床前明月光”--> 分词
将一段文本按照一定的规则,拆分为不同的词条(每一个词条被称为term)
所有的分词结果都记录对应的诗句内容
反向索引的实现就是对诗句进行分词,分成单个的词或字,由词推句,即为反向索引

需要解决数据库查询存在的问题:
性能低:使用模糊查询,左边有通配符,不会走索引,会全表扫描,性能低
功能弱:对于如下的数据如果以”华为手机“作为条件,查询不出来数据
存储和查询原理:
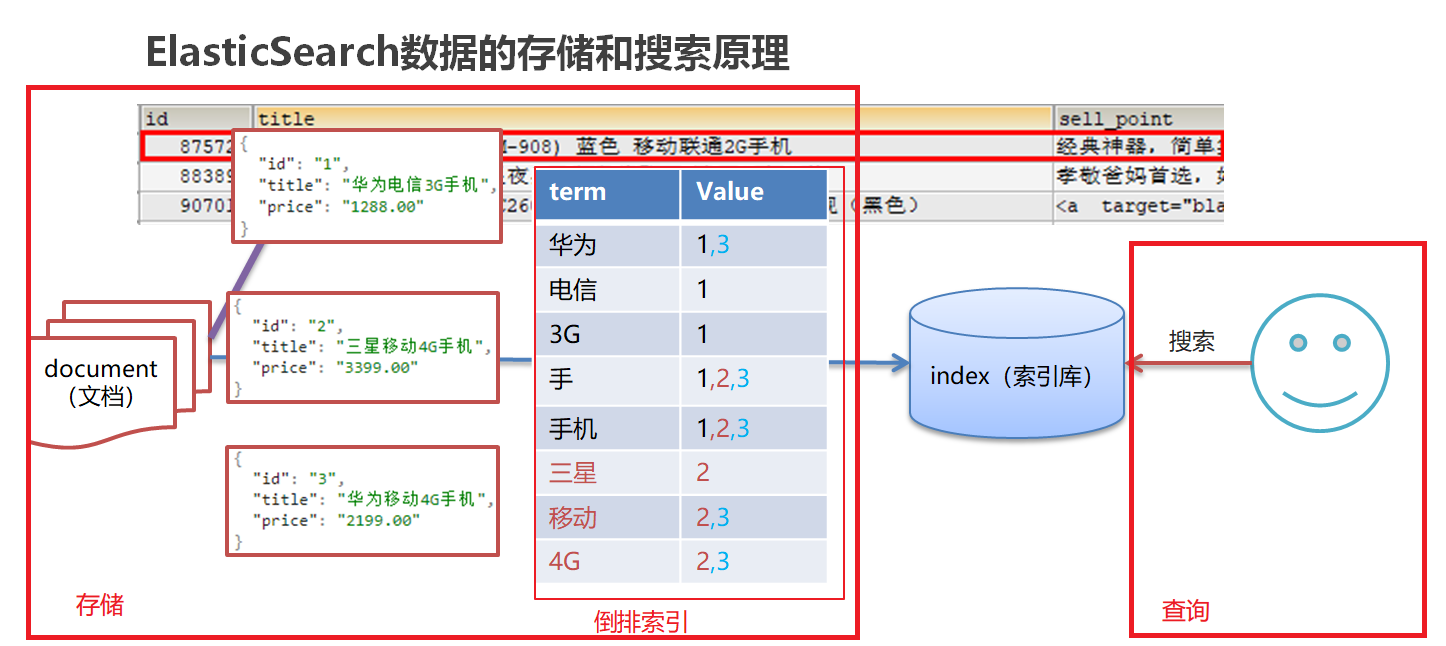
存储
对存储数据中的title进行分词,记录每个词语和数据id的对应关系(倒排索引)
搜索:使用倒排索引,自定将对title进行分词(“华为”,“手机”),找到所有的匹配:1,2,3
使用“华为手机”作为关键字查询
华为:1,3
手机:1,2,3
Lucene:是一套用于全文检索和搜寻的开源程式库,由Apache软件基金会支持和提供
ElasticSearch是一个基于Lucene的搜索服务器。隐藏了Lucene的复杂性,对外提供Restful 接口来搜索
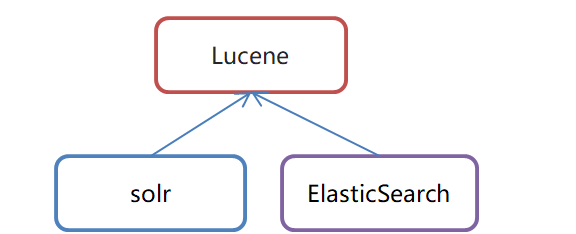
es和solr选择哪个?
1.如果你公司现在用的solr可以满足需求就不要换了。
2.如果你公司准备进行全文检索功能的开发,建议优先考虑es,因为像Github这样大规模的搜索都在用它。
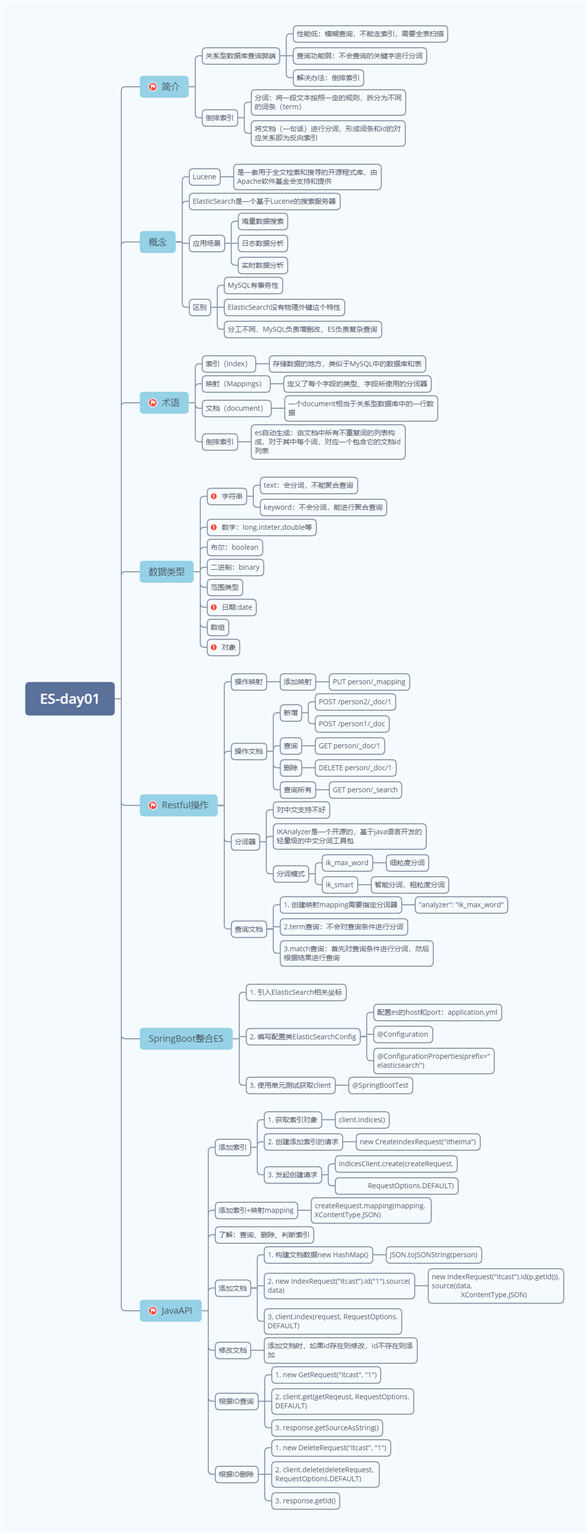
介绍
一个分布式、高扩展、高实时的搜索与数据分析引擎
基于RESTful web接口:http请求进行增删查改
用Java语言开发的,并作为Apache许可条款下的开放源码发布,是一种流行的企业级搜索引擎
应用场景
海量数据搜索,下图是es在项目中的应用方式:
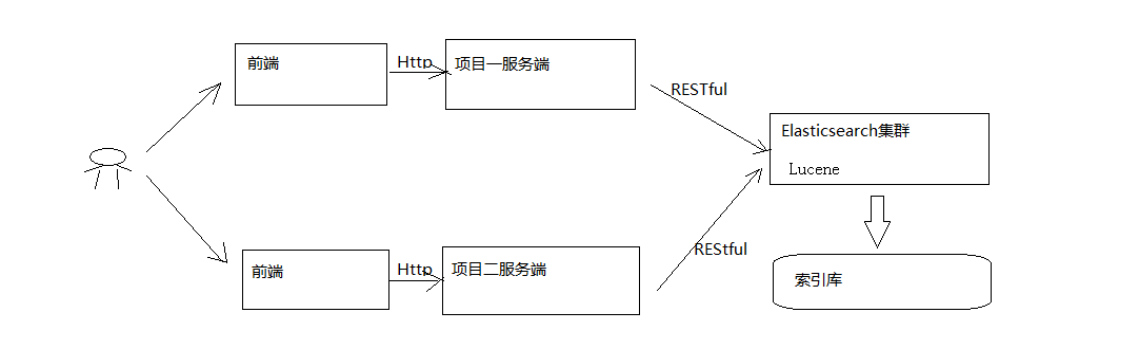
1)用户在前端搜索关键字
2)项目前端通过http方式请求项目服务端
3)项目服务端通过Http RESTful方式请求ES集群进行搜索
4)ES集群从索引库检索数据
日志数据分析
实时数据分析
?MySQL有事务性,而ElasticSearch没有事务性,所以你删了的数据是无法恢复的。
?ElasticSearch没有物理外键这个特性,,如果你的数据强一致性要求比较高,还是建议慎用
?ElasticSearch和MySql分工不同,MySQL负责存储(增删改)数据,ElasticSearch负责搜索数据。
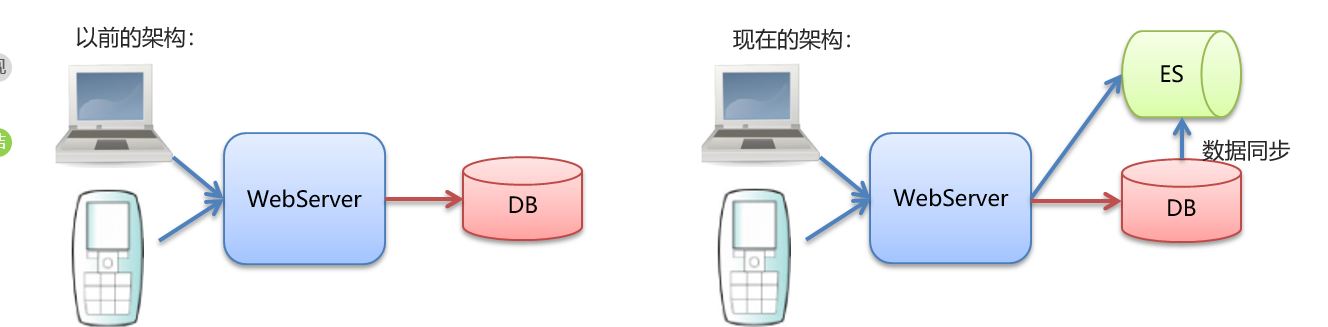
MySQL同步数据到ES常用工具:
通过JavaAPI写入ES
logstash, es官方推荐的
canal, 阿里开源的
1、上传ElasticSearch安装包
alt+p # 打开sftp窗口
# 上传es安装包
put e:/software/elasticsearch-7.4.0-linux-x86_64.tar.gz

2、执行解压操作 ,如下图
 # 将elasticsearch-7.4.0-linux-x86_64.tar.gz解压到opt文件夹下. -C 大写
 tar -zxvf elasticsearch-7.4.0-linux-x86_64.tar.gz  -C /opt
3、创建普通用户
因为安全问题,Elasticsearch 不允许root用户直接运行,所以要创建新用户,在root用户中创建新用户,执行如下命令:
useradd itheima  # 新增itheima用户
passwd  itheima  # 为itheima用户设置密码
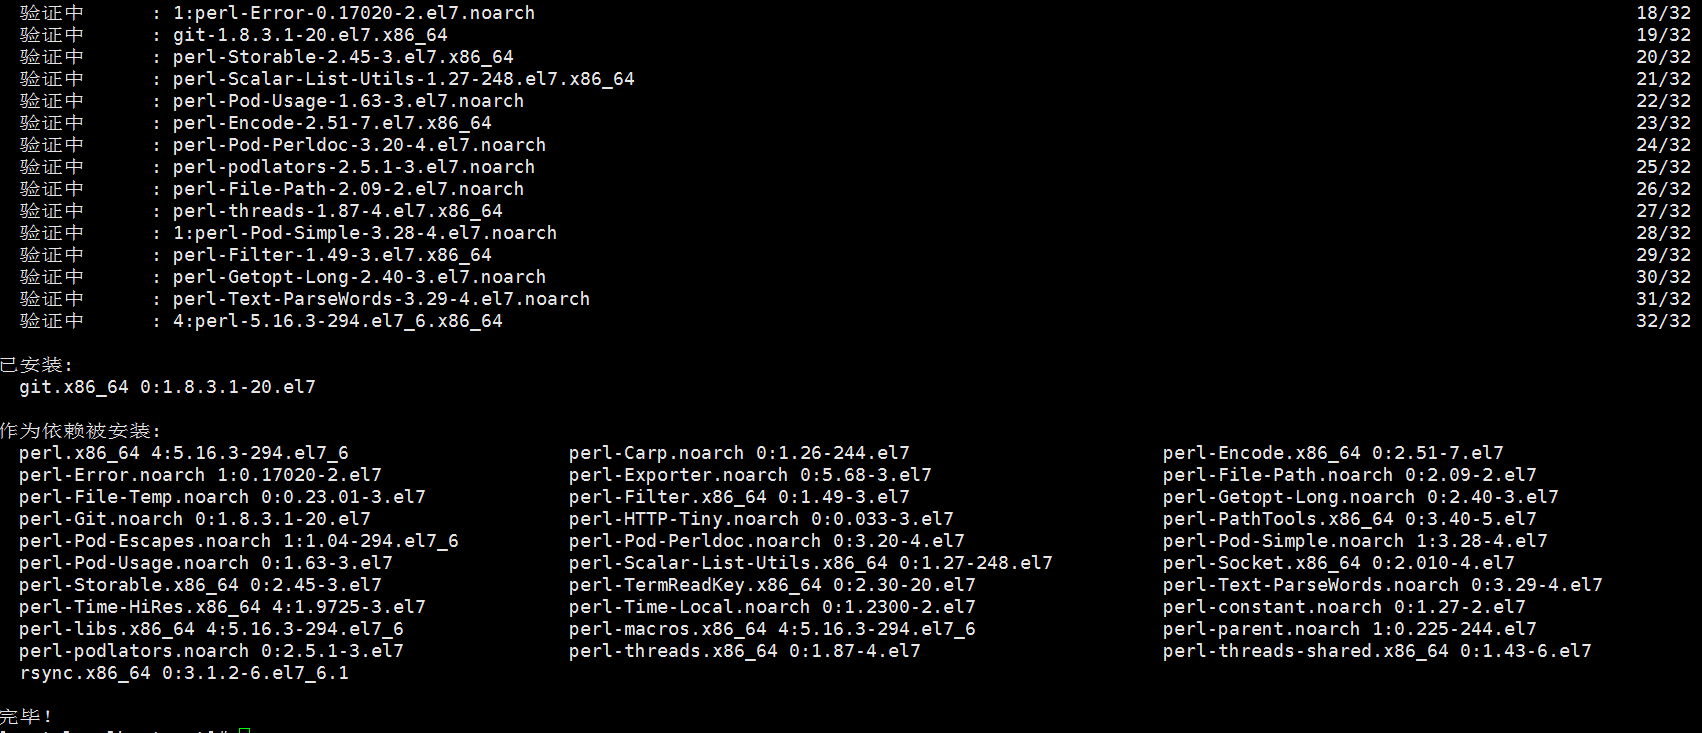
5、为新用户授权,如下图
chown -R itheima:itheima /opt/elasticsearch-7.4.0 #文件夹所有者
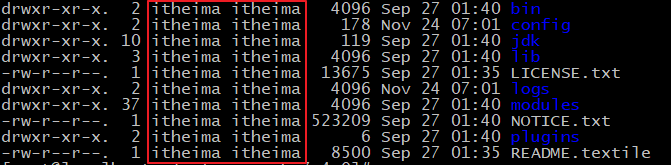
将 /opt/elasticsearch-7.4.0文件夹授权给itheima用户,由上图可见,我们的文件夹权限赋给了itheima
6、修改elasticsearch.yml文件
vim /opt/elasticsearch-7.4.0/config/elasticsearch.yml

# ======================== Elasticsearch Configuration =========================
cluster.name: my-application
node.name: node-1
network.host: 0.0.0.0
http.port: 9200
cluster.initial_master_nodes: ["node-1"]
cluster.name:配置elasticsearch的集群名称,默认是elasticsearch。建议修改成一个有意义的名称
node.name:节点名,elasticsearch会默认随机指定一个名字,建议指定一个有意义的名称,方便管理
network.host:设置为0.0.0.0允许外网访问
http.port:Elasticsearch的http访问端口
cluster.initial_master_nodes:初始化新的集群时需要此配置来选举master
7、修改配置文件
新创建的itheima用户最大可创建文件数太小,最大虚拟内存太小,切换到root用户,编辑下列配置文件, 添加类似如下内容
# 切换到root用户
su root
?
#1. ===最大可创建文件数太小=======
vim /etc/security/limits.conf
# 在文件末尾中增加下面内容
itheima soft nofile 65536
itheima hard nofile 65536
# =====
vim /etc/security/limits.d/20-nproc.conf
# 在文件末尾中增加下面内容
itheima soft nofile 65536
itheima hard nofile 65536
*  hard    nproc     4096
# 注:* 代表Linux所有用户名称
?
#2. ===最大虚拟内存太小=======
vim /etc/sysctl.conf
# 在文件中增加下面内容
vm.max_map_count=655360
# 重新加载,输入下面命令:
sysctl -p
8、启动elasticsearch
#switch user
su itheima  # 切换到itheima用户启动
cd /opt/elasticsearch-7.4.0/bin
./elasticsearch #启动
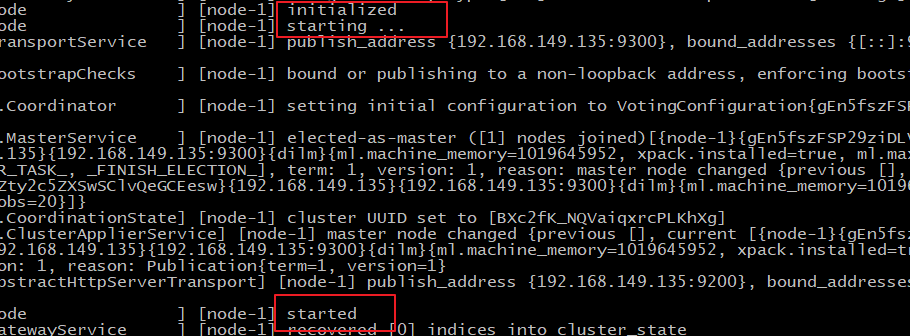
通过上图我们可以看到elasticsearch已经成功启动
1、在访问elasticsearch前,请确保防火墙是关闭的,执行命令:
#暂时关闭防火墙
systemctl  stop  firewalld
?
# 或者
#永久设置防火墙状态
systemctl enable firewalld.service  #打开防火墙永久性生效,重启后不会复原
systemctl disable firewalld.service #关闭防火墙,永久性生效,重启后不会复原
浏览器输入http://192.168.52.128:9200/,如下图
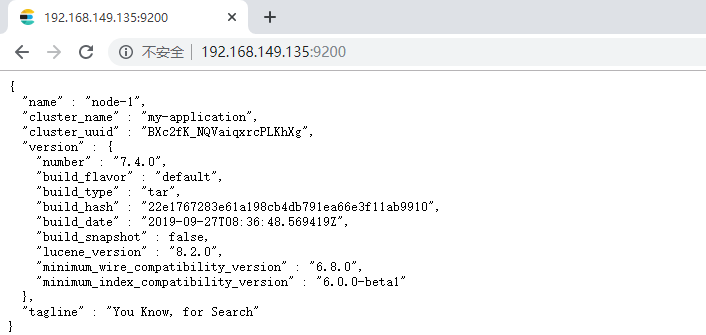
此时elasticsearch已成功启动:
重点几个关注下即可:
number" : "7.4.0"   表示elasticsearch版本
lucene_version" : "8.2.0"  表示lucene版本
name : 默认启动的时候指定了 ES 实例名称
cluster_name : 默认名为 elasticsearch
1、什么是Postman
Postman是一个http模拟请求的工具。
官网介绍:“Modern software is built on APIs,Postman helps you develop APIs faster”
看得出来,它是一个专门测试 API 的工具,Postman 提供功能强大的 Web API 和 HTTP 请求的调试,它能够发送任何类型的HTTP 请求 (GET, POST, PUT, DELETE…),并且能附带任何数量的参数和 Headers。不仅如此,它还提供测试数据和环境配置数据的导入导出。
进入官网www.getpostman.com,下载
1、什么是Kibana
Kibana是一个针对Elasticsearch的开源分析及可视化平台,用来搜索、查看交互存储在Elasticsearch索引中的数据。使用Kibana,可以通过各种图表进行高级数据分析及展示。
Kibana让海量数据更容易理解。它操作简单,基于浏览器的用户界面可以快速创建仪表板(dashboard)实时显示Elasticsearch查询动态。
2、上传kibana
CRT中克隆一个窗口,上传Kibana
put ?E:\software\kibana-7.4.0-linux-x86_64.tar.gz
2、解压kibana
tar -xzf kibana-7.4.0-linux-x86_64.tar.gz -C /opt
解压到当前目录(/opt)下
3、修改kibana配置
vim /opt/kibana-7.4.0-linux-x86_64/config/kibana.yml

server.port: 5601
server.host: "0.0.0.0"
server.name: "kibana-itcast"
elasticsearch.hosts: ["http://127.0.0.1:9200"]
elasticsearch.requestTimeout: 99999
server.port:http访问端口
server.host:ip地址,0.0.0.0表示可远程访问
server.name:kibana服务名
elasticsearch.hosts:elasticsearch地址
elasticsearch.requestTimeout:请求elasticsearch超时时间,默认为30000,此处可根据情况设置
4、启动kibana
由于kibana不建议使用root用户启动,如果用root启动,需要加--allow-root参数
# 切换到kibana的bin目录
cd /opt/kibana-7.4.0-linux-x86_64/bin
# 启动
./kibana --allow-root

启动成功。
5、访问kibana
1.浏览器输入http://192.168.52.128:5601/,如下图:
http://192.168.52.128:5601/
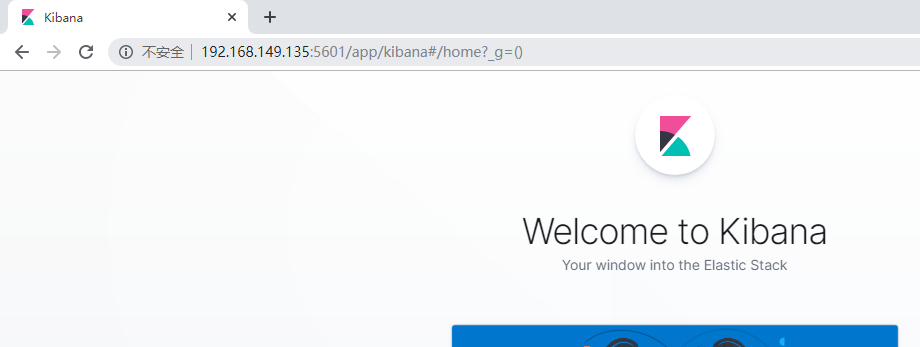
看到这个界面,说明Kibanan已成功安装。
Discover:可视化查询分析器 Visualize:统计分析图表 Dashboard:自定义主面板(添加图表) Timelion:Timelion是一个kibana时间序列展示组件(暂时不用) Dev Tools:Console控制台(同CURL/POSTER,操作ES代码工具,代码提示,很方便) Management:管理索引库(index)、已保存的搜索和可视化结果(save objects)、设置 kibana 服务器属性。
Tips: 课后扩展内容
head简介
ead插件是ES的一个可视化管理插件,用来监视ES的状态,并通过head客户端和ES服务进行交互,比如创建映射、创建索引等。
在登陆和访问head插件地址和ElasticSearch前需要事先在服务器上安装和配置好ElasticSearch以及head插件。安装完后,默认head插件的web端口为9100,ElasticSearch服务的端口为9200,使用浏览器访问head地址,如
1) 什么是Node
简单的说 Node.js 就是运行在服务端的 JavaScript。Node.js 是一个基于
2) 下载Node
上一节我们已经安装好了Elasticsearch,接下来我们来安装head插件,由于elasticsearch-head插件是由nodejs语言编写,所以安装elasticsearch-head前需要先安装nodejs。 首先,执行以下命令安装nodejs和grunt
打开虚拟机,执行wget命令下载Node,如下图:
wget https://nodejs.org/dist/v10.15.2/node-v10.15.2-linux-x64.tar.xz

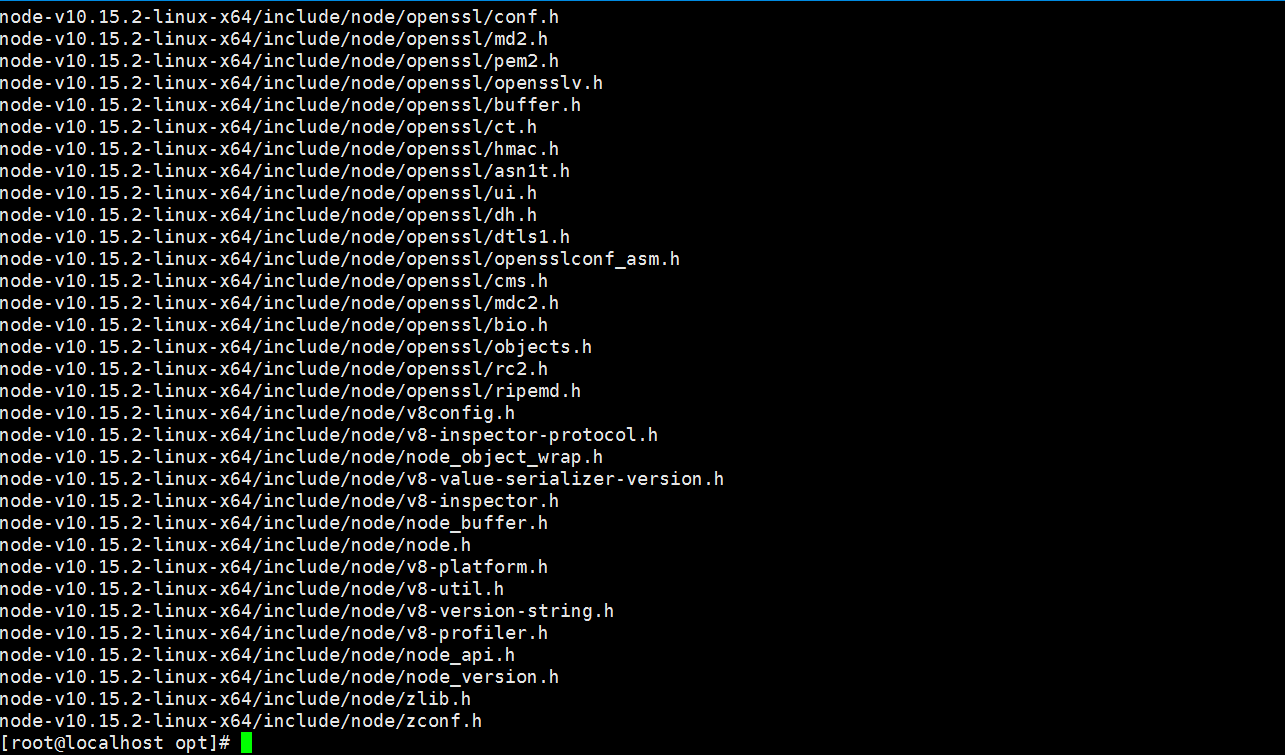
3)解压Node包
tar xvf node-v10.15.2-linux-x64.tar.xz
4)设置软连接
解压文件的 bin 目录底下包含了 node、npm 等命令,我们可以使用 ln 命令来设置软连接:
ln -s bin/npm /usr/local/bin/

 ln -s bin/node /usr/local/bin/
在/etc/profile中配置好path环境变量
vi ~/.bash_profile

export NODE_HOME=/opt/nodejs/node-v10.15.2-linux-x64

export PATH=$PATH:$NODE_HOME/bin
保存退出,使文件生效
source ~/.bash_profile
查看node安装版本,执行 node -v 验证安装如下图:

安装grunt(运行在Node.js上面的任务管理器(task runner)),为了获得Grunt的更多产品特性,需要全局安装Grunt‘s 命令行接口(CLI),使用npm进行安装,如下:
npm install -g grunt-cli

查看grunt版本

输出grunt版本信息,表示安装成功。
1) 执行命令安装git
git yum install git -y
2) 切换到/opt目录下,执行下面的克隆命令
git clone git://github.com/mobz/elasticsearch-head.git

3) 进入到elasticsearch-head目录
cd elasticsearch-head
4) 运行
在运行之前我们需要修改下elasticsearch.yml,因为ES默认不开启跨域访问,需要添加以下配置:
#开启cors跨域访问支持,默认为false
http.cors.enabled: true
#跨域访问允许的域名地址,(允许所有域名)以上使用正则
http.cors.allow-origin: "*"
然后开始执行运行命令:
npm run start

5) 访问head
浏览器输入ip:port:9100,如下图
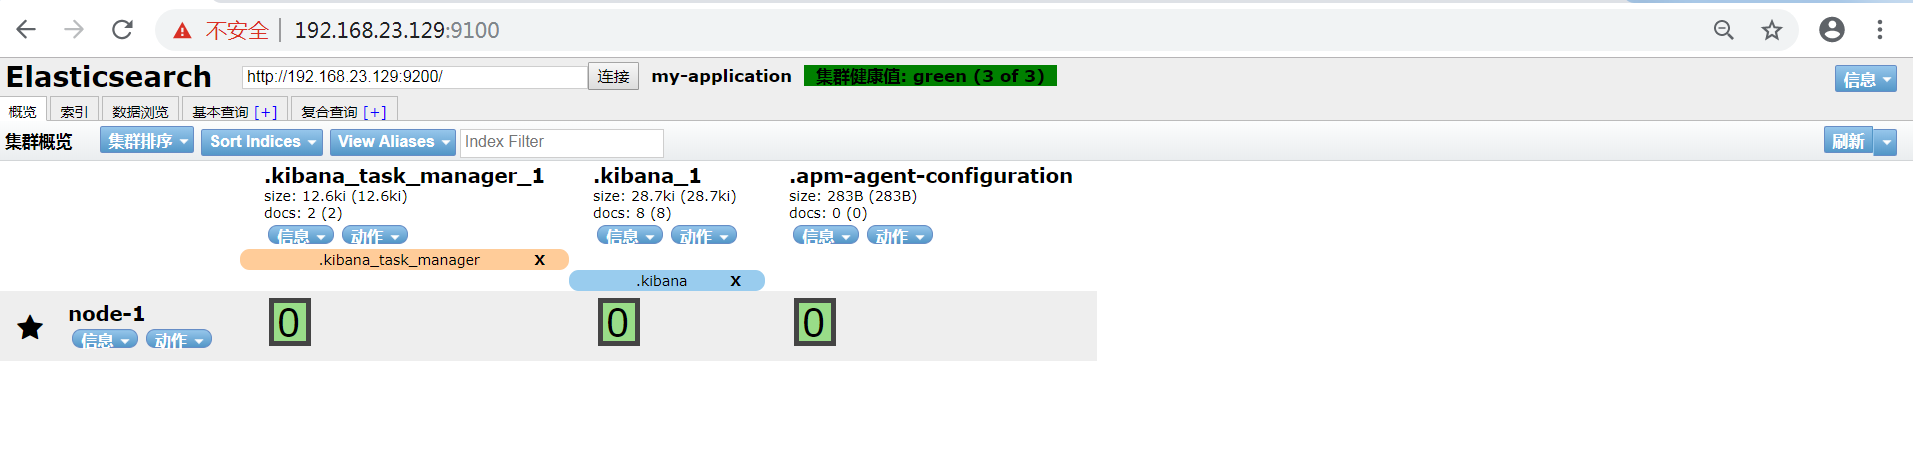
看到这个界面说明我们的head插件成功安装并且成功连接Elasticsearch。
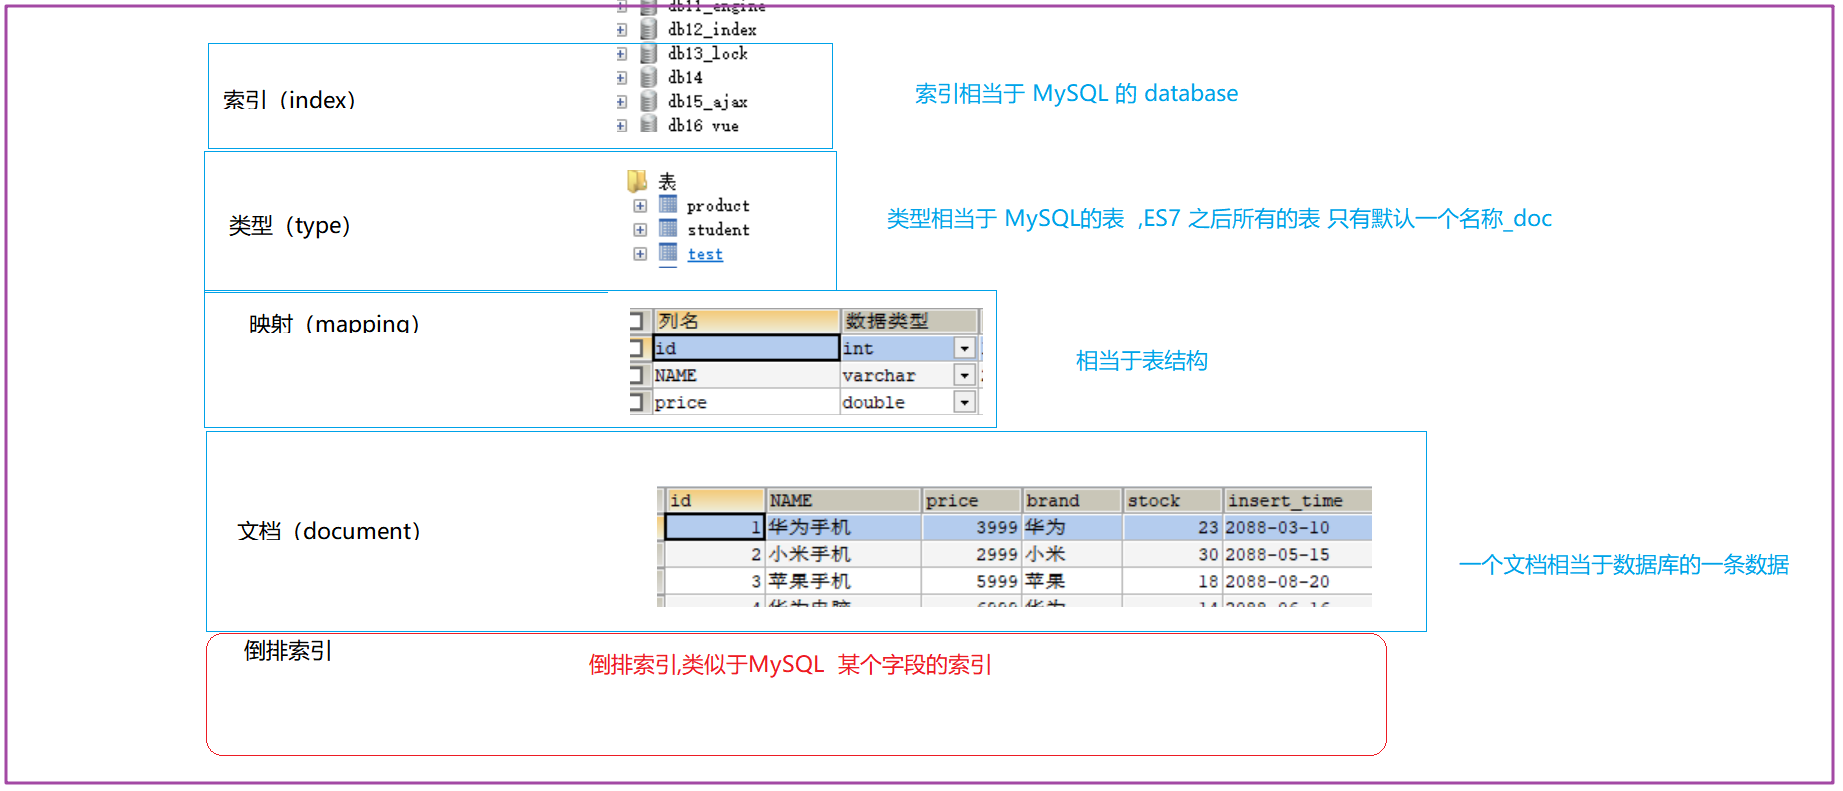
ElasticSearch存储数据的地方,可以理解成关系型数据库中的数据库概念。database
一种type就像一类表。如用户表、角色表等。在Elasticsearch7.X默认type为_doc
\- ES 5.x中一个index可以有多种type。
?
\- ES 6.x中一个index只能有一种type。
?
\- ES 7.x以后,将逐步移除type这个概念,现在的操作已经不再使用,默认_doc
mapping定义了每个字段的类型、字段所使用的分词器等。相当于关系型数据库中的表结构。
Elasticsearch中的最小数据单元,常以json格式显示。一个document相当于MySQL数据库中的一行数据。
一个倒排索引由文档中所有不重复词的列表构成,对于其中每个词,对应一个包含它的文档id列表。
1.REST(Representational State Transfer),表述性状态转移,是一组架构约束条件和原则。满足这些约束条件和原则的应用程序或设计就是RESTful。就是一种定义接口的规范。
2.基于HTTP。
3.使用XML格式定义或JSON格式定义。
4.每一个URI代表一种资源。
5.客户端使用GET、POST、PUT、DELETE 4个表示操作方式的动词对服务端资源进行操作:
GET:用来获取资源(查询)
POST:用来新建资源(新增)
PUT:用来更新资源(修改)
DELETE:用来删除资源(删除)

使用Kibana操作ES:http://192.168.52.128:5601/app/kibana#/dev_tools/console?_g=()
kibana是操作ES的WEB客户端,相当于操作MySQL数据库的sqlyog
# 创建索引
PUT person
# 查看索引
GET person
# 删除索引(同时会删除其所有数据,相当于mysql的drop database)
DELETE person
# 查询所有索引
GET _all
?
delete /c*   (通配符删除c 开头的索引)
简单数据类型
字符串
text:会分词,不支持聚合
keyword:不会分词,将全部内容作为一个词条,支持聚合
数值:long.inteter,double等
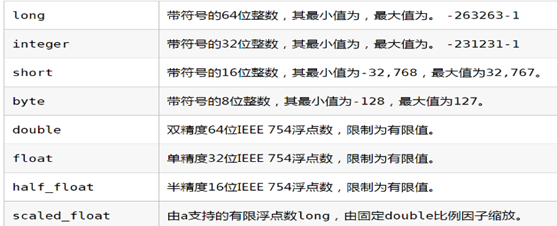
布尔:boolean
日期:date
二进制:binary
范围类型
integer_range, float_range, long_range, double_range, date_range
复杂数据类型
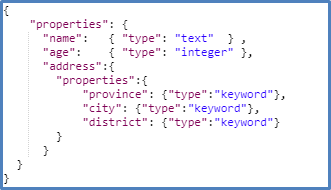
数组:[ ] Nested: nested (for arrays of JSON objects 数组类型的JSON对象)
对象:{ } Object: object(for single JSON objects 单个JSON对象)
注意: 字段类型没有修改功能
# 删除索引(同时会删除其所有数据,相当于mysql的drop database)
DELETE person
?
# 创建索引
PUT person
?
# 查看索引
GET person
?
# 添加映射(相当于添加表字段)
PUT /person/_mapping
{
    "properties":{
        "name":{
            "type":"text"
        },
        "age":{
            "type":"integer"
        }
    }
}
# 仅查看映射(查看表结构)
GET person/_mapping
# 仅查看索引,会自动显示表结构(查看表结构)
GET person
# 创建索引并添加映射(相当于建立数据库时,(因为只有一张表type=_doc)同时制定表字段)
PUT /person
{
  "mappings": {
    "properties": {
      "name": {
        "type": "text"
      },
      "age": {
        "type": "integer"
      }
    }
  }
}
# 指定id,如果id=1数据不存在,则添加(insert)数据;否则是修改(update)
PUT /person/_doc/1
{
  "name":"张三",
  "age":18,
  "address":"北京海淀区"
}
?
# 添加文档,不指定id
POST /person/_doc/
{
  "name":"王五",
  "age":18,
  "address":"北京"
}
# 根据id 查看
GET /person1/_doc/1
# 查看所有(无条件查询)
GET /person1/_search
# 删除指定id文档
DELETE /person1/_doc/1
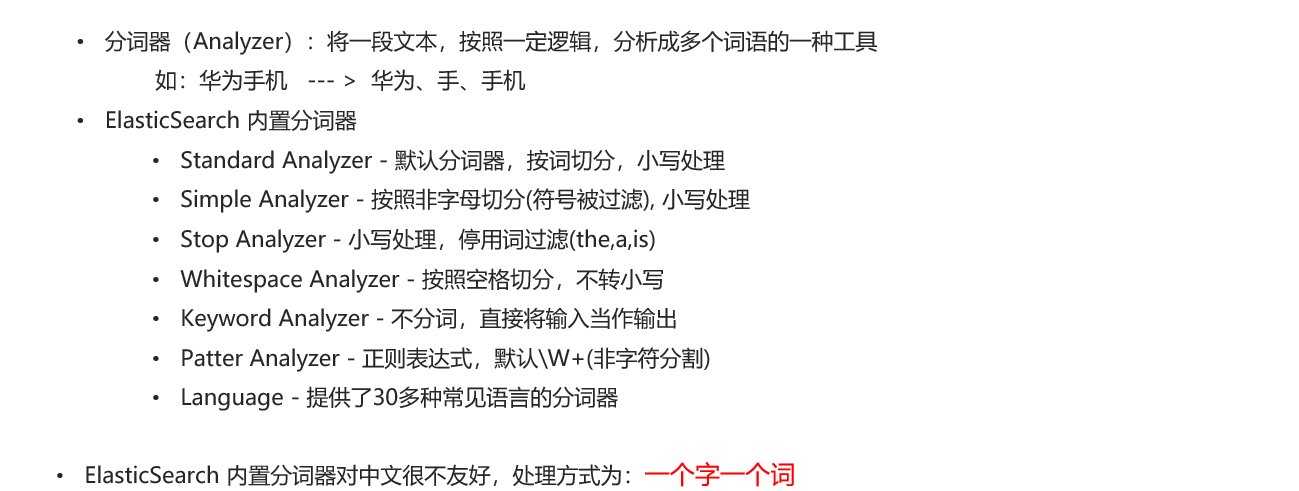
中文分词器
?IKAnalyzer是一个开源的,基于java语言开发的轻量级的中文分词工具包
?是一个基于Maven构建的项目
?具有60万字/秒的高速处理能力
?支持用户词典扩展定义
?下载地址:https://github.com/medcl/elasticsearch-analysis-ik/archive/v7.4.0.zip
参见 ik分词器安装.md
IK分词器有两种分词模式:ik_max_word和ik_smart模式
1、ik_max_word
# 方式一ik_max_word
# 会将文本做最细粒度的拆分,比如会将“乒乓球明年总冠军”拆分为“乒乓球、乒乓、球、明年、总冠军、冠军。
GET /_analyze
{
  "analyzer": "ik_max_word",
  "text": "乒乓球明年总冠军"
}

ik_max_word分词器执行如下:

{
  "tokens" : [
    {
      "token" : "乒乓球",
      "start_offset" : 0,
      "end_offset" : 3,
      "type" : "CN_WORD",
      "position" : 0
    },
    {
      "token" : "乒乓",
      "start_offset" : 0,
      "end_offset" : 2,
      "type" : "CN_WORD",
      "position" : 1
    },
    {
      "token" : "球",
      "start_offset" : 2,
      "end_offset" : 3,
      "type" : "CN_CHAR",
      "position" : 2
    },
    {
      "token" : "明年",
      "start_offset" : 3,
      "end_offset" : 5,
      "type" : "CN_WORD",
      "position" : 3
    },
    {
      "token" : "总冠军",
      "start_offset" : 5,
      "end_offset" : 8,
      "type" : "CN_WORD",
      "position" : 4
    },
    {
      "token" : "冠军",
      "start_offset" : 6,
      "end_offset" : 8,
      "type" : "CN_WORD",
      "position" : 5
    }
  ]
}
2、ik_smart
# 方式二ik_smart
# 会做最粗粒度的拆分,比如会将“乒乓球明年总冠军”拆分为乒乓球、明年、总冠军。
GET /_analyze
{
  "analyzer": "ik_smart",
  "text": "乒乓球明年总冠军"
}
ik_smart分词器执行如下:
{
  "tokens" : [
    {
      "token" : "乒乓球",
      "start_offset" : 0,
      "end_offset" : 3,
      "type" : "CN_WORD",
      "position" : 0
    },
    {
      "token" : "明年",
      "start_offset" : 3,
      "end_offset" : 5,
      "type" : "CN_WORD",
      "position" : 1
    },
    {
      "token" : "总冠军",
      "start_offset" : 5,
      "end_offset" : 8,
      "type" : "CN_WORD",
      "position" : 2
    }
  ]
}
由此可见:使用ik_smart可以将文本"text": "乒乓球明年总冠军"分成了【乒乓球】【明年】【总冠军】
这样看的话,这样的分词效果更智能一些,达到了我们的要求。
1.创建索引,添加映射,并指定分词器为ik分词器
# 如果有删除
DELETE person

# 添加映射_指定分词器(相当于添加表字段)
PUT person
{
  "mappings": {
    "properties": {
      "name": {
        "type": "keyword"   // keyword 类型 不会分词
      },
      "address": {
        "type": "text",  // text 类型 会分词, 但不能进行聚合查询(类似SQL group by/sum函数)
        "analyzer": "ik_max_word"
      }
    }
  }
}

GET person
2.添加文档
# 添加几条数据备用
# 指定id
POST /person/_doc/1
{
  "name":"张三",
  "age":18,
  "address":"北京海淀区"
}

POST /person/_doc/2
{
  "name":"李四",
  "age":18,
  "address":"北京朝阳区"
}

POST /person/_doc/3
{
  "name":"王五",
  "age":18,
  "address":"北京昌平区"
}

POST /person/_doc/4
{
  "name":"李雷",
  "age":18,
  "address":"华为5G手机"
}
3.查询映射数据
GET /person/_search
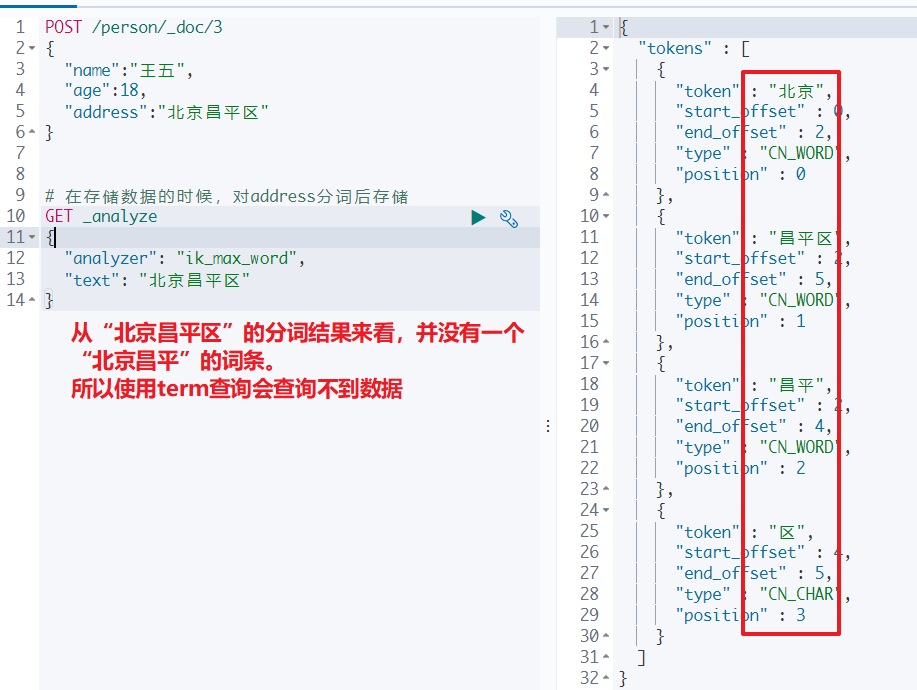
4.查看分词效果
GET _analyze
{
  "analyzer": "ik_max_word",
  "text": "北京昌平区"
}
词条查询:term,不会将查询条件拆分
使用“北京”做为查询条件:
# 可以查询到3条数据
GET /person/_search
{
  "query": {
    "term": {
      "address": {
        "value": "北京"
      }
    }
  }
}
使用“北京昌平”做为查询条件:
# 查询不到数据,因为没有一个叫“北京昌平”的词条
GET /person/_search
{
  "query": {
    "term": {
      "address": {
        "value": "北京昌平"
      }
    }
  }
}
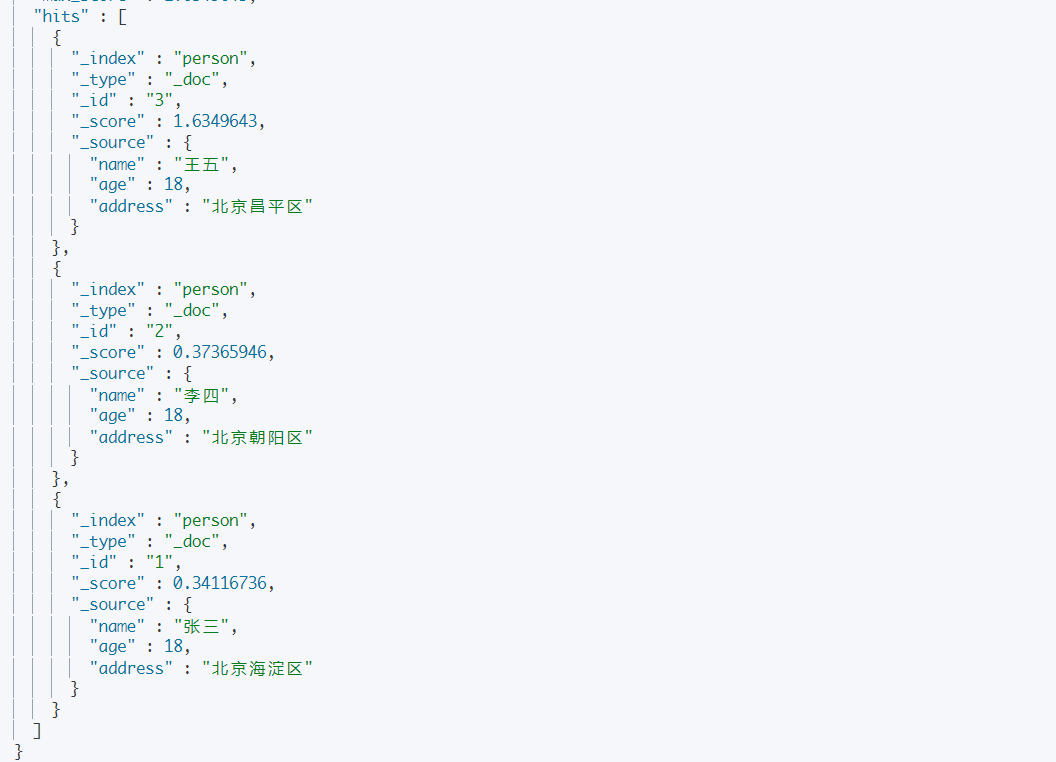
全文查询:match
match查询会对查询条件进行分词,先将查询条件进行分词,然后查询,求并集(or)
# 1.对查询条件“北京昌平”进行分词: 北京,昌平
# 2.根据分词结果逐个查询

GET /person/_search
{
  "query": {
    "match": {
      "address": "北京昌平"
    }
  }
}
结果会把所有address中有北京和昌平的都查询出来:
词条查询:term(关键词查询)
term查询不会对查询条件进行分词,只有当词条和查询字符串完全匹配时才匹配搜索
全文查询:match(全文查询)
match查询会对查询条件进行分词,先将查询条件进行分词,然后查询,求并集(or)
①搭建SpringBoot工程
②引入ElasticSearch相关坐标:7.4.0
<parent>
    <groupId>org.springframework.boot</groupId>
    <artifactId>spring-boot-starter-parent</artifactId>
    <version>2.1.8.RELEASE</version>
    <relativePath/> <!-- lookup parent from repository -->
</parent>
<dependencies>
    <dependency>
        <groupId>org.springframework.boot</groupId>
        <artifactId>spring-boot-starter</artifactId>
    </dependency>

    <dependency>
        <groupId>org.springframework.boot</groupId>
        <artifactId>spring-boot-starter-test</artifactId>
        <scope>test</scope>
    </dependency>

    <!--引入es的坐标-->
    <dependency>
        <groupId>org.elasticsearch.client</groupId>
        <artifactId>elasticsearch-rest-high-level-client</artifactId>
        <version>7.4.0</version>
    </dependency>
    <dependency>
        <groupId>org.elasticsearch.client</groupId>
        <artifactId>elasticsearch-rest-client</artifactId>
        <version>7.4.0</version>
    </dependency>
    <dependency>
        <groupId>org.elasticsearch</groupId>
        <artifactId>elasticsearch</artifactId>
        <version>7.4.0</version>
    </dependency>

    <dependency>
        <groupId>org.projectlombok</groupId>
        <artifactId>lombok</artifactId>
    </dependency>

    <dependency>
        <groupId>com.alibaba</groupId>
        <artifactId>fastjson</artifactId>
        <version>1.2.4</version>
    </dependency>

</dependencies>
③测试
编写配置类ElasticSearchConfig
package com.itheima.elasticsearchdemo.config;

import lombok.Data;
import org.apache.http.HttpHost;
import org.elasticsearch.client.RestClient;
import org.elasticsearch.client.RestHighLevelClient;
import org.springframework.boot.context.properties.ConfigurationProperties;
import org.springframework.context.annotation.Bean;
import org.springframework.context.annotation.Configuration;

@Configuration
@ConfigurationProperties(prefix="elasticsearch")
public class ElasticSearchConfig {

    private String host;

    private int port;

    //添加get,set方法

    @Bean
    public RestHighLevelClient client(){
        return new RestHighLevelClient(RestClient.builder(
                new HttpHost(host,port,"http")
        ));
    }
}
配置es信息: resources\application.yml
elasticsearch:
  host: 192.168.52.128
  port: 9200
编写单元测试类:ElasticsearchDay01ApplicationTests
注意:使用@Autowired注入RestHighLevelClient 如果报红线,则是因为配置类所在的包和测试类所在的包,包名不一致造成的
package com.itheima.elasticsearchdemo;

import org.springframework.boot.SpringApplication;
import org.springframework.boot.autoconfigure.SpringBootApplication;

@RunWith(SpringRunner.class)
@SpringBootTest(classes = ElasticsearchDemoApplication.class)
public class ElasticsearchDemoApplicationTests {

    @Autowired
    private RestHighLevelClient client;

    @Test
    public void contextLoads() {
        System.out.println(client);
    }
}
在ElasticsearchDemoApplicationTests单元测试类中进行如下练习:
1.添加索引
# 注意导包:org.elasticsearch.client.indices.CreateIndexRequest

/**
 * 添加索引
 */
@Test
public void addIndex() throws IOException {
    //1.使用client获取操作索引的对象
    IndicesClient indicesClient = client.indices();
    //2.具体操作,获取返回值
    CreateIndexRequest createRequest = new CreateIndexRequest("itheima");
    CreateIndexResponse response = indicesClient.create(createRequest,
            RequestOptions.DEFAULT);

    //3.根据返回值判断结果
    System.out.println(response.isAcknowledged());
}
2.添加索引,并添加映射
/**
     * 添加索引,并添加映射
     */
    @Test
    public void addIndexAndMapping() throws IOException {
       //1.使用client获取操作索引对象
        IndicesClient indices = client.indices();
        //2.具体操作获取返回值
        //2.具体操作,获取返回值
        CreateIndexRequest createIndexRequest = new CreateIndexRequest("itcast");
        //2.1 设置mappings
        String mapping = "{\n" +
                "      \"properties\" : {\n" +
                "        \"address\" : {\n" +
                "          \"type\" : \"text\",\n" +
                "          \"analyzer\" : \"ik_max_word\"\n" +
                "        },\n" +
                "        \"age\" : {\n" +
                "          \"type\" : \"long\"\n" +
                "        },\n" +
                "        \"name\" : {\n" +
                "          \"type\" : \"keyword\"\n" +
                "        }\n" +
                "      }\n" +
                "    }";
        createIndexRequest.mapping(mapping,XContentType.JSON);

        CreateIndexResponse createIndexResponse = indices.create(createIndexRequest, RequestOptions.DEFAULT);
        //3.根据返回值判断结果
        System.out.println(createIndexResponse.isAcknowledged());
    }

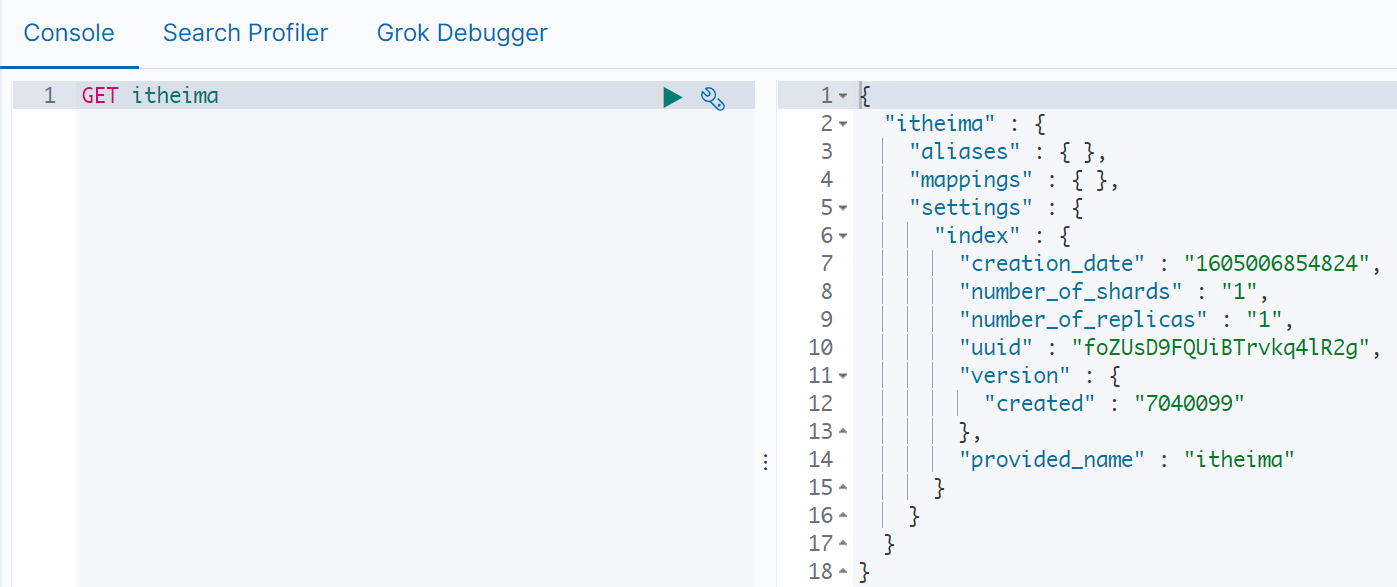
查询索引
   /**
     * 查询索引
     */
    @Test
    public void queryIndex() throws IOException {
        IndicesClient indices = client.indices();

        GetIndexRequest getRequest=new GetIndexRequest("itcast");
        GetIndexResponse response = indices.get(getRequest, RequestOptions.DEFAULT);
        Map<String, MappingMetaData> mappings = response.getMappings();
        //iter 提示foreach
        for (String key : mappings.keySet()) {
            System.out.println(key+"==="+mappings.get(key).getSourceAsMap());
        }
    }
删除索引
 /**
     * 删除索引
     */
    @Test
    public void deleteIndex() throws IOException {
         IndicesClient indices = client.indices();
        DeleteIndexRequest deleteRequest=new DeleteIndexRequest("itheima");
        AcknowledgedResponse delete = indices.delete(deleteRequest, RequestOptions.DEFAULT);
        System.out.println(delete.isAcknowledged());

    }
索引是否存在
 /**
     * 索引是否存在
     */
    @Test
    public void existIndex() throws IOException {
        IndicesClient indices = client.indices();

        GetIndexRequest getIndexRequest=new GetIndexRequest("itheima");
        boolean exists = indices.exists(getIndexRequest, RequestOptions.DEFAULT);

        System.out.println(exists);
    }
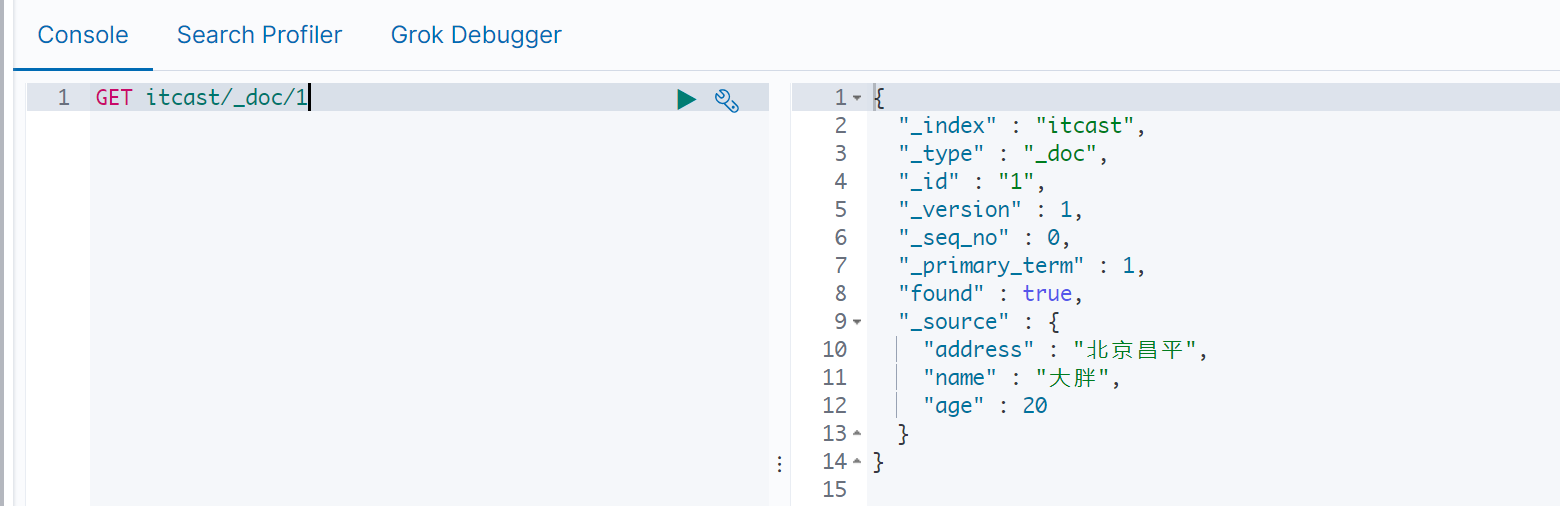
1.添加文档,使用map作为数据
/**
 * 添加文档,使用map作为数据
 */
@Test
public void addDoc() throws IOException {
    //数据对象,map
    Map data = new HashMap();
    data.put("address", "北京昌平");
    data.put("name", "大胖");
    data.put("age", 20);

    //1.获取操作文档的对象
    IndexRequest request = new IndexRequest("itcast").id("1").source(data);
    //添加数据,获取结果
    IndexResponse response = client.index(request, RequestOptions.DEFAULT);

    //打印响应结果
    System.out.println(response.getId());
}
2.添加文档,使用对象作为数据
检查是否添加fastjson和lombok的依赖:
<dependency>
    <groupId>org.projectlombok</groupId>
    <artifactId>lombok</artifactId>
</dependency>

<!--fastjson依赖-->
<dependency>
    <groupId>com.alibaba</groupId>
    <artifactId>fastjson</artifactId>
    <version>1.2.4</version>
</dependency>
创建Person类:使用lombok提供的@Data注解来完成setter, getter,toString等方法
package com.itheima.domain;

import lombok.Data;

@Data
public class Person {
    private String id;
    private String name;
    private int age;
    private String address;

}
通过fastjson将Java对象转换成JSON字符串:
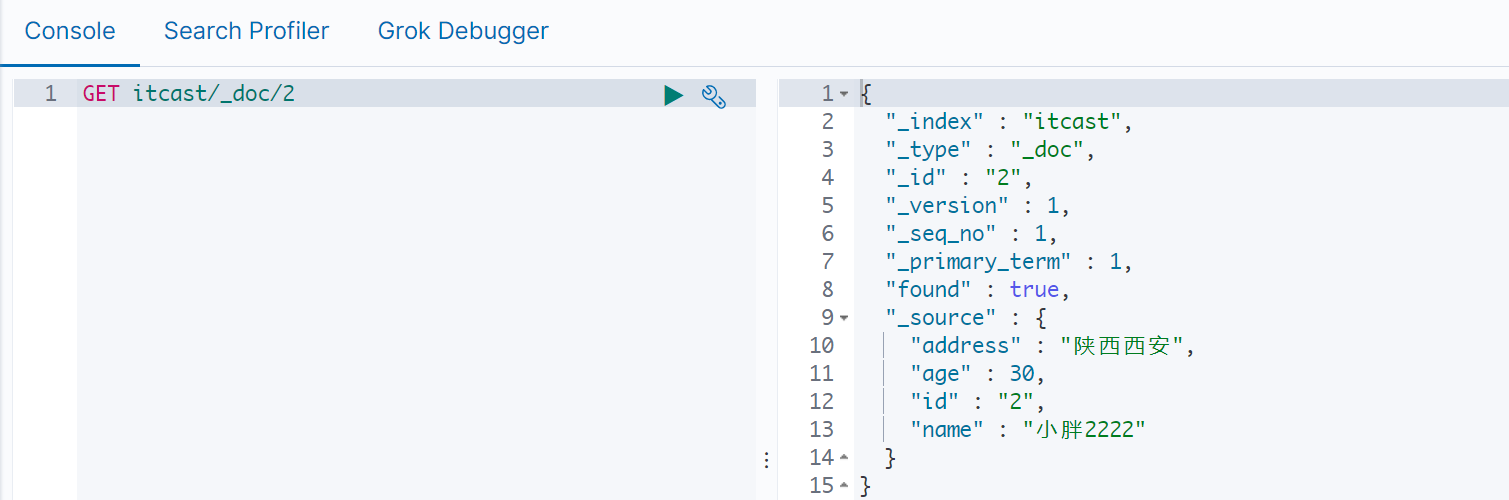
//将对象转为json
String data = JSON.toJSONString(p);

/**
 * 添加文档,使用对象作为数据
 */
@Test
public void addDoc2() throws IOException {
    //数据对象,javaObject
    Person p = new Person();
    p.setId("2");
    p.setName("小胖2222");
    p.setAge(30);
    p.setAddress("陕西西安");

    //将对象转为json
    String data = JSON.toJSONString(p);

    //1.获取操作文档的对象
    IndexRequest request = new IndexRequest("itcast").id(p.getId()).source(data,
            XContentType.JSON);
    //添加数据,获取结果
    IndexResponse response = client.index(request, RequestOptions.DEFAULT);

    //打印响应结果
    System.out.println(response.getId());
}
1.修改文档:添加文档时,如果id存在则修改,id不存在则添加
/**
     * 修改文档:添加文档时,如果id存在则修改,id不存在则添加
     */
@Test
public void UpdateDoc() throws IOException {
    Person person=new Person();
    person.setId("2");
    person.setName("李四");
    person.setAge(20);
    person.setAddress("北京三环车王");

    String data = JSON.toJSONString(person);

    IndexRequest request=new IndexRequest("itcast").id(person.getId()).source(data,XContentType.JSON);
    IndexResponse response = client.index(request, RequestOptions.DEFAULT);
    System.out.println(response.getId());
}
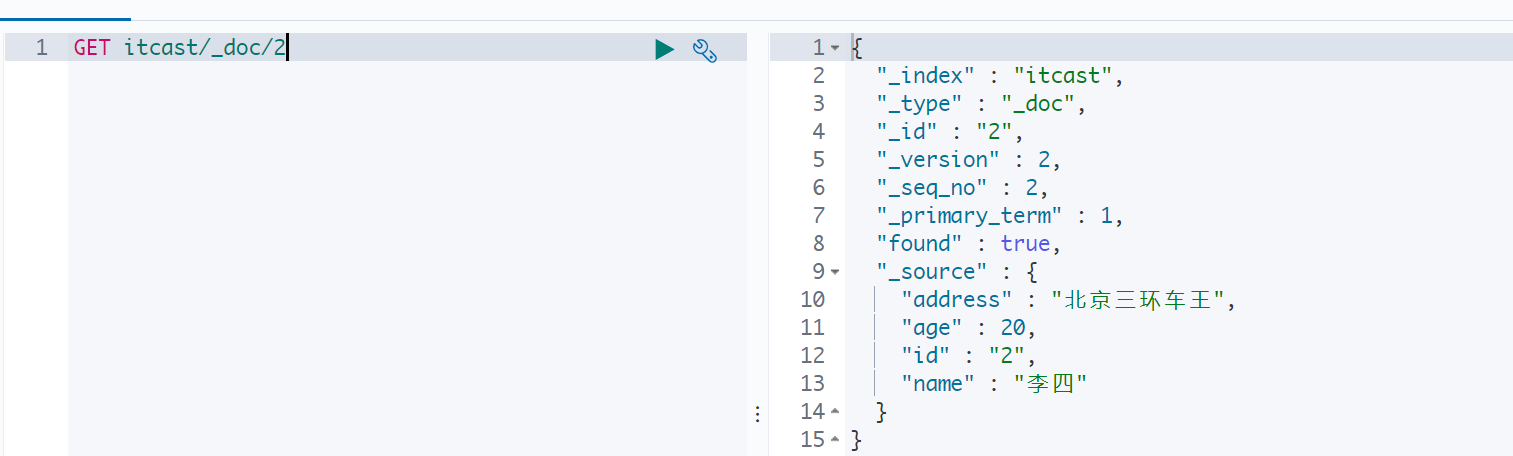
2.根据id查询文档
/**
   * 根据id查询文档
   */
@Test
public void getDoc() throws IOException {

    //设置查询的索引、文档
    GetRequest indexRequest=new GetRequest("itcast","2");

    GetResponse response = client.get(indexRequest, RequestOptions.DEFAULT);
    System.out.println(response.getSourceAsString());
}
3.根据id删除文档
/**
     * 根据id删除文档
     */
    @Test
    public void delDoc() throws IOException {

        //设置要删除的索引、文档
        DeleteRequest deleteRequest=new DeleteRequest("itcast","1");

        DeleteResponse response = client.delete(deleteRequest, RequestOptions.DEFAULT);
        System.out.println(response.getId());
    }

新增或修改:
IndexRequest request = new IndexRequest("index_name").id("")
client.index()
查询
GetRequest request = new GetRequest("index_name").id("")
client.get()
删除
DeleteRequest request = new DeleteRequest("index_name").id("")
client.delete()
ElasticSearch基础:安装ElasticSearch及辅助工具,ElasticSearch 核心概念,操作 ElasticSearch,ElasticSearch JavaAPI
标签:fast tran 控制台 恢复 包管理 alt+ 开源 华为手机 可见
原文地址:https://www.cnblogs.com/859630097com/p/14583196.html