Vue
简介
Vue:是一套用于构建用户界面的渐进式JavaScript框架。与其它大型框架不同的是,Vue 被设计为可以自底向上逐层应用。Vue 的核心库只关注视图层,方便与第三方库或既有项目整合。
CSS预处理器:提供CSS缺失的样式层复用机制,减少冗余代码,提高样式代码的可维护性,大大提高前端在样式上的开发效率。
CSS预处理器:是一种专门的编程语言,进行web页面样式设计,通过编译器转化为正常的CSS文件,以供项目使用。
常用CSS预处理器:
SASS,基于Ruby,通过服务端处理,功能强大,解析效率高,需要学习Ruby语言。
LESS,基于NodeJS,通过客户端处理,使用简单。
TypeScript:
- TypeScript是一种由微软开发的开源、跨平台的编程语言。它是JavaScript的超集,最终会被编译为JavaScript代码。
- TypeScript扩展了JavaScript的语法,所以任何现有的JavaScript程序可以运行在TypeScript环境中。TypeScript是为大型应用的开发而设计,并且可以编译为JavaScript。
JavaScript框架:
- JQuery:优点是简化了DOM操作,缺点是DOM操作太频繁,影响前端性能。
- Angular:Google收购的前端框架,由一群Java程序员开发,其特点是将将后台的MVC模式搬到了前端,并增加了模块化开发的理念,与微软合作,采用TypeScript语法开发,对后端程序员友好,对前端程序员不太友好。
- React:FaceBook出品,一款高性能JS前端框架,其特点是提出了新概念【虚拟DOM】用于减少真实DOM操作,在内存中模拟DOM操作,有效的提升了前端的渲染效率;缺点是复杂,需要额外学习一门JSX语言。
- Vue:一款渐进式JavaScript框架,所谓渐进式就是逐步实现新特性的意思,如实现模块化开发,路由,状态管理等新特性,其特点是包含了Angular(模块化)和React(虚拟DOM)的优点。
- Axios:前端通信框架,因为Vue的边界很明确,就是为了处理DOM,不具备通信能力;为此就需要一个通信框架与服务器交互,当然也可以使用JQuery提供的Ajax通信功能。
UI框架
- Ant-Design:阿里巴巴出品。基于React的UI框架。
- ElementUI,iview,ice:饿了么出品 ,基于Vue的UI框架。
- BootStrap:Twitter推出的用于前端开发的开源工具包。
- AmazeUI:一款HTML5跨屏前端框架。
JavaScript构建工具:
- Babel:JS 编译工具,主要用于浏览器不支持的ES新特性,比如用于编译TypeScript。
- WebPack:模块打包器,主要作用是打包,压缩,合并及按序加载。
MVVM模式的实现者:
- Model:模型层,这里表示JavaScript对象。
- View:视图层,这里表示DOM(HTML操作的元素)。
- ViewModel:连接视图和数据的中间件,Vue.js就是MVVC中ViewModel层的实现者。
在MVVC架构中,是不允许数据和视图直接通信的,只能通过ViewModel来通信,而ViewModel就是定义了一个Observer观察者。
- ViewModel能够观察到数据的变化,并对视图对应的内容进行更新。
- ViewModel能够监听到视图的变化,并能通知数据发生改变。
因此,Vue.js就是一个MVVM的实现者,它的核心就是实现了DOM监听与数据绑定。
为什么使用MVVM:分离视图和模型
- 低耦合:视图可独立于Model变化和修改,一个ViewModel可绑定到不同的View上,当View变化的时候Model可以不变,当Model变化的时候View也可以不变。
- 可复用:可以把一些逻辑视图放在一个ViewModel中,让很多View重用这段逻辑视图。
- 独立开发:开发人员可以专注业务逻辑和数据的开发(ViewModel),设计人员专注于页面设计。
- 可测试:测试可以针对ViewModel来写。
第一个Vue程序
IDEA安装Vue.js插件
demo.html
<body>
<div id="app">
     <h1>{{message}}</h1>
    <span v-bind:title="message">
    鼠标悬停几秒查看动态绑定的信息
    </span>

</div>

<!--    导入Vue.js-->
<script src="https://cdn.jsdelivr.net/npm/vue@2.5.21/dist/vue.min.js"></script>
<script>
    var vm = new Vue({
        el:"#app",
        data:{
            message:"hello,vue!"
        }
    });
</script>

</body>
Vue基本语法
- if
<body>
<!--View层-->
<div id="app">
   <h1 v-if="ok">Yes</h1>
   <h1 v-else>No</h1>
</div>
<div id="app2">
    <h1 v-if="type===‘A‘">A</h1>
    <h1 v-else-if="type===‘B‘">B</h1>
    <h1 v-else>C</h1>
</div>

<!--    导入Vue.js-->
<script src="https://cdn.jsdelivr.net/npm/vue@2.5.21/dist/vue.min.js"></script>
<script>
    var vm = new Vue({
        el:"#app",
        data:{
            ok: true
        }
    });
    var vm = new Vue({
        el:"#app2",
        data:{
            type: ‘A‘
        }
    });
</script>
</body>
- for
<body>
<div id="app">
   <h1 v-for="item in items">{{item.message}}</h1>
</div>

<!--    导入Vue.js-->
<script src="https://cdn.jsdelivr.net/npm/vue@2.5.21/dist/vue.min.js"></script>
<script>
    var vm = new Vue({
        el:"#app",
        data:{
          items:[
              {message: ‘zzrr‘},
              {message: ‘Vue‘}
          ]
        }
    });
</script>
</body>
- 监听事件
<body>
<!--View层-->
<div id="app">
   <button v-on:click="sayHi">click me</button>
</div>

<!--    导入Vue.js-->
<script src="https://cdn.jsdelivr.net/npm/vue@2.5.21/dist/vue.min.js"></script>
<script>
    var vm = new Vue({
        el: "#app",
        data: {
            message: ‘zzr‘
        },
        methods: {
            // 方法必须定义在Vue的methods对象中
            sayHi: function () {
                alert(this.message);
            }
        }
    });
</script>
</body>
双向绑定
文本框绑定
<body>
<!--View层-->
<div id="app">
<!--   输入的文本:<input type="text" v-model="message">{{message}}-->
    <textarea v-model="message"></textarea>
   输入文本框内容为:{{message}}

</div>

<!--    导入Vue.js-->
<script src="https://cdn.jsdelivr.net/npm/vue@2.5.21/dist/vue.min.js"></script>
<script>
    var vm = new Vue({
        el: "#app",
        data: {
            message: ""
        }
    });
</script>
</body>
单选框绑定
<body>
<!--View层-->
<div id="app">

    性别:
    <input type="radio" name="sex" value="男" v-model="zr">男
    <input type="radio" name="sex" value="女" v-model="zr">女
    <p>
        你选中了:{{zr}}
    </p>
</div>

<!--    导入Vue.js-->
<script src="https://cdn.jsdelivr.net/npm/vue@2.5.21/dist/vue.min.js"></script>
<script>
    var vm = new Vue({
        el: "#app",
        data: {
            zr: ""
        }
    });
</script>
</body>
下拉框
<body>
<!--View层-->
<div id="app">
    <p>
        下拉框:<select v-model="message">
        <option value="" disabled>--请选择--</option>
        <option>A</option>
        <option>B</option>
        <option>C</option>
    </select>
        value: {{message}}
    </p>
</div>

<!--    导入Vue.js-->
<script src="https://cdn.jsdelivr.net/npm/vue@2.5.21/dist/vue.min.js"></script>
<script>
    var vm = new Vue({
        el: "#app",
        data: {
            message: ""
        }
    });
</script>
</body>
组件
<body>
<!--View层-->
<div id="app">
    <zzr v-for="item in items" v-bind:zr="item"></zzr>
</div>

<!--    导入Vue.js-->
<script src="https://cdn.jsdelivr.net/npm/vue@2.5.21/dist/vue.min.js"></script>
<script>
    // 定义一个Vue组件component
    Vue.component("zzr",{
        props: [‘zr‘],
        template: ‘<li>{{zr}}</li>‘
    });
    var vm = new Vue({
        el: "#app",
        data: {
            items: ["java","linux","vue"]
        }
    });
</script>
</body>
Axios异步通信
Axios是一个开源的可以用在浏览器端和 Node.JS 的异步通信框架, 它的主要作用是和Ajax一样实现异步通信。
Axios:
- 从浏览器中创建XMLHttpRequests
- 从Node.js创建http请求
- 支持Peomise API [JS中链式编程]
- 拦截请求和响应
- 转换请求数据和响应数据
- 取消请求
- 自动转换 JSON 数据
- 客户端支持防御XSRF [跨站请求伪造]
测试
<head>
    <meta charset="UTF-8">
    <title>Title</title>

<!--    解决闪烁问题-->
    <style>
        [v-clock]{
            display: none;
        }
    </style>
</head>
<body>
<!--View层-->
<div id="vue" v-clock>
    <div>{{info.name}}</div>
    <div>{{info.address}}</div>
    <div>{{info.links}}</div>
    <div>{{info.address.city}}</div>

    <a v-bind:href="info.url">博客园</a>
</div>

<!--    导入Vue.js和axios-->
<script src="https://cdn.jsdelivr.net/npm/vue@2.5.21/dist/vue.min.js"></script>
<script src="https://unpkg.com/axios/dist/axios.min.js"></script>
<script>
    var vm = new Vue({
        el: "#vue",
        data(){//data方法
          return{
              //请求的返回参数格式,必须和json字符串一样
              info: {
                  name: null,
                  url: null,
                  address:{
                      city: null,
                      country: null
                  },
                  links:[{
                      name: null,
                      url: null
                  }]
              }
          }
        },
        mounted(){//钩子函数
            axios.get(‘../data.json‘).then(response=>(this.info=response.data))
        }
    });
</script>
</body>
data.json
{
  "name": "zr",
  "url": "https://www.cnblogs.com/zhou-zr",
  "page": "11",
  "address": {
    "city": "武汉",
    "country": "中国"
  },
  "links": [
    {
      "name": "bokeyuan",
      "url": "cnblogs.com/zhou-zr"
    },
    {
      "name": "zrkuang",
      "url": "www.baidu.com"
    }
  ]
}
计算属性
计算属性:是一个能够将计算结果缓存起来的属性(将行为转化成了静态的属性),可理解为缓存。
demo8.html
<body>
<!--View层-->
<div id="app">
    <p>currentTime():{{currentTime()}}</p>
    <p>currentTime2:{{currentTime2}}</p>
</div>

<!--    导入Vue.js-->
<script src="https://cdn.jsdelivr.net/npm/vue@2.5.21/dist/vue.min.js"></script>
<script>
    var vm = new Vue({
        el: "#app",
        data: {
            message:"hello,zzzrrr!"
        },
        methods: {
            currentTime: function () {//在浏览器控制台输出vm.currentTime()时间戳值会改变
                return Date.now();//返回时间戳
            }
        },
        computed: {//计算属性   methods,computed方法名不能重,重名会调用methods中的方法
            currentTime2: function () {//在浏览器控制台输出vm.currentTime2时间戳值不会改变
                 this.message;  //增加这一行后控制台vm.message="zzrr"再输出时间戳值会改变
                return Date.now();//返回时间戳
            }
        }
    });
</script>

</body>
调用方法时,每次需要计算,既然计算就必然产生系统的开销,如果这个结果不经常变化就可以考虑将这个结果缓存起来。计算结果的主要目的就是将不经常变化的计算结果进行缓存,以节省系统的开销。
Slot
在Vue.js中我们使用元素作为承载分支内容的出口,称为插槽,可以应用在组合组件的场景中。
v-bind:简写 :
demo9.html
<body>

<!--View层-->
<div id="app">
    <tudo>
        <!--v-bind:简写 :-->
        <tudo-title slot="tudo-title" :title="title"></tudo-title>
        <tudo-items slot="tudo-items" v-for="item in tudoItems" :items="item"></tudo-items>
    </tudo>
</div>

<!--    导入Vue.js-->
<script src="https://cdn.jsdelivr.net/npm/vue@2.5.21/dist/vue.min.js"></script>
<script>

    Vue.component("tudo",{
        template:
            ‘<div>            <slot></slot>            <ul>            <slot></slot>            </ul>            </div>‘
    });

    Vue.component("tudo-title",{
        props: [‘title‘],
        template: ‘<div>{{title}}</div>‘
    });
    Vue.component("tudo-items",{
        props: [‘items‘],
        template: ‘<li>{{items}}</li>‘
    });

    var vm = new Vue({
        el: "#app",
        data: {
            title: "周周",
            tudoItems: ["Java","ZZRR","Kuang"],
        }
    });
</script>

</body>
自定义事件
v-on:简写 @
this.$emit 自定义事件分发
demo10.html
<body>

<!--View层-->
<div id="app">
    <tudo>
        <tudo-title slot="tudo-title" :title="title"></tudo-title>
        <tudo-items slot="tudo-items" v-for="(item,index) in tudoItems" :items="item" v-bind:index="index" v-on:remove="removeItems(index)"></tudo-items>
    </tudo>
</div>

<!--    导入Vue.js-->
<script src="https://cdn.jsdelivr.net/npm/vue@2.5.21/dist/vue.min.js"></script>
<script>

    Vue.component("tudo",{
        template:
            ‘<div>‘+
            ‘<slot name="tudo-title"></slot>‘+
            ‘<ul>‘+
            ‘<slot name="tudo-items"></slot>‘+
            ‘</ul>‘+
            ‘</div>‘
    });

    Vue.component("tudo-title",{
        props: [‘title‘],
        template: ‘<div>{{title}}</div>‘
    });
    Vue.component("tudo-items",{
        props: [‘items‘,‘index‘],
        //v-on:简写 @
        template: ‘<li>{{index}}----{{items}} <button @click="remove">删除</button></li>‘,
        methods: {
            remove: function (index) {
                //this.$emit  自定义事件分发
                this.$emit(‘remove‘,index);
            }
        }
    });

    var vm = new Vue({
        el: "#app",
        data: {
            title: "周周",
            tudoItems: ["Java","ZZRR","Kuang"],
        },
        methods: {
            removeItems: function (index) {
                console.log("删除了"+this.tudoItems[index]);
                this.tudoItems.splice(index,1); //一次删除一个元素
            }
        }
    });
</script>

</body>
第一个Vue-cli程序
-
安装node.js(官网下载64位的安装包,直接安装到自己指定目录)
-
cmd以管理员打开,node-v;npm-v分别输入查看版本
-
安装淘宝镜像加速器,npm install cnpm -g

-
安装vue-cli,输入cnpm install vue-cli -g
-
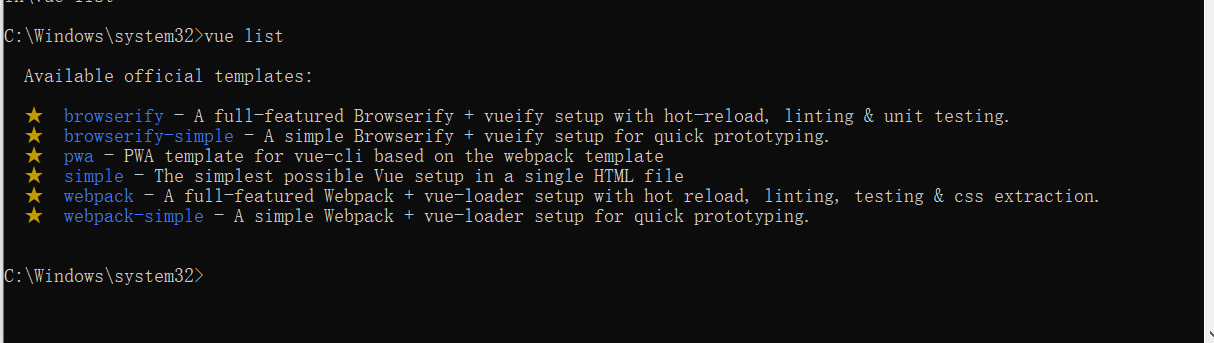
输入vue list,查看可以基于哪些模板创建 vue 应用程序,通常选择webpack
- 新建一个项目文件夹,cmd进入该文件夹,输入vue init webpack myvue(一路no即可)
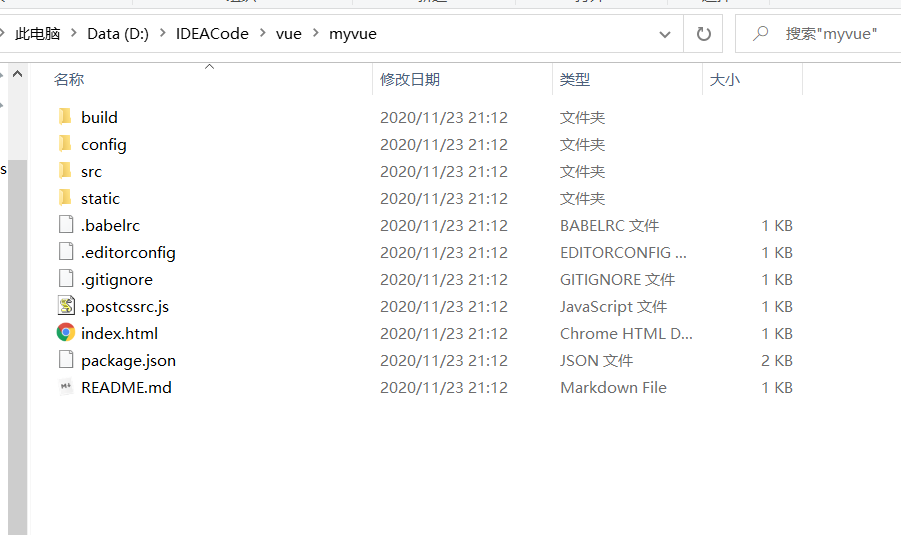
-
进入vue项目中 cd myvue,再执行npm install
-
npm run dev启动项目
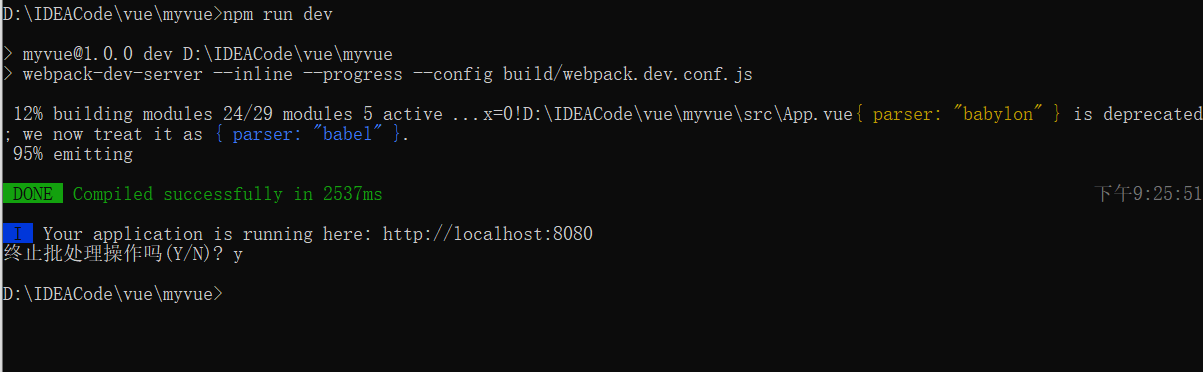
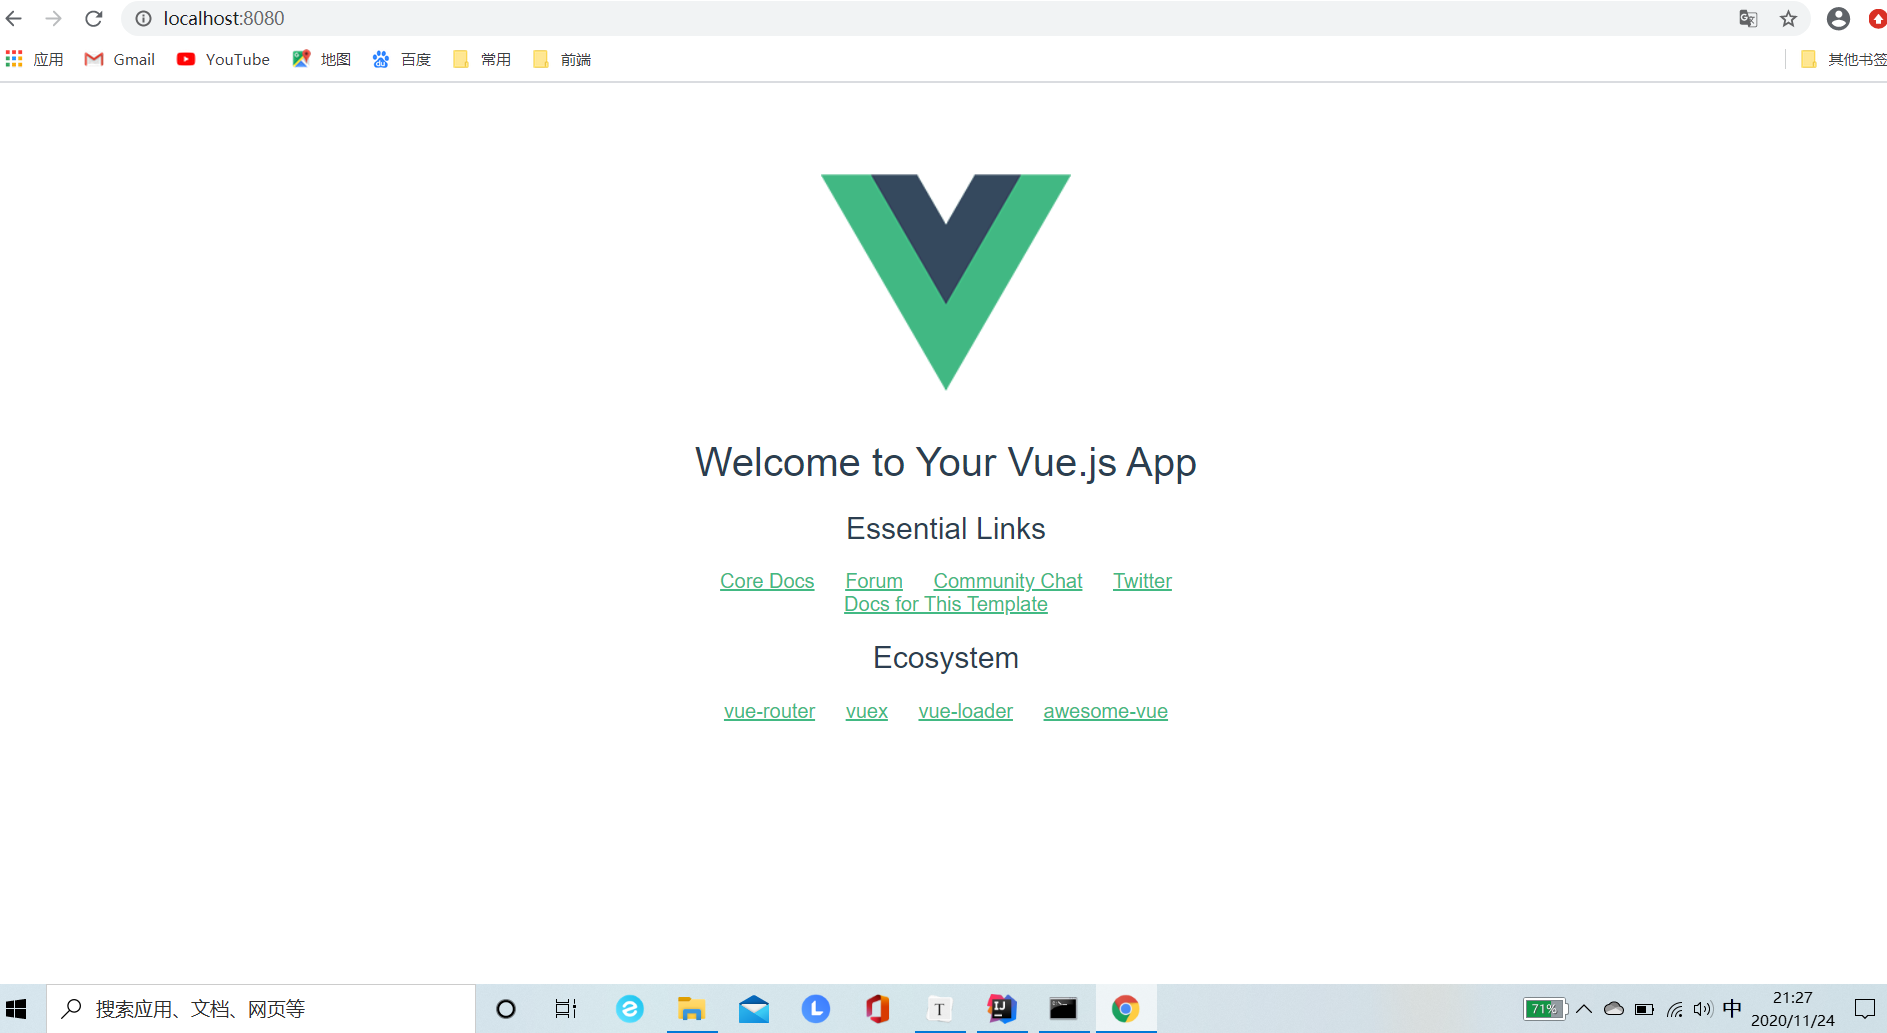
- 可输入以上地址访问,ctrl+c 终止
webpack学习使用
webpack是一个现代JavaScript应用程序的静态模块打包器(model bundler),当webpack处理应用程序时,它会递归的构建一个依赖关系图,其中包含应用程序需要的每个模块,然后将这些模块打包成一个或者多个包(bundle) 。
cmd以管理员启动:
-
npm install webpack -g
-
npm install webpack-cli -g
测试安装成功:
- webpack -v
- webpack-cli -v
项目包(webpack-study)下modules文件夹下
hello.js
//暴露一个方法
exports.sayHi = function () {
    document.write("<h1>zzzrrr</h1>")
};
(webpack-study)/modules/main.js
var hello = require("./hello");
hello.sayHi();
项目包(webpack-study)下webpack.config.js
module.exports = {
    entry: "./modules/main.js",
    output:{
        filename: "./js/bundle.js",
    }
};
打包
管理员cmd进入到(webpack-study)下,webpack打包,webpack --watch热部署(选一个即可)。
项目包下index.html
<body>
<script src="dist/js/bundle.js"></script>
</body>
Vue-Router路由
Vue-Router是Vue.js官方的路由管理器,它和Vue.js的核心深度集成,让构建单页面应用变得易如反掌,包含的功能有:
- 嵌套的路由/视图类
- 模块化的,基于组件的路由配置
- 路由参数,查询,通配符
- 基于Vue.js过渡系统的视图过渡效果
- 细粒度的导航控制
- 带有自动激活的CSS class的连接
- HTML5历史模式或hash模式,在IE9中自动降级
- 自定义的滚动条行为
项目目录下:npm install vue-router --save-dev
src/components/Content.vue
<template>
  <h1>内容页</h1>
</template>

<script>
export default {
  name: "Content"
}
</script>

<style scoped>

</style>
src/components/Main.vue
<template>
  <h1>首页</h1>
</template>

<script>
export default {
  name: "Main"
}
</script>

<style scoped>

</style>
src/components/Zzr.vue
<template>
  <h1>ZZRR</h1>
</template>

<script>
export default {
  name: "Zzr"
}
</script>

<style scoped>

</style>
src/router/index.js
import Vue from ‘vue‘;
import VueRouter from ‘vue-router‘;
import Content from "../components/Content";
import Main from "../components/Main";
import Zzr from "../components/Zzr";

//安装路由
Vue.use(VueRouter);

//配置导出路由

export default new VueRouter({
  routes: [
    {
      //路径
      path: ‘/content‘,
      name: ‘content‘,
      //跳转的组件
      component: Content
    },
    {
      //路径
      path: ‘/main‘,
      name: ‘content‘,
      //跳转的组件
      component: Main
    },
    {
      //路径
      path: ‘/zzr‘,
      name: ‘content‘,
      //跳转的组件
      component: Zzr
    },
  ]
});
src/App.vue
<template>
  <div id="app">
    <h1>Vue-Router</h1>
    <router-link to="/main">首页</router-link>
    <router-link to="/content">内容页</router-link>
    <router-link to="/zzr">Zzr</router-link>
    <router-view></router-view>
  </div>
</template>

<script>

export default {
  name: ‘App‘,

}
</script>

<style>
#app {
  font-family: ‘Avenir‘, Helvetica, Arial, sans-serif;
  -webkit-font-smoothing: antialiased;
  -moz-osx-font-smoothing: grayscale;
  text-align: center;
  color: #2c3e50;
  margin-top: 60px;
}
</style>
src/main.js
import Vue from ‘vue‘
import App from ‘./App‘
import router from ‘./router‘  //自动扫描里面的路由配置
Vue.config.productionTip = false;

new Vue({
  el: ‘#app‘,
  //配置路由
  router,
  components: { App },
  template: ‘<App/>‘
})
项目下执行 npm run dev,然后访问。
vue+elementUI
创建工程步骤
- 创建工程
- vue init webpack hello-vue
- 进入工程目录
- cd hello-vue
- 安装
- npm install vue-router --sava-dev
- 安装
- npm i element-ui -S
- 安装依赖
- npm install
- 安装SASS加载器
- cnpm install sass-loader node-sass --save-dev
- 启动测试
- npm run dev
解释说明:
npm install moduleName:安装模块到项目目录下。
npm install -g moduleName:-g 安装模块到全局,具体安装到哪个位置,要看 npm config prefix 的位置。
npm install --save moduleName:--save 的意思值将模块安装到项目目录下,并在package文件的 dependencies 节点写入依赖,-S为该命令的缩写。
npm install --save-dev moduleName:--save-dev 的意思值将模块安装到项目目录下,并在package文件的 devDependencies 节点写入依赖,-D为该命令的缩写。
搭建项目,结构目录如下:
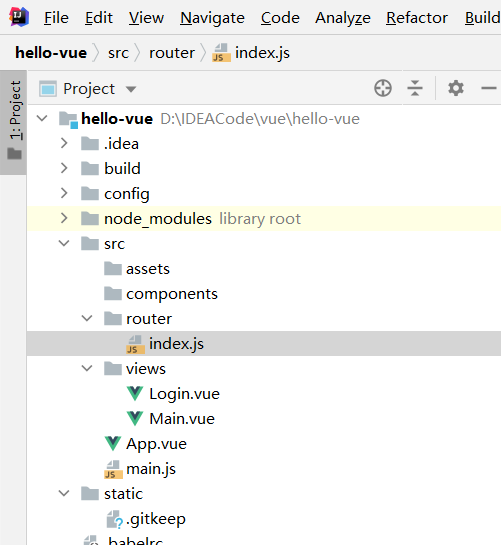
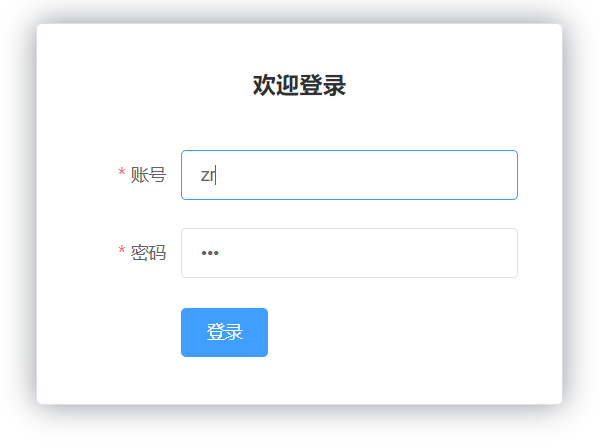
Login.vue
<template>
  <div>
    <el-form ref="loginForm" :model="form" :rules="rules" label-width="80px" class="login-box">
      <h3 class="login-title">欢迎登录</h3>
      <el-form-item label="账号" prop="username">
        <el-input type="text" placeholder="请输入账号" v-model="form.username"/>
      </el-form-item>
      <el-form-item label="密码" prop="password">
        <el-input type="password" placeholder="请输入密码" v-model="form.password"/>
      </el-form-item>
      <el-form-item>
        <el-button type="primary" v-on:click="onSubmit(‘loginForm‘)">登录</el-button>
      </el-form-item>
    </el-form>

    <el-dialog
      title="温馨提示"
      :visible.sync="dialogVisible"
      width="30%"
      :before-close="handleClose">
      <span>请输入账号和密码</span>
      <span slot="footer" class="dialog-footer">
        <el-button type="primary" @click="dialogVisible = false">确 定</el-button>
      </span>
    </el-dialog>
  </div>
</template>

<script>
export default {
  name: "Login",
  data() {
    return {
      form: {
        username: ‘‘,
        password: ‘‘
      },

      // 表单验证,需要在 el-form-item 元素中增加 prop 属性
      rules: {
        username: [
          {required: true, message: ‘账号不可为空‘, trigger: ‘blur‘}
        ],
        password: [
          {required: true, message: ‘密码不可为空‘, trigger: ‘blur‘}
        ]
      },

      // 对话框显示和隐藏
      dialogVisible: false
    }
  },
  methods: {
    onSubmit(formName) {
      // 为表单绑定验证功能
      this.$refs[formName].validate((valid) => {
        if (valid) {
          // 使用 vue-router 路由到指定页面,该方式称之为编程式导航
          this.$router.push("/main");
        } else {
          this.dialogVisible = true;
          return false;
        }
      });
    }
  }
}
</script>

<style lang="scss" scoped>
.login-box {
  border: 1px solid #DCDFE6;
  width: 350px;
  margin: 180px auto;
  padding: 35px 35px 15px 35px;
  border-radius: 5px;
  -webkit-border-radius: 5px;
  -moz-border-radius: 5px;
  box-shadow: 0 0 25px #909399;
}

.login-title {
  text-align: center;
  margin: 0 auto 40px auto;
  color: #303133;
}
</style>
App.vue
<template>
  <div id="app">
    <h1>App</h1>
  <router-view></router-view>
  </div>
</template>

<script>

export default {
  name: ‘App‘,

}
</script>
index.js
import Vue from ‘vue‘
import Router from ‘vue-router‘

import Login from "../views/Login"
import Main from "../views/Main"

Vue.use(Router);
export default new Router({
  routes: [
    {
      path: ‘/main‘,
      component: Main
    },
    {
      path: ‘/login‘,
      component: Login
    }
  ]
});
App.vue
<template>
  <div id="app">
    <h1>App</h1>
  <router-view></router-view>
  </div>
</template>

<script>

export default {
  name: ‘App‘,

}
</script>
main.js
import Vue from ‘vue‘
import App from ‘./App‘
import router from ‘./router‘

import ElementUI from ‘element-ui‘;
import ‘element-ui/lib/theme-chalk/index.css‘;

Vue.use(router);
Vue.use(ElementUI);
new Vue({
  el: ‘#app‘,
  router,
  render: h => h(App), //Element
})
执行npm run dev后,访问http://localhost:8080/#/login
注意如果打包发布失败:在pakage.json中降低sass版本为"sass-loader": "^7.3.1",
如果出现:

执行 npm uninstall node-sass 卸载
再安装 cnpm install node-sass@4.14.1
最后:npm run dev
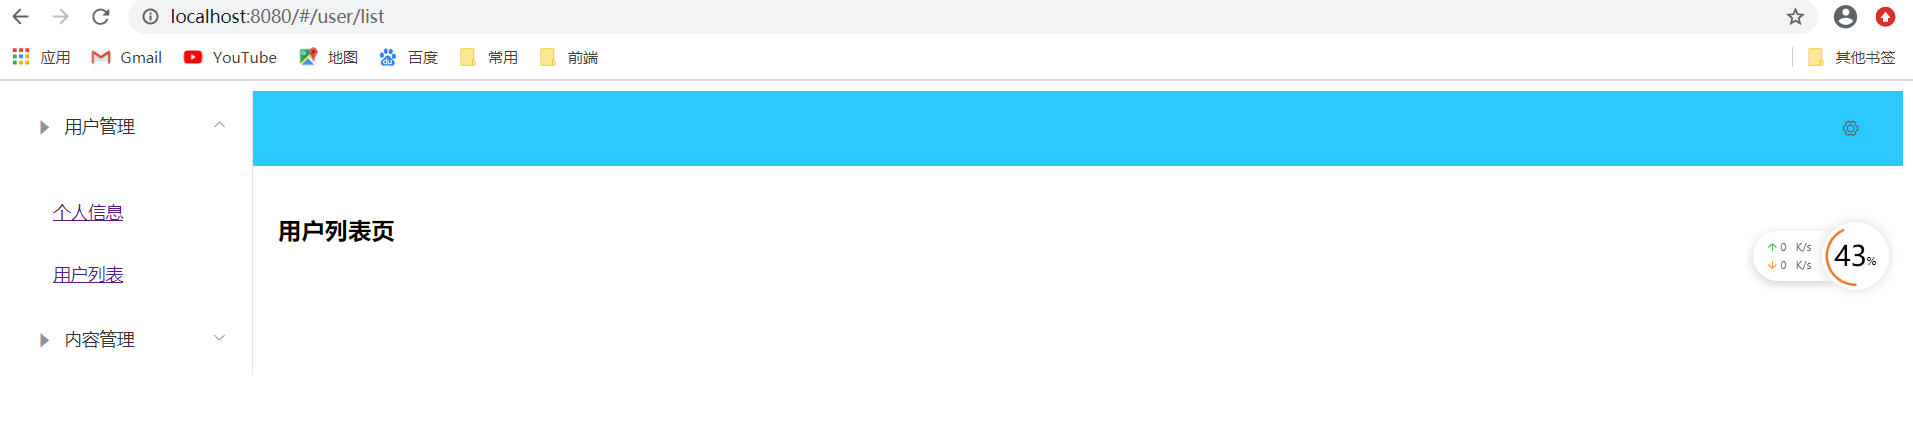
嵌套路由
嵌套路由又称子路由,在实际应用中,通常由多层嵌套的组件而成,同样的,URL中各段动态路径也按某种结构对应嵌套各层组件。
在上一个项目基础下增加user文件夹

List.vue
<template>
  <h1>用户列表页</h1>
</template>

<script>
export default {
  name: "List"
}
</script>

<style scoped>

</style>
Profile.vue
<template>
  <h1>个人信息</h1>
</template>

<script>
export default {
  name: "Profile"
}
</script>

<style scoped>

</style>
index.js
import Vue from ‘vue‘
import Router from ‘vue-router‘

import Login from "../views/Login"
import Main from "../views/Main"

import UserList from "../views/user/List";
import UserProfile from "../views/user/Profile";
Vue.use(Router);
export default new Router({
  routes: [
    {
      path: ‘/main‘,
      component: Main,
      //嵌套路由
      children: [
        {path: ‘/user/profile‘,component: UserProfile},
        {path: ‘/user/list‘,component: UserList}
      ]
    },
    {
      path: ‘/login‘,
      component: Login,
    }
  ]
});
Main.vue
<template>
  <div>
    <el-container>
      <el-aside width="200px">
        <el-menu :default-openeds="[‘1‘]">
          <el-submenu index="1">
            <template slot="title"><i class="el-icon-caret-right"></i>用户管理</template>
            <el-menu-item-group>
              <el-menu-item index="1-1">
                <!--插入的地方-->
                <router-link to="/user/profile">个人信息</router-link>
              </el-menu-item>
              <el-menu-item index="1-2">
                <!--插入的地方-->
                <router-link to="/user/list">用户列表</router-link>
              </el-menu-item>
            </el-menu-item-group>
          </el-submenu>
          <el-submenu index="2">
            <template slot="title"><i class="el-icon-caret-right"></i>内容管理</template>
            <el-menu-item-group>
              <el-menu-item index="2-1">分类管理</el-menu-item>
              <el-menu-item index="2-2">内容列表</el-menu-item>
            </el-menu-item-group>
          </el-submenu>
        </el-menu>
      </el-aside>

      <el-container>
        <el-header style="text-align: right; font-size: 12px">
          <el-dropdown>
            <i class="el-icon-setting" style="margin-right: 15px"></i>
            <el-dropdown-menu slot="dropdown">
              <el-dropdown-item>个人信息</el-dropdown-item>
              <el-dropdown-item>退出登录</el-dropdown-item>
            </el-dropdown-menu>
          </el-dropdown>
        </el-header>
        <el-main>
          <!--在这里展示视图-->
          <router-view />
        </el-main>
      </el-container>
    </el-container>
  </div>
</template>
<script>
export default {
  name: "Main"
}
</script>
<style scoped lang="scss">
.el-header {
  background-color: #2acaff;
  color: #333;
  line-height: 60px;
}
.el-aside {
  color: #333;
}
</style>
参数传递及重定向
方法一
修改Main.vue
<el-menu-item index="1-1">
  <!--插入的地方  name;地址,params:参数  传参:v-bind -->
  <router-link :to="{name: ‘UserProfile‘,params: {id:1}}">个人信息</router-link>
</el-menu-item>
修改index.js
//嵌套路由
children: [
  {path: ‘/user/profile/:id‘,name: ‘UserProfile‘,component: UserProfile},
  {path: ‘/user/list‘,component: UserList}
]
修改Profile.vue,接收
<template>
  <!--  所有的元素不能直接在根节点下-->
  <div>
    <h1>个人信息</h1>
    {{$route.params.id}}
  </div>
</template>
方法二
Main.vue和方法一相同
index.js
//嵌套路由
children: [
  {path: ‘/user/profile/:id‘,name: ‘UserProfile‘,component: UserProfile,props:true},
  {path: ‘/user/list‘,component: UserList}
]
修改Profile.vue,接收
<template>
  <!--  所有的元素不能直接在根节点下-->
  <div>
    <h1>个人信息</h1>
    {{id}}
  </div>
</template>

<script>
export default {
  props: [‘id‘],
  name: "Profile"
}
</script>

<style scoped>

</style>
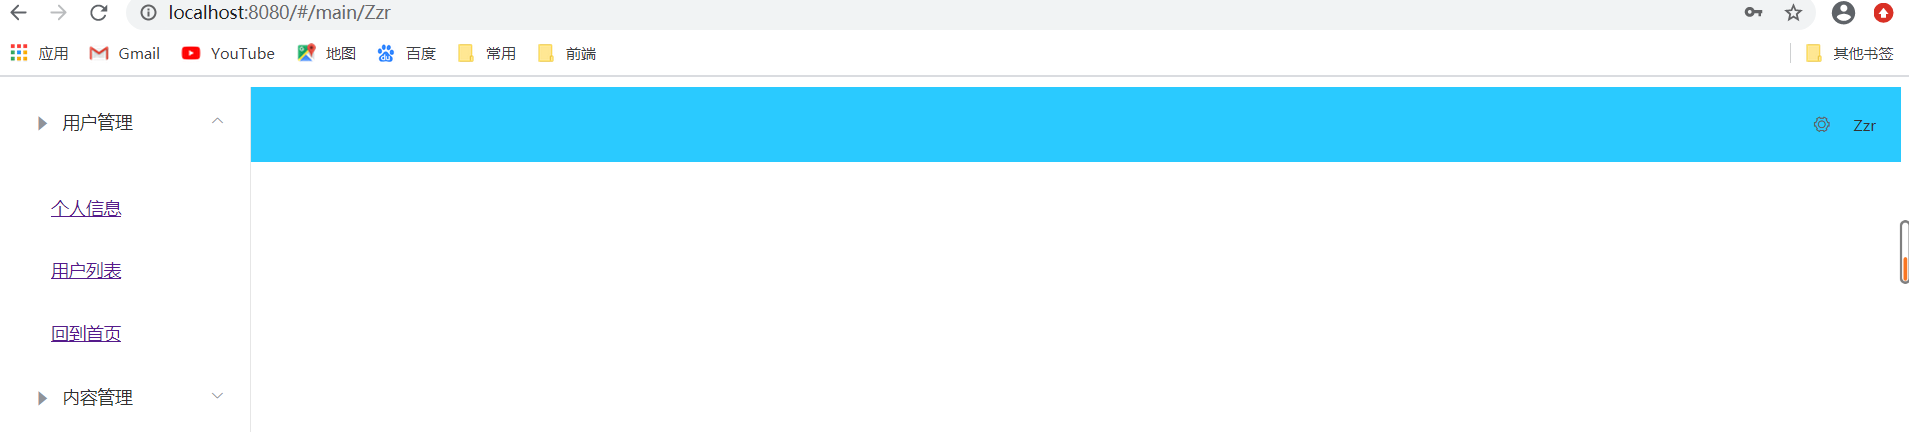
重定向
index.js中增加
{
  path: ‘/goHome‘,
  redirect: ‘/main‘,
}
Main.vue中增加
<el-menu-item index="1-3">
  <!--插入的地方-->
  <router-link to="/goHome">回到首页</router-link>
</el-menu-item>
登录显示用户名:
Login.vue中修改为:
methods: {
  onSubmit(formName) {
    // 为表单绑定验证功能
    this.$refs[formName].validate((valid) => {
      if (valid) {
        // 使用 vue-router 路由到指定页面,该方式称之为编程式导航
        this.$router.push("/main/"+this.form.username);
      } else {
        this.dialogVisible = true;
        return false;
      }
    });
  }
}
index.js中Main组件上增加 props: true,
path: ‘/main/:name‘,
props: true,
component: Main,
Main.vue增加 props:[‘name‘], 接收参数, {{name}} 显示
 <el-container>
        <el-header style="text-align: right; font-size: 12px">
          <el-dropdown>
            <i class="el-icon-setting" style="margin-right: 15px"></i>
            <el-dropdown-menu slot="dropdown">
              <el-dropdown-item>个人信息</el-dropdown-item>
              <el-dropdown-item>退出登录</el-dropdown-item>
            </el-dropdown-menu>
          </el-dropdown>
          <span>{{name}}</span>
        </el-header>
        <el-main>
          <!--在这里展示视图-->
          <router-view />
        </el-main>
      </el-container>
    </el-container>
  </div>
</template>
<script>
export default {
  props:[‘name‘],
  name: "Main"
}
</script>
测试 http://localhost:8080/#/login 登录后右上方显示用户名
404和路由钩子
路由模式有两种:
- hash:路径带#符号,如 http://localhost:8080/#/login
- history:路径不带#符号,如 http://localhost:8080/login
index.js中增加 mode: ‘history‘,
export default new Router({
  mode: ‘history‘,
  routes: [
    {
    });
配置404页面
NotFound.vue
<template>
<div><h1>404,你的页面走丢了</h1></div>
</template>

<script>
export default {
  name: "NotFound"
}
</script>

<style scoped>

</style>
index.js
import NotFound from "../views/NotFound";
....
//路由中增加
{
      path: ‘*‘,
      component: NotFound,
    }
路由钩子与异步请求
beforeRouteEnter:在进入路由前执行
beforeRouteLeave:在离开路由前执行
Profile.vue
export default {
  props: [‘id‘],
  name: "Profile",
  beforeRouteEnter:(to, from, next)=>{
    console.log("进入路由之前!");
    next();
  },beforeRouteLeave:(to, from, next)=>{
    console.log("进入路由之后!");
    next();
  },
  methods: {
    getData: function () {
      this.axi
    }
  }
}
参数说明:
- to:路由将要跳转的路径信息
- from:路径跳转前的路径信息
- next:路由的控制参数
- next() 跳入下一个页面
- next(‘/path‘) 改变路由的跳转方向,使其跳到另一个路由
- next(false) 返回原来的界面
- next((vm)=>{}) 仅在beforeRouteEnter中可用,vm是组件实例
在钩子函数中使用异步请求:
-
安装axios:cnpm install axios -s (打包失败使用npm install --save vue-axios或官网npm install --save axios vue-axios)
-
main.js中引用axios
Profile.vue
<script>
export default {
  props: [‘id‘],
  name: "Profile",
  beforeRouteEnter:(to, from, next)=>{
    console.log("进入路由之前!");
    next(vm => {
      vm.getData();//进入路由之前执行该方法
    });
  },beforeRouteLeave:(to, from, next)=>{
    console.log("进入路由之后!");
    next();
  },
  methods: {
    getData: function () {
      this.axios({
        method: ‘get‘,
        url: ‘http://localhost:8080/static/mock/data.josn‘,
      }).then(function (response) {
        console.log(response);
      })
    }
  }
}
</script>