标签:tor not turn utf-8 总结 ora odi onstop 维护
Android 的防劫持是门大学问。涉及到众多高深的知识。本文不会阐述这些。本文只是会讨论其中的一个小部分---如何检测界面被覆盖,或者说如何检测用户离开了应用。
最近需要实现一个功能:当用户退出 APP 时,如果用户处于某些特定的界面(比如登录、注册、修改密码界面),需要提示用户退出了应用。以满足合规要求。实现效果可以参考"建设银行 APP"。做这个功能主要是为了满足以下两个目的:
经过几天的预研,也算是搞懂了一些东西。话不多说,开讲。
首先,我们需要知道以下几个概念:
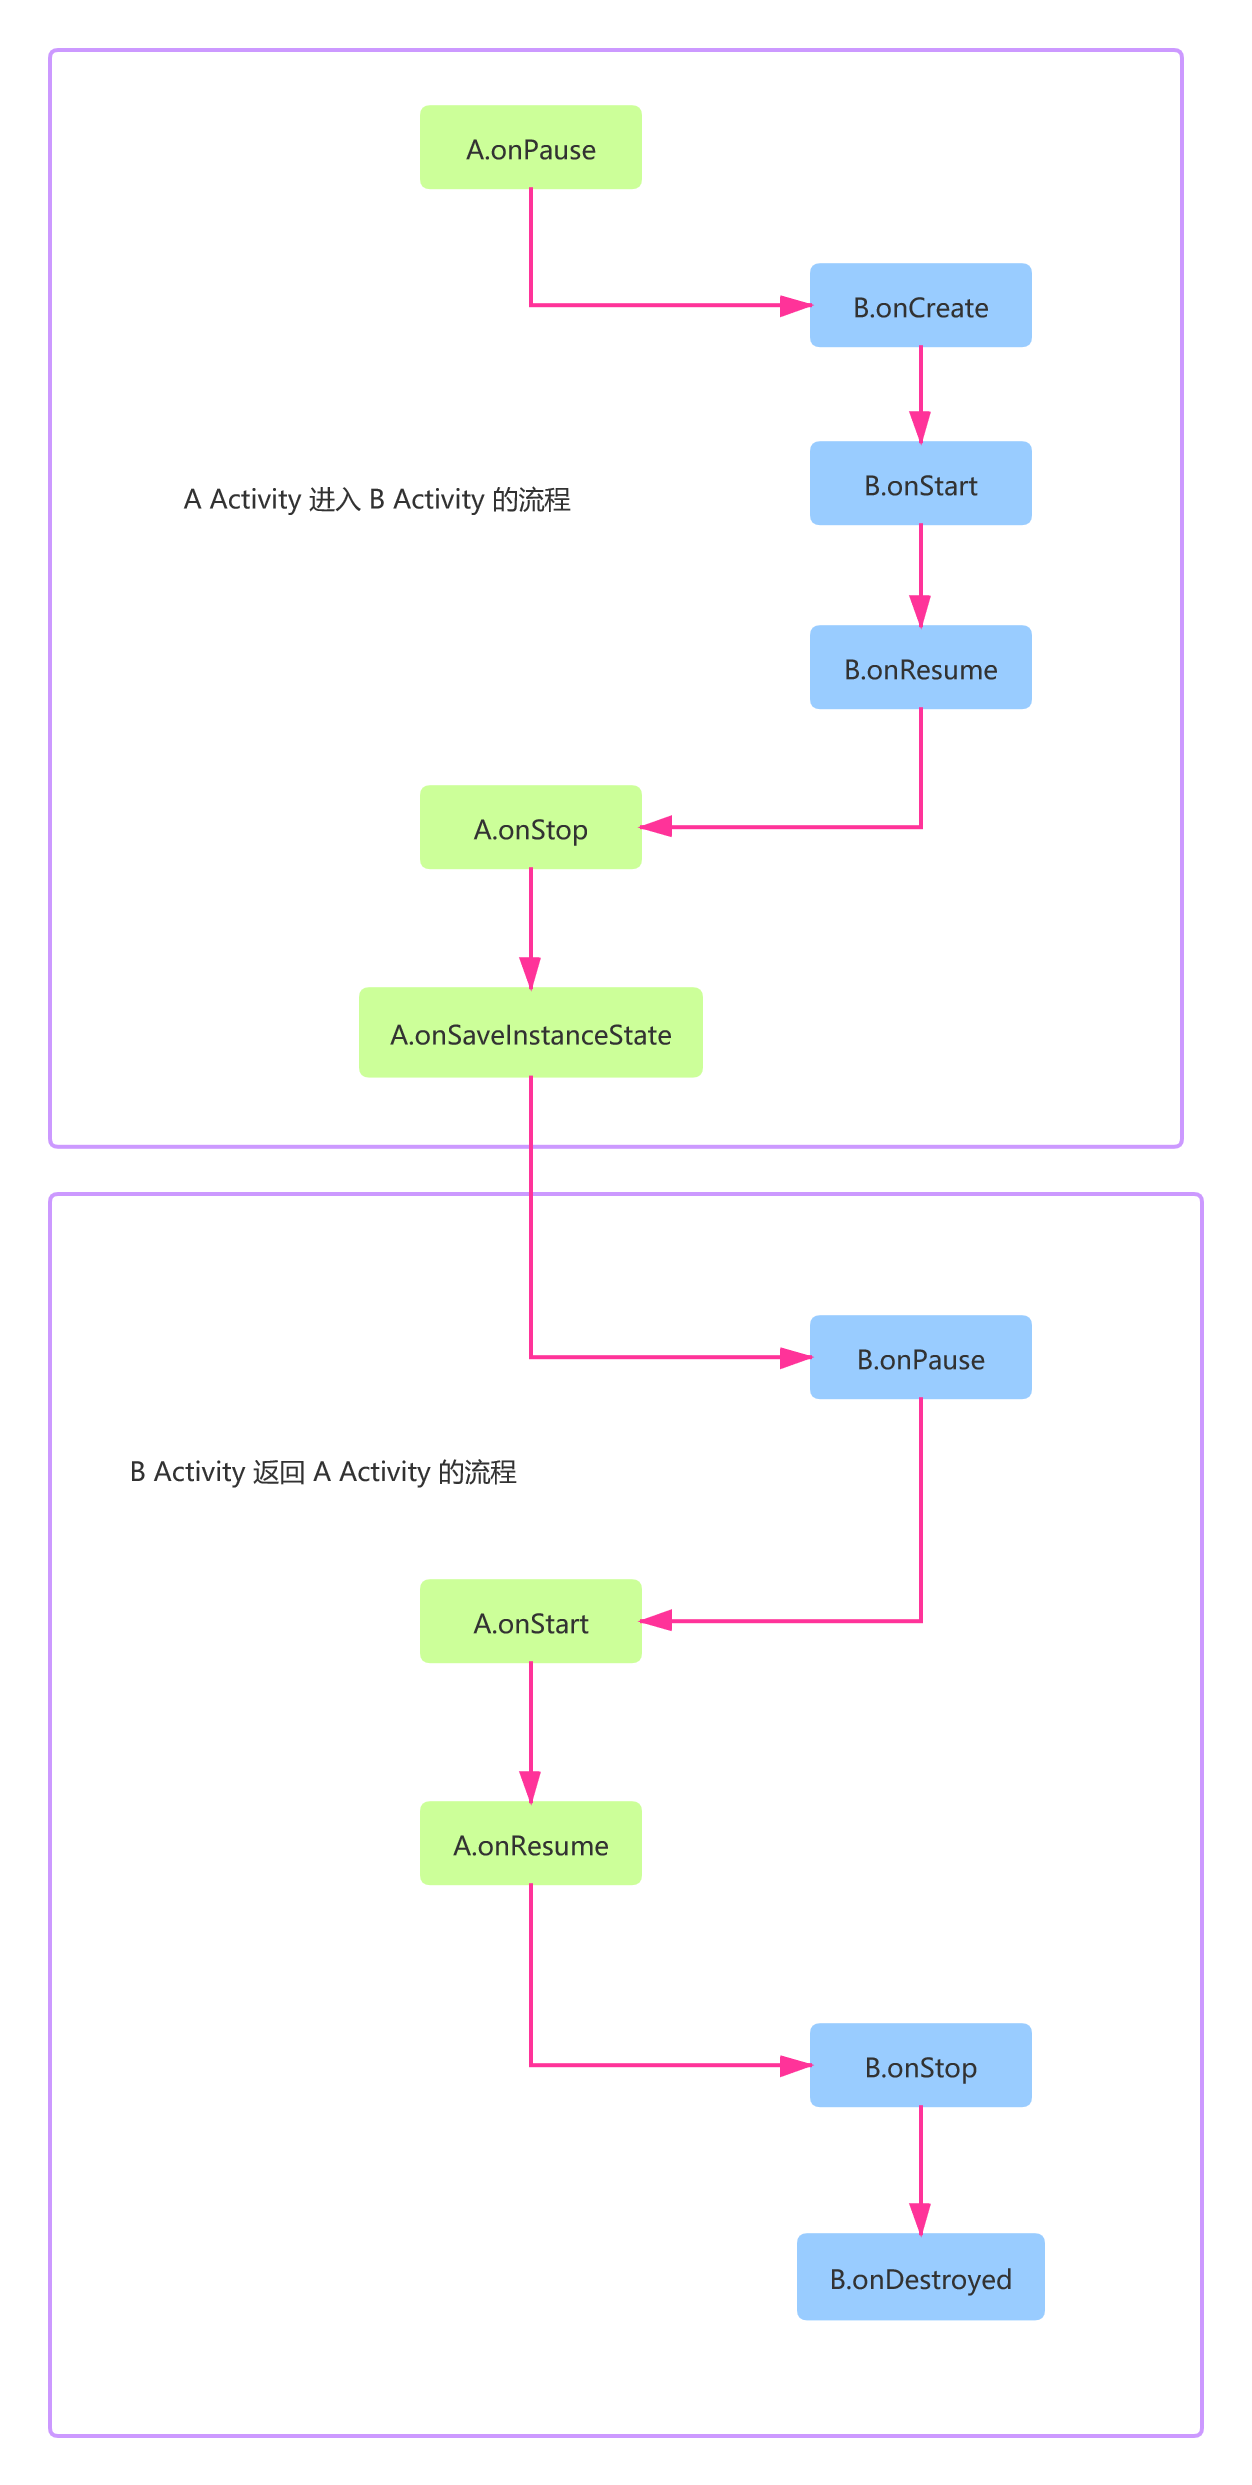
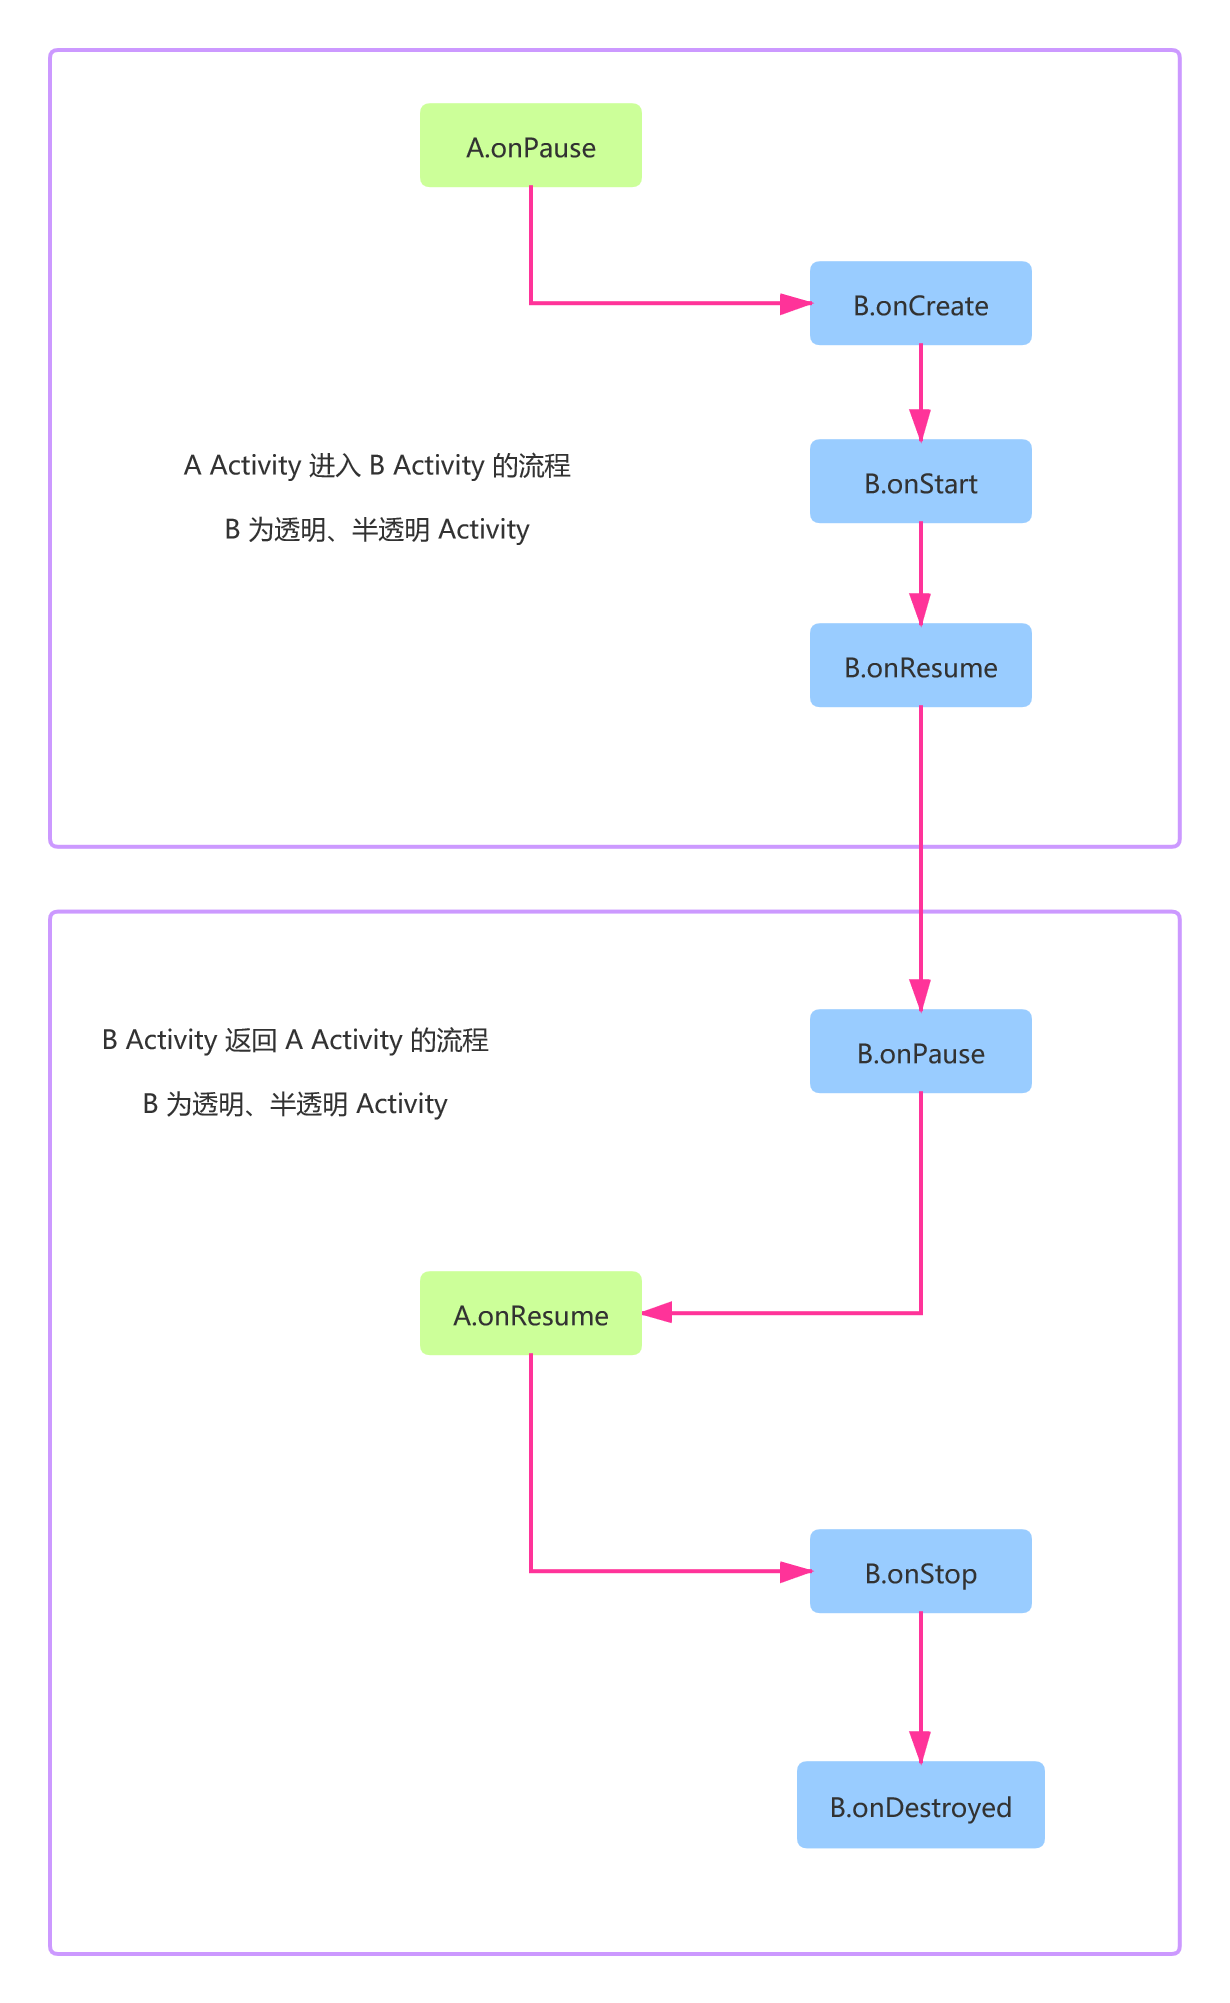
假设当前在 APP 1 的 A 界面,进入了 APP 2 的 B 界面,那么相应的生命周期为:
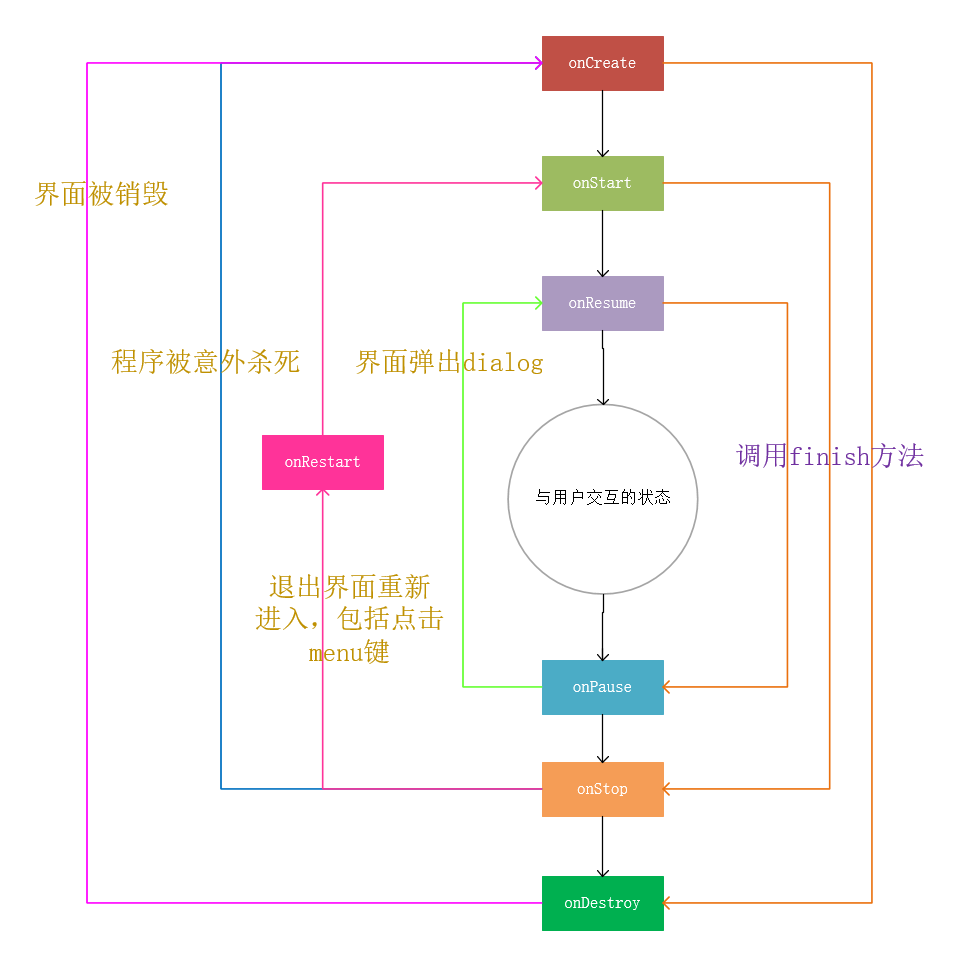
下面几张图片是关于生命周期的说明:
既然我们已经知道了启动透明界面和非透明界面(2 种界面)的不同,那么就需要针对性的做些设计了。而又因为需要检测其它 APP,所以需要设计多个 APP (2 个)及多个对应的界面(2 * 2 = 4 个界面)。
下面是设计的两个 APP。
新建 1 个项目,我把他起名叫 ThisApp,意思是当前需要检测界面覆盖的 APP。这个 APP 代表着实际工作中我们需要维护的 APP。
自定义 Application,在初始化时注册生命周期变化监听:
/**
 * LifeCycleApplication: 监听生命周期变化的 Application
 * */
public class ThisLCApplication extends Application {
    private static final String TAG = "ThisLCApplication";

    private ActivityLifecycleCallbacks callback = new ActivityLifecycleCallbacks() {
        @Override
        public void onActivityCreated(@NonNull Activity activity, @Nullable Bundle savedInstanceState) {
            Log.d(TAG, "  onActivityCreated           ---> " + activity.getClass().getSimpleName());
        }

        @Override
        public void onActivityStarted(@NonNull Activity activity) {
            Log.d(TAG, "  onActivityStarted           ---> " + activity.getClass().getSimpleName());
        }

        @Override
        public void onActivityResumed(@NonNull Activity activity) {
            Log.d(TAG, "  onActivityResumed           ---> " + activity.getClass().getSimpleName());
        }

        @Override
        public void onActivityPaused(@NonNull Activity activity) {
            Log.d(TAG, "  onActivityPaused            ---> " + activity.getClass().getSimpleName());
        }

        @Override
        public void onActivityStopped(@NonNull Activity activity) {
            Log.d(TAG, "  onActivityStopped           ---> " + activity.getClass().getSimpleName());
        }

        @Override
        public void onActivitySaveInstanceState(@NonNull Activity activity, @NonNull Bundle outState) {
            Log.d(TAG, "  onActivitySaveInstanceState ---> " + activity.getClass().getSimpleName());
        }

        @Override
        public void onActivityDestroyed(@NonNull Activity activity) {
            Log.d(TAG, "  onActivityDestroyed         ---> " + activity.getClass().getSimpleName());
        }
    };

    @Override
    public void onCreate() {
        super.onCreate();

        registerActivityLifecycleCallbacks(callback);
    }
}
在清单文件 AndroidManifest.xml 中使用 ThisLCApplication:
<?xml version="1.0" encoding="utf-8"?>
<manifest xmlns:android="http://schemas.android.com/apk/res/android"
    package="com.wellcherish.thisapp">
    <application
        android:name=".ThisLCApplication"
        android:allowBackup="true"
        android:icon="@mipmap/ic_launcher"
        android:label="@string/app_name"
        android:roundIcon="@mipmap/ic_launcher_round"
        android:supportsRtl="true"
        android:theme="@style/AppTheme">
        <activity android:name=".MainActivity">
            <intent-filter>
                <action android:name="android.intent.action.MAIN" />
                <category android:name="android.intent.category.LAUNCHER" />
            </intent-filter>
        </activity>
    </application>
</manifest>
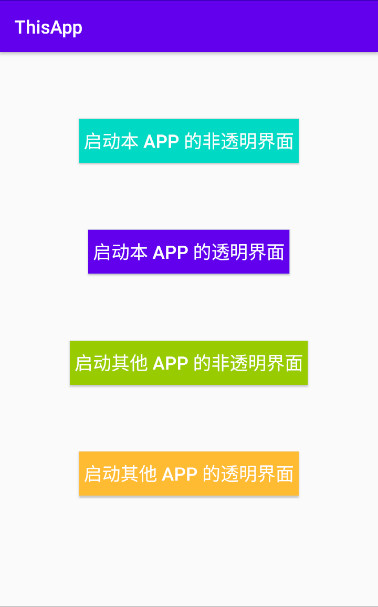
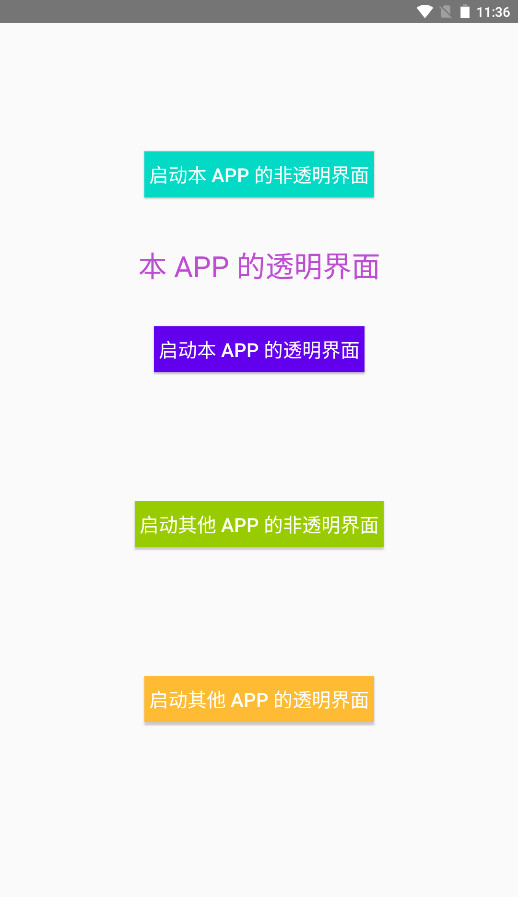
首先设计主界面 MainActivity。包含几个按钮:
xml 代码如下:
<?xml version="1.0" encoding="utf-8"?>
<androidx.constraintlayout.widget.ConstraintLayout xmlns:android="http://schemas.android.com/apk/res/android"
    xmlns:app="http://schemas.android.com/apk/res-auto"
    xmlns:tools="http://schemas.android.com/tools"
    android:layout_width="match_parent"
    android:layout_height="match_parent"
    tools:context=".MainActivity">

    <!-- 第 1 个 Button -->
    <androidx.constraintlayout.widget.Guideline
        android:id="@+id/gl_020"
        android:layout_width="match_parent"
        android:layout_height="wrap_content"
        android:orientation="horizontal"
        app:layout_constraintGuide_percent="0.20" />
    <Button
        android:id="@+id/btn_1"
        android:layout_width="wrap_content"
        android:layout_height="wrap_content"
        android:padding="5dp"
        android:text="启动本 APP 的非透明界面"
        android:textColor="@android:color/white"
        android:textSize="20sp"
        android:background="@color/colorAccent"
        app:layout_constraintEnd_toEndOf="parent"
        app:layout_constraintStart_toStartOf="parent"
        app:layout_constraintBottom_toTopOf="@id/gl_020"
        android:onClick="startThisOpaqueActivity" />

    <!-- 第 2 个 Button -->
    <androidx.constraintlayout.widget.Guideline
        android:id="@+id/gl_040"
        android:layout_width="match_parent"
        android:layout_height="wrap_content"
        android:orientation="horizontal"
        app:layout_constraintGuide_percent="0.40" />
    <Button
        android:id="@+id/btn_2"
        android:layout_width="wrap_content"
        android:layout_height="wrap_content"
        android:padding="5dp"
        android:text="启动本 APP 的透明界面"
        android:textColor="@android:color/white"
        android:textSize="20sp"
        android:background="@color/colorPrimary"
        app:layout_constraintEnd_toEndOf="parent"
        app:layout_constraintStart_toStartOf="parent"
        app:layout_constraintBottom_toTopOf="@id/gl_040"/>

	<!-- 第 3 个 Button -->
    <androidx.constraintlayout.widget.Guideline
        android:id="@+id/gl_060"
        android:layout_width="match_parent"
        android:layout_height="wrap_content"
        android:orientation="horizontal"
        app:layout_constraintGuide_percent="0.60" />
    <Button
        android:id="@+id/btn_3"
        android:layout_width="wrap_content"
        android:layout_height="wrap_content"
        android:padding="5dp"
        android:text="启动其他 APP 的非透明界面"
        android:textColor="@android:color/white"
        android:textSize="20sp"
        android:background="@android:color/holo_green_light"
        app:layout_constraintEnd_toEndOf="parent"
        app:layout_constraintStart_toStartOf="parent"
        app:layout_constraintBottom_toTopOf="@id/gl_060"
        android:onClick="startOtherOpaqueActivity"/>

	<!-- 第 4 个 Button -->
    <androidx.constraintlayout.widget.Guideline
        android:id="@+id/gl_080"
        android:layout_width="match_parent"
        android:layout_height="wrap_content"
        android:orientation="horizontal"
        app:layout_constraintGuide_percent="0.80" />
    <Button
        android:id="@+id/btn_4"
        android:layout_width="wrap_content"
        android:layout_height="wrap_content"
        android:padding="5dp"
        android:text="启动其他 APP 的透明界面"
        android:textColor="@android:color/white"
        android:textSize="20sp"
        android:background="@android:color/holo_orange_light"
        app:layout_constraintEnd_toEndOf="parent"
        app:layout_constraintStart_toStartOf="parent"
        app:layout_constraintBottom_toTopOf="@id/gl_080"
        android:onClick="startOtherTransparentActivity"/>
</androidx.constraintlayout.widget.ConstraintLayout>
上面的几个点击方法实现如下:
public void startThisOpaqueActivity(View view) {
    Intent i = new Intent(MainActivity.this, ThisOpaqueActivity.class);
    startActivity(i);
}

public void startThisTransparentActivity(View view) {
    Intent i = new Intent(MainActivity.this, ThisTransparentActivity.class);
    startActivity(i);
}

public void startOtherOpaqueActivity(View view) {
    Intent i = new Intent();
    i.setComponent(new ComponentName("com.wellcherish.otherapp",
        "com.wellcherish.otherapp.OtherOpaqueActivity"));
    startActivity(i);
}

public void startOtherTransparentActivity(View view) {
    Intent i = new Intent();
    i.setComponent(new ComponentName("com.wellcherish.otherapp",
        "com.wellcherish.otherapp.OtherTransparentActivity"));
    startActivity(i);
}
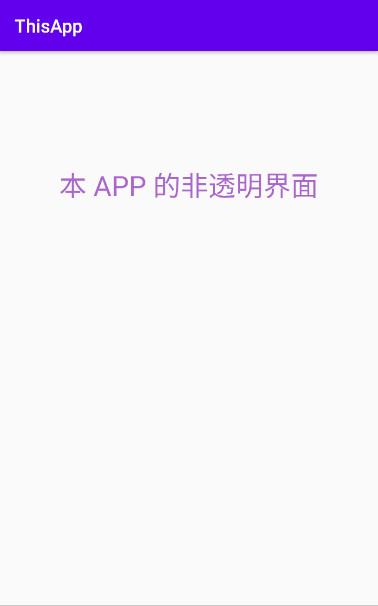
ThisApp 的非透明界面(ThisOpaqueActivity)显示内容如下:
XML 代码如下:
<?xml version="1.0" encoding="utf-8"?>
<androidx.constraintlayout.widget.ConstraintLayout xmlns:android="http://schemas.android.com/apk/res/android"
    xmlns:app="http://schemas.android.com/apk/res-auto"
    xmlns:tools="http://schemas.android.com/tools"
    android:layout_width="match_parent"
    android:layout_height="match_parent"
    tools:context=".ThisOpaqueActivity">

    <androidx.constraintlayout.widget.Guideline
        android:id="@+id/gl_020"
        android:layout_width="match_parent"
        android:layout_height="wrap_content"
        android:orientation="horizontal"
        app:layout_constraintGuide_percent="0.20"/>

    <TextView
        android:layout_width="wrap_content"
        android:layout_height="wrap_content"
        android:padding="5dp"
        android:text="本 APP 的非透明界面"
        android:textSize="30sp"
        android:textColor="@android:color/holo_purple"
        app:layout_constraintStart_toStartOf="parent"
        app:layout_constraintEnd_toEndOf="parent"
        app:layout_constraintTop_toBottomOf="@id/gl_020"/>

</androidx.constraintlayout.widget.ConstraintLayout>
ThisApp 的透明界面(ThisTransparentActivity)显示内容如下:
xml 代码如下:
<?xml version="1.0" encoding="utf-8"?>
<androidx.constraintlayout.widget.ConstraintLayout xmlns:android="http://schemas.android.com/apk/res/android"
    xmlns:app="http://schemas.android.com/apk/res-auto"
    xmlns:tools="http://schemas.android.com/tools"
    android:layout_width="match_parent"
    android:layout_height="match_parent"
    tools:context=".ThisTransparentActivity">

    <androidx.constraintlayout.widget.Guideline
        android:id="@+id/gl_025"
        android:layout_width="match_parent"
        android:layout_height="wrap_content"
        android:orientation="horizontal"
        app:layout_constraintGuide_percent="0.25"/>

    <TextView
        android:layout_width="wrap_content"
        android:layout_height="wrap_content"
        android:padding="5dp"
        android:text="本 APP 的透明界面"
        android:textSize="30sp"
        android:textColor="#BD4ED2"
        app:layout_constraintStart_toStartOf="parent"
        app:layout_constraintEnd_toEndOf="parent"
        app:layout_constraintTop_toBottomOf="@id/gl_025"/>
</androidx.constraintlayout.widget.ConstraintLayout>
然后自定义透明主题,并在 AndroidManifest 中为 Activity 设置:
<style name="translucent" parent="Theme.AppCompat.NoActionBar">
    <!-- 设置背景透明度及其颜色值 -->
    <item name="android:windowBackground">#0000</item>
    <!-- 设置当前Activity是否透明-->
    <item name="android:windowIsTranslucent">true</item>
    <!-- 设置当前Activity进出方式-->
    <item name="android:windowAnimationStyle">@android:style/Animation.Translucent</item>
</style>

<!-- 在 AndroidManifest 中设置主题 -->
<activity android:name=".ThisTransparentActivity"
    android:theme="@style/translucent" />
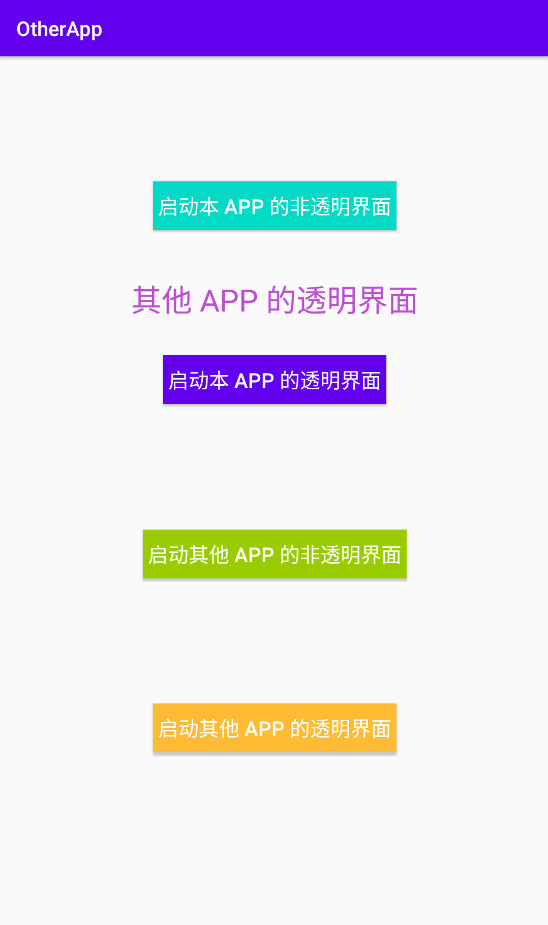
新建 2 个项目,我把他起名叫 OtherApp,意思是需要覆盖当前 APP 的其它 APP。这个 APP 可以理解成实际使用中的恶意 APP。这个 APP 我们只需要模拟两个界面即可。
自定义 Application,在初始化时注册生命周期变化监听,代码和 ThisApp 的完全一样,只是改了下 TAG,就不放代码了。
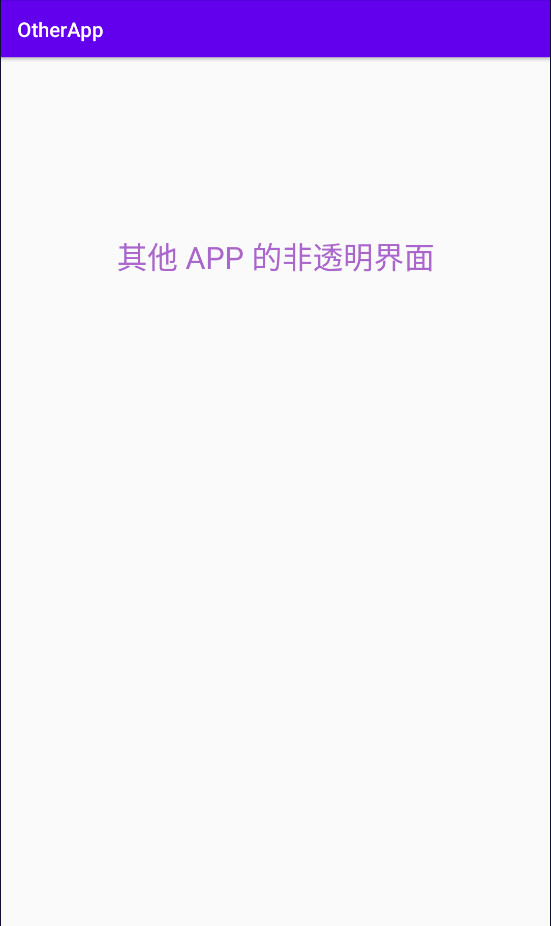
OtherApp 的非透明界面(OtherOpaqueActivity)显示内容如下:
XML 代码就不放了,和 ThisApp 的 ThisOpaqueActivity 布局完全相同,只是改了下 TextView 的文案,文案从图中可以知晓。
OtherApp 的透明界面(OtherTransparentActivity)显示内容如下:
xml 代码和主题代码就不放了,和 ThisApp 的 ThisTransparentActivity 布局完全相同,只是改了下 TextView 的文案,文案从图中可以知晓。而 xml 中也只多了一个允许其他应用访问的设置。
<!-- OtherApp 需要设置 exported 项为 true -->
<activity android:name=".OtherOpaqueActivity"
    android:exported="true"/>
<activity android:name=".OtherTransparentActivity"
    android:theme="@style/translucent"
    android:exported="true"/>
在设计好了 APP 之后,就可以做方案验证了。根据网上现有的资料,我发现界面覆盖检测有以下几种方法:
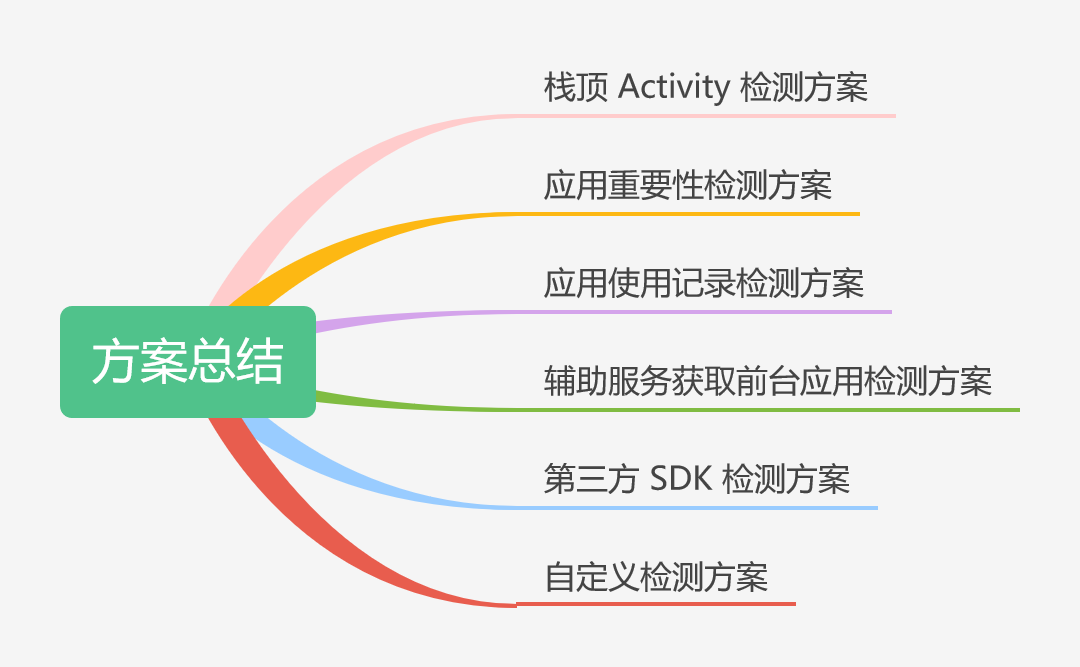
这些方案我一个个说明。
在 Android 中,与用户交互的界面,一定是处于任务栈的栈顶。所以可以使用这个方案来检测栈顶 Activity,判断页面是否被其他 APP 的界面覆盖。方案主要是在生命周期变化时(启动其他界面时,当前栈顶的 Activity 的生命周期状态一定会改变),检测栈顶 Activity 是否属于当前 APP,进而判断出当前 APP 是否被其他应用覆盖。但是鉴于启动透明界面和非透明界面时存在着不同的生命周期流程,所以需要验证不同的生命周期流程是否会影响到上述检测方案的准确性。
先上方案的核心实现代码:
public static boolean checkByTopActivity(Activity activity) {
    ActivityManager activityManager = (ActivityManager) activity
        .getSystemService(Context.ACTIVITY_SERVICE);

    try {
        ComponentName cn = activityManager.getRunningTasks(1).get(0).topActivity;
        // 不相等,说明被覆盖了
        return !activity.getPackageName().equals(cn.getPackageName());
    } catch (Exception e) {
        Log.e(TAG, "", e);
        return false;
    }
}
将该检测方法放到自定义 Application 的生命周期监听的 onStop 中,则可以检测 APP 是否在前台了。
但是如果你直接在 Android Studio 中使用上述的代码,Android Studio 会给出提示,如下。这说明了该方案存在高低版本兼容问题。

经过验证,生命周期的确会影响到检测的准确性。假设是从 A 界面进入 B 界面。
在 Android 中,每一个应用都有一个优先级,进程的优先级分类有:前台进程、可见进程、服务进程、后台进程、空进程。可以通过这个标识来判断进程是否在前台,进而判断是否退出了应用,或者应用是否被其他 App 覆盖。
核心代码如下:
public static boolean checkByProcessImportance(Activity activity) {
    ActivityManager activityManager = (ActivityManager) activity
        .getSystemService(Context.ACTIVITY_SERVICE);
    try {
        List<ActivityManager.RunningAppProcessInfo> appProcesses = activityManager
            .getRunningAppProcesses();
        for (ActivityManager.RunningAppProcessInfo appProcess : appProcesses) {
            // 非当前 APP
            if(!appProcess.processName.equals(activity.getPackageName())) {
                continue;
            }
            /**
             * 前台进程:100
             * 可见进程:200
             * 服务进程:300
             * 后台进程:400
             * 空进程:  500
             */
            return appProcess.importance != ActivityManager
                .RunningAppProcessInfo.IMPORTANCE_FOREGROUND;
        }
        return false;
    } catch (Exception e) {
        Log.e(TAG, "", e);
        return false;
    }
}
经过验证,该方案也无法检测透明界面的覆盖情况
上述两种常见的方案都存在失效的场景的情况,我也一筹莫展。但是经过一段时间的探索后,我发现我装的一个叫做 "当前 Activity" 的应用,可以检测出半透明界面。一道曙光乍现,我将这个 APK 反编译了出来。经过一番探索之后,我发现了 "UsageStatsManager" 这个类,上网一搜,发现这个类是和 "应用使用记录统计" 这个功能强关联的。关于这个类的使用,可以看下这几篇文章:Android 5.0 应用使用情况统计信息、(Android 9.0)应用使用数据统计服务——UsageStatsManager、4种获取前台应用的方法(肯定有你不知道的)。这几个文章里讲的就比较清楚了,这里就不重复叙述了。直接上代码。
<uses-permission android:name="android.permission.PACKAGE_USAGE_STATS" />
public static boolean checkByUsage(Activity activity) {
    if(!checkPermission(activity)) {
        try {
            activity.startActivity(new Intent(Settings.ACTION_USAGE_ACCESS_SETTINGS));
        } catch (Exception e) {
            e.printStackTrace();
        }
        return false;
    }

    UsageStatsManager statsManager = (UsageStatsManager) activity
        .getSystemService(Context.USAGE_STATS_SERVICE);
    long endTime = System.currentTimeMillis();
    List<UsageStats> usageStatsList = statsManager
        .queryUsageStats(UsageStatsManager.INTERVAL_DAILY, endTime - 1000*10, endTime);
    if(usageStatsList == null || usageStatsList.size() <= 0) {
        return false;
    }
    return !usageStatsList.get(0).getPackageName().equals(activity.getPackageName());
}

public static boolean checkPermission(Activity activity) {
    if (Build.VERSION.SDK_INT <= Build.VERSION_CODES.LOLLIPOP) {
        return false;
    }
    AppOpsManager appOpsManager = (AppOpsManager) activity
        .getSystemService(Context.APP_OPS_SERVICE);

    int mode;

    if (Build.VERSION.SDK_INT >= Build.VERSION_CODES.Q) {
        mode = appOpsManager.unsafeCheckOpNoThrow(AppOpsManager.OPSTR_GET_USAGE_STATS,
            Process.myUid(), activity.getPackageName());
    } else {
        mode = appOpsManager.checkOpNoThrow(AppOpsManager.OPSTR_GET_USAGE_STATS,
            Process.myUid(), activity.getPackageName());
    }
    return mode == AppOpsManager.MODE_ALLOWED;
}
上面的第三篇文章链接中,有指出可以与使用应用使用记录统计达到相同目的的一个功能,就是 辅助服务获取前台应用,这个辅助服务,是无障碍的相关功能。而 当前 Activity 这个 APK,在使用时,就会申请辅助服务的相关权限。可以看出,当前 Activity 就是使用的这个方法检测前台应用。
首先定义辅助服务。
public class AccessibilityMonitorService extends AccessibilityService {
    private CharSequence mWindowClassName;
    private String mCurrentPackage;
    @Override
    public void onAccessibilityEvent(AccessibilityEvent event) {
        int type=event.getEventType();
        switch (type){
            // 核心代码
            case AccessibilityEvent.TYPE_WINDOW_STATE_CHANGED:
                mWindowClassName = event.getClassName();
                mCurrentPackage = event.getPackageName()==null ? "" : event.getPackageName().toString();
                break;
            default:
                break;
        }
    }
}
然后在 AndroidManifest 清单文件中申明服务。
<service
    android:name=".service.AccessibilityMonitorService"
    android:permission="android.permission.BIND_ACCESSIBILITY_SERVICE"
    >
    <intent-filter>
        <action android:name="android.accessibilityservice.AccessibilityService" />
    </intent-filter>

    <meta-data
        android:name="android.accessibilityservice"
        android:resource="@xml/accessibility" />
</service>
然后在 res/xml/ 文件夹下新建文件 accessibility.xml,内容如下:
<?xml version="1.0" encoding="utf-8"?>
<accessibility-service
    xmlns:android="http://schemas.android.com/apk/res/android"
    android:accessibilityEventTypes="typeWindowStateChanged"
    android:accessibilityFeedbackType="feedbackGeneric"
    android:accessibilityFlags="flagRetrieveInteractiveWindows"
    android:canRetrieveWindowContent="true"
    android:canRequestFilterKeyEvents ="true"
    android:notificationTimeout="10"
    android:packageNames="@null"
    android:description="@string/accessibility_des"
    android:settingsActivity="com.pl.recent.MainActivity"
/>
关键是 typeWindowStateChanged 这个事件的声明。
这样就可以检测前台应用的改变,并获取前台应用的包名了。
总结一下:应用使用情况统计 和 辅助服务 两种方法虽然能检测出半透明应用的覆盖情况,但是需要申请额外权限。这两个权限及其敏感的权限,一般过不了合规检查。所以这两种方法,知道就行了,不会用的。
这个没啥好讲的。我们公司跟梆梆交流过。梆梆的 SDK 能满足要求,但是很贵,就先放弃了。因为找到了其他方法(就是下面讲的 自定义检测方案)。
在讲自定义检测方案之前,我们需要先总结一下现有方案的优缺点:
既然上面的方案都有明显的缺点,那肯定只有我们自定义了。还好,自定义的方案是能实现的(否则只能使用第三方 SDK 了)。
在做界面覆盖检测这个功能的研究中,我发现了一件事。那就是在未授权的状态下,一个应用无法获取前台应用的相关信息。我们可以理解成应用无法获取其他应用的信息。既然如此,我们只关注本应用就行了,不关注其他应用。
所有的 APP 被覆盖或者退出应用时,都会走生命周期的流程,其中 onPause 方法是必定执行的。在进入 APP 时,如果是 Activity 已创建,则肯定会执行 onResume 方法,如果 Activity 未创建,则肯定会执行 onCreate 方法。通常 Activity 的切换不会太耗时(太耗时容易 ANR)。
基于上述逻辑,我设计了一个方案:在 Activity 生命周期走到 onPause 时,延时发送一个事件,该事件会触发一个 Toast 提醒,该 Toast 用于提示用户已离开本应用。然后在 onCreate、onResume 中移除延时事件。设在 A 界面启动 B,该方案的解释如下:
综上,下面讲讲自定义方案的具体实现。
首先,定义一个界面覆盖检测类。提供事件延时发送,取消等接口,延时 500 ms。
public class CoverageChecker {
    private static final String TAG = "CoverageChecker";
    private static CoverageChecker INSTANCE;
    /**
     * 是否退出了当前 APP 的标志
     * */
    private boolean isQuit = false;
    // Application Context,防止内存泄漏
    private Context mContext;
    // 延时事件
    private Runnable r;
    // 延时事件发射器
    private Handler handler;
    // 单例模式
    private CoverageChecker(Context context) {
        this.mContext = context.getApplicationContext();
        handler = new Handler(Looper.getMainLooper());
        r = new Runnable() {
            @Override
            public void run() {
                if(isQuit()) {
                    Log.d(TAG, "app is covered, show notify");
                    showCoveredHint();
                }
            }
        };
    }
    public static CoverageChecker getInstance(Context context) {
        if(INSTANCE == null) {
            synchronized (CoverageChecker.class) {
                if(INSTANCE == null) {
                    INSTANCE = new CoverageChecker(context);
                }
            }
        }
        if(INSTANCE.mContext == null) {
            INSTANCE.mContext = context.getApplicationContext();
        }
        return INSTANCE;
    }

    public boolean isQuit() {
        return isQuit;
    }

    public void setQuit(boolean isQuit) {
        this.isQuit = isQuit;
    }

    /**
     * 退出界面时,延迟通知
     *
     * @param activity
     * */
    public synchronized void delayNotify(Activity activity) {
        // 不需要提示,则返回
        if(!isNeedNotify(activity)) {
            return;
        }
        setQuit(true);
        // 先移除已有的
        handler.removeCallbacks(r);
        handler.postDelayed(r, 500);
    }

    /**
     * 进入界面时,移除通知
     * */
    public synchronized void removeNotify() {
        if(isQuit()) {
            setQuit(false);
            handler.removeCallbacks(r);
        }
    }

    /**
     * 判断是否需要提示退出 APP
     * */
    public synchronized boolean isNeedNotify(Activity activity) {
        if(activity == null) {
            Log.w(TAG, "activity == null, not notify");
            return false;
        }
        String actName = activity.getClass().getName();
        if(TextUtils.isEmpty(actName)) {
            Log.w(TAG, "activity name is null, not notify");
            return false;
        }
        // 登录、注册、密码、用户信息等敏感界面才提示,其他界面不提示
        return actName.contains("login")          // 登录相关界面
            || actName.contains("register")       // 注册相关界面
            || actName.contains("password")       // 密码相关界面
            || actName.contains("userinfo");      // 信息相关界面
    }

    /**
     * 当应用被覆盖时,显示提示
     * */
    public void showCoveredHint() {
        if(mContext == null) {
            Log.d(TAG, "showCoveredHint---mContext == null");
            return;
        }
        Toast.makeText(mContext, "你已退出应用", Toast.LENGTH_SHORT).show();
    }
}
然后在 Application 的生命周期回调中触发延时发送,取消等逻辑。
public class CustomApplication extends Application {
    private static final String TAG = "CustomApplication";

    @Override
    public void onCreate() {
        registerActivityLifecycleCallbacks(new ActivityLifecycleCallbacks() {
            @Override
            public void onActivityCreated(Activity activity, Bundle savedInstanceState) {
                // 移除通知
                CoverageChecker.getInstance(activity).removeNotify();
            }

            @Override
            public void onActivityStarted(Activity activity) {
            }

            @Override
            public void onActivityResumed(Activity activity) {
                // 移除通知
                CoverageChecker.getInstance(activity).removeNotify();
            }

            @Override
            public void onActivityPaused(Activity activity) {
                // 延时通知
                CoverageChecker.getInstance(activity).delayNotify(activity);
            }

            @Override
            public void onActivityStopped(Activity activity) {
            }

            @Override
            public void onActivitySaveInstanceState(Activity activity, Bundle outState) {
            }

            @Override
            public void onActivityDestroyed(Activity activity) {
            }
        });
    }
}
在 AndroidManifest.xml 使用 CustomApplication 后,即可监测应用是否被覆盖了。
使用了自定义方案后,顺利的通过了梆梆的检测,APP 满足了应用合规检测的要求。
标签:tor not turn utf-8 总结 ora odi onstop 维护
原文地址:https://www.cnblogs.com/wellcherish/p/14594071.html