标签:for connect turn item vpd 而且 app requests none
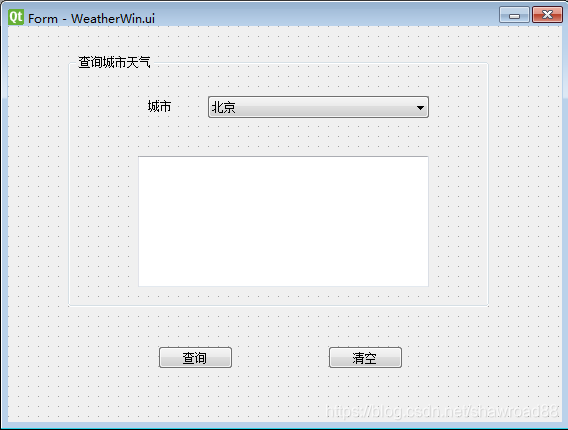
为了大家比较容易设置,我们这里在把对象查看器中的内容贴出来

简单的几个组件:一个窗口+两个按钮+一个下拉是的盒子+一个标签+一个返回文本显示的内容
将demo.ui转换成demo.py文件的
方法一:手动点击.ui—Qt—PyUIC
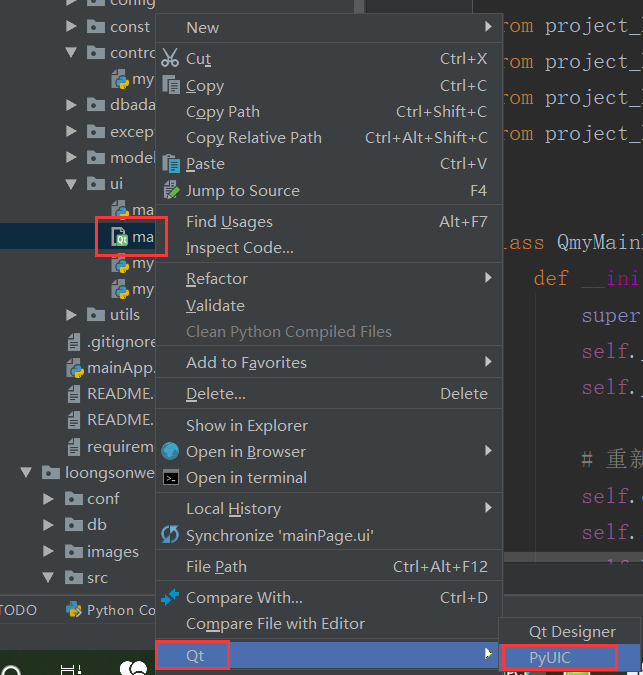
方法二:控制台命令
python -m PyQt5.uic.pyuic demo.ui -o demo.py
pyuic -o Weather3.0.py Weather3.0.ui
下面是转换后的py文件
# -*- coding: utf-8 -*-

# Form implementation generated from reading ui file ‘WeatherWin.ui‘

#

# Created by: PyQt5 UI code generator 5.11.3

#

# WARNING! All changes made in this file will be lost!

from PyQt5 import QtCore, QtGui, QtWidgets

class Ui_Form(object):
    def setupUi(self, Form):
        Form.setObjectName("Form")
        Form.resize(554, 396)
        self.clearBtn = QtWidgets.QPushButton(Form)
        self.clearBtn.setGeometry(QtCore.QRect(320, 320, 75, 23))
        self.clearBtn.setObjectName("clearBtn")
        self.groupBox = QtWidgets.QGroupBox(Form)
        self.groupBox.setGeometry(QtCore.QRect(60, 30, 421, 251))
        self.groupBox.setObjectName("groupBox")
        self.label = QtWidgets.QLabel(self.groupBox)
        self.label.setGeometry(QtCore.QRect(80, 39, 51, 21))
        self.label.setObjectName("label")
        self.weatherComboBox = QtWidgets.QComboBox(self.groupBox)
        self.weatherComboBox.setGeometry(QtCore.QRect(140, 40, 221, 22))
        self.weatherComboBox.setObjectName("weatherComboBox")
        self.weatherComboBox.addItem("")
        self.weatherComboBox.addItem("")
        self.weatherComboBox.addItem("")
        self.weatherComboBox.addItem("")
        self.resultText = QtWidgets.QTextEdit(self.groupBox)
        self.resultText.setGeometry(QtCore.QRect(70, 100, 291, 131))
        self.resultText.setObjectName("resultText")
        self.queryBtn = QtWidgets.QPushButton(Form)
        self.queryBtn.setGeometry(QtCore.QRect(150, 320, 75, 23))
        self.queryBtn.setObjectName("queryBtn")
        self.retranslateUi(Form)

        QtCore.QMetaObject.connectSlotsByName(Form)

    def retranslateUi(self, Form):
        _translate = QtCore.QCoreApplication.translate
        Form.setWindowTitle(_translate("Form", "Form"))
        self.clearBtn.setText(_translate("Form", "清空"))
        self.groupBox.setTitle(_translate("Form", "查询城市天气"))
        self.label.setText(_translate("Form", "城市"))
        self.weatherComboBox.setItemText(0, _translate("Form", "北京"))
        self.weatherComboBox.setItemText(1, _translate("Form", "西安"))
        self.weatherComboBox.setItemText(2, _translate("Form", "上海"))
        self.weatherComboBox.setItemText(3, _translate("Form", "天津"))
        self.queryBtn.setText(_translate("Form", "查询"))
第二步只是将界面绘制了出来并转换为py文件,接着我们会使用requests模块对网站发起请求,获取我们想要的数据,并显示到我们的窗口中。
首先我们试着访问一下该网址:http://www.weather.com.cn/data/sk/101010100.html 这个查的是北京的天气,是一个json格式的数据,而且还乱码了,没关系,我们等会改成utf-8就好了。 每个城市之间只是那红色的城市代码不同。 我这里只找了北京,天津,西安,上海的城市代码。所以只能查这些地区。。 如果想找你所在的城市,去网上找一下。这是我在网上随便找的。我们可以构造查询了连接,然后用requests进行请求。 返回json格式的数据,我们一步一步提取出来就可以了。 下面是调用的文件。
import sys
from PyQt5.QtWidgets import *
from Weather import Ui_Form
import requests

class MainWindow(QMainWindow):
    def __init__(self, parent=None):
        super(MainWindow, self).__init__(parent)
        self.ui = Ui_Form()
        self.ui.setupUi(self)
    self.ui.clearBtn.clicked.connect(self.clearResult)
    self.ui.queryBtn.clicked.connect(self.queryWeather)
def queryWeather(self):

    print(‘* queryWeather‘)
    cityName = self.ui.weatherComboBox.currentText()
    cityCode = self.transCityName(cityName)
    web = ‘http://www.weather.com.cn/data/sk/‘ + cityCode + ‘.html‘
    rep = requests.get(web)
    rep.encoding = ‘utf-8‘
    # print(rep.json())

    msg1 = ‘城市: %s‘ % rep.json()[‘weatherinfo‘][‘city‘] + ‘\n‘
    msg2 = ‘风向: %s‘ % rep.json()[‘weatherinfo‘][‘WD‘] + ‘\n‘
    msg3 = ‘温度: %s‘ % rep.json()[‘weatherinfo‘][‘temp‘] + ‘\n‘
    msg4 = ‘风力: %s‘ % rep.json()[‘weatherinfo‘][‘WS‘] + ‘\n‘ + ‘度‘
    msg5 = ‘湿度: %s‘ % rep.json()[‘weatherinfo‘][‘SD‘] + ‘\n‘
    result = msg1 + msg2 + msg3 + msg4 + msg5
    self.ui.resultText.setText(result)

def transCityName(self, cityName):
    cityCode = ‘‘

    if cityName == ‘北京‘:
        cityCode = ‘101010100‘
    elif cityName == ‘天津‘:
        cityCode = ‘101030100‘
    elif cityName == ‘上海‘:
        cityCode = ‘101020100‘
    elif cityName == ‘西安‘:
        cityCode = ‘101110101‘

    return cityCode

def clearResult(self):
    print(‘* clearResult‘)
    self.ui.resultText.clear()
if __name__ == ‘__main__‘:
    app = QApplication(sys.argv)
    win = MainWindow()
    win.setObjectName("MainWindow")  # 为主窗口设置对象名 为了在下面设置背景颜色
    win.setStyleSheet("#MainWindow{border-image:url(./images/python.jpg);}")  # 这个图片路径是我自己的,你可以这一张你自己的图片。或者把这两行都给注释掉
    win.show()
    sys.exit(app.exec_())
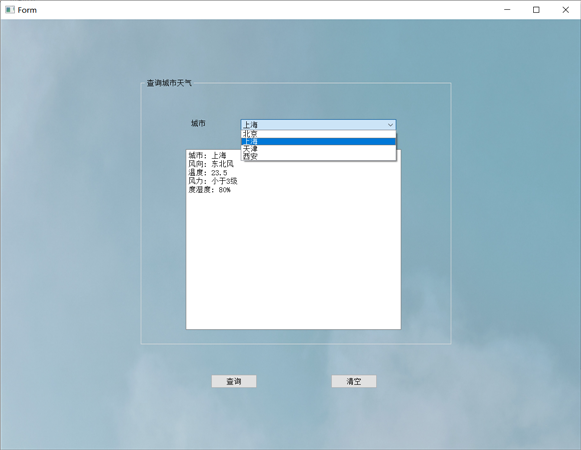
最后的界面:
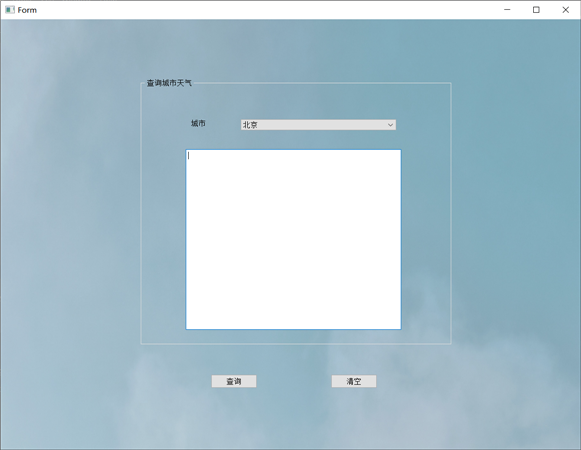
看一下功能,有个下拉框 可以选择城市,然后点击查询就可以查到了。
标签:for connect turn item vpd 而且 app requests none
原文地址:https://www.cnblogs.com/zhuhukang/p/14849212.html