标签:image ati 根据 模块 lin refresh bytes 技术 remote
1.GlusterFS 安装前的准备
电脑一台,内存>=4G,可用磁盘空间大于50G
安装VMWARE Workstation虚拟机软件
安装好四台CentOS-6-x86_64(6.2-6.8都可以)的虚拟机
基本系统:1核CPU+1024M内存+10G硬盘
网络选择:网络地址转换(NAT)
关闭iptables和SELinux
预装glusterfs软件包
| 描述 | IP | 主机名 | 要求 |
| Glusterfs01 | 192.168.146.146 | mystorage01 | 多添加两块各10G的硬盘sdb和sdc |
| Glusterfs02 | 192.168.146.147 | mystorage02 | 多添加两块各10G的硬盘sdb和sdc |
| Glusterfs03 | 192.168.146148 | mystorage03 | 多添加两块各10G的硬盘sdb和sdc |
| Glusterfs04 | 192.168.146.153 | mystorage04 | 多添加两块各10G的硬盘sdb和sdc |
| Glusterfs05 | 192.168.146.152 | WebServerClient | 无 |

 1 #四台Gluster服务器上操作
 2 [root@localhost ~]# mkdir -p rpm
 3 [root@localhost ~]# cd rpm/
 4 [root@localhost rpm]# ls
 5 dbench-4.0-12.el6.x86_64.rpm
 6 glusterfs-3.7.20-1.el6.x86_64.rpm
 7 glusterfs-api-3.7.20-1.el6.x86_64.rpm
 8 glusterfs-api-devel-3.7.20-1.el6.x86_64.rpm
 9 glusterfs-cli-3.7.20-1.el6.x86_64.rpm
10 glusterfs-client-xlators-3.7.20-1.el6.x86_64.rpm
11 glusterfs-coreutils-0.0.1-0.1.git0c86f7f.el6.x86_64.rpm
12 glusterfs-coreutils-0.2.0-1.el6_37.x86_64.rpm
13 glusterfs-devel-3.7.20-1.el6.x86_64.rpm
14 glusterfs-extra-xlators-3.7.20-1.el6.x86_64.rpm
15 glusterfs-fuse-3.7.20-1.el6.x86_64.rpm
16 glusterfs-ganesha-3.7.20-1.el6.x86_64.rpm
17 glusterfs-geo-replication-3.7.20-1.el6.x86_64.rpm
18 glusterfs-libs-3.7.20-1.el6.x86_64.rpm
19 glusterfs-rdma-3.7.20-1.el6.x86_64.rpm
20 glusterfs-resource-agents-3.7.20-1.el6.noarch.rpm
21 glusterfs-server-3.7.20-1.el6.x86_64.rpm
22 keyutils-1.4-5.el6.x86_64.rpm
23 keyutils-libs-1.4-5.el6.x86_64.rpm
24 libaio-0.3.107-10.el6.x86_64.rpm
25 libevent-1.4.13-4.el6.x86_64.rpm
26 libgssglue-0.1-11.el6.x86_64.rpm
27 libntirpc-1.3.1-1.el6.x86_64.rpm
28 libntirpc-devel-1.3.1-1.el6.x86_64.rpm
29 libtirpc-0.2.1-13.el6_9.x86_64.rpm
30 nfs-utils-1.2.3-75.el6_9.x86_64.rpm
31 nfs-utils-lib-1.1.5-13.el6.x86_64.rpm
32 python-argparse-1.2.1-2.1.el6.noarch.rpm
33 python-gluster-3.7.20-1.el6.noarch.rpm
34 pyxattr-0.5.0-1.el6.x86_64.rpm
35 rpcbind-0.2.0-13.el6_9.1.x86_64.rpm
36 rsync-3.0.6-12.el6.x86_64.rpm
37 userspace-rcu-0.7.16-2.el6.x86_64.rpm
38 userspace-rcu-0.7.7-1.el6.x86_64.rpm
39 userspace-rcu-devel-0.7.16-2.el6.x86_64.rpm
40 userspace-rcu-devel-0.7.7-1.el6.x86_64.rpm
41 [root@localhost rpm]# yum -y install createrepo
42 [root@localhost rpm]# createrepo -v .
2.GlusterFS 安装
(1)添加hosts文件实现集群主机之间相互能够解析
1 #四台Gluster服务器上操作
2 [root@Glusterfs01 ~]# vim /etc/hosts
3 127.0.0.1   localhost localhost.localdomain localhost4 localhost4.localdomain4
4 ::1         localhost localhost.localdomain localhost6 localhost6.localdomain6
5 192.168.146.149 Glusterfs01
6 192.168.146.147 Glusterfs02
7 192.168.146.148 Glusterfs03
8 192.168.146.143 Glusterfs04
(2)利用教程附带的rpm软件包组,充当本地定制化yum源
1 #四台Gluster服务器上操作
2 [root@localhost yum.repos.d]# vim /etc/yum.repos.d/CentOS-Media.repo
3 [rpm]                                    #在末行加入此模块
4 name=rpm
5 baseurl=file:///root/rpm/
6 gpgcheck=0
7 enabled=1
8 [root@localhost rpm]# yum -y clean all && yum makecache
9 [root@localhost ~]# yum -y install glusterfs-server glusterfs-cli glusterfs-geo-replication
3.配置glusterfs
(1)查看glusterfs版本信息
 1 [root@Glusterfs01 ~]# which glusterfs
 2 /usr/sbin/glusterfs
 3 [root@Glusterfs01 ~]# glusterfs -V
 4 glusterfs 3.7.20 built on Jan 30 2017 15:39:27
 5 Repository revision: git://git.gluster.com/glusterfs.git
 6 Copyright (c) 2006-2013 Red Hat, Inc. <http://www.redhat.com/>
 7 GlusterFS comes with ABSOLUTELY NO WARRANTY.
 8 It is licensed to you under your choice of the GNU Lesser
 9 General Public License, version 3 or any later version (LGPLv3
10 or later), or the GNU General Public License, version 2 (GPLv2),
11 in all cases as published by the Free Software Foundation.
(2)启动服务
1 [root@glusterfs01 ~]# /etc/init.d/glusterd status
2 glusterd is stopped
3 [root@glusterfs01 ~]# /etc/init.d/glusterd start    #启动
4 Starting glusterd:                                         [  OK  ]
5 [root@glusterfs01 ~]# /etc/init.d/glusterd status
6 glusterd (pid  1356) is running...
7 [root@glusterfs01 ~]# chkconfig glusterd on #添加开机启动
(3) 存储主机加入信任存储池
虚拟机添加信任存储池
特别提示:只需要让一个虚拟机进行添加操作即可。但自己并不需要添加信任自己
1 #确保所有的虚拟机的glusterd服务都处于开启状态,然后执行如下操作
2 [root@glusterfs01 ~]# gluster peer probe glusterfs02
3 peer probe: success.
4 [root@glusterfs01 ~]# gluster peer probe glusterfs03
5 peer probe: success.
6 [root@glusterfs01 ~]# gluster peer probe glusterfs04
7 peer probe: success.
(4) 查看虚拟机信任状态添加结果
 1 [root@glusterfs01 ~]# gluster peer status
 2 Number of Peers: 3
 3
 4 Hostname: glusterfs02
 5 Uuid: 76b29268-bc52-44fc-ba6a-ab94cacf5fec
 6 State: Peer in Cluster (Connected)
 7
 8 Hostname: glusterfs03
 9 Uuid: 00e83abc-1925-42a6-881e-62c168f56cdf
10 State: Peer in Cluster (Connected)
11
12 Hostname: glusterfs04
13 Uuid: 7fe221b0-8590-4f6a-ba63-080095de833b
14 State: Peer in Cluster (Connected)
(5)配置前的准备工作
1 #链接光盘源,安装xfs支持包(Centos7已经不再需要安装)
2 #所有都要装
3 [root@glusterfs01 ~]# yum -y install xfsprogs
在企业里我们还需要分区然后才能进行格式化。但是我们这里就省略了,我们直接格式化每台虚拟机的那块10G硬盘
 1 [root@glusterfs01 ~]#  mkfs.ext4 /dev/sdb
 2 mke2fs 1.41.12 (17-May-2010)
 3 /dev/sdb is entire device, not just one partition!
 4 Proceed anyway? (y,n) y
 5 Filesystem label=
 6 OS type: Linux
 7 Block size=4096 (log=2)
 8 Fragment size=4096 (log=2)
 9 Stride=0 blocks, Stripe width=0 blocks
10 655360 inodes, 2621440 blocks
11 131072 blocks (5.00%) reserved for the super user
12 First data block=0
13 Maximum filesystem blocks=2684354560
14 80 block groups
15 32768 blocks per group, 32768 fragments per group
16 8192 inodes per group
17 Superblock backups stored on blocks:
18     32768, 98304, 163840, 229376, 294912, 819200, 884736, 1605632
19
20 Writing inode tables: done
21 Creating journal (32768 blocks): done
22 Writing superblocks and filesystem accounting information: done
23
24 This filesystem will be automatically checked every 23 mounts or
25 180 days, whichever comes first.  Use tune2fs -c or -i to override.
在四台机器上执行mkdir -p /gluster/brick1 建立挂在块设备的目录
挂载磁盘到文件系统(4台都做,步骤相同)
 1 [root@glusterfs01 ~]# mkdir -p /gluster/brick1
 2 [root@glusterfs01 ~]# mount /dev/sdb /gluster/brick1
 3 [root@glusterfs01 ~]# df -h
 4 Filesystem                    Size  Used Avail Use% Mounted on
 5 /dev/mapper/VolGroup-lv_root   18G  1.3G   16G   8% /
 6 tmpfs                         491M     0  491M   0% /dev/shm
 7 /dev/sda1                     485M   33M  427M   8% /boot
 8 /dev/sdb                      9.9G  151M  9.2G   2% /gluster/brick1
 9
10 #    继续重复以上步骤,将第二块磁盘sdc格式化,并挂载到每台虚拟机的/gluster/brick2上
11 [root@glusterfs01 ~]#  mkfs.ext4 /dev/sdc
12 mke2fs 1.41.12 (17-May-2010)
13 /dev/sdc is entire device, not just one partition!
14 Proceed anyway? (y,n) y
15 Filesystem label=
16 OS type: Linux
17 Block size=4096 (log=2)
18 Fragment size=4096 (log=2)
19 Stride=0 blocks, Stripe width=0 blocks
20 655360 inodes, 2621440 blocks
21 131072 blocks (5.00%) reserved for the super user
22 First data block=0
23 Maximum filesystem blocks=2684354560
24 80 block groups
25 32768 blocks per group, 32768 fragments per group
26 8192 inodes per group
27 Superblock backups stored on blocks:
28     32768, 98304, 163840, 229376, 294912, 819200, 884736, 1605632
29
30 Writing inode tables: done
31 Creating journal (32768 blocks): done
32 Writing superblocks and filesystem accounting information: done
33
34 This filesystem will be automatically checked every 31 mounts or
35 180 days, whichever comes first.  Use tune2fs -c or -i to override.
36 [root@glusterfs01 ~]# mkdir -p /gluster/brick2
37 [root@glusterfs01 ~]# mount /dev/sdc /gluster/brick2
38 [root@glusterfs01 ~]# df -h
39 Filesystem                    Size  Used Avail Use% Mounted on
40 /dev/mapper/VolGroup-lv_root   18G  1.3G   16G   8% /
41 tmpfs                         491M     0  491M   0% /dev/shm
42 /dev/sda1                     485M   33M  427M   8% /boot
43 /dev/sdb                      9.9G  151M  9.2G   2% /gluster/brick1
44 /dev/sdc                      9.9G  151M  9.2G   2% /gluster/brick2
4台虚拟机加入开机自动挂载
1 [root@glusterfs01 ~]#  echo "mount /dev/sdb /gluster/brick1" >> /etc/rc.local
2 [root@glusterfs01 ~]# echo "mount /dev/sdc /gluster/brick2" >> /etc/rc.local
3 [root@glusterfs01 ~]#  tail -2 /etc/rc.local
4 tail: inotify cannot be used, reverting to polling
5 mount /dev/sdb /gluster/brick1
6 mount /dev/sdc /gluster/brick2
(6)创建volume分布式卷
基本卷:
分布式卷(Distributed):相当于raid0读写速度,文件数平均分配
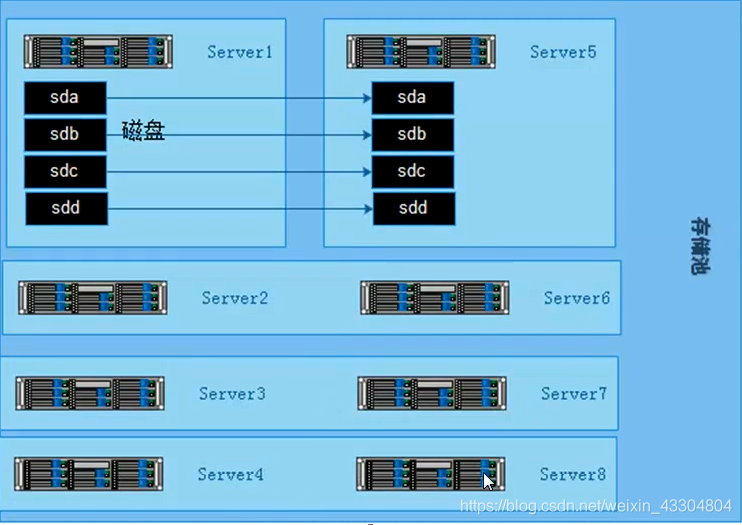
复制卷(Replicated):相当于raid1
条带式卷(Striped):针对大文件使用,文件大小平均分配
复合卷:
分布式复制卷(Distributed Replicated):相当于raid1+0
分布式条带卷(Distributed Striped):
复制条带卷(Replicated Striped):
分布式复制条带卷(Distributed Replicated Striped):
 1 #创建分布式卷(在glusterfs01上操作)
 2 [root@glusterfs01 ~]# gluster volume create gs1 glusterfs01:/gluster/brick1 glusterfs02:/gluster/brick1 force
 3 volume create: gs1: success: please start the volume to access data
 4
 5 #启动创建的卷(在glusterfs01上操作)
 6 [root@glusterfs01 ~]# gluster volume start gs1
 7 volume start: gs1: success
 8
 9 #然后我们发现4台虚拟机都能看到如下信息(在任意虚拟机上操作)
10 [root@glusterfs04 ~]#  gluster volume info
11
12 Volume Name: gs1    #卷名
13 Type: Distribute    #分布式
14 Volume ID: 0f0adf7a-3b8f-4016-ac72-83f633e90fac #ID号
15 Status: Started     #启动状态
16 Number of Bricks: 2 #一共两个块设备
17 Transport-type: tcp #tcp的连接方式
18 Bricks: #块信息
19 Brick1: glusterfs01:/gluster/brick1
20 Brick2: glusterfs02:/gluster/brick1
21 Options Reconfigured:
22 performance.readdir-ahead: on
(7) volume的两种挂载方式
 1 #挂载卷到目录(在glusterfs01上操作)
 2 [root@glusterfs01 ~]# mount -t glusterfs 127.0.0.1:/gs1 /mnt    #将本地的分布式卷gs01挂载到/mnt目录下
 3 [root@Glusterfs01 ~]# df -h
 4 Filesystem                    Size  Used Avail Use% Mounted on
 5 /dev/mapper/VolGroup-lv_root   18G  1.3G   16G   8% /
 6 tmpfs                         491M     0  491M   0% /dev/shm
 7 /dev/sda1                     485M   33M  427M   8% /boot
 8 /dev/sdb                      9.9G  151M  9.2G   2% /gluster/brick1
 9 /dev/sdc                      9.9G  151M  9.2G   2% /gluster/brick2
10 127.0.0.1:/gs1                 20G  302M   19G   2% /mnt      #挂载成功,我们看到磁盘空间已经整合
11
12 #在挂载好的/mnt目录里创建实验文件(在glusterfs01上操作)
13 [root@glusterfs01 ~]# touch /mnt/{1..5}
14 [root@glusterfs01 ~]# ls /mnt
15 1  2  3  4  5
16
17 #在其他虚拟机上挂载分布式卷gs1,查看同步挂载结果
18 [root@glusterfs02 rpm]# mount -t glusterfs 127.0.0.1:/gs1 /mnt
19 [root@glusterfs02 rpm]# ls /mnt
20 1  2  3  4  5
21 [root@glusterfs03 rpm]# mount -t glusterfs 127.0.0.1:/gs1 /mnt
22 [root@glusterfs03 rpm]# ls /mnt
23 1  2  3  4  5
24 [root@glusterfs04 ~]# mount -t glusterfs 127.0.0.1:/gs1 /mnt
25 [root@glusterfs04 ~]# ls /mnt
26 1  2  3  4  5
在挂载之前我们先来看一下如何打开glusterfs的NFS挂载方式
 1 #在glusterfs01上执行如下操作
 2 [root@glusterfs01 ~]# gluster volume status #查看分布式卷的状态
 3 Status of volume: gs1
 4 Gluster process                             TCP Port  RDMA Port  Online  Pid
 5 ------------------------------------------------------------------------------
 6 Brick glusterfs01:/gluster/brick1           49152     0          Y       1911
 7 Brick glusterfs02:/gluster/brick1           49152     0          Y       1695
 8 NFS Server on localhost                     N/A       N/A        N       N/A    #本地分布式卷NFS挂载未开启
 9 NFS Server on glusterfs04                   2049      0          Y       2679
10 NFS Server on glusterfs02                   2049      0          Y       2600   #出现具体的端口就表明开启了
11 NFS Server on glusterfs03                   2049      0          Y       2608
12
13 Task Status of Volume gs1
14 ------------------------------------------------------------------------------
15 There are no active volume tasks
以上结果是是什么原因呢?
如果NFS Server的挂载端口显示N/A表示未开启挂载功能,这是由于要先进行nfs挂载是需要装两个nfs的软件包的rpcbind和nfs-utils
当然就算系统装了这两个软件包,那么我们也需要开启rpcbind服务,然后在重启glusterfs服务才能够进行nfs挂载的操作。
现在我们就来开启glusterfs01的nfs挂载功能,如下:
 1 #在glusterfs01上执行如下操作
 2 [root@glusterfs01 ~]# rpm -qa nfs-utils #查看是否安装nfs-utils
 3 nfs-utils-1.2.3-75.el6_9.x86_64
 4 [root@glusterfs01 ~]# rpm -qa rpcbind   #查看是否安装rpcbind
 5 rpcbind-0.2.0-13.el6_9.1.x86_64
 6 [root@glusterfs01 ~]# /etc/init.d/rpcbind status    #查看rpcbind服务状态
 7 rpcbind is stopped
 8 [root@glusterfs01 ~]# /etc/init.d/rpcbind start     #开启rpcbind服务
 9 Starting rpcbind:                                          [  OK  ]
10 [root@glusterfs01 ~]# /etc/init.d/glusterd stop     #停止glusterd服务
11 Stopping glusterd:                                         [  OK  ]
12 [root@glusterfs01 ~]# /etc/init.d/glusterd start    #开启glusterd服务
13 Starting glusterd:                                         [  OK  ]
14 root@glusterfs01 ~]# gluster volume status  #这里需要等几秒再查看,就会发现nfs挂载方式开启了
15 Status of volume: gs1
16 Gluster process                             TCP Port  RDMA Port  Online  Pid
17 ------------------------------------------------------------------------------
18 Brick glusterfs01:/gluster/brick1           49152     0          Y       1911
19 Brick glusterfs02:/gluster/brick1           49152     0          Y       1695
20 NFS Server on localhost                     2049      0          Y       2984   #已经开启
21 NFS Server on glusterfs04                   2049      0          Y       2679
22 NFS Server on glusterfs03                   2049      0          Y       2608
23 NFS Server on glusterfs02                   2049      0          Y       2600
24
25 Task Status of Volume gs1
26 ------------------------------------------------------------------------------
27 There are no active volume tasks
接下来,我们尝试在准备好的第五台虚拟机WebServer上进行nfs方式的挂载
 1 #在Webserver上进行如下操作
 2 [root@localhost ~]#  rpm -qa nfs-utils          #查看nfs-utils是否安装
 3 [root@localhost ~]# mount /dev/sr0 /media/cdrom
 4 mount: block device /dev/sr0 is write-protected, mounting read-only
 5 [root@localhost ~]# yum -y install nfs-utils
 6 [root@localhost ~]# mount -t nfs 192.168.146.149:/gs1 /mnt        #以nfs方式远程挂载分布式卷
 7 mount.nfs: rpc.statd is not running but is required for remote locking.
 8 mount.nfs: Either use ‘-o nolock‘ to keep locks local, or start statd.
 9 mount.nfs: an incorrect mount option was specified          #根据提示我们加上-o nolock参数
10 [root@localhost ~]# mount -t nfs -o nolock 192.168.146.149:/gs1 /mnt
11 [root@WebServer ~]# ls /mnt #挂载成功
12 1  2  3  4  5  6  666  sss  yunjisuan
13 [root@WebServer ~]# touch /mnt/benet    #创建文件测试
14 [root@WebServer ~]# ls /mnt
15 1  2  3  4  5  6  666  benet  sss  yunjisuan
16
17 #在glusterfs任意虚拟机上进行如下操作
18 [root@glusterfs04 ~]# mount -t glusterfs 127.0.0.1:/gs1 /mnt
19 [root@glusterfs04 ~]# ls /mnt
20 1  2  3  4  5  6  666  benet  sss  yunjisuan    #数据已经同步
(8)创建分布式复制卷
 1 #在任意一台gluster虚拟机上进行如下操作
 2 [root@glusterfs01 ~]# gluster volume create gs2 replica 2 glusterfs03:/gluster/brick1 glusterfs04:/gluster/brick1 force
 3 volume create: gs2: success: please start the volume to access data
 4 [root@glusterfs01 ~]# gluster volume info gs2
 5
 6 Volume Name: gs2
 7 Type: Replicate #复制卷
 8 Volume ID: c76fe8fd-71a7-4395-9dd2-ef1dc85163b8
 9 Status: Created
10 Number of Bricks: 1 x 2 = 2
11 Transport-type: tcp
12 Bricks:
13 Brick1: glusterfs03:/gluster/brick1
14 Brick2: glusterfs04:/gluster/brick1
15 Options Reconfigured:
16 performance.readdir-ahead: on
17 [root@glusterfs01 ~]# gluster volume start gs2  #启动卷
18 volume start: gs2: success
(9)创建分布式条带卷
 1 [root@glusterfs01 ~]# gluster volume create gs3 stripe 2 glusterfs01:/gluster/brick2 glusterfs02:/gluster/brick2 force
 2 volume create: gs3: success: please start the volume to access data
 3 [root@glusterfs01 ~]# gluster volume info gs3
 4
 5 Volume Name: gs3
 6 Type: Stripe    #条带卷
 7 Volume ID: 6d2e27c7-f5a1-4473-9df8-a7261851a2ed
 8 Status: Created
 9 Number of Bricks: 1 x 2 = 2
10 Transport-type: tcp
11 Bricks:
12 Brick1: glusterfs01:/gluster/brick2
13 Brick2: glusterfs02:/gluster/brick2
14 Options Reconfigured:
15 performance.readdir-ahead: on
16 [root@glusterfs01 ~]# gluster volume start gs3  #启动卷
17 volume start: gs3: success
1 在WebServer服务器挂载创建的三种类型卷gs1,gs2,gs3,进行数据写入测试
 1 #在WebServer上进行数据写入操作
 2 [root@WebServer ~]# mount -o nolock -t nfs 192.168.146.144:/gs1 /mnt
 3 [root@WebServer ~]# df -h
 4 Filesystem                    Size  Used Avail Use% Mounted on
 5 /dev/mapper/VolGroup-lv_root   18G 1014M   16G   7% /
 6 tmpfs                         491M     0  491M   0% /dev/shm
 7 /dev/sda1                     485M   33M  427M   8% /boot
 8 /dev/sr0                      4.2G  4.2G     0 100% /media/cdrom
 9 192.168.146.144:/gs1           20G  301M   19G   2% /mnt
10 [root@WebServer ~]# touch /mnt/{1..10}
11 [root@WebServer ~]# ls /mnt/
12 1  10  2  3  4  5  6  7  8  9
13
14 #在glusterfs01和glusterfs02上进行查看(看看数据到底写入了哪个盘)
15 [root@glusterfs01 ~]# ls /gluster/brick1
16 1  5  7  8  9
17 [root@glusterfs02 ~]# ls /gluster/brick1
18 10  2  3  4  6
结论:分布式卷的数据存储方式是将数据平均写入到每个整合的磁盘中,类似于raid0,写入速度快,但这样磁盘一旦损坏没有纠错能力。
 1 #在WebServer上进行数据写入操作
 2 [root@WebServer ~]# mount -o nolock -t nfs 192.168.146.144:/gs2 /mnt
 3 [root@WebServer ~]# df -h
 4 Filesystem                    Size  Used Avail Use% Mounted on
 5 /dev/mapper/VolGroup-lv_root   18G 1014M   16G   7% /
 6 tmpfs                         491M     0  491M   0% /dev/shm
 7 /dev/sda1                     485M   33M  427M   8% /boot
 8 /dev/sr0                      4.2G  4.2G     0 100% /media/cdrom
 9 192.168.146.144:/gs2          9.9G  151M  9.2G   2% /mnt    #可用容量减半
10 [root@WebServer ~]# ls /mnt
11 lost+found
12 [root@WebServer ~]# touch /mnt/{1..10}
13 [root@WebServer ~]# ls /mnt
14 1  10  2  3  4  5  6  7  8  9  lost+found
15
16 #在glusterfs03和glusterfs04上进行查看(看看数据到底写入了哪个盘)
17 [root@glusterfs03 ~]# ls /gluster/brick1
18 1  10  2  3  4  5  6  7  8  9  lost+found
19 [root@glusterfs04 ~]# ls /gluster/brick1
20 1  10  2  3  4  5  6  7  8  9  lost+found
结论:分布式复制卷的数据存储方式为,每个整合的磁盘中都写入同样的数据内容,类似于raid1,数据非常安全,读取性能高,占磁盘容量。
3.分布式条带卷gs3的数据写入测试
 1 #在WebServer上进行数据写入操作
 2 [root@WebServer ~]# umount /mnt
 3 [root@WebServer ~]# mount -o nolock -t nfs 192.168.146.144:/gs3 /mnt
 4 [root@WebServer ~]# df -h
 5 Filesystem                    Size  Used Avail Use% Mounted on
 6 /dev/mapper/VolGroup-lv_root   18G 1014M   16G   7% /
 7 tmpfs                         491M     0  491M   0% /dev/shm
 8 /dev/sda1                     485M   33M  427M   8% /boot
 9 /dev/sr0                      4.2G  4.2G     0 100% /media/cdrom
10 192.168.146.144:/gs3           20G  301M   19G   2% /mnt
11 [root@WebServer ~]# dd if=/dev/zero of=/root/test bs=1024 count=262144  #创建大小为256M的文件
12 262144+0 records in
13 262144+0 records out
14 268435456 bytes (268 MB) copied, 1.81006 s, 148 MB/s
15 [root@WebServer ~]# du -sh test
16 256M    test
17 [root@WebServer ~]# cp test /mnt/   #复制到/mnt目录下
18 [root@WebServer ~]# ls /mnt
19 test
20 [root@WebServer ~]# du -sh /mnt/test    #查看大小为256M
21 256M    /mnt/test
22
23 #在glusterfs01和glusterfs02上进行查看(看看数据到底是怎么存的)
24 [root@glusterfs01 ~]# du -sh /gluster/brick2/test
25 129M    /gluster/brick2/test
26 [root@glusterfs02 ~]# du -sh /gluster/brick2/test
27 129M    /gluster/brick2/test
结论:我们发现分布式条带卷,是将数据的容量平均分配到了每个整合的磁盘节点上。大幅提高大文件的并发读访问。
 1 [root@glusterfs01 ~]# gluster volume add-brick gs2 replica 2 glusterfs03:/gluster/brick2 glusterfs04:/gluster/brick2 force   #添加两个块设备
 2 volume add-brick: success
 3 [root@glusterfs01 ~]# gluster volume info gs2
 4
 5 Volume Name: gs2
 6 Type: Distributed-Replicate
 7 Volume ID: c76fe8fd-71a7-4395-9dd2-ef1dc85163b8
 8 Status: Started
 9 Number of Bricks: 2 x 2 = 4         #已经扩容
10 Transport-type: tcp
11 Bricks:
12 Brick1: glusterfs03:/gluster/brick1
13 Brick2: glusterfs04:/gluster/brick1
14 Brick3: glusterfs03:/gluster/brick2
15 Brick4: glusterfs04:/gluster/brick2
16 Options Reconfigured:
17 performance.readdir-ahead: on
1 特别提示:
2 对分布式复制卷和分布式条带卷进行扩容时,要特别注意,如果创建卷之初的时候选择的是replica 2 或者stripe 2。那么扩容时,就必须一次性扩容两个或两个的倍数的块设备。
3 例如你给一个分布式复制卷的replica为2,你在增加bricks的时候数量必须为2,4,6,8等。
 1 #在WebServer上挂载gs2并查看挂载目录的容量
 2 [root@WebServer ~]# umount /mnt
 3 [root@WebServer ~]# mount -o nolock -t nfs 192.168.146.144:/gs2 /mnt
 4 [root@WebServer ~]# df -h
 5 Filesystem                    Size  Used Avail Use% Mounted on
 6 /dev/mapper/VolGroup-lv_root   18G  1.3G   16G   8% /
 7 tmpfs                         491M     0  491M   0% /dev/shm
 8 /dev/sda1                     485M   33M  427M   8% /boot
 9 /dev/sr0                      4.2G  4.2G     0 100% /media/cdrom
10 192.168.146.144:/gs2           20G  301M   19G   2% /mnt        #已经扩容
我们再次写入数据
 1 #在WebServer上进行数据写入操作
 2 [root@WebServer ~]# touch /mnt/{11..20}
 3 [root@WebServer ~]# ls /mnt
 4 1  10  11  12  13  14  15  16  17  18  19  2  20  3  4  5  6  7  8  9  lost+found
 5
 6 #在glusterfs03和glusterfs04上查看数据存到哪里去了
 7 [root@glusterfs03 ~]# gluster volume info gs2
 8
 9 Volume Name: gs2
10 Type: Distributed-Replicate
11 Volume ID: c76fe8fd-71a7-4395-9dd2-ef1dc85163b8
12 Status: Started
13 Number of Bricks: 2 x 2 = 4
14 Transport-type: tcp
15 Bricks:
16 Brick1: glusterfs03:/gluster/brick1     #组成gs2的块设备就在03和04上
17 Brick2: glusterfs04:/gluster/brick1
18 Brick3: glusterfs03:/gluster/brick2
19 Brick4: glusterfs04:/gluster/brick2
20 Options Reconfigured:
21 performance.readdir-ahead: on
22 [root@glusterfs03 ~]# ls /gluster/brick1
23 1  10  11  12  13  14  15  16  17  18  19  2  20  3  4  5  6  7  8  9  lost+found
24 [root@glusterfs03 ~]# ls /gluster/brick2
25 lost+found          #什么都没有
26 [root@glusterfs04 ~]# ls /gluster/brick1
27 1  10  11  12  13  14  15  16  17  18  19  2  20  3  4  5  6  7  8  9  lost+found
28 [root@glusterfs04 ~]# ls /gluster/brick2
29 lost+found          #还是什么都没有
1 通过对扩容的gs2进行写入测试,我们发现数据并没有被写入到新加入的块设备中,这是为甚什么?
2 这是因为,为了数据的安全,新扩容块设备的卷,默认必须先做一次磁盘平衡(块设备同步),如此才能正常开始使用。
3.进行磁盘存储的平衡
注意:平衡布局是很有必要的,因为布局结构是静态的,当新的bricks加入现有卷,新创建的文件会分布到旧的bricks中,所以需要平衡布局结构,使新加入的bricks生效。布局平衡只是使新布局生效,并不会在新的布局移动老的数据,如果你想在新布局生效后,重新平衡卷中的数据,还需要对卷中的数据进行平衡。
 1 #对gs2进行磁盘存储平衡
 2 [root@glusterfs01 ~]# gluster volume rebalance gs2 start
 3 volume rebalance: gs2: success: Rebalance on gs2 has been started successfully. Use rebalance status command to check status of the rebalance process.
 4 ID: 0024338c-84df-4edb-b68c-107415a27506
 5
 6 #检查gs2块设备磁盘平衡结果
 7 [root@glusterfs03 ~]# ls /gluster/brick1
 8 10  12  14  15  16  17  2  3  4  6  lost+found
 9 [root@glusterfs03 ~]# ls /gluster/brick2
10 1  11  13  18  19  20  5  7  8  9  lost+found
11 [root@glusterfs04 ~]# ls /gluster/brick1
12 10  12  14  15  16  17  2  3  4  6  lost+found
13 [root@glusterfs04 ~]# ls /gluster/brick2
14 1  11  13  18  19  20  5  7  8  9  lost+found
1 执行磁盘存储平衡以后,我们发现数据被复制成了4份在4个块设备中。
(1)对存储卷中的brick进行缩减
1 注意:你可能想在线缩小卷的大小,例如:当硬件损坏或者网络故障的时候,你可能想在卷中移除相关的bricks。
2 注意,当你移除bricks的时候,你在gluster的挂载点将不能继续访问是数据,只有配置文件中的信息移除后你才能继续访问bricks的数据。
3 当移除分布式复制卷或者分布式条带卷的时候,移除的bricks数目必须是replica或者stripe的倍数。例如:一个分布式条带卷的stripe是2,当你移除bricks的时候必须是2,4,6,8等。
 1 #先停止卷gs2
 2 [root@glusterfs01 ~]# gluster volume stop gs2
 3 Stopping volume will make its data inaccessible. Do you want to continue? (y/n) y
 4 volume stop: gs2: success
 5
 6 #然后移除卷,因为是复制卷且replica为2,因此每次移除必须是2的倍数
 7 [root@glusterfs01 ~]# gluster volume remove-brick gs2 replica 2 glusterfs03:/gluster/brick2 glusterfs04:/gluster/brick2 force
 8 Removing brick(s) can result in data loss. Do you want to Continue? (y/n) y
 9 volume remove-brick commit force: success
10
11 #我们发现gs2的卷已经被移除
12 [root@glusterfs01 ~]# gluster volume info gs2
13
14 Volume Name: gs2
15 Type: Replicate
16 Volume ID: c76fe8fd-71a7-4395-9dd2-ef1dc85163b8
17 Status: Stopped
18 Number of Bricks: 1 x 2 = 2
19 Transport-type: tcp
20 Bricks:
21 Brick1: glusterfs03:/gluster/brick1
22 Brick2: glusterfs04:/gluster/brick1
23 Options Reconfigured:
24 performance.readdir-ahead: on
25
26 #重新启动卷gs2
27 [root@glusterfs01 ~]# gluster volume start gs2
28 volume start: gs2: success
(2)对存储卷进行删除
 1 #停止卷gs1
 2 [root@glusterfs01 ~]# gluster volume stop gs1
 3 Stopping volume will make its data inaccessible. Do you want to continue? (y/n) y
 4 volume stop: gs1: success
 5
 6 #删除卷gs1
 7 [root@glusterfs01 ~]# gluster volume delete gs1
 8 Deleting volume will erase all information about the volume. Do you want to continue? (y/n) y
 9 volume delete: gs1: success
10
11 #查看卷信息,发现gs1已经没了
12 [root@glusterfs01 ~]# gluster volume info
13
14 Volume Name: gs2
15 Type: Replicate
16 Volume ID: c76fe8fd-71a7-4395-9dd2-ef1dc85163b8
17 Status: Started
18 Number of Bricks: 1 x 2 = 2
19 Transport-type: tcp
20 Bricks:
21 Brick1: glusterfs03:/gluster/brick1
22 Brick2: glusterfs04:/gluster/brick1
23 Options Reconfigured:
24 performance.readdir-ahead: on
25
26 Volume Name: gs3
27 Type: Stripe
28 Volume ID: 6d2e27c7-f5a1-4473-9df8-a7261851a2ed
29 Status: Started
30 Number of Bricks: 1 x 2 = 2
31 Transport-type: tcp
32 Bricks:
33 Brick1: glusterfs01:/gluster/brick2
34 Brick2: glusterfs02:/gluster/brick2
35 Options Reconfigured:
36 performance.readdir-ahead: on
1 特别提示:
2 无论是缩减卷还是删除卷,并不会是清除卷中的数据。数据仍旧会保存在对应磁盘上。
一般选择2U的机型,磁盘STAT盘4T,如果I/O要求比较高,可以采购SSD固态硬盘。为了充分保证系统的稳定性和性能,要求所有glusterfs服务器硬件配置尽量一致,尤其是硬盘数量和大小。机器的RAID卡需要带电池,缓存越大,性能越好。一般情况下,建议做RAID10,如果出于空间要求考虑,需要做RAID5,建议最好能有1-2块硬盘的热备盘。
2. 系统要求和分区划分
系统要求使用CentOS6.x,安装完成后升级到最新版本,安装的时候,不要使用LVM,建议/boot分区200M,根分区100G,swap分区和内存一样大小,剩余空间给gluster使用,划分单独的硬盘空间。系统安装软件没有特殊要求,建议除了开发工具和基本的管理软件,其他软件一律不装。
3. 网络环境
网络要求全部千兆环境,gluster服务器至少有2块网卡,1块网卡绑定供gluster使用,剩余一块分配管理网络ip,用于系统管理。如果有条件购买万兆交换机,服务器配置万兆网卡,存储性能会更好。网络方面如果安全性要求高,可以多网卡绑定。
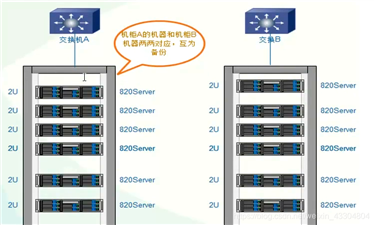
4. 服务器摆放分布
服务器主备机器要放在不同的机柜,连接不同的交换机,即使一个机柜出现问题,还有一份数据正常访问。
5. 构建高性能,高可用存储
一般在企业中,采用的是分布式复制卷,因为有数据备份,数据相对安全,分布式条带卷目前对glusterfs来说没有完全成熟,存在一定的是数据安全风险。
(1) 开启防火墙端口
1 一般在企业应用中Linux防火墙是打开的,开通服务器之间访问的端口
1 iptables -I INPUT -p tcp --dport 24007:24011 -j ACCEPT
2 iptables -I INPUT -p tcp --dport 49152:49162 -j ACCEPT
 1 [root@glusterfs01 ~]# cat /etc/glusterfs/glusterd.vol
 2 volume management
 3     type mgmt/glusterd
 4     option working-directory /var/lib/glusterd
 5     option transport-type socket,rdma
 6     option transport.socket.keepalive-time 10
 7     option transport.socket.keepalive-interval 2
 8     option transport.socket.read-fail-log off
 9     option ping-timeout 0
10     option event-threads 1
11 #   option base-port 49152      #默认端口可以在这里改,因为这个端口可能会和企业里的kvm端口冲突
(2)Glusterfs文件系统优化
| 参数项目 | 说明 | 缺省值 | 合法值 |
| Auth.allow | IP访问授权 | *(allow all) | IP地址 |
| Cluster.min-free-disk | 剩余磁盘空间阈值 | 10% | 百分比 |
| Cluster.stripe-block-size | 条带大小 | 128KB | 字节 |
| Network.frame-timeout | 请求等待时间 | 1800s | 0-1800 |
| Network.ping-timeout | 客户端等待时间 | 42s | 0-42 |
| Nfs.disabled | 关闭NFS服务 | Off | Off\on |
| Performance.io-thread-count | IO线程数 | 16 | 0-65 |
| Performance.cache-refresh-timeout | 缓存校验周期 | 1s | 0-61 |
| Performance.cache-size | 读缓存大小 | 32MB | 字节 |
Performance.quick-read:优化读取小文件的性能
Performance.read-ahead:用预读的方式提高读取的性能,有利于应用频繁持续性的访问文件,当应用完成当前数据块读取的时候,下一个数据块就已经准备好了。
Performance.write-behind:写入数据时,先写入缓存内,再写入硬盘内,以提高写入的性能。
Performance.io-cache:缓存已经被读过的。
调整方法:Gluster volume set <卷> <参数>
 1 [root@glusterfs01 ~]# gluster volume info gs2
 2
 3 Volume Name: gs2
 4 Type: Replicate
 5 Volume ID: c76fe8fd-71a7-4395-9dd2-ef1dc85163b8
 6 Status: Started
 7 Number of Bricks: 1 x 2 = 2
 8 Transport-type: tcp
 9 Bricks:
10 Brick1: glusterfs03:/gluster/brick1
11 Brick2: glusterfs04:/gluster/brick1
12 Options Reconfigured:
13 performance.readdir-ahead: on
14 [root@glusterfs01 ~]# gluster volume set gs2 performance.read-ahead on   #设置预缓存优化
15 volume set: success
16 [root@glusterfs01 ~]# gluster volume info gs2
17
18 Volume Name: gs2
19 Type: Replicate
20 Volume ID: c76fe8fd-71a7-4395-9dd2-ef1dc85163b8
21 Status: Started
22 Number of Bricks: 1 x 2 = 2
23 Transport-type: tcp
24 Bricks:
25 Brick1: glusterfs03:/gluster/brick1
26 Brick2: glusterfs04:/gluster/brick1
27 Options Reconfigured:
28 performance.read-ahead: on      #已经添加上了
29 performance.readdir-ahead: on
30 [root@glusterfs01 ~]# gluster volume set gs2 performance.cache-size 256MB    #设置读缓存大小
31 volume set: success
32 [root@glusterfs01 ~]# gluster volume info gs2
33
34 Volume Name: gs2
35 Type: Replicate
36 Volume ID: c76fe8fd-71a7-4395-9dd2-ef1dc85163b8
37 Status: Started
38 Number of Bricks: 1 x 2 = 2
39 Transport-type: tcp
40 Bricks:
41 Brick1: glusterfs03:/gluster/brick1
42 Brick2: glusterfs04:/gluster/brick1
43 Options Reconfigured:
44 performance.cache-size: 256MB       #已经添加上了
45 performance.read-ahead: on
46 performance.readdir-ahead: on
(3)监控及日常维护
使用Zabbix自带模板即可。Cpu,内存,主机存活,磁盘空间,主机运行时间,系统load。日常情况要查看服务器的监控值,遇到报警要及时处理。
 1 #以下命令在复制卷的场景下才会有
 2 #gluster volume status gs2   查看节点NFS是否在线
 3 (开没开端口)
 4 #gluster volume heal gs2 full 启动完全修复
 5
 6 #gluster volume heal gs2 info 查看需要修复的文件
 7
 8 #gluster volume heal gs2 info healed 查看修复成功的文件
 9
10 #gluster volume heal gs2 info heal-failed 查看修复失败文件
11
12 #gluster volume heal gs2 info split-brain 查看脑裂的文件
13
14 #gluster volume quota gs2 enable    --激活quota功能
15
16 #gluster volume quota gs2 disable   --关闭quota功能
17
18 #gluster volume quota gs2 limit-usage   /data   10GB --/gs2/data 目录限制
19
20 #gluster volume quota gs2 list --quota 信息列表
21
22 #gluster volume quota gs2 list /data    --限制目录的quota信息
23
24 #gluster volume set gs2 features.quota-timeout 5    --设置信息的超时事实上时间
25
26 #gluster volume quota gs2 remove /data  -删除某个目录的quota设置
27
28 备注:
29
30 1)quota 功能,主要是对挂载点下的某个目录进行空间限额。如:/mnt/glusterfs/data目录,而不是对组成卷组的空间进行限制
硬盘故障
因为底层做了raid配置,有硬件故障,直接更换硬盘,会自动同步数据。(raid5)
一台主机故障
一台节点故障的情况包括以下类型:
1、物理故障
2、同时有多块硬盘故障,造成是数据丢失
3、系统损坏不可修复
解决方法:
找一台完全一样的机器,至少要保证硬盘数量和大小一致,安装系统,配置和故障机同样的ip,安装gluster软件,保证配置一样,在其他健康的节点上执行命令gluster peer status,查看故障服务器的uuid。
 1 #例如:
 2 [root@glusterfs03 ~]# gluster peer status
 3 Number of Peers: 3
 4
 5 Hostname: glusterfs02
 6 Uuid: 0b52290d-96b0-4b9c-988d-44062735a8a8
 7 State: Peer in Cluster (Connected)
 8
 9 Hostname: glusterfs04
10 Uuid: a43ac51b-641c-4fc4-be56-f6873423b462
11 State: Peer in Cluster (Connected)
12
13 Hostname: glusterfs01
14 Uuid: 198f2c7c-1104-4671-8989-b430b77540e9
15 State: Peer in Cluster (Connected)
16 [root@glusterfs03 ~]#
修改新加机器的/var/lib/glusterd/glusterd.info和故障机器的一样
1 [root@glusterfs04 ~]# cat /var/lib/glusterd/glusterd.info
2 UUID=a43ac51b-641c-4fc4-be56-f6873423b462
3 operating-version=30712
在新机器挂载目录上执行磁盘故障的操作(任意节点)
1 [root@glusterfs04 ~]# gluster volume heal gs2 full
2 Launching heal operation to perform full self heal on volume gs2 has been successful
3 Use heal info commands to check status
就会自动开始同步,但是同步的时候会影响整个系统的性能
可以查看状态
1 [root@glusterfs04 ~]# gluster volume heal gs2 info
2 Brick glusterfs03:/gluster/brick1
3 Status: Connected
4 Number of entries: 0
5
6 Brick glusterfs04:/gluster/brick1
7 Status: Connected
8 Number of entries: 0
标签:image ati 根据 模块 lin refresh bytes 技术 remote
原文地址:https://www.cnblogs.com/youzhongmin/p/9943750.html
