标签:style blog http io ar color os 使用 sp
   //CAShapeLayer是通过给一条曲线来绘制的,我们可以给定不同曲线来制造动画,我们也可以改变下面的曲线来制造动画
//  self.backgroundLayer.strokeStart=0.0f;
//  self.backgroundLayer.strokeEnd=1.0f;
[self.backgroundLayer setLineJoin:@"round"];//设置线条的相交模式

[self.backgroundLayer setLineDashPattern:@[@(50.0),@(2.0)]];//设置线条的间隔50来填充,2个单元来空格,就是创造虚线
//CAShapeLayer还可以用于遮罩层,就是全部遮罩起来,只显示路线框起来的部分//看着,这个layer的frame启示只要装的下路径就可以了,不用遮罩整个屏幕
用于这种情况的下的路径,只能通过CGPathCreateMutable来绘制路线,否则没效果,不能采用uikit或者cgcontextref这些来绘制

 UIImage *image=[UIImage imageNamed:@"scratch_46.jpg"];
    [[[self view]layer] setContents:(id)[image CGImage]];
    CGMutablePathRef path =CGPathCreateMutable();
    CGPathMoveToPoint(path, NULL, 0, 100);
    CGPathAddLineToPoint(path,NULL, 200, 0);
    CGPathAddLineToPoint(path, NULL, 200, 200);
    CGPathAddLineToPoint(path, NULL, 0, 100);
    CAShapeLayer *masklayer=  [CAShapeLayer layer];
    [masklayer setBounds:CGRectMake(0, 0, 200, 200)];
    [masklayer setPosition:CGPointMake(200, 200)];
    [masklayer setPath:path];

    [[[self view] layer]setMask:masklayer];
#import "RecordingCircleOverlayView.h"

@implementation RecordingCircleOverlayView
-(id)init{
    self=[super init];
    if (self) {

    }
    return self;
}


-(id)initWithFrame:(CGRect) frame{
    self=[super initWithFrame:frame];
    if (self) {
        self.progressLayers=[NSMutableArray array];
        CGPoint arcCenter = CGPointMake(CGRectGetMidY(self.bounds), CGRectGetMidX(self.bounds));
        CGFloat radius = CGRectGetMidX(self.bounds);
        self.beipath = [UIBezierPath bezierPathWithArcCenter:arcCenter
                                                      radius:radius
                                                  startAngle:M_PI
                                                    endAngle:-M_PI
                                                   clockwise:NO];
        self.backgroundLayer=[CAShapeLayer layer];
        self.backgroundLayer.frame=self.bounds;
        self.backgroundLayer.path=self.beipath.CGPath;
        self.backgroundLayer.strokeColor=[[UIColor lightGrayColor] CGColor];
        self.backgroundLayer.fillColor = [[UIColor clearColor] CGColor];
        self.backgroundLayer.lineWidth = 2.0;
        self.backgroundLayer.strokeStart=0.0f;
        self.backgroundLayer.strokeEnd=1.0f;

        [self.layer addSublayer:self.backgroundLayer];
        UITapGestureRecognizer *tap=   [[UITapGestureRecognizer alloc]initWithTarget:self action:@selector(updateAnimations)];
        [self addGestureRecognizer:tap];
        [self addNewLayer];
    }
    return self;
}


- (void)addNewLayer
{
    CAShapeLayer *progressLayer = [CAShapeLayer layer];
    progressLayer.path = self.beipath.CGPath;
    progressLayer.strokeColor = [UIColor colorWithRed:(CGFloat)rand()/(CGFloat)RAND_MAX green:(CGFloat)rand()/(CGFloat)RAND_MAX blue:(CGFloat)rand()/(CGFloat)RAND_MAX alpha:1.0].CGColor;
    progressLayer.fillColor = [[UIColor clearColor] CGColor];
    progressLayer.lineWidth = 2.0;
    progressLayer.strokeEnd = 0.1f;//将这条被塞尔曲线划分成10分,这里只绘制0.1,其他的同理,那么就可以添加动画了

    [self.layer addSublayer:progressLayer];
    [self.progressLayers addObject:progressLayer];

    self.currentProgressLayer = progressLayer;
}
#pragma mark 添加动画
- (void)updateAnimations
{
    CGFloat duration = self.duration * (1.f - [[self.progressLayers firstObject] strokeEnd]);
    CGFloat strokeEndFinal = 1.f;

    for (CAShapeLayer *progressLayer in self.progressLayers)
    {
        CABasicAnimation *strokeEndAnimation = nil;
        strokeEndAnimation = [CABasicAnimation animationWithKeyPath:@"strokeEnd"];
        strokeEndAnimation.duration = duration;
        strokeEndAnimation.fromValue = @(progressLayer.strokeEnd);
        strokeEndAnimation.toValue = @(strokeEndFinal);
        strokeEndAnimation.autoreverses = NO;
        strokeEndAnimation.repeatCount = 0.f;
        strokeEndAnimation.fillMode = kCAFillModeForwards;
        strokeEndAnimation.removedOnCompletion = NO;
        strokeEndAnimation.delegate = self;
        [progressLayer addAnimation:strokeEndAnimation forKey:@"strokeEndAnimation"];

        strokeEndFinal -= (progressLayer.strokeEnd - progressLayer.strokeStart);

        if (progressLayer != self.currentProgressLayer)
        {
            CABasicAnimation *strokeStartAnimation = nil;
            strokeStartAnimation = [CABasicAnimation animationWithKeyPath:@"strokeStart"];
            strokeStartAnimation.duration = duration;
            strokeStartAnimation.fromValue = @(progressLayer.strokeStart);
            strokeStartAnimation.toValue = @(strokeEndFinal);
            strokeStartAnimation.autoreverses = NO;
            strokeStartAnimation.repeatCount = 0.f;
            strokeStartAnimation.fillMode = kCAFillModeForwards;
            strokeStartAnimation.removedOnCompletion = NO;
            [progressLayer addAnimation:strokeStartAnimation forKey:@"strokeStartAnimation"];
        }
    }
    CABasicAnimation *backgroundLayerAnimation = [CABasicAnimation animationWithKeyPath:@"strokeStart"];
    backgroundLayerAnimation.duration = duration;
    backgroundLayerAnimation.fromValue = @(self.backgroundLayer.strokeStart);
    backgroundLayerAnimation.toValue = @(1.f);
    backgroundLayerAnimation.autoreverses = NO;
    backgroundLayerAnimation.repeatCount = 0.f;
    backgroundLayerAnimation.fillMode = kCAFillModeForwards;
    backgroundLayerAnimation.removedOnCompletion = NO;
    backgroundLayerAnimation.delegate = self;
    [self.backgroundLayer addAnimation:backgroundLayerAnimation forKey:@"strokeStartAnimation"];
}

@end
//CAGradientLayer常用于给定一个颜色数组,这个layer就能将这个颜色数组展示出来,动画一般就是修改其中的几个属性
#import "YHCAGradientLayer.h"

@implementation YHCAGradientLayer

-(id)initWithFrame:(CGRect)frame{
  self=  [super initWithFrame:frame];
    if (self) {
        CAGradientLayer *layer = (id)[self layer];
        [layer setStartPoint:CGPointMake(0.0, 0.0)];//满足ios坐标系
        [layer setEndPoint:CGPointMake(1.0, 0.0)];//同理,开始点与结束点的连线,然后数组颜色来填充


        NSMutableArray *colors = [NSMutableArray array];
        for (NSInteger hue = 0; hue <= 360; hue += 1) {
            UIColor *color;
            color = [UIColor colorWithHue:1.0 * hue / 360.0
                               saturation:1.0
                               brightness:1.0
                                    alpha:1.0];
            [colors addObject:(id)[color CGColor]];
        }
        [layer setColors:[NSArray arrayWithArray:colors]];
        [self performAnimation];
    }
    return self;
}
#pragma  mark 为了简便,直接将原来的基层layer换成CAGradientLayer
+(Class)layerClass{

    return [CAGradientLayer class];
}

#pragma mark 动画
- (void)performAnimation {

    CAGradientLayer *layer = (id)[self layer];
    NSMutableArray *mutable = [[layer colors] mutableCopy];
    id lastColor = [mutable lastObject] ;
    [mutable removeLastObject];
    [mutable insertObject:lastColor atIndex:0];

    NSArray *shiftedColors = [NSArray arrayWithArray:mutable];

    [layer setColors:shiftedColors];

    CABasicAnimation *animation;
    animation = [CABasicAnimation animationWithKeyPath:@"colors"];
    animation.toValue=shiftedColors;
    [animation setDuration:0.008];
    [animation setRemovedOnCompletion:YES];
    [animation setFillMode:kCAFillModeForwards];
    [animation setDelegate:self];
    [layer addAnimation:animation forKey:@"animateGradient"];
}
#pragma mark 结束后再次调用,相当于永动了
- (void)animationDidStop:(CAAnimation *)animation finished:(BOOL)flag {
    [self performAnimation];
}

@end
//下面是网络上摘录的
CAGradientLayer的一些属性解析
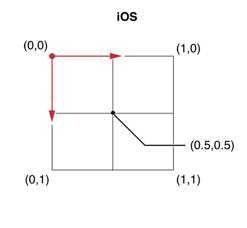
iOS中Layer的坐标系统:
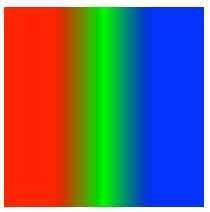
效果:
倒影的制作思路,就是一个layer放主图片,一个layer旋转180来放副图片,然后用一个CAGrandientLayer的梯度颜色来模拟颜色简洁变化

- (void)viewDidLoad
{
[super viewDidLoad];
CAGradientLayer *colorLayer = [CAGradientLayer layer];
colorLayer.frame = (CGRect){CGPointZero, CGSizeMake(200, 200)};
colorLayer.position = self.view.center;
[self.view.layer addSublayer:colorLayer];
// 颜色分配
colorLayer.colors = @[(__bridge id)[UIColor redColor].CGColor,
(__bridge id)[UIColor greenColor].CGColor,
(__bridge id)[UIColor blueColor].CGColor];
// 颜色分割线
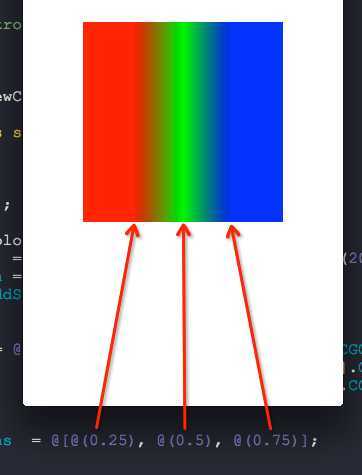
colorLayer.locations = @[@(0.25), @(0.5), @(0.75)];
// 起始点
colorLayer.startPoint = CGPointMake(0, 0);
// 结束点
colorLayer.endPoint = CGPointMake(1, 0);
}
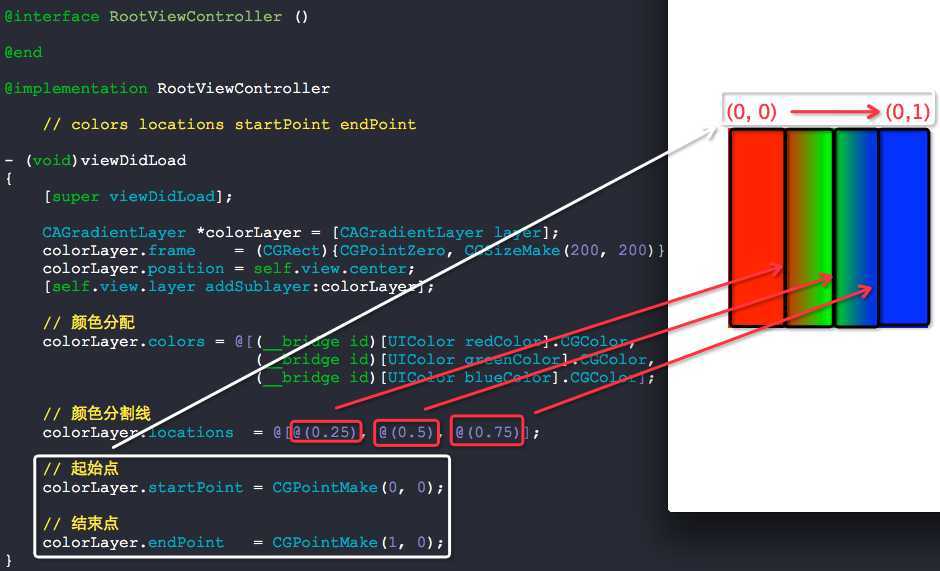
颜色分配严格遵守Layer的坐标系统,locations,startPoint,endPoint都是以Layer坐标系统进行计算的.
而locations并不是表示颜色值所在位置,它表示的是颜色在Layer坐标系相对位置处要开始进行渐变颜色了.
CAGradientLayer 的这四个属性 colors locations startPoint endPoint 都是可以进行动画的哦.
附录:
稍微复杂点的动画效果
//
//  RootViewController.m
//
//  Copyright (c) 2014年 Y.X. All rights reserved.
//

#import "RootViewController.h"
#import "YXGCD.h"

@interface RootViewController ()

@property (nonatomic, strong) GCDTimer  *timer;

@end

@implementation RootViewController

- (void)viewDidLoad
{
    [super viewDidLoad];

    CAGradientLayer *colorLayer = [CAGradientLayer layer];
    colorLayer.backgroundColor = [UIColor blueColor].CGColor;
    colorLayer.frame    = (CGRect){CGPointZero, CGSizeMake(200, 200)};
    colorLayer.position = self.view.center;
    [self.view.layer addSublayer:colorLayer];

    // 颜色分配
    colorLayer.colors = @[(__bridge id)[UIColor cyanColor].CGColor,
                          (__bridge id)[UIColor orangeColor].CGColor,
                          (__bridge id)[UIColor magentaColor].CGColor];

    // 起始点
    colorLayer.startPoint = CGPointMake(0, 0);

    // 结束点
    colorLayer.endPoint   = CGPointMake(1, 0);

    _timer = [[GCDTimer alloc] initInQueue:[GCDQueue mainQueue]];
    [_timer event:^{

        static CGFloat test = - 0.1f;

        if (test >= 1.1)
        {
            test = - 0.1f;
            [CATransaction setDisableActions:YES];
            colorLayer.locations  = @[@(test), @(test + 0.05), @(test + 0.1)];
        }
        else
        {
            [CATransaction setDisableActions:NO];
            colorLayer.locations  = @[@(test), @(test + 0.05), @(test + 0.1)];
        }

        test += 0.1f;

    } timeInterval:NSEC_PER_SEC];
    [_timer start];
}

@end

    _timer = [[GCDTimer alloc] initInQueue:[GCDQueue mainQueue]];
    [_timer event:^{

        static CGFloat test = - 0.1f;

        if (test >= 1.1)
        {
            test = - 0.1f;
            [CATransaction setDisableActions:NO];
            colorLayer.locations  = @[@(test), @(test + 0.01), @(test + 0.011)];
        }
        else
        {
            [CATransaction setDisableActions:NO];
            colorLayer.locations  = @[@(test), @(test + 0.01), @(test + 0.011)];
        }

        test += 0.1f;

    } timeInterval:NSEC_PER_SEC];
    [_timer start];
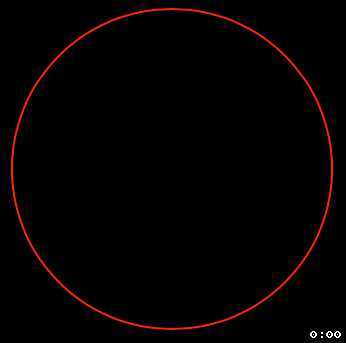
配合CAShapeLayer使用
//
//  RootViewController.m
//
//  Copyright (c) 2014年 Y.X. All rights reserved.
//

#import "RootViewController.h"
#import "YXGCD.h"

@interface RootViewController ()

@property (nonatomic, strong) GCDTimer  *timer;

@end

// 将常数转换为度数
#define   DEGREES(degrees)  ((M_PI * (degrees))/ 180.f)

@implementation RootViewController

- (void)viewDidLoad
{
    [super viewDidLoad];
    self.view.backgroundColor = [UIColor blackColor];

    CAGradientLayer *colorLayer = [CAGradientLayer layer];
    colorLayer.backgroundColor = [UIColor blueColor].CGColor;
    colorLayer.frame    = (CGRect){CGPointZero, CGSizeMake(200, 200)};
    colorLayer.position = self.view.center;
    [self.view.layer addSublayer:colorLayer];

    // 颜色分配
    colorLayer.colors = @[(__bridge id)[UIColor redColor].CGColor,
                          (__bridge id)[UIColor whiteColor].CGColor,
                          (__bridge id)[UIColor redColor].CGColor];
    colorLayer.locations  = @[@(-0.2), @(-0.1), @(0)];

    // 起始点
    colorLayer.startPoint = CGPointMake(0, 0);

    // 结束点
    colorLayer.endPoint   = CGPointMake(1, 0);

    CAShapeLayer *circle = [RootViewController LayerWithCircleCenter:CGPointMake(102, 100)
                                                              radius:80
                                                          startAngle:DEGREES(0)
                                                            endAngle:DEGREES(360)
                                                           clockwise:YES
                                                     lineDashPattern:nil];
    circle.strokeColor = [UIColor redColor].CGColor;
    [self.view.layer addSublayer:circle];
    circle.strokeEnd = 1.f;
    colorLayer.mask = circle;

    _timer = [[GCDTimer alloc] initInQueue:[GCDQueue mainQueue]];
    [_timer event:^{

        static int i = 0;
        if (i++ % 2 == 0)
        {
            CABasicAnimation* fadeAnim = [CABasicAnimation animationWithKeyPath:@"locations"];
            fadeAnim.fromValue = @[@(-0.2), @(-0.1), @(0)];
            fadeAnim.toValue   = @[@(1.0), @(1.1), @(1.2)];
            fadeAnim.duration  = 1.5;
            [colorLayer addAnimation:fadeAnim forKey:nil];
        }

    } timeInterval:NSEC_PER_SEC];
    [_timer start];
}

+ (CAShapeLayer *)LayerWithCircleCenter:(CGPoint)point
                                 radius:(CGFloat)radius
                             startAngle:(CGFloat)startAngle
                               endAngle:(CGFloat)endAngle
                              clockwise:(BOOL)clockwise
                        lineDashPattern:(NSArray *)lineDashPattern
{
    CAShapeLayer *layer = [CAShapeLayer layer];

    // 贝塞尔曲线(创建一个圆)
    UIBezierPath *path = [UIBezierPath bezierPathWithArcCenter:CGPointMake(0, 0)
                                                        radius:radius
                                                    startAngle:startAngle
                                                      endAngle:endAngle
                                                     clockwise:clockwise];

    // 获取path
    layer.path = path.CGPath;
    layer.position = point;

    // 设置填充颜色为透明
    layer.fillColor = [UIColor clearColor].CGColor;

    // 获取曲线分段的方式
    if (lineDashPattern)
    {
        layer.lineDashPattern = lineDashPattern;
    }

    return layer;
}

@end
标签:style blog http io ar color os 使用 sp
原文地址:http://www.cnblogs.com/liyang31tg/p/4151288.html