标签:
Telerik提供了RadDiagram控件,用于图形元素的旋转,拖拽和缩放.更重要的是,它还拓展了许多绑定的命令(复制,剪切,粘贴,回退等等).
我们可以用来组织自己的图形编辑工具.
Step1.定义图形元素容器(Shape)的基类,继承RadDiagramShape,并重写Serialize和Deserialize方法,来定制将来对象的保存或复制.

    /// <summary>
    /// 图形Shape控件
    /// </summary>
    public class FigureShape : RadDiagramShape
    {
        public FigureShape()
        {
            IsConnectorsManipulationEnabled = false;
        }
        /// <summary>
        /// 序列化
        /// </summary>
        /// <returns></returns>
        public override SerializationInfo Serialize()
        {
            SerializationInfo serializationInfo = base.Serialize();

            try
            {
                var obj = base.Content as FigureBase;
                if (obj != null)
                {
                    IFormatter formatter = new BinaryFormatter();
                    using (var ms = new MemoryStream())
                    {
                        formatter.Serialize(ms, obj);
                        serializationInfo["Figure"] = Convert.ToBase64String(ms.ToArray());
                    }
                }
            }
            catch (Exception e)
            {
                throw new Exception("序列化过程失败:" + e.Message);
            }
            return serializationInfo;
        }
        /// <summary>
        /// 反序列化
        /// </summary>
        /// <param name="serializationInfo"></param>
        public override void Deserialize(SerializationInfo serializationInfo)
        {
            base.Deserialize(serializationInfo);

            try
            {
                if (serializationInfo["Figure"] != null)
                {
                    var buffer = Convert.FromBase64String(serializationInfo["Figure"].ToString());
                    IFormatter formatter = new BinaryFormatter();
                    using (var ms = new MemoryStream(buffer))
                    {
                        Content = formatter.Deserialize(ms);
                        //绑定Shape坐标和Figure坐标
                        this.DataContext = Content;
                        var binding = new Binding("Position") { Mode = BindingMode.TwoWay };
                        this.SetBinding(PositionProperty, binding);
                    }
                }
            }
            catch (Exception e)
            {
                throw new Exception("反序列化过程失败:" + e.Message);
            }
        }
    }
Step2.定义图形元素基类,并支持可序列化
    /// <summary>
    /// 图形基类
    /// </summary>
    [Serializable]
    public abstract class FigureBase : NotificationObject
    {
        /// <summary>
        /// 图形位置
        /// </summary>
        private Point position;
        public Point Position
        {
            get { return position; }
            set { position = value; RaisePropertyChanged("Position"); }
        }
    }
Step3.定义基本图形元素,继承FigureBase,只列出一个示例,不再详述
    [Serializable]
    public class StationFig : FigureBase
    {
        /// <summary>
        /// xml节点构造
        /// </summary>
        /// <param name="node"></param>
        public StationFig(XmlNode node)
        {
            var infoNode = node.ChildNodes.Cast<XmlNode>().FirstOrDefault(s => s.Name == "use");
            var xAttri = infoNode.GetAttributeByName("x");
            var yAttri = infoNode.GetAttributeByName("y");

            this.Position = new Point(double.Parse(xAttri), double.Parse(yAttri));
            this.StationType = infoNode.GetAttributeByName("class");
        }

        /// <summary>
        /// 厂站类型(220kv,500kv)
        /// </summary>
        private string stationType;
        public string StationType
        {
            get { return stationType; }
            set { stationType = value; RaisePropertyChanged("StationType"); }
        }
    }
Step4.定义图形元素的样式
    <!--线路样式-->
    <DataTemplate DataType="{x:Type svgFigs:LineFig}" >
        <Path x:Name="path" StrokeThickness="2" Data="{Binding Path}"/>
        <DataTemplate.Triggers>
            <DataTrigger Binding="{Binding LineType}" Value="kv500">
                <Setter Property="Stroke" Value="Yellow" TargetName="path"/>
            </DataTrigger>
            <DataTrigger Binding="{Binding LineType}" Value="kv220">
                <Setter Property="Stroke" Value="White" TargetName="path"/>
            </DataTrigger>
        </DataTemplate.Triggers>
    </DataTemplate>
    <!--厂站样式-->
    <DataTemplate DataType="{x:Type svgFigs:StationFig}" >
        <Ellipse x:Name="ellipse" Width="20" Height="20" Fill="Transparent" StrokeThickness="3"/>
        <DataTemplate.Triggers>
            <DataTrigger Binding="{Binding StationType}" Value="kv500">
                <Setter Property="Stroke" Value="Yellow" TargetName="ellipse"/>
            </DataTrigger>
            <DataTrigger Binding="{Binding StationType}" Value="kv220">
                <Setter Property="Stroke" Value="White" TargetName="ellipse"/>
            </DataTrigger>
        </DataTemplate.Triggers>
    </DataTemplate>
    <!--文本样式-->
    <DataTemplate DataType="{x:Type svgFigs:TextFig}" >
        <TextBlock x:Name="text" Foreground="White" FontFamily="{Binding FontFamily}" FontSize="{Binding FontSize}" Text="{Binding Text}"/>
    </DataTemplate>
Step5.界面编辑工具面板
<telerik:RadDiagram x:Name="diagram"  MinWidth="500" BorderThickness="1"
Background="Black"
IsBackgroundSurfaceVisible="False"
IsSnapToItemsEnabled="False"
IsSnapToGridEnabled="False"/>
Step6.关键步骤,定义Shape容器中ContentTemplate显示内容
<Style TargetType="{x:Type common:FigureShape}">
      <Setter Property="BorderBrush" Value="{x:Null}"/>
      <Setter Property="Background" Value="Transparent"/>
      <Setter Property="Position" Value="{Binding Position,Mode=TwoWay}"/>
       <Setter Property="Content" Value="{Binding}"/>
       <Setter Property="Template">
           <Setter.Value>
                <ControlTemplate TargetType="{x:Type common:FigureShape}">
                      <ContentPresenter/>
                 </ControlTemplate>
            </Setter.Value>
        </Setter>
</Style>
Step7.增加图形元素到面板
        /// <summary>
        /// 增加图元到绘图面板
        /// </summary>
        /// <param name="figure"></param>
        private void AddFigureToDiagram(FigureBase figure)
        {
            var shape = new FigureShape() { DataContext = figure };
            diagram.AddShape(shape);
        }
编辑工具示例:(支持图元的旋转,移动,缩放,复制粘贴等操作,属性编辑,缩略图导航...)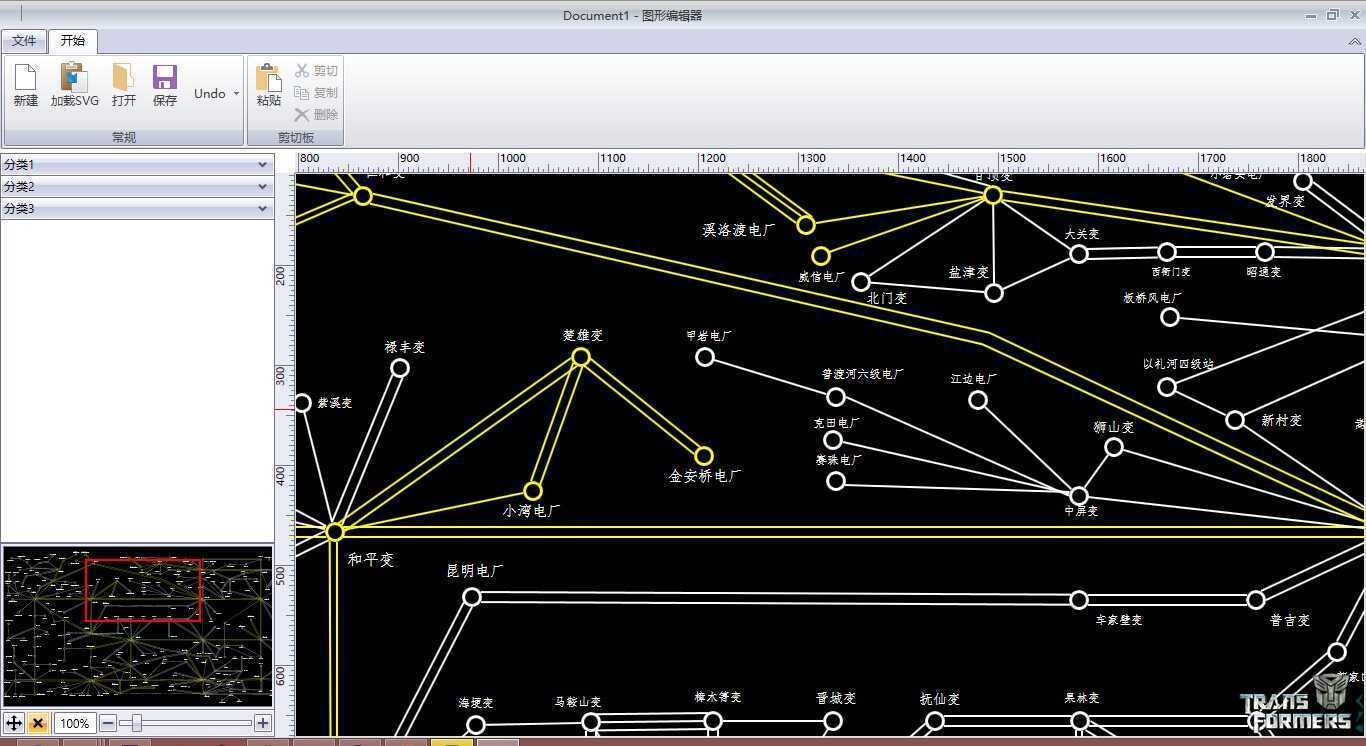
【Telerik控件学习】-建立自己的图形编辑工具(Diagram)
标签:
原文地址:http://www.cnblogs.com/lizzie-xhu/p/4236282.html
