这几天一直在折腾虚拟机的监测,顺便记录下一些心得:
使用zabbix监测微软云上的虚拟机
1. 在ms azure管理界面创建一台ubuntu 12.04的虚机, 并添加端口udp 161(snmp 访问需要)
2. 安装SNMP到这台机器上(linux)。
1. sudo apt-get install snmp
2. sudo apt-get install snmpd
3. sudo vi /etc/snmp/snmpd.conf
将这一行agentAddress udp:127.0.0.1:161注释掉,即 #agentAddress udp:127.0.0.1:161
然后将原来的这一行#agentAddress udp:161,udp6:[::1]:161去掉注释,即agentAddress udp:161,udp6:[::1]:161这样便可以实现snmp的远程监 听了。
4. snmpwalk -v 1 -c public *******(虚机的私有IP或dns名称) .1.3.6.1.2.1.2.2.1.2 检查结果有信息则成功
3. Zabbix 2.2 for Ubuntu 12.04 LTS
1.敲如下命令开始安装ZABBIX.(www.zabbix.com官网)
1.wget http://repo.zabbix.com/zabbix/2.2/ubuntu/pool/main/z/zabbix-release/zabbix-release_2.2-1+precise_all.deb
2.sudo dpkg -i zabbix-release_2.2-1+precise_all.deb
3.sudo apt-get update
2.安装zabbix包
sudo apt-get install zabbix-server-mysql zabbix-frontend-php
3.*安装代理*(可选,如果你想用ZABBIX的监控代理必须要装。本人没有安装代理,用snmp实施监控)
apt-get install zabbix-agent
4.编辑/etc/apache2/conf.d/zabbix文件
sudo vi /etc/apache2/conf.d/zabbix
# php_value date.timezone Europe/Riga 这行去掉#号即取消注释。
php_value date.timezone Europe/Riga 改成这样
5. 重启服务service apache2 restart
如此,ZABBIX服务器算是安装完毕了,接着就需要登入到ZABBIX上,去创建你需要的监控目标和内容了。
4.创建host和item及其配置
1.打开浏览器访问:http://***.chinacloudapp.cn/zabbix < http://***.chinacloudapp.cn为你创建的虚拟机的dns名称>/
2.输入默认的账号admin 密码zabbix 登入。

3.想要修改密码或者添加用户就如图选择,点击admin进去后点击change password即可。

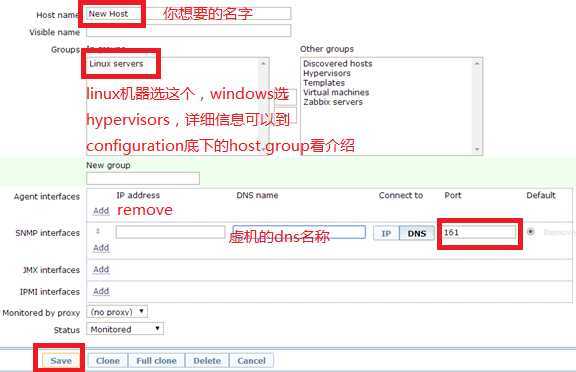
4. 创建Host.(想监测就必须创建)
1. 安装如图点击,创建一台新的host。(默认有一台zabbix
server,不用管,它只监测你安装ZABBIX的机器,而且监测状态是关闭的。) 
2. 输入信息如下图,保存。
3. 创建item,点击host右边的item,再点右上角的create item。(创建你想监测的信息项)
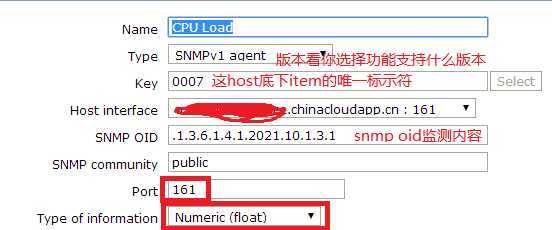
只需要填写如上必要信息就可以了,其他行可以不管。点保存。
4. 完成后就可以到如图位置去查看目前监测情况了。
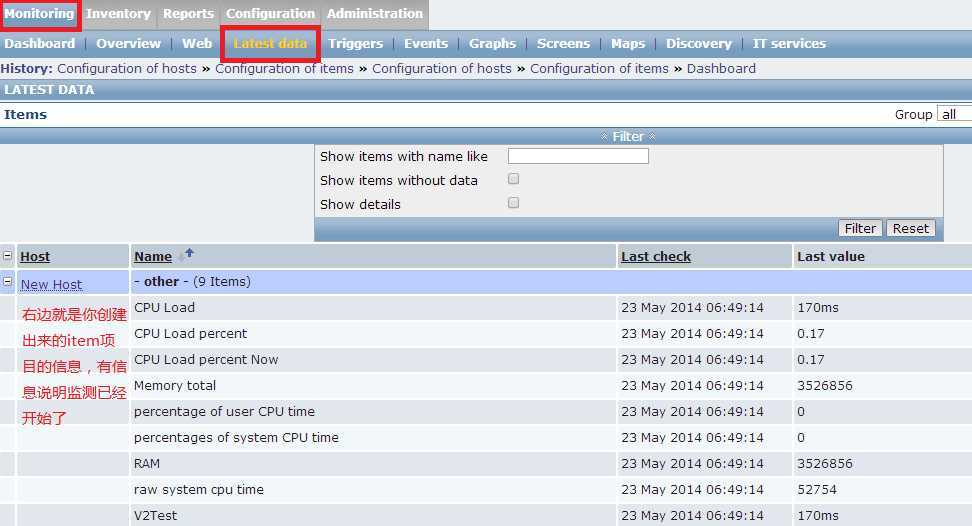
到此,算是成功的监测到了,云上的虚拟器的状态。
5.注意/错误排查:
新建的host开始工作后右边方块snmp会变绿,如果变红色说明没有连通你的监测机器,试着在本地调用snmpwalk -v 1 -c public *******(虚机的私有IP) .1.3.6.1.2.1.2.2.1.2来看snmp服务运行状况.或者登入到ms azure管理界面查看虚拟机是否开启了161端口(私有)。
检查snmpd.conf文件是否配置正确,检查sump community等信息
item成功起来后,右边方块会变绿色enable,如果变成红色,把鼠标移动到那,看看错误信息,然后逐一排查。
6. 安装配置zabbix agent on windows
详见官网:https://www.zabbix.com/documentation/2.2/manual/appendix/install/windows_agent
https://www.zabbix.com/documentation/2.2/manual/concepts/agent
1.下载agent

2. 下载完解压后有2个文件夹,bin and conf,把conf里的文件复制到c:盘下。然后编辑zabbix_agentd.win.conf如下:
Server=ss.ss.ss.ss(你部署zabbix server机器的dns名称,最好写私有ip)
Hostname=xx.xx.xx.xx (一般都用本机的ip地址,由于云上ip不稳定,建议使用机器名,注意需要保持与监控添加的host保持一致)
LogFile=c:\zabbix\log\zabbix_agentd.log
Timeout=3
3. 修改完成之后运行cmd命令c:\zabbix\zabbix_agentd.exe –i 成功后提示installed successfully.
4. 启动agent:c:\zabbix\zabbix_agentd.exe –s 成功后提示started successfully。
5. 参数:
Options:
-c --config <file> Specify alternate configuration file (default is c:\zabbix_agentd.conf).
-h --help Display help information.
-V --version Display version number.
-p --print Print known items and exit.
-t --test <item key> Test single item and exit.
Functions:
-i --install Install Zabbix agent as a service.
-d --uninstall Uninstall Zabbix agent service.
-s --start Start Zabbix agent service.
-x --stop Stop Zabbix agent service.
7. snmp oid附录:
http://tools.cisco.com/Support/SNMP/do/BrowseOID.do?local=en这个网址可以吧snmp oid和object name互换。
常用的oid (Linux)
CPU Statistics
Load ## 机器负载
1 minute Load:
.1.3.6.1.4.1.2021.10.1.3.1
5 minute Load: .1.3.6.1.4.1.2021.10.1.3.2
15
minute Load: .1.3.6.1.4.1.2021.10.1.3.3
CPU
percentage of user CPU time:
.1.3.6.1.4.1.2021.11.9.0
raw user cpu time: .1.3.6.1.4.1.2021.11.50.0
percentages of system CPU time: .1.3.6.1.4.1.2021.11.10.0
raw system cpu
time: .1.3.6.1.4.1.2021.11.52.0
percentages of idle CPU time:
.1.3.6.1.4.1.2021.11.11.0
raw idle cpu time: .1.3.6.1.4.1.2021.11.53.0
raw
nice cpu time: .1.3.6.1.4.1.2021.11.51.0
Memory Statistics
Total Swap Size snmpwalk -v 1 -c public localhost
.1.3.6.1.4.1.2021.4.3.0
UCD-SNMP-MIB::memTotalSwap.0 = INTEGER: 489940
kB
Available Swap Space snmpwalk -v 1 -c public localhost
.1.3.6.1.4.1.2021.4.4.0
UCD-SNMP-MIB::memAvailSwap.0 = INTEGER: 284752
kB
Total RAM in machine snmpwalk -v 1 -c public localhost
.1.3.6.1.4.1.2021.4.5.0
UCD-SNMP-MIB::memTotalReal.0 = INTEGER: 255672 kB
The available real memory snmpwalk -v 1 -c public
localhost .1.3.6.1.4.1.2021.4.6.0
UCD-SNMP-MIB::memAvailReal.0 = INTEGER:
14456 kB
the Total free memory in the machine (free Swap memory + free RAM
memory)
snmpwalk-v 1 -c public localhost .1.3.6.1.4.1.2021.4.11.0
UCD-SNMP-MIB::memTotalFree.0 = INTEGER: 298804 kB
Total RAM Shared snmpwalk -v 1 -c public
localhost .1.3.6.1.4.1.2021.4.13.0
UCD-SNMP-MIB::memShared.0 = INTEGER: 0
kB
Total RAM Buffered snmpwalk -v 1 -c public
localhost .1.3.6.1.4.1.2021.4.14.0
UCD-SNMP-MIB::memBuffer.0 = INTEGER: 2888
kB
Total Cached Memory snmpwalk -v 1 -c public localhost
.1.3.6.1.4.1.2021.4.15.0
UCD-SNMP-MIB::memCached.0 = INTEGER: 47816 kB
Disk Statistics
The snmpd.conf needs to be edited. Add the following (assuming a machine with a single ‘/’ partition):
disk / 100000 (or)
includeAllDisks 10% for all partitions and disks
The OIDs are as follows
Path where the disk is mounted: .1.3.6.1.4.1.2021.9.1.2.1
Path of the
device for the partition: .1.3.6.1.4.1.2021.9.1.3.1
Total size of the
disk/partion (kBytes): .1.3.6.1.4.1.2021.9.1.6.1
Available space on the disk:
.1.3.6.1.4.1.2021.9.1.7.1
Used space on the disk:
.1.3.6.1.4.1.2021.9.1.8.1
Percentage of space used on disk:
.1.3.6.1.4.1.2021.9.1.9.1
Percentage of inodes used on disk:
.1.3.6.1.4.1.2021.9.1.10.1
System Uptime: .1.3.6.1.2.1.1.3.0
Network
ifInOctets .1.3.6.1.2.1.2.2.1.10
ifOutOctets . 1.3.6.1.2.1.2.2.1.16
监测网速的话,可以这样做:取2个时间点的值,相减后除以时间间隔就行了,如:
下载:12:00:00 时间点调用.1.3.6.1.2.1.2.2.1.10取值,得到a。
12:00:10时间点调用.1.3.6.1.2.1.2.2.1.10取值,得到b。
则下载网速为|b-a|/(12:00:10 – 12:00:00)。上传雷同,调用. 1.3.6.1.2.1.2.2.1.16取值就可以了。
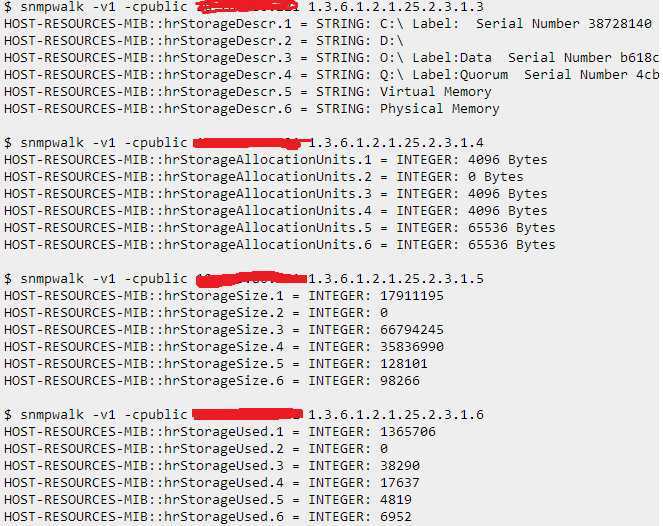
Windows
Cpu: .1.3.6.1.2.1.25.3.3.1.2
(.iso.org.dod.internet.mgmt.mib-2.host.hrDevice.hrProcessorTable.hrProcessorEntry.hrProcessorLoad) in HOST-RESOURCES-MIB.
Disk and memory
Net: 同linux
使用zabbix通过snmp来监测微软云上的虚拟机,布布扣,bubuko.com
原文地址:http://www.cnblogs.com/mr2hang/p/3753494.html