标签:des c style class blog code
http://en.wikipedia.org/wiki/Init


In Unix-based computer operating systems, init (short for initialization) is the first process started during booting of the computer system. Init is a daemon process that continues running until the system is shut down. It is the direct or indirectancestor of all other processes and automatically adopts all orphaned processes. Init is started by the kernel using a hard-coded filename, and if the kernel is unable to start it, a kernel panic will result. Init is typically assigned process identifier 1.
The design of init has diverged in Unix systems such as System III and System V, from the functionality provided by the init in Research Unix and its BSD derivatives. The usage on most Linux distributions is somewhat compatible with System V, but some distributions, such as Slackware, use a BSD-style and others, such as Gentoo, have their own customized version.
Several replacement init implementations have been written with attempt to address design limitations in the standard versions. These include systemd and Upstart, the latter being used by Ubuntu[1][2] and some other Linux distributions.[3][4]
System V init examines the /etc/inittab file for
an :initdefault: entry, which defines any default runlevel. If
there is no default runlevel, then init dumps the user to
a system console for manual entry of a runlevel.
The runlevels in System V describe certain states of a machine, characterized by the processes run. There are generally eight runlevels, three of which are "standard":
Aside from these, every Unix and Unix-like system treats runlevels a little
differently. The common denominator,
the /etc/inittab file, defines what each runlevel does
(if they do anything at all) in a given system.
| Operating System | Default runlevel |
|---|---|
| AIX | 2 |
| CentOS | 3 (console/server) or 5 (graphical/desktop)[5] |
| Debian | 2[6] |
| Gentoo Linux | 3[7] |
| HP-UX | 3 (console/server/multiuser) or 4 (graphical) |
| Mac OS X | 3 |
| Mandriva Linux | 3 (console/server) or 5 (graphical/desktop) |
| Red Hat Enterprise Linux / Fedora | 3 (console/server) or 5 (graphical/desktop)[8] |
| Slackware Linux | 3 |
| Solaris | 3[9] |
| SUSE Linux Enterprise/openSUSE Linux | 3 (console/server) or 5 (graphical/desktop)[10] |
| Ubuntu (Server and Desktop) | 2[6] |
On the Linux distributions defaulting to runlevel 5 in the table above, runlevel 5 invokes a multiuser graphical environment running the X Window System, usually with a display manager like GDM or KDM. However, the Solaris operating system typically reserves runlevel 5 to shut down and automatically power off the machine.
On most systems users can check the current runlevel with either of the following commands:
$ runlevel (need to be root or sudo)$ who -rThe root typically changes
the current runlevel by running
the telinit or init commands.
The /etc/inittab file sets the default runlevel with
the :initdefault:entry.
On Unix systems, changing the runlevel is achieved by starting only the missing services (as each level defines only those that are started / stopped).[citation needed] For example, changing a system from runlevel 3 to 4 might only start the local X server. Going back to runlevel 3, it would be stopped again.
BSD init
runs the initialization shell
script located in /etc/rc, then launches getty on text-based
terminals or a windowing
system such as X on
graphical terminals under the control of /etc/ttys. There are
no runlevels; the /etc/rc file determines what programs
are run by init. The advantage of this system is that it is simple and easy to
edit manually. However, new software added to the system may require changes to
existing files that risk producing an unbootable system. To mitigate this, BSD
variants have long supported a
site-specific /etc/rc.local file that is run in a
sub-shell near the end of the boot sequence.
A fully modular system was introduced with NetBSD 1.5
and ported to FreeBSD 5.0
and successors. This system executes scripts in
the /etc/rc.d directory. Unlike System V‘s script
ordering, which is derived from the filename of each script, this system uses
explicit dependency tags placed within each script.[11] The
order in which scripts are executed is determined by
the rcorder script based on the requirements stated in these
tags.
Traditionally, one of the major drawbacks of init is that it starts tasks serially, waiting for each to finish loading before moving on to the next. When startup processes end up I/O blocked, this can result in long delays during boot.
Various efforts have been made to replace the traditional init daemons to address this and other design problems, including:
http://zh.wikipedia.org/wiki/Init
init(为英语:initialization的简写)是 Unix 和 类Unix 系统中用来产生其它所有进程的程序。它以守护进程的方式存在,其进程号为1。
Unix 系列中(如 System III 和 System V)init的作用,和研究中的 Unix 和 BSD 派生版本相比,发生了一些变化。大多数Linux发行版是和 System V 相兼容的,但是一些发行版如Arch 和 Slackware 采用的是BSD风格,其它的如 Gentoo 是自己定制的。Ubuntu[1][2] 和其它一些发行版现在开始采用 Upstart[3] 来代替[4] 传统的 init 进程。
BSD init 运行存放于‘/etc/rc‘的初始化 shell 脚本,然后启动基于文本模式的终端(getty)或者基于图形界面的终端(窗口系统,如 X)。 这里没有运行模式的问题,因为文件 ‘rc‘ 决定了 init 如何执行。
优点: 简单且易于手动编辑。
缺点: 如果第三方软件需要在启动过程执行它自身的初始化脚本,它必须修改已经存在的启动脚本,一旦这种过程中有一个小错误,都将导致系统无法正常启动。
值得注意的是,现代的 BSD 派生系统一直支持使用 ‘rc.local‘ 文件的方式,它将在正常启动过程接近最后的时间以子脚本的方式来执行。这样做减少了整个系统无法启动的风险。然后,第三方软件包可以将它们独立的 start/stop 脚本安装到一个本地的 ‘rc.d‘ 目录中(通常这是由 ports collection/pkgsrc 完成的)。 FreeBSD 和 NetBSD 现在默认使用rc.d ,该目录中所有的用户启动脚本,都被分成更小的子脚本,和 SysV 类似。rcorder 通常根据在 rc.d目录中脚本之间的依赖关系来决定脚本的执行顺序。
System V init 检查 ‘/etc/inittab‘ 文件中是否含有 ‘initdefault‘ 项。 这告诉 init 系统是否有一个默认运行模式。如果没有默认的运行模式,那么用户将进入系统控制台,手动决定进入何种运行模式。
优点: 灵活性强
缺陷: 比较复杂
System V中运行模式描述了系统各种可能的状态。通常会有 8 种运行模式,即运行模式 0 到 6 和 S 或者 s。其中运行模式 3 为"保留的"运行模式:
除了模式 0, 1,6外, 每种 Unix 和 Unix-like 系统对运行模式的定义不太一样。通常在 /etc/inittab 文件中定义了各种运行模式的工作范围。
| 操作系统 | 默认的运行模式 |
|---|---|
| AIX | 2 |
| Arch Linux | 3 |
| CentOS | 3 |
| Debian GNU/Linux | 2 [5] |
| Gentoo Linux | 3 |
| Mandriva Linux | 5 |
| Mac OS X | 3 |
| Red Hat Linux / Fedora Core | 3 or 5 |
| Slackware Linux | 3 |
| Solaris | 3 [6] |
| SUSE Linux | 5 [7] |
| Ubuntu (Server and Desktop) | 2 [8] |
上面的表中有两种Linux发行版默认的运行模式为 5,模式 5 是多用户图形环境(X Window System),通常还包括X显示管理器。然而在Solaris操作系统中,模式 5 被保留用来执行关机和自动切断电源。
大多数操作系统的用户可以用下面的命令来判断当前的运行模式是什么:
$ runlevel
$ who -r
在 root 权限下,运行 telinit 或者 init 命令可以改变当前的运行模式。 /etc/inittab 文件中设置的默认的运行模式在 :initdefault: 项中。
Linux系统中,现代的bootloader(如 LILO 或者 GRUB),用户可以在初始化过程中最后启动的进程来取代默认的 /sbin/init。
通常是在 bootloader 环境中通过执行 init=/foo/bar命令。例如,如果执行 init=/bin/bash,启动单用户
root 的 shell 环境,无需用户密码。
BSD的变种,大多数平台, bootstrap 程序是可以被打断的,然后执行 boot
-s 命令进入单用户模式。
单用户模式并不没有跳过 init,它仍然可以执行 /sbin/init,但是它将使 init
询问 exec() 将要执行的命令 (默认为 /bin/sh)
的路径,而不是采用正常的多用户启动顺序。 如果内核启动时在 /etc/ttys 文件中被标注为 "不安全"
(在某些系统中,当前的"安全模式" 可能会有些变化),
在允许这种情况(或者回退到单用户模式,如果用户执行 CTRL+D),init 将首先询问 root 用户的密码。
如果该程序退出,内核将在多用户模式下重新执行 init。 如果系统从多用户模式切换到单用户模式,还将碰到上述的情况。
如果内核加载后, init 不能被正常启动, 这将导致 panic 错误,此时系统将不可使用。想要通过
init 自身来改变 init 的路径,不同的版本情况不太一样(NetBSD中可执行 boot -a ;
FreeBSD中利用 init_path 命令装载变量)。
很多人一直努力地从某些方面改进传统的 init 守护进程,使它变得更完善。下面列出的是一些改进,没有特别的顺序:
下面列出的项目还没有大范围的使用:
http://en.wikipedia.org/wiki/Upstart
 | |
| Original author(s) | Scott James Remnant |
|---|---|
| Developer(s) | Canonical Ltd. |
| Initial release | August 24, 2006 |
| Stable release | 1.12.1[1] / March 11, 2014 |
| Written in | C |
| Operating system | Linux |
| Type | Init daemon |
| License | GPLv2 |
| Website | upstart.ubuntu.com
|
Upstart is an event-based replacement for the traditional init daemon – the method by which several Unix-likecomputer operating systems perform tasks when the computer is started. It was written by Scott James Remnant, a former employee of Canonical Ltd.
The traditional init process was originally only responsible for bringing the computer into a normal running state after power-on, or gracefully shutting down services prior to shutdown. As a result, the design is strictlysynchronous, blocking future tasks until the current one has completed. Its tasks must also be defined in advance, as they are limited to this prep or cleanup function. This leaves it unable to handle various non-startup-tasks on a modern desktop computer elegantly, including:
Upstart‘s event-driven model allows it to respond to events asynchronously as they are generated.[2]
Upstart operates asynchronously; it handles starting of the tasks and services during boot and stopping them during shutdown, and also supervises the tasks and services while the system is running.
Easy transition and perfect backwards compatibility with sysvinit were the explicit design goals;[3] accordingly, Upstart can run unmodified sysvinit scripts. In this way it differs from most other init replacements (beside systemd and OpenRC), which usually assume and require complete transition to run properly, and do not support a mixed environment of traditional and new startup methods.[4]
Upstart allows for extensions to its event model through the use of initctl to input custom, single events, or event bridges to integrate many or more-complicated events.[5] By default, Upstart includes bridges for socket, dbus, udev, file, and dconf events; additionally, more bridges (for example, a Mach ports bridge, or a devd (found on FreeBSD systems) bridge) are possible.[6]
Linux distributions and other operating systems based on the Linux kernel which use Upstart as the default init system:
Linux distributions that support or have supported Upstart to some extent, but moved away since or no longer use it as their default init system:
http://upstart.ubuntu.com/cookbook/
http://en.wikipedia.org/wiki/Systemd
| Original author(s) | Lennart Poettering,Kay Sievers |
|---|---|
| Developer(s) | Lennart Poettering, Kay Sievers and others[1] |
| Initial release | 30 March 2010 |
| Stable release | 213[2] / 28 May 2014 |
| Written in | C[3] |
| Operating system | Linux |
| Type | Init daemon |
| License | first GPLv2+, currently GNU LGPL2.1+ [4] |
| Website | freedesktop.org/…/systemd/
|
systemd is a system management daemon designed exclusively for the Linux kernel API. For systems using it, it is the first process which is executed in user space during the Linux startup process. Therefore, systemd serves as the root of the user space‘s process tree. The name systemd adheres to the Unix convention of making daemons easier to distinguish by having letter d as the last one in their actual filenames.[5]
Systemd was developed for Linux to replace the init system inherited from UNIX System V and Berkeley Software Distribution (BSD) operating systems. Like init, systemd is a daemon that manages other daemons. All daemons, including systemd, are background processes. Systemd is the first daemon to start (during booting) and the last daemon to terminate (during shutdown).
Lennart Poettering and Kay Sievers, the software engineers who initially developed systemd,[1] sought to surpass the efficiency of the init daemon in several ways. They wanted to improve the software framework for expressing dependencies; to allow more processing to be done concurrently or in parallel during systembooting; and to reduce the computational overhead of the shell.
Systemd is published as free and open-source software under the terms of the GNU Lesser General Public License version 2.1 or later.[4]


Systemd‘s initialization instructions for each daemon are recorded in a declarative configuration file rather than a shell script. For inter-process communication, systemd makes Unix domain sockets and D-Bus available to the running daemons. Because systemd tracks processes using Linux cgroups instead of process identifiers(PIDs), daemons cannot "escape" systemd; not even by double-forking. Systemd is also capable of aggressive parallelization.
Among systemd‘s auxiliary features are a cron-like job scheduler called systemd Calendar Timers, and an eventlogging subsystem called journal.[6] The system administrator may choose whether to log system events with systemd or syslog. Systemd‘s logfile is a binary file. The state of systemd itself can be preserved in asnapshot for future recall.
In April 2012, the source tree for udev (a device manager for the Linux kernel, which handles the /devdirectory and all user space actions when adding/removing devices, including firmware loading) was merged into systemd.[7]
Systemd provides a replacement for sysvinit, pm-utils, inetd, acpid, syslog, watchdog, cron and atd. Also, it has an integrated login manager called systemd-logind, which offers multiseat improvements and replaces ConsoleKit, which is no longer maintained.[8][9]
All available userspace utility programs for systemd and their man pages are currently documented at the project‘s official page.[10]
In version 209, networkd was integrated, which provides abilities for systemd to perform various network configurations; as of this version, support is limited to statically assigned addresses and basic support forbridging configuration.[11][12][13][14][15]
Since version 205, systemd offers ControlGroupInterface, an API to the Linux kernel cgroups.[16] The Linux kernel cgroups are adapted to support kernfs,[17] and are being modified to support a unified hierarchy.[18]
In the interest of enhancing the interoperability between systemd and GNOME desktop environment, systemd coauthor Lennart Poettering asked the GNOME Project to consider making systemd an external dependency of GNOME 3.2, so those two projects become better integrated, with GNOME using operations offered by systemd for various tasks.[19]
In November 2012, the GNOME Project concluded that basic GNOME functionality should not rely on systemd.[20] However, in contradiction of this statement, GNOME 3.8 introduced a de facto dependency on systemd by introducing session management behaviors which depend on how systemd operates. While the developers of Gentooattempted to adapt these changes in OpenRC, the implementation contained too many bugs, causing the distribution to mark systemd as a dependency of GNOME.[21][22]
At the same time, GNOME is pushing further integration of systemd.[23] For Mutter version 3.13.2, mutter-launch was replaced with logind integration.[24]
Adoption of systemd has been controversial at times. Articles run in Linux Advocates have characterized systemd as "the new PulseAudio," and as "an accident waiting to happen."[25][26] One Fuduntu contributor is quoted as stating that systemd has limited software choice:[25]
Systemd, whether by design, or circumstance, is largely becoming non-optional. Inclusion of core technologies such as dbus and udev are reducing choice for linux users and developers, rather than expanding them—which is the very antithesis of the idea of Free/Open Source software.
In a 2012 interview, Slackware‘s founder Patrick Volkerding also expressed reservations about the systemd architecture:[27]
Concerning systemd, I do like the idea of a faster boot time (obviously), but I also like controlling the startup of the system with shell scriptsthat are readable, and I‘m guessing that‘s what most Slackware users prefer too. I don‘t spend all day rebooting my machine, and having looked at systemd config files it seems to me a very foreign way of controlling a system to me, and attempting to control services, sockets, devices, mounts, etc., all within one daemon flies in the face of the UNIX concept of doing one thing and doing it well.
Eric S. Raymond declined to comment on systemd at first, but stated, "I‘m aware there’s a controversy."[28] Then in a March 2014 interview on Slashdot, he expressed some concerns about the goals and architecture of systemd:[29]
I want to study it carefully because I‘m a bit troubled by what I hear about the feature set and the goals. From that, I fear it may be one of those projects that is teetering right at the edge of manageable complexity – OK as long as an architect with a strong sense of design discipline is running things, but very prone to mission creep and bloat and likely to turn into a nasty hairball over the longer term.
In May 2011, Fedora became the first major Linux distribution to enable systemd by default.[30] As of October 2013, Slackware does not support or use systemd, but Slackware‘s lead Patrick Volkerding has not ruled out the possibility for switching to it.[31]
| Linux distribution | Date added to software repository[note 1] | Enabled by default? |
|---|---|---|
| ?ngstr?m | N/A | Yes |
| Arch Linux | October 2012[32] | Yes |
| CoreOS | July 2013 | Yes[33] |
| Debian GNU/Linux[34] | April 2012 | Chosen for next release[note 2] |
| Fedora | May 2011 (v15)[37] | Yes |
| Frugalware Linux | August 2011 (v1.5)[38] | Yes |
| Gentoo Linux | 2011[39][40][41] | No |
| Mageia | May 2012 (v2.0)[42] | Yes |
| openSUSE | March 2011 (v11.4)[43] | Yes |
| Red Hat Enterprise Linux | Pending for RHEL 7 | Pending for RHEL 7[44][45] |
| Sabayon Linux | August 2013 (v13.08)[46] | Yes |
| Slackware | N/A | No |
| Ubuntu[note 3] | April 2013 (v13.04)[48] | Planned[36] |
http://blog.csdn.net/zhoudaxia/article/details/6666872
1、init程序剖析
init进程是内核引导过程完成时创建的第一个进程。Linux使用了init进程来对组成Linux的服务和应用程序进行初始化。
当 init 进程启动时(使用传统的sysvinit版本),它会打开一个名为 /etc/inittab 的文件。这个文件是 init
的配置文件,定义了如何对系统进行初始化。这个文件还包含了有关出现电源故障时执行的操作(如果系统支持)、以及在检测到 Ctrl-Alt-Delete
键序列时应该如何反应的信息。请参看 清单 1 中该文件的简短片段,了解它所提供的内容。
inittab 配置文件使用通用格式定义了几项内容:id:runlevels:action:process。其中 id
是惟一标识该项的字符序列。runlevels 定义了操作所使用的运行级别。action 指定了要执行的特定操作。最后,process
定义了要执行的进程。
清单 1. inittab 文件摘录
在 init 加载 /etc/inittab 之后,就会将系统切换到 initdefault
操作所定义的运行级别。如 清单 1 所示,即运行级别 2。我们可以将运行级别看作是系统的状态。例如,运行级别 0 定义了系统挂起状态,运行级别 1
是单用户模式。运行级别 2 到 5 是多用户状态,运行级别 6
表示重启。(注意有些发行版对于运行级别的表示是不同的)。还可以以另一种方式考虑运行级别,即它是一种定义可以执行哪些进程(定义系统状态的进程)的方法。
我们可以使用 telinit 工具(这是一个指向 init 工具的链接)与 init 进程进行通信。例如,如果目前在多用户模式下(runlevel
2),希望切换到单用户模式(runlevel 1),使用命令 telinit 1 即可(使用超级用户模式)。要查看系统的当前运行级别,请使用命令
runlevel。
正如 清单 1 定义的一样, initdefault 指定默认的
init 级别是 2 (多用户模式)。在定义初始的运行级别之后,则调用 rc 脚本以及参数
2(运行级别)来启动系统。这个脚本然后会调用各种服务和应用程序脚本来启动或停止特定的元素。在本例中,文件都是在 /etc/rc2.d/
中定义的。例如,如果要启动 MySQL 应用程序(例如系统启动),可以这样调用:/etc/rc2.d/S20mysql start。在关闭系统时,则使用
stop 参数调用相同的脚本集。
最后,串行执行大量的脚本以启动各种需要的服务(通常可以在
Linux
的引导屏幕中看到)。即使这些服务彼此无关时,依然会顺次启动它们。其结果是引导过程非常耗时(尤其在具有很多服务的大型系统上更是如此)。
关于这个问题的一个很明显的解决方案是去掉 init 命令的串行特性,将其替换成并行化操作。在很多多处理系统中都可以看到这种用法。例如,socket
striping,或者使用两个或多个 socket
并行地移动数据,就是一个基于这个主题的解决方案。独立磁盘冗余阵列(RAID)系统也是通过将磁盘分成条状(通常是并行的)来提高 I/O
性能。
修改初始化进程非常的简单。在引导时(使用 LILO 或
GRUB),指定一个新进程来开始处理系统初始化。指定 init=/sbin/mynewinit 作为内核引导行的一部分从而调用这个进程,而不是默认的 init
进程。在 /init/main.c:kernel_init()-->init_post()的内核源代码中您可以看到这种用法。如果在内核引导行中提供了一个
init 命令,引导时就会使用它。否则,内核就会尝试启动 4 个备选方法之一(第一个是 /sbin/init,接着是/etc/init, /bin/init,
/bin/sh)。
init进程是由内核启动的第一个也是惟一的一个用户进程,它是后续所有进程的发起者,比如init进程启动/bin/sh程序后,才能够在控制台上输入各种命令。
init执行的基本流程如下:
(1)解析/etc/inittab:执行sysinit命令指定的进程,以前通常是/etc/init.d/rcS,在新版本的init程序中则通常是/etc/rc.d/rc.sysinit脚本。
(2)执行/etc/rc.d/rc.sysinit:这是由init执行的第一个脚本,此步进行的工作包括配置网络、配置内核参数、挂载root文件系统、检查文件系统、设置系统时钟、配置机器、开启交换空间等。
(3)执行/etc/rc.d/rcX.d/[K...][S...]:根据定义的initdefault运行级别,执行对应wait命令指定的程序,这会运行对应目录下的各个程序,并等待它们运行完。在rcX.d目录下,首先终止K开头的服务(用来关闭一个服务),然后启动S开头的服务(用来启动一个服务)。对每一个运行级别来说,在/etc/rc.d子目录中都有一个对应的下级目录。这些运行级别的下级子目录的命名方法为rcX.d,
其中X就是代表运行级别的数字。在各个运行级别的子目录中,都建立有到/etc/rc.d/init.d子目录中命令脚本程序的符号链接,链接的名称在K与S后有一个数字,表示执行顺序,数字小的先执行,例如K01tog-pegasus、S00microcode_ctl。对以K开头的脚本执行时系统会传递stop参数,而S开头的脚本系统会传递start参数。
(4)执行/etc/rc.d/rc.local:Redhat中运行模式2,3,5都把/etc/rc.d/rc.local作为初始化脚本中的最后一个文件,所以用户可以自己在这个文件中添加一些需要在其他初始化工作之后,登陆之前执行的命令。
(5)执行getty程序:为每个联机终端使用fork()创建一个子进程,并在子进程中运行getty程序,init进程则调用wait(),进入等待子进程结束状态。getty程序设置终端类型、属性、速度和线路规程等。对于字符界面的运行级别(如级别2和3),它会打开并初始化一个tty端口,显示提示信息。通常,若/etc/issue文本文件存在,则getty会首先显示其中的文本信息,然后显示登录提示信息(例如“plinux
login:”
),出现字符登录界面,并等待用户键入用户名和口令。可以在inittab文件中配置使用哪一种getty程序(在“id:runlevels:action:process”的process部分指定,并可以传递相应的getty参数),如agetty,
getty, mgetty, uugetty,
mingetty,fbgetty等。getty程序只能由超级用户执行。
注意如果第1步中的inittab文件指定的默认运行级别是图形用户界面形式(如级别5),则init程序会转向去执行/etc/X11/prefdm脚本,它会执行/usr/sbin/gdm,启动图形登录界面。GDM管理的不只是X的启动,还有登录,注销,挂起等一系列操作。
启动登录界面(图形或字符界面),并输入完用户名后,getty会调用login程序。
(6)执行login程序:getty调用exec()执行login程序,以核对输入的用户名和口令。由于调用了exec(而不是fork),login的执行环境会覆盖getty的执行环境。login进程会读取/etc/passwd,以用户名和口令。login根据用户输入的用户名,从口令文件passwd中取得对应用户的登录项,然后调用getpass()以显示”password:”提示信息,读取用户键入的密码,然后使用加密算法对键入的密码进行加密处理,并与口令文件中该用户项中pw_passwd字段作比较。如果用户几次键入的密码均无效,则login程序会以出错码1退出执行,表示此次登录过程失败。此时父进程(进程init)的wait()会返回该退出进程的pid,因此会根据记录下来的信息再次创建一个子进程,并在该子进程中针对该终端设备再次执行getty程序,重复上述过程。
如果用户键入的密码正确,则login就会把当前工作目录(Currend Work
Directory)修改成口令文件中指定的起始工作目录。并把对该终端设备的访问权限修改成用户读/写和组写,设置进程的组ID。然后利用所得到的信息初始化环境变量信息,例如起始目录(HOME=)、使用的shell程序(SHELL=)、用户名(USER=和LOGNAME=)和系统执行程序的默认路径序列(PATH=)。接着显示/etc/motd文件(message-of-the-day)中的文本信息,并检查并显示该用户是否有邮件的信息。最后login程序改变成登录用户的用户ID,并执行口令文件中该用户项中指定的shell程序,如/bin/bash或/bin/csh等。有关login程序的一些执行选项和特殊访问限制的说明,可参见Linux系统中的在线手册页(man
-8 login)。
(7)执行shell程序或x-windows:如果用户名和口令正确,login调用exec执行shell命令行解释程序(当然,也可以执行X-windows的图形界面,如果用户设置了的话)。登录shell会首先从/etc/profile文件以及$HOME/.bash_profile文件(或.bashrc文件,若存在的话)读取命令并执行。因此用户可以把每次登录时都要执行的命令放在.bash_profile文件中。如果在进入shell时设置了ENV环境变量(或者在.bash_profile文件中设置了该变量),则shell还会从$ENV指定的文件中读去命令并执行。因此我们也可以把每次运行shell都要执行的命令放在ENV变量指定的文件中。设置ENV环境变量的方法是把下列语句放在你起始目录的.bash_profile文件中:
ENV=$HOME/.anyfilename; export ENV。
运行shell时,原来的getty进程最终被替换成了bash进程,对应的getty,login,bash这三个程序也就具有相同的进程ID。在成功登录到Linux系统后,你会发现(使用”top”或”ps
–ax”命令)自己终端原来的getty进程已经找不到了。因为getty进程执行了login程序,被替换成了login进程,并且最后被替换成你的登录shell进程。对于图形用户界面,login程序最后会被替换成图形界面进程(如gnome-session程序)。
(8)Linux运行时:init进程会负责收取孤儿进程。如果某个进程创建子进程之后,在子进程终止之前终止,则子进程成为孤儿进程。在Linux中所有的进程必须属于单棵进程树,所以孤立进程必须被收取。一旦进程成为孤儿,它会立即成为init进程的子进程。这是为了保持进程树的完整性。
(9)用户注销:当某个终端或虚拟控制台上的用户注销之后,该终端上的所有进程都会被终止(killed),包括bash。然后,init进程就会调用fork为该终端或虚拟控制台重新创建一个getty进程,以便能够让其他用户登录。这是为什么呢?你应该发现,当用户登录时,“getty”用的是“exec”而不是“fork”系统调用来执行“login”,这样,“login”在执行的时候会覆盖“getty”的执行环境(同理,用户注册成功后,“login”的执行环境也会被shell占用)。所以,如果想再次使用同一终端,必须再启动一个“getty”。对于图形界面,用户注销后会回到图形登录界面。
(10)系统关闭:init负责杀死所有其它的进程,卸载所有的文件系统并停止处理器的工作,以及任何其它被配置成要做的工作。
以Fedora 14桌面系统中为例(它使用新的upstart
init程序,不过它兼容sysvinit),/etc/inittab文件内容如下:
Fedora的默认运行级别为5,是多用户的x-windows图形界面。与传统的sysvinit有所不同,在upstart中,只会为默认运行级别使用inittab文件,要添加其他的运行级别,应该放到/etc/init/rc.conf中,而不是inittab中。upstart系统现在首先运行的是/etc/init/rcS.conf,其内容如下(Fedora 14中):
upstart首先在系统引导时首先运行rc.sysinit脚本,然后搜索inittab的initdefault,用telinit切换到initdefault的级别来运行。upstart把原来/etc/inittab的功能被分散到/etc/init下的各个conf文件中。
注意不同的Linux发行版会对upstart做一些不同的定制。在ubuntu中,甚至默认不再有/etc/inittab文件了。当然他仍然会处理这个文件(如果有的话),如果你有需要,可以创建这个文件,添加需要的内容。Ubuntu
10.04中的/etc/init/rcS.conf内容如下:
这里先做一些前期检查,与Fedora不同的是,第一个执行的脚本换成了/etc/init/rc-sysinit.conf,其内容如下:
可见Ubuntu是在rc-sysinit.conf中才处理inittab并切换到initdefault级别来运行。
init的完整初始化过程如下(包括启动字符界面和图形界面):
注意在rc.sysinit加载完/etc/sysconfig/modules/中(如果你希望额外加载一些比如遥控器之类的模块,你可以在这里增加脚本)的用户自定义的模块后,就会由update_boot_stage通知图形化的启动界面,准备进入启动画面,内核启动的命令行参数(在grub中可以看到)中会指定rhgb程序。rhgb程序的作用是在启动的时候建立一个临时的仅使用loopback网络的X窗口服务器,然后在这个窗口上显示启动进度,init程序的其他部分可以通过rhgb-client程序向这个进度窗口发送消息。在“配置机器相关参数”这一步中,如果存在/.unconfigured文件,会先调用rhgb-client向进度窗口发送消息,然后调用/usr/bin/system-config-keyboard配置键盘,调用 /usr/bin/passwd root配置超级用户密码,调用/usr/sbin/system-config-network-tui配置网络,调用/usr/sbin/timeconfig配置时区,调用 /usr/sbin/authconfig-tui --nostart配置网络登录,调用/usr/sbin/ntsysv配置默认的运行级别。然后清空包括/var/lock/,/var/run/, /tmp等在内的临时目录,并开启交换空间。运行完rc.sysinit后,rcS.conf就会查找inittab中的默认运行级别并切换到这个级别。
转到rc.conf,它调用/etc/rc.d/rc脚本,运行指定级别目录下的各个启动脚本。首先按照名称顺序运行那些K打头的脚本,然后按照名称顺序运行那些S打头的脚本。启动脚本(是符号链接)中的数字是怎么来的呢,它是由你指定的,如果你要增加自己的启动脚本到相应的启动级别中去,这个数字当然应该由你指定,因为只有你才知道这个脚本应该以什么样的优先级启动。但是对于那些已经存在的启动脚本,它们的优先级是在脚本中最前面的注释行中的chkconfig这一行指定的,在这一行中,你可以看到类似# chkconfig: 35 99 95的字样,它的含义是:这个脚本应该增加到运行级别3和运行级别5中,启动的优先级是99,关闭的优先级是95,当然,这些数字是由那些Fedora的开发者测试过没有问题,所以才写在这里的。二进制的程序/sbin/chkconfig将会读取这一行,并且在将服务增加到启动级别中去的时候自动生成文件名。文件名中的第一个字符S和K代表了什么含义呢?它代表了你在services控制面板中选择了打开这个服务还是关闭这个服务,如果你在那里打开了这个服务,则以S作为前导符,否则为K。结合我们前面介绍的启动过程,你就可以知道,在启动的时候,Fedora会首先保证那些K打头的脚本是关闭的(通过以stop参数调用这个脚本),然后才会逐个启动那些S打头的脚本(通过以start参数调用这个脚本)。对于每个启动脚本文件,如果想知道启动了时候都做了些什么,可以查看相应脚本中的start()函数,比如对于avahi-dnsconfd这个脚本,我们可以看到,它只是运行了/usr/sbin/avahi-dnsconfd -D这个命令。
最后执行的初始化脚本是rc.local,你可以在这个脚本中添加自定义的需要启动的服务或需要执行的命令。在所有需要启动的服务都启动完毕以后,rc脚本通过rhgb-client程序通知rhgb图形界面退出,rhgb的使命就完成了。
init程序在运行完rc.local后,执行/etc/init/start-ttys.conf的配置,它查找init配置文件中的$ACTIVE_CONSOLES指定的每个tty设备(为tty1-tty6),并调用tty.conf启动这些tty设备。tty.conf会在/dev/tty1-/dev/tty6设备上启动/sbin/mingetty。从现在开始,你可以通过Ctrl+Alt+F1..F6在各个不同的tty之间进行切换了。
上面“fork()--->/sbin/mingetty”这一部分是指传统字符界面的启动及登录过程,这个过程在前面已经介绍比较清楚了。现在的Linux桌面系统都是登录到图形用户界面,登录屏幕是图形界面的形式。下面“/etc/init/start-ttys.conf”这一部分是指图形界面的启动和登录过程。
1)直接启动图形界面
在启动mingetty后,如果运行级别为5,init程序会执行prefdm.conf的配置,它调用/etc/X11/prefdm脚本,准备启动图形界面登录管理器。prefdm将会读取位于/etc/sysconfig/desktop中的配置文件,如果没有指定任何配置文件,prefdm运行的顺序依次为gdm,kdm,wdm和xdm,从而出现图形登录界面。后面的启动部分就属于GNOME,KDE或者其它相应的窗口管理器了。
注意,对于Ubuntu,默认运行级别为2,在/etc/rc2.d目录中包含了启动登录管理器gdm的脚本。
无论是gdm,xdm还是kdm,所做的事情都是类似的,即启动一个X
server窗口,基于这个X窗口提供一个图形化的用户登录界面,以便在实际进入X窗口系统之前,对用户进行验证,并且提供用户选择自己希望的语言,窗口管理器等的机会。除此之外,dm程序一般还支持别的一些操作,比如提供直接关机的选项以及根据配置决定是否打开XDMCP服务的端口等。gdm的配置定义在/etc/gdm/custom.conf中。
XDMCP服务是X窗口显示管理器控制协议的缩写,它允许用户在远程电脑上运行X窗口服务,然后通过XDMCP协议使用本地的XDM登录,登录以后的后续操作将使用远程的X窗口作为显示系统。一个很简单的例子,首先使用gdmsetup程序(系统管理菜单中的登录窗口)打开XDMCP的支持(远程选项卡更改为与本地相同),然后打开一个终端窗口,运行Xnest
:1 -query
127.0.0.1命令(Xnest并不是默认安装的命令),你将在一个新开的窗口中看到和你的登录屏幕一模一样的登录屏幕,你可以登录其它用户,进行所有和本地用户一样的操作。显然如果你是在另外一台电脑上,只需要把相应的ip地址改掉就可以了。并不一定非要使用Xnest程序,你甚至可以在远程的Win32系统上进行基于XDMCP的远程登录,这首先需要你在你的windows系统上运行一个X
窗口系统,有很多种类似的实现,包括X-win32和cygwin在内的各种免费和收费版本都是一个不错的选择,事实上,一台强劲的服务器通过这种方法可以将N台落魄的486PC转变成可以运行高级科学运算的X终端。除了这些方法,你还可以使用内置于gnome之中的vino程序,这个程序可以基于本地的X窗口打开一个兼容于vnc的服务,你可以使用各种类型的vncviewer来连接这个服务并进行远程操作(参见首选项菜单中的远程桌面),这种实现方式下,远程显示的屏幕和本地屏幕是完全相同的。或者你也可以使用单独的vncserver,这种使用方式和XDMCP的使用方法类似,只是登录的用户和使用的窗口管理器都是由vncserver指定好的。
在登录界面上,用户可以选择语言、键盘布局、会话等。系统内建的几个会话包括安全模式终端,安全模式gnome以及上一次的成功登录等,其它的会话则是从配置文件中读取的,gdm将会在多个目录中寻找设定的会话,包括/etc/X11/sessions/,/usr/share/gdm/BuiltInSessions/,/usr/share/xsessions/等,路径可以通过daemon/SessionDesktopDir配置项进行更改,gdm在这些目录中寻找扩展名为desktop的文件,比如默认会话对应的文件是
/usr/share/gdm/BuiltInSessions/default.desktop,而gnome会话对应的文件为/usr/share/xsessions/gnome.desktop。这些配置文件定义了在不同的语言中这个会话要显示的名称。
当用户选择了一个X会话,输入了正确的用户名和密码以后,gdm执行命令的顺序依次是,首先它将执行位于daemon/PreSessionScriptDir配置项路径下(默认为/etc/gdm/PreSession/)的所有脚本文件,来执行启动会话前的一些任务,比如更改X窗口的默认背景之类,然后它将调用位于daemon/PostLoginScriptDir配置的目录中(默认为/etc/gdm/PostLogin)的脚本,执行一些在刚刚登录以后需要运行的命令,然后它将以前面提到的desktop文件中定义的exec参数的值作为参数,调用daemon/BaseXsession配置项指定的脚本(默认为/etc/gdm/Xsession),比如如果你选择的是默认会话,那么执行的命令将会是/etc/gdm/Xsession
default,如果你查看这个文件你将发现,在这种情况下,它将首先检查是否存在主目录的.xsession文件,如果存在就执行它,否则检查是否存在主目录下的.Xclients文件,如果存在则执行它,否则就将执行/etc/X11/xinit/Xclients文件,这个文件根据
/etc/sysconfig/desktop配置文件中的设置运行各个X client,第一个X
client默认为执行gnome-session。
运行完gnome-session,我们就进入了GNOME桌面环境。而配置在daemon/PostSessionScriptDir配置项(默认值为/etc/gdm/PostSession/)所设定的目录中的脚本将在GNOME会话结束以后运行,这意味着无论出于什么原因,gnome程序已经完全退出了,也许是你选择了注销命令,也许是X窗口崩溃了,如果你有这方面的需要,可以将相应的脚本放在对应的目录中。
2)通过startx启动图形界面
还有一种启动图形界面的方式,就是在登录到字符界面后,通过运行startx脚本来启动X图形界面。startx并不使用gdm来启动X窗口,而是用xinit程序启动X。/usr/bin/xinit是一个二进制文件,并非是一个脚本。它的主要功能是启动一个X服务器,同时启动第一个基于X的客户端应用程序。当第一个Client退出时,xinit将杀死X
server进程,然后自己终止运行。
参考xinit的man文档,可知其用法为:xinit
[[client] options ] [-- [server] [display]
options]。其中client用于指定第一个X客户端应用程序,client后面的options是传给这个应用程序的参数,server是用于指定启动哪个X服务器,一般为/usr/bin/X或/usr/bin/Xorg,display用于指定display
number,一般为0,表示第一个display,option为传给server的参数。
如果不指定client,xinit会查找HOME(环境变量)目录下的.xinitrc文件,如果存在这个文件,xinit直接调用execvp函数执行该文件,以启动指定的X客户端程序。如果这个文件不存在,那么client及其options默认为:
xterm -geometry +1+1 -n login -display :0 。
如果不指定server,xinit会查找HOME(环境变量)目录下的.xserverrc
文件,如果存在这个文件,xinit直接调用execvp函数执行该文件,以启动指定的X服务器。如果这个文件不存在,那么server及其display为: X :0
。如果系统目录中不存在X命令,那么我们需要在系统目录下建立一个名为X的链接,使其指向真正的X
server命令(Ubuntu下为Xorg)。
下面是几个关于xinit应用的例子:
(1)xinit
/usr/bin/xclock -- /usr/bin/X :0
该例子将启动X
server,
同时将会启动xclock。请注意指定client或server时,需要用绝对路径,否则xinit将因无法区别是传给xterm或server的参数还是指定的client或server而直接当成是参数处理。
(2)在HOME下新建.xinitrc文件,并加入以下几行:
当xinit启动时,它会先启动X
server,然后启动一个clock,两个xterm,最后启动窗口管理器twm。请注意最后一个命令不能后台运行,否则所有命令都后台运行的话xinit就会返回退出,同样的,除最后一个命令外都必须后台运行,否则后面的命令将只有在该命令退出后才能运行。
看到这里,眼尖的人或许早以看出xinit的功能完全可以由脚本来实现,例如要启动X
Server和一个xterm,就像xinit默认启动的那样,只需要在新建一个脚本或在rc.local中加入:
这个实现完全正确,然而却并没有完全实现xinit所具有的功能,xinit的功能就是当最后一个启动的client(如上面第二个例子中的twm窗口管理器)退出后,X服务器也会退出。而我们的脚本实现中当我们退出xterm后并不会退出X
server。
startx可以看作是xinit的前端,用法和xinit的基本一样:startx [[client] options ] [-- [server]
[display] options]。为什么呢?这是因为startx其实就是一个脚本,它启动X
server就是通过调用xinit命令实现的,startx的参数将全部传给xinit。因此,这些参数的意义和xinit的参数是一样的。
下面是两个关于startx命令的简单例子:
(1)startx --
-depth 16:以16位色启动X 服务器。
(2)startx -- -dpi
100:以100的dpi启动X 服务器。
startx会先记录$HOME下的.xinitrc和.xserverrc文件(如果有的话),系统目录/etc/X11/xinit/下的xinitrc和.xserverrc文件。然后解析用户的参数,如果该用户指定了该参数,那么startx就会以该参数来启动xinit,否则就会解析$HOME目录下的.xinitrc和.xserverrc文件,如果该文件不存在,就会解析系统目录下(/etc/X11/xinit/)的xinitrc和xserverrc文件,如果这个文件也不存在,那
startx就将以默认的client(xterm)和server(/usr/bin/X)为参数来启动xinit。
在Fedora 14中,只有/etc/X11/xinit/xinitrc文件,由它来运行Xclients脚本,这个脚本用于运行各个指定的X client,其中的第一个X client即为gnome-session,这就是GNOME桌面环境。从代码可知,xinitrc的功能与Xsession几乎一样,只有一些细微的差别(在Ubuntu中xinitrc是直接调用Xsession的)。
完整的Linux init程序启动过程如下图:
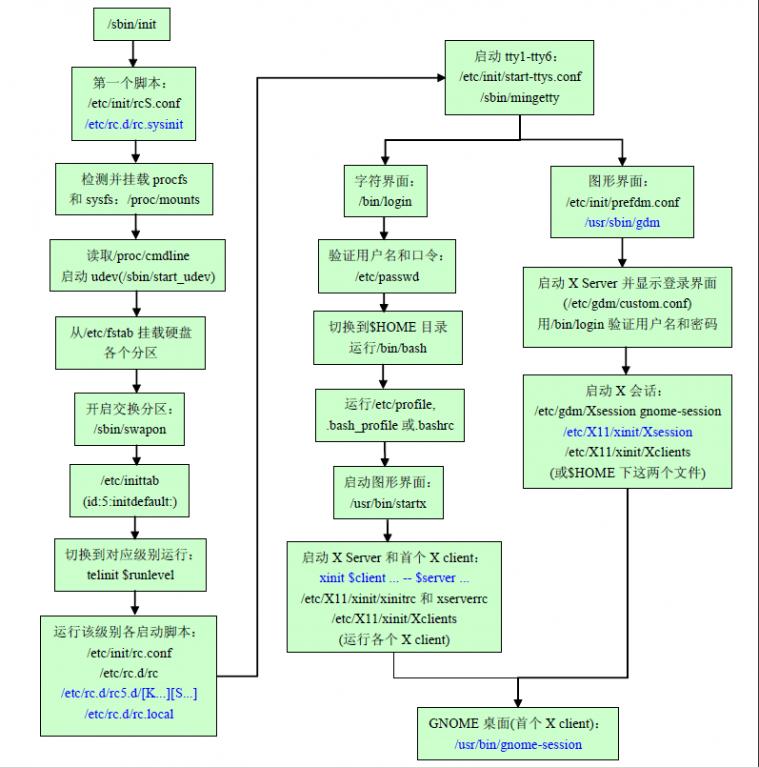
图1 Linux init程序启动过程
2、initng介绍
由于传统的init进程(sysvinit)是一个串行化的进程,因此可对这部分系统进行充分优化。实际上,您可以使用任何方法来对init进程进行优化。其中最简单方法是禁用不必要的服务。例如,如果您运行的是一个桌面系统(而不是一个服务器),就可以禁用诸如
apache、sendmail 和 mysql 之类的服务,这样可以缩短init序列。
其他的一些init程序版本解决了这个问题。一种是基于依赖关系的(即使用依赖关系来提供并行化,如新版的initng),一种是一个基于事件的系统(即进程依赖于事件来表示自己何时启动或停止,如upstart)。
initng(下一代 init)可以完全取代异步启动进程的init,它能更加快速地完成init进程。initng
背后的基本思想是只要满足了服务的依赖关系就可启动。这样系统就可以在 CPU 和 I/O
之间实现较好的平衡。当从磁盘上加载一个脚本或等待硬件设备启动的同时,可以运行另一个脚本来启动另外一个服务。
作为一个基于依赖关系的解决方案,initng 使用自己的初始化脚本集,它们对服务和守护进程的依赖性进行了编码。清单 2
展示了一个示例。这个脚本指定了需要为给定的运行级别启动的服务。该服务具有两个依赖关系,使用 need 关键字定义,分别是 system/initial 和
net/all。在 system/my_service 可以启动之前,这些服务必须是可用的。当这些服务可用时,exec 关键字就开始起作用了。exec
关键字(以及 start 选项)定义了如何使用任何可用的选项启动服务。要停止这个服务,就会使用 exec 关键字以及 stop
选项。
清单 2. 为 initng 定义服务
您可以使用服务定义对整个系统进行编码,如清单 2
所示。那些没有依赖关系的服务可以立即(并行地)启动,而具有依赖关系的服务则必须等待以安全启动。您可以将 initng
看作一个基于目标的系统。其目标就是要启动的服务。没有进行显式的规划;相反,依赖关系简单地定义了服务初始化的流程,这个过程中隐含着并行化的操作。
initng 的典型安装需要 initng 发行版(源代码或二进制文件)和 ifiles 发行版。您可以使用 ./configure、make 和
make install 编译自己的 initng 发行版。您必须使用 cmake 来编译 ifiles
文件(这是脚本文件)。根据系统需求的不同,您可能需要创建新的服务/守护进程定义(不过很可能 initng 社区中已经有人这样做了)。然后您还必须修改 LILO
或 GRUB 的配置以指向新的 /sbin/initng。要控制 initng,需要使用 ngc(对应telinit 与传统的
init)。它们的语法有些不同,不过功能是相同的。
linux init->upstart->systemd,布布扣,bubuko.com
标签:des c style class blog code
原文地址:http://www.cnblogs.com/baiyw/p/3761360.html