标签:
开源地址:https://github.com/excilys/androidannotations第一步:先打开Help菜单,点击Install New Software
第二步,选择安装Juno:
第三步,在下面的列表中找到Programming Languages节点并展开,找到Eclipse Java Development Tools,勾选上,剩下的安装步骤你懂的,安装完了会要求自动重启Eclipse,重启后就有Annotation Processing啦。
重启后发现就会发现那个配置,


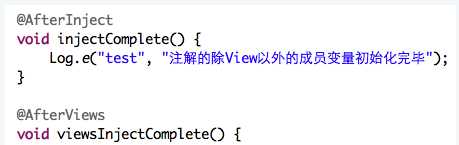
当View相关的成员变量初始化完毕后,会调用拥有@AfterViews注解的方法,你可以在里面初始化一些界面控件等。如果其他的成员变量处事完毕,就会调用@AfterInject。
比如大多数应用的逻辑是这样的,初始化界面之后,就发起耗时的数据请求,然后解析获取到的数据,再设置到界面上。一般的涉及UI线程与异步任务交互的时候,相对都比较麻烦一些。让我们看下AA是如何实现的。
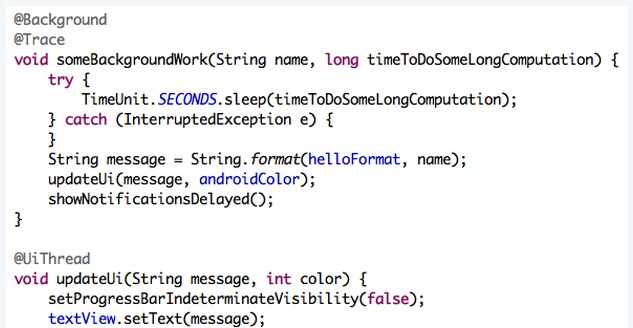
很简单吧,UI线程执行的方法加个@UiThread,异步线程方法加个@Background,两者的交互就是方法直接的相互调用,其他的你不用关心,一切的实现都是AA的编译器去自动生成交互的代码。交互的过程,完全没有在执行异步的感觉,不用再使用Handler去发送接收Message了。两个注解就把以前一堆的代码实现的功能给实现了,真心给个最大的赞。
五、Rest API在AA中也支持Rest API,而且支持所有的HTTP请求方法。下面演示的是一个GET请求。
@Rest("http://www.bookmarks.com")public interface BookmarkClient {@Get("/bookmarks/{userId}?search={search}")Bookmarks getBookmarks(String search, String userId);}
@Backgroundvoid searchAsync(String searchString, String userId) {Bookmarks bookmarks = restClient.getBookmarks(searchString, userId);updateBookmarks(bookmarks);}
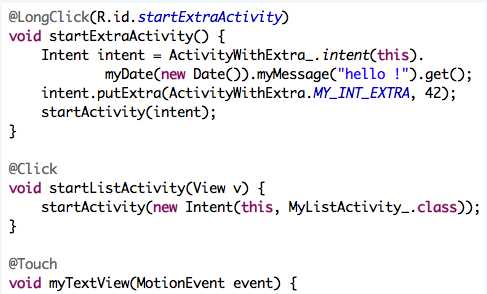
/***samy*/@EActivity(R.layout.activity_a20thirdparty_androidannotations_aamain)// Sets content view to R.layout.translatepublic class AAMainAct extends Activity {@ViewById// Injects R.id.textInput// 提供id来生成控件,如果不指定ID,默认以控件名进行查找,如上面的myEditTextEditText myEditText;@ViewById(R.id.myTextView)// Injects R.id.myTextViewTextView textView;@AnimationRes// Injects android.R.anim.fade_inAnimation fadeIn;@StringRes(R.string.hello)String helloFormat;@ColorResint androidColor;@BooleanResboolean someBoolean;@SystemServiceNotificationManager notificationManager;@SystemServiceWindowManager windowManager;//当View相关的成员变量初始化完毕后,会调用拥有@AfterViews注解的方法,你可以在里面初始化一些界面控件等。如果其他的成员变量处事完毕,就会调用@AfterInject。/*** AndroidAnnotations gracefully handles support for onBackPressed, whether you use ECLAIR (2.0), or pre ECLAIR android version.*/public void onBackPressed() {super.onBackPressed();Toast.makeText(this, "Back key pressed!", Toast.LENGTH_SHORT).show();}@Overrideprotected void onCreate(Bundle savedInstanceState) {super.onCreate(savedInstanceState);// windowManager should not be nullwindowManager.getDefaultDisplay();requestWindowFeature(Window.FEATURE_INDETERMINATE_PROGRESS);}// //事件控制,可以以按钮的id作为方法名,同时支持的事件还有onLongClick,onTextChange等// @LongClick// When R.id.myButtonClicked button is clicked// android:id="@+id/myButton"// 两种点击事件方法都可以的;myButton() myButtonClicked()@Clickvoid myButton() {// void myButtonClicked() {String name = myEditText.getText().toString();setProgressBarIndeterminateVisibility(true);someBackgroundWork(name, 5);}/*** 对于@Click,方法名和xml文件中的id一样就可以这样写,AndroidAnnotations会自动识别,对于* 多个Button,可以写多个@Click,也可以在这样*/// @Click({R.id.button1,R.id.button2,R.id.button3})// void buttonClicked(Button bt){// switch(bt.getId()){// case R.id.button1: //// break;// ...// }// }@Background// Executed in a background thread// 开启新线程后台运行,注意不要引用UI控件,而且返回值类型一定是voidvoid someBackgroundWork(String name, long timeToDoSomeLongComputation) {try {TimeUnit.SECONDS.sleep(timeToDoSomeLongComputation);}catch (InterruptedException e) {}String message = String.format(helloFormat, name);updateUi(message, androidColor);showNotificationsDelayed();}@UiThread// Executed in the ui thread//UI线程void updateUi(String message, int color) {setProgressBarIndeterminateVisibility(false);textView.setText(message);textView.setTextColor(color);}@UiThread(delay = 2000)// 可以设置延时时间,以毫秒为单位void showNotificationsDelayed() {Notification notification = new Notification(R.drawable.ic_launcher, "Hello !", 0);PendingIntent contentIntent = PendingIntent.getActivity(this, 0, new Intent(), 0);notification.setLatestEventInfo(getApplicationContext(), "aa notification", "aa_test!", contentIntent);notificationManager.notify(1, notification);}// android:id="@+id/startExtraActivity"@LongClickvoid startExtraActivity() {// 这个传值有点不好弄Intent intent = AAWithExtraAct_.intent(this).myDate(new Date()).myMessage("hello !").classCastExceptionExtra("42").get();// Intent intent = ActivityWithExtra_.intent(this).myDate(new Date()).myMessage("hello !").get();// intent.putExtra(ActivityWithExtra_.MY_INT_EXTRA, 42);startActivity(intent);}@Clickvoid startListActivity(View v) {startActivity(new Intent(this, AAListAct_.class));}@Touchvoid myTextView(MotionEvent event) {Toast.makeText(this, "myTextView was touched!: " , Toast.LENGTH_SHORT).show();}@Transactionalint transactionalMethod(SQLiteDatabase db, int someParam) {return 42;}}
Butter Knife也是使用注入视图的方式使开发人员尽可能少的编写代码。相比AndroidAnnotations,个人觉得没有AndroidAnnotations
使用简单,而且文档几乎也没有。还是先看一小段代码吧:
package com.example.butterknife;import android.app.Activity;import android.os.Bundle;import android.widget.Button;import android.widget.ListView;import android.widget.TextView;import android.widget.Toast;import butterknife.InjectView;import butterknife.OnClick;import butterknife.ButterKnife;import butterknife.OnItemClick;import butterknife.OnLongClick;import static android.widget.Toast.LENGTH_SHORT;public class SimpleActivity extends Activity {@InjectView(R.id.title) TextView title;@InjectView(R.id.subtitle) TextView subtitle;@InjectView(R.id.hello) Button hello;@InjectView(R.id.list_of_things) ListView listOfThings;@InjectView(R.id.footer) TextView footer;private SimpleAdapter adapter;@OnClick(R.id.hello) void sayHello() {Toast.makeText(this, "Hello, views!", LENGTH_SHORT).show();}@OnLongClick(R.id.hello) boolean sayGetOffMe() {Toast.makeText(this, "Let go of me!", LENGTH_SHORT).show();return true;}@Override protected void onCreate(Bundle savedInstanceState) {super.onCreate(savedInstanceState);setContentView(R.layout.simple_activity);ButterKnife.inject(this);// Contrived code to use the "injected" views.title.setText("Butter Knife");subtitle.setText("View \"injection\" for Android.");footer.setText("by Jake Wharton");hello.setText("Say Hello");}}
总之,两者虽有相似的地方,但看到AndroidAnnotations之后,就不愿使用Butter Knife了。另外,值得你注意的是butter Knife
有个代码生成的插件呢,不过是针对Android Studio的,请看图:
(gif 的图为什么不会动啊)
Generate -> Generate ButterKnife Injections点击 Confirm , 代码自动生成!插件项目主页:
https://github.com/inmite/android-butterknife-zelezny
下载插件:
http://plugins.jetbrains.com/plugin/7369
public class MainActivity extends ActionBarActivity {@Overrideprotected void onCreate(Bundle savedInstanceState) {super.onCreate(savedInstanceState);// Try to generate Activity injections by clicking to R.layout.activity_mainsetContentView(R.layout.activity_main);if (savedInstanceState == null) {getSupportFragmentManager().beginTransaction().add(R.id.container, new Fragment()).commit();}}}
标签:
原文地址:http://www.cnblogs.com/hongfeiliuxing/p/4468307.html


