标签:
离上一篇 用Xamarin.Form做个技术预览版的APP 有一个月零几天了. 现在这个APP在业务方面的代码由另外一个同事全权处理, 我又闲了下来, 要去弄另外一个项目.
这个把月, 踩过 Xamarin.Form 很多坑, 填过很多坑, 也造了很坑...
这里做个总结, 给想跳坑的你做个参考.
下拉刷新还是很简单的, 首先要设置 listView.IsPullToRefreshEnabled 为 true
 1 /// <summary>
 2 /// 下拉刷新事件
 3 /// </summary>
 4 /// <param name="sender"></param>
 5 /// <param name="e"></param>
 6 public void RefreshData(object sender, EventArgs e) {
 7     this.PageIdx = 0;
 8     this.LoadConsigns(true);
 9     var lst = (ListView)sender;
10     lst.IsRefreshing = false;
11 }
下拉刷新有自带事件可以处理, 但是加载更多却没有原生支持.
一开始,我在 ListView 的 Footer 中加了一个 Button , 点击的时候加载更多的数据, 在 WP 和 Android 下表现完美.
但是在 iOS 下:
无奈之下,只好放弃这种做法.
上面说放弃在 ListView 中加Footer, 但是加载更多这个功能还是要完成的.
先来看一下如何用 ItemAppearing 来处理加载更多的:
 1 /// <summary>
 2 /// 最后一条数据展现时,加载更多
 3 /// </summary>
 4 /// <param name="sender"></param>
 5 /// <param name="e"></param>
 6 public void LastAppear(object sender, ItemVisibilityEventArgs e) {
 7     if (this.Datas.Last().Equals(e.Item)) {
 8         this.LoadConsigns();
 9     }
10 }
即拿事件参数中的 e.Item 来和数据源中的最后一条来比较, 如果是同一个对象, 说明最后一条已经展现在当前可见屏幕范围之内, 可以加载更多数据了.
这样做,在 iOS 和 Android 下表现很完美.
但是在 WP 下却有可能加载完了第一页,紧接着加载第二页的问题.
因为在 WP 下是用 LongListSelector 来模拟的 ListView, LongListSelector 用了UI虚化技术, 虚化的条数貌似和一屏能显示的条数有关, 具体多少条不能设置, LongListSelector 自己维护.
相同的情况还发生在 TabbedPage 的子页中, 假设一个 TabbedPage 有4个ContentPage , 在初次进入App 的时候, 前两个 ContentPage 的 OnAppearing 事件都会触发.
ListView 的Group Header 如果用 Template, 在 WP / Android 下, 表现完美.
但是 iOS 7.1 下直接不显示, 在 8.1时而显示,时而不显示, 并伴有稍微的错位.
如果不用 Template , 表现是挺好的.
如果有这样的页面, 那请直接换 TableView , 将原来想放到两个 ListView 中的数据分别写到一个 TableView 的不同 TableSection 中.
因为多个 ListView 上下显示, 并不会自动"流式布局".
这部分是 Xamarin.form 官方的文档读书笔记, 贴出来给你做个参考, 因为它很重要:
有两点会使 ListView 性能受损:
1,using ViewCell‘s with lots of views, and
2,using layouts that require lots of measurement.
1,在 cell 中使用过多的 views(控件)
2,过多的布局测量
为达到最优性能:
1,使用内建的 Cell (TextCell/ ImageCell /SwitchCell /EntryCell)
2,尽量少的元素。
3,避免层级嵌套;可以使用 AbsoluteLayout 或 Grid 来减少嵌套。
4,避免 Fill 之外的 LayoutOptions 选项。
在 iOS 和 WP 下, 切换页面效果很流畅, Android 表现的有些卡.
做为优化, 我把加载数据从构造函数移到 OnAppearing 事件中, 并做了一个 500 毫秒的延时:
 1 protected override void OnAppearing() {
 2     base.OnAppearing();
 3
 4     if (this.Data == null)
 5         Task.Delay(500).ContinueWith((t) => {
 6             Device.BeginInvokeOnMainThread(() => {
 7                 this.LoadData();
 8             });
 9         });
10
11 }
这样做之后, 切换页面相对来说会流畅很多.
HUD
Android 下使用 AndHUD , iOS 下使用 BTProgressHUD, 这两个在在 NuGet 上都有.
但是并没有 WP 的HUD, 还好, 我用 Popup 做了一个.
1     public interface IHud {
2         void Close();
3         void Show(string msg);
4         void ShowToast(string msg, int delay = 1000);
5     }
 1 [assembly: Dependency(typeof(Hud))]
 2 namespace LBC.Mobi.WinPhone.Services {
 3     public class Hud : IHud {
 4
 5         private System.Windows.Controls.Grid Container = new System.Windows.Controls.Grid();
 6
 7         private Popup Popup = null;
 8
 9         public Hud() {
10             this.Popup = new Popup() {
11                 Child = new Border() {
12                     Background = new SolidColorBrush(Colors.Black),
13                     Opacity = 0.6,
14                     CornerRadius = new CornerRadius(10),
15                     Padding = new System.Windows.Thickness(10),
16                     HorizontalAlignment = System.Windows.HorizontalAlignment.Center,
17                     VerticalAlignment = System.Windows.VerticalAlignment.Center,
18                     Child = this.Container,
19                 }
20             };
21
22             this.Container.SizeChanged += Container_SizeChanged;
23         }
24
25         void Container_SizeChanged(object sender, SizeChangedEventArgs e) {
26             var size = System.Windows.Application.Current.RootVisual.RenderSize;
27             this.Popup.HorizontalOffset = (size.Width - this.Container.ActualWidth) / 2;
28             this.Popup.VerticalOffset = (size.Height - this.Container.ActualHeight) / 2;
29         }
30
31         public void ShowToast(string msg, int delay = 1000) {
32             this.Popup.IsOpen = true;
33             this.Container.Children.Clear();
34             this.Container.Children.Add(new TextBlock() {
35                 Text = msg,
36                 Foreground = new SolidColorBrush(Colors.White),
37                 FontSize = 20
38             });
39
40             var v = Windows.Phone.Devices.Notification.VibrationDevice.GetDefault();
41             v.Vibrate(TimeSpan.FromSeconds(0.1));
42
43             Task.Delay(delay)
44                 .ContinueWith(t =>
45                     Deployment.Current.Dispatcher.BeginInvoke(() => {
46                         this.Popup.IsOpen = false;
47                     })
48                     );
49         }
50
51         public void Close() {
52             this.Popup.IsOpen = false;
53         }
54
55         public void Show(string msg) {
56             this.ShowToast(msg, 60000);
57         }
58     }
59 }
前一篇,我说 Xamarin 生成的 Android 的 app 巨大, 主要是因为没有联编 (Linking).
之所以没有联编, 是因为联编就报:
error XA2006: Reference to metadata item ....
之类的错误.
昨天搜索了一下, 联编是因为工程选项没有设置正确:
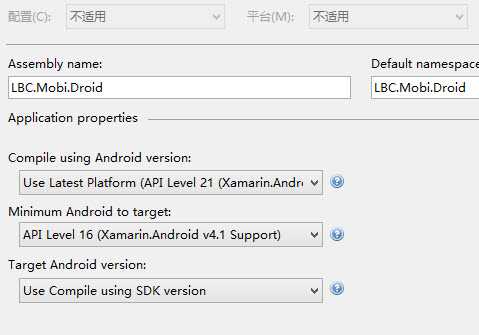
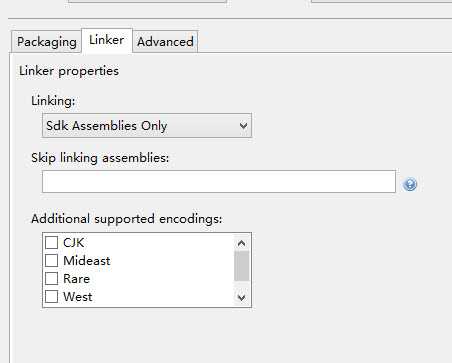
Linking 选项不能选择 Sdk and User Assemblies. 否则生成的 APK 无法运行
如止设置之后, 我这个 APP 的大小只有 5.09 M
用 .NET 做App, 服务提供首选 WebApi, 只不过...
直接使用 Asp.net Web API Client 的相关泛型方法读取数据的时候, 在 IOS 下真机(注意,是真机调试, 模拟器不会报错)调试会报错.
Attempting to JIT compile method ‘System.Net.Http.HttpContentExtensions:ReadAsAsync<LBC.Mobi.WebApiClient.Models.Token> (System.Net.Http.HttpContent,System.Type,System.Collections.Generic.IEnumerable`1<System.Net.Http.Formatting.MediaTypeFormatter>,System.Net.Http.Formatting.IFormatterLogger,System.Threading.CancellationToken)‘ while running with --aot-only. See http://docs.xamarin.com/ios/about/limitations for more information.
因为 IOS 是 AOT (静态编译), 而 Android 和 WP 使用的是 JIT(动态编译).具说 Android 也引入了 AOT ,不懂.
具体的限制可以从以下链接获取:
http://docs.xamarin.com/ios/about/limitations
这个文档没有看太懂, 但是这个错误是因为在调用 WebApi 的时候, 使用了相关的泛型方法而报错.
但是并不是说, 不能使用泛型, 因为在 iOS 项目属性里, 有个 Enable generic value type sharing, 如果不勾上这个, 连最基本的泛型使用都会报错. 然而这个选项在当前我使用的 Xamarin 版本中, 对 WebApi 来说, 没卵用.
不过,不要怕, 有人贴段变通的方法:
https://bugzilla.xamarin.com/show_bug.cgi?id=12746
你也可参考:
  1 using System;
  2 using System.Net;
  3 using System.Net.Http;
  4 using System.Net.Http.Formatting;
  5 using System.Net.Http.Headers;
  6 using System.Threading.Tasks;
  7 using System.Linq;
  8
  9 namespace LBC.Mobi.WebApiClient {
 10
 11     public abstract class MethodBase {
 12
 13         public virtual bool SupportProtoBuf {
 14             get {
 15                 return true;
 16             }
 17         }
 18
 19         public bool HasError {
 20             get;
 21             protected set;
 22         }
 23
 24         public string ErrorReason {
 25             get;
 26             protected set;
 27         }
 28
 29         public HttpStatusCode? Status {
 30             get;
 31             protected set;
 32         }
 33
 34         /// <summary>
 35         /// 方法名,除去基地址,比如 User/Get
 36         /// </summary>
 37         public abstract string MethodName {
 38             get;
 39         }
 40
 41         /// <summary>
 42         /// 如何执行,是Post,get还是 delete 等, 执行的参数等.
 43         /// </summary>
 44         internal abstract Func<HttpClient, Uri, Task<HttpResponseMessage>> Invoke {
 45             get;
 46         }
 47
 48
 49         internal async virtual Task<HttpResponseMessage> GetResult(string token) {
 50             Uri url = new Uri(ApiClient.GetMethodUrl(this.MethodName));
 51
 52             if (this.Invoke != null) {
 53                 using (var client = new OAuthHttpClient(token)) {
 54                     if (this.SupportProtoBuf)
 55                         client.DefaultRequestHeaders.Accept.Add(new MediaTypeWithQualityHeaderValue("application/x-protobuf"));
 56
 57                     return await this.Invoke.Invoke(client, url);
 58                 }
 59             }
 60
 61             return await Task.FromResult<HttpResponseMessage>(null);
 62         }
 63     }
 64
 65     public abstract class MethodBase<T> : MethodBase {
 66
 67         internal async virtual Task<T> Execute(string token) {
 68             var msg = await this.GetResult(token);
 69             var reason = "";
 70             HttpStatusCode? status = null;
 71             if (msg != null) {
 72                 if (msg.IsSuccessStatusCode) {
 73                     //var str = await a.Content.ReadAsStringAsync();
 74                     //var o = JsonConvert.DeserializeObject<T>(str);
 75
 76                     var useProtoBuf = msg.Content.Headers.ContentType.MediaType.Equals("application/x-protobuf", StringComparison.OrdinalIgnoreCase);
 77
 78                     //if (this.SupportProtoBuf) {
 79                     if (useProtoBuf) {
 80                         return await this.Read(typeof(T), msg, new ProtoBufFormatter()).ContinueWith(t => (T)t.Result);
 81                         //return await a.Content.ReadAsAsync<T>(new[] { new ProtoBufFormatter() });
 82                     } else {
 83                         return await this.Read(typeof(T), msg).ContinueWith(t => (T)t.Result);
 84                         //return await a.Content.ReadAsAsync<T>();
 85                     }
 86                 } else {
 87                     reason = msg.ReasonPhrase;
 88                     status = msg.StatusCode;
 89                 }
 90             }
 91
 92             this.HasError = true;
 93             this.ErrorReason = reason;
 94             this.Status = status;
 95
 96             return await Task.FromResult<T>(default(T));
 97         }
 98
 99         //IOS 是 AOT , 不支持 JIT, 在反序列化的时候,要用该方法.
100         private async Task<object> Read(Type outType, HttpResponseMessage msg, params MediaTypeFormatter[] formatters) {
101             if (formatters != null && formatters.Length > 0)
102                 return await msg.Content.ReadAsAsync(outType, formatters);
103             else
104                 return await msg.Content.ReadAsAsync(outType);
105         }
106     }
107 }
ios 的 Splash 很好设置, 在选项里点点就可以完成了.
WP 的更简单, 放一个 480 X 800 的 SplashScreenImage.jpg 的图片到 WP 项目的根目录就是了. 如果还想适应个分辨率, 延个时啥的,可参考:
http://stackoverflow.com/questions/19450446/how-to-set-splash-screen-in-window-phone-8-application-development
麻烦的就是, Android
请按以下的设置处理:
1, 先新建一个 Activity:
1     [Activity(Label = "货代网", MainLauncher = true, Icon = "@drawable/icon", NoHistory = true, Theme = "@style/Theme.Splash", ConfigurationChanges = ConfigChanges.ScreenSize | ConfigChanges.Orientation)]
2     public class SplashScreen : Activity {
3         protected override void OnCreate(Bundle bundle) {
4             base.OnCreate(bundle);
5             var intent = new Intent(this, typeof(MainActivity));
6             StartActivity(intent);
7             Finish();
8         }
9     }
其中, MainLauncher 设为 true
还要设置一下 Theme : Style/Theme
2, 将 MainActivity 上标注的 MainLauncher 改为 false , 或删除.
3, 在 Resources/Velues 目录下新增 Styles.xml:
 1 <resources>
 2   <style name="Theme.Splash"
 3     parent="android:Theme">
 4     <item name="android:windowBackground">
 5       @drawable/splashscreen
 6     </item>
 7     <item name="android:windowNoTitle">true</item>
 8     <item name="android:windowIsTranslucent">false</item>
 9     <item name="android:windowIsFloating">false</item>
10     <item name="android:backgroundDimEnabled">true</item>
11   </style>
12 </resources>
其中, name="Theme.Splash" 就是上面新建的 Activity (SplashScreen) 标注的的值.
4, 在 Resources/drawable 目录下新建一个 SplashScreen.xml, 对应到上面的Xml 中的 <item name="android:windowBackground"> 的值:
 1 <?xml version="1.0" encoding="UTF-8" ?>
 2
 3 <layer-list xmlns:android="http://schemas.android.com/apk/res/android" >
 4   <item>
 5     <shape android:shape="rectangle" >
 6       <solid android:color="#3498db" />
 7     </shape>
 8   </item>
 9   <item>
10     <bitmap xmlns:android="http://schemas.android.com/apk/res/android"
11       android:src="@drawable/Splash"
12       android:gravity="center"
13       android:layout_gravity="center"/>
14   </item>
15 </layer-list>
5, 在 Resources/drawable 目录下放个 Splash.png, 对应到上面的 XML 中的 bitmap 节的 src 属性.
--------------
完
这个是商业项目, 所以没有源代码共享.
如果你感兴趣, 可以下载 android 的 app 试用 ( Android 4.1 及以上 ), 服务是我本机的调试环境, 每天 9:30 ~ 下午 18:00 开启.
http://files.cnblogs.com/files/xling/LBC.LBC-Signed.apk
用户名/密码 : FRANK / FRANK
标签:
原文地址:http://www.cnblogs.com/xling/p/4531190.html