标签:style blog http java color 使用
这次学习的控件非常重要且非常强大,是ios应用中使用率非常高的一个控件,可以说几乎每个app都会使用到它,它就是功能异常强大的Table Views。可以打开你的iphone中的phone、Messages、Contacts、Mail、Settings等等等等,这些都用到了Table Views。
在Table Views中,Table是用来显示一系列数据的,每条数据占用且只占用一行(一个table cell),在ios中没有规定table到底可以容纳多少行数据,也就是说,只要内存足够多,table可以容纳任意多行的数据。
上面的2段文字,一共提到了三个概念:Table,Table View Cell,Table View,它们之间的关系如下,Table用来保存数据,Table View用来显示当前可见的Table中的数据(也就是iphone屏幕中显示的那些数据),Table View Cell就是当前可见的Table View中的那一行,这样说可能还不是最清楚,那么看下面的图,你就可以有一个比较直观的认识了。 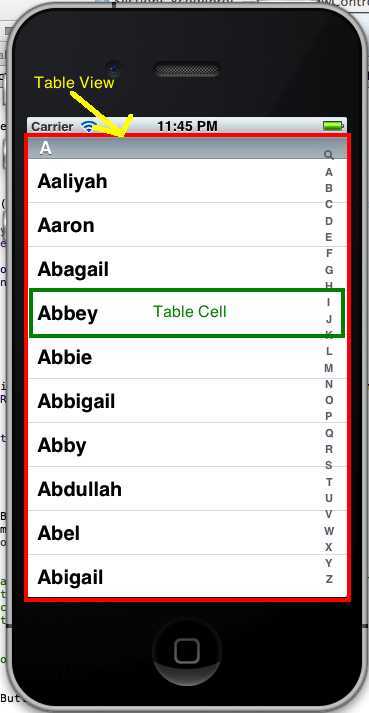
ios的设计是很注重资源的节省的,这样做的好处就是能够是程序运行的尽可能的快,给用户更好的体验,因此一些不需要的东西,ios是坚决不会显示或者生成的,在Table Views中,只有当前浏览到的数据,会生成table view cell,然后显示,没有浏览到的数据,不会生成多余的cell,而且当一个cell移除屏幕后,这个cell会给进入屏幕的数据继续使用,因此,生成的cell的数量会是固定的,不会多不会少,正好够在table view中显示。
和前一篇Pickers一样,Table Views也使用delegate:UITableViewDelegate,UITableViewDataSource。
另外,Table Views只有一列,每行只有一个cell,每个cell可以包含一张图片,一些文字,一个icon,任意多个subview(之后都会有例子,看了就明白了)。
好了,说了一些概念性的东西,还是有点小小的枯燥,下面开始coding。
1)创建一个新的项目,这次选择Single View Application模板,命名为Simple Table 
2)添加Table View控件  在Project navigator中选中BIDViewController.xib,在Object Library中找到上面的Table View控件,拖到view上面,Table View将占满整个view(一般来所,Table View会占满整个view,当然必要时会空出navigator bar,tool bar,tab bar)
选中view中的table view,打开Connections Inspector,会看到很熟悉的dataSource和delegate,这个在学习Picker View的时候已经见到过,这里的作用和在Picker View中是一样的。将它们关联到File‘s Owner 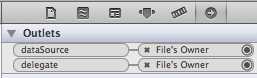
3)写code 打开BIDViewController.h,添加如下代码

#import <UIKit/UIKit.h>

@interface BIDViewController : UIViewController <UITableViewDelegate,UITableViewDataSource>

@property (strong, nonatomic) NSArray *listData;

@end
有没有很熟悉的感觉,Table View的协议(protocols)和Picker View的是一样的,然后声明一个NSArray来存放数据。
打开BIDViewController.m,添加如下代码
#import "BIDViewController.h"

@implementation BIDViewController
@synthesize listData;

- (void)didReceiveMemoryWarning
{
    [super didReceiveMemoryWarning];
    // Release any cached data, images, etc that aren‘t in use.
}

#pragma mark - View lifecycle

- (void)viewDidLoad
{
    [super viewDidLoad];
    // Do any additional setup after loading the view, typically from a nib.
    NSArray *array = [[NSArray alloc] initWithObjects:@"Sleepy", @"Sneezy",
                      @"Bashful", @"Happy", @"Doc", @"Grumpy", @"Dopey", @"Thorin",
                      @"Dorin", @"Nori", @"Ori", @"Balin", @"Dwalin", @"Fili", @"Kili",
                      @"Oin", @"Gloin", @"Bifur", @"Bofur", @"Bombur", nil];
    self.listData = array;
}

- (void)viewDidUnload
{
    [super viewDidUnload];
    // Release any retained subviews of the main view.
    // e.g. self.myOutlet = nil;
    self.listData = nil;
}

#pragma mark -
#pragma mark Table View Data Source Methods
- (NSInteger)tableView:(UITableView *)tableView numberOfRowsInSection:(NSInteger)section{
    return [self.listData count];
}

- (UITableViewCell *)tableView:(UITableView *)tableView cellForRowAtIndexPath:(NSIndexPath *)indexPath {
    static NSString *SimpleTableIdentifier = @"SimlpeTableIdentifier";

    UITableViewCell *cell = [tableView dequeueReusableCellWithIdentifier:SimpleTableIdentifier];
    if(cell == nil) {
        cell = [[UITableViewCell alloc]
                initWithStyle:UITableViewCellStyleDefault
                reuseIdentifier:SimpleTableIdentifier];
    }

    NSUInteger row = [indexPath row];
    cell.textLabel.text = [listData objectAtIndex:row];

    return cell;
}
......
这里面需要解释的就是2个dataSource方法,其他的方法都简单,在这里就不过多解释了: tableView:numberOfRowsInSection:用来告诉table view在Section中有多少个数据(listData中的数据个数),这里有一个Section的概念,暂且先不用理会,我们这个例子中只有1个Section,因此直接返回listData中的数据个数即可(Section的概念下一篇会介绍) tableView:cellForRowAtIndexPath:当table view需要创建一个cell时,会调用该方法。这个方法稍微有点复杂,但也不是很难理解,首先声明了一个静态的字符串SimpleTableIdentifier,这个字符串作为一个key用来标识UITableViewCell的类型,凡是cell拥有这个key,就可以认为他们是同一种类型的cell,相互之间可以任意使用。前面已经说过,一个Table View在同一时间只会创建一定数量的Table View Cell(够用就好),因此当一个cell移出屏幕后,这个cell会被放入一个队列,等待其他即将显示的数据使用。接下来的一句语句 UITableViewCell *cell = [tableView dequeueReusableCellWithIdentifier:SimpleTableIdentifier]; 就是通过刚才的key来寻找可重复使用的Table View Cell。 如果没有可重复使用的cell(cell == nil),那么就需要创建一个新的cell cell = [[UITableViewCell alloc] initWithStyle:UITableViewCellStyleDefault //设定cell显示的样式 reuseIdentifier:SimpleTableIdentifier]; //设置标示符SimpleTableIdentifier(设置key),这样以后这个cell才可以被制定的key找到并重复使用。 cell创建完成后,需要设置显示的文字 NSUInteger row = [indexPath row]; //通过indexPath找到现在显示第几行的数据 cell.textLabel.text = [listData objectAtIndex:row]; //得到行号后再去listData中找到相应的数据,并复制给cell的属性textLabel。 这些都设置好后,返回cell即可
4)编译运行 希望上面的解释大家都能够看懂,然后command+B,command+R编译运行程序,效果如下 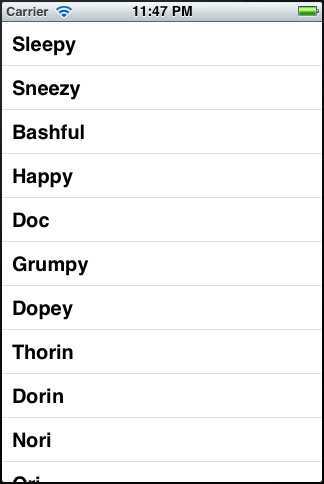
5)添加图片 可以为每个cell添加一张图片,并显示在cell的左边,首先下载下面的图片:Star.png 然后将图片拖到Project navigator中,放在Simple Table文件夹下 打开BIDViewController.m,在刚才添加的tableView:cellForRowAtIndexPath方法中添加如下代码
- (UITableViewCell *)tableView:(UITableView *)tableView cellForRowAtIndexPath:(NSIndexPath *)indexPath {
    static NSString *SimpleTableIdentifier = @"SimlpeTableIdentifier";

    UITableViewCell *cell = [tableView dequeueReusableCellWithIdentifier:SimpleTableIdentifier];
    if(cell == nil) {
        cell = [[UITableViewCell alloc]
                initWithStyle:UITableViewCellStyleDefault
                reuseIdentifier:SimpleTableIdentifier];
    }

    UIImage *image = [UIImage imageNamed:@"star.png"];
    cell.imageView.image = image;

    NSUInteger row = [indexPath row];
    cell.textLabel.text = [listData objectAtIndex:row];

    return cell;
}
好了,在此编译code并运行,效果如下 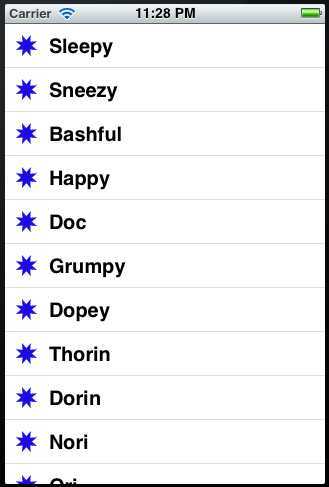 很简单吧,如果当我们选中table view中的一行,想换一张图片,表示选中的状态,进行如下操作 添加一张选中状态的图片到Simple Table文件夹下:Star2.png 打开BIDViewController.m,在tableView:cellForRowAtIndexPath方法中添加如下代码
- (UITableViewCell *)tableView:(UITableView *)tableView cellForRowAtIndexPath:(NSIndexPath *)indexPath {
    static NSString *SimpleTableIdentifier = @"SimlpeTableIdentifier";

    UITableViewCell *cell = [tableView dequeueReusableCellWithIdentifier:SimpleTableIdentifier];
    if(cell == nil) {
        cell = [[UITableViewCell alloc]
                initWithStyle:UITableViewCellStyleDefault
                reuseIdentifier:SimpleTableIdentifier];
    }

    UIImage *image = [UIImage imageNamed:@"star.png"];
    cell.imageView.image = image;

    UIImage *image2 = [UIImage imageNamed:@"star2.png"];
    cell.imageView.highlightedImage = image2;

    NSUInteger row = [indexPath row];
    cell.textLabel.text = [listData objectAtIndex:row];

    return cell;
}
编译运行,效果如下 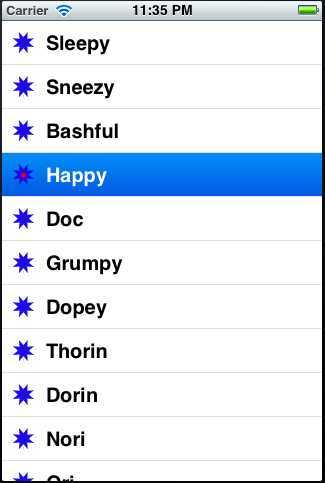 当我们选中一行row的时候,图片发生了变化,UITableViewCell的属性imageView.image用来设置一般状态下的图片,imageView.highlightedImage用来设置选中状态下的图片,如果不设置,将继续使用一般状态下的图片。
6)UITableViewCell的Style 在介绍style之前,先看看UITableViewCell自带的3个属性,其中2个我们在之前的例子中已经使用到,分别是TextLabel和imageView,第三个属性是detailTextLabel,看下面的例子,就知道这个detailTextLabel是什么东东了,还是打开BIDViewController.m,在tableView:cellForRowAtIndexPath方法中添加如下代码
- (UITableViewCell *)tableView:(UITableView *)tableView cellForRowAtIndexPath:(NSIndexPath *)indexPath {
    static NSString *SimpleTableIdentifier = @"SimlpeTableIdentifier";

    UITableViewCell *cell = [tableView dequeueReusableCellWithIdentifier:SimpleTableIdentifier];
    if(cell == nil) {
        cell = [[UITableViewCell alloc]
                initWithStyle:UITableViewCellStyleDefault
                reuseIdentifier:SimpleTableIdentifier];
    }

    UIImage *image = [UIImage imageNamed:@"star.png"];
    cell.imageView.image = image;

    UIImage *image2 = [UIImage imageNamed:@"star2.png"];
    cell.imageView.highlightedImage = image2;

    NSUInteger row = [indexPath row];
    cell.textLabel.text = [listData objectAtIndex:row];

    if (row < 7)
        cell.detailTextLabel.text = @"Mr. Disney";
    else
        cell.detailTextLabel.text = @"Mr. Tolkien";

    return cell;
}
编译运行 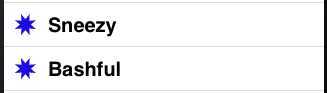 有没有发现什么变化也没有?这是因为是用来UITableViewCellStyleDefault样式造成的,UITableViewCell一共有4种样式,在tableView:cellForRowAtIndexPath方法中,创建cell的时候设置initWithStyle,就是cell的样式。
cell = [[UITableViewCell alloc]
                initWithStyle:UITableViewCellStyleDefault
                reuseIdentifier:SimpleTableIdentifier];
现在换一种样式看看,将上面代码中的UITableViewCellStyleDefault改成UITableViewCellStyleSubtitle,在编译运行看一下效果 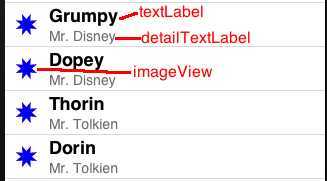 这次效果对了,所有的3个属性都显示出来了。
总结一下所有4个UITableViewCell的样式 UITableViewCellStyleDefault 
UITableViewCellStyleSubtitle 
UITableViewCellStyleValue1 
UITableViewCellStyleValue2 
最后别忘了还是将样式设置回UITableViewCellStyleDefault,之后的例子还是以这个样式为例子的
7)UITableViewCell的缩进 打开BIDViewController.m,添加如下代码
#pragma mark -
#pragma mark Table Delegate Methods
- (NSInteger)tableView:(UITableView *)tableView indentationLevelForRowAtIndexPath:(NSIndexPath *)indexPath {
    NSUInteger row = [indexPath row];
    return row;
}
tableview:indentationLevelForRowAtIndexPath这个方法用于设置缩进的级别,使用indexPath取得当前row是在第几行,然后根据第几行来设置缩进的大小。注意,这个方法是table view的delegate方法,之前用到的方法都是dataSource方法。
编译运行 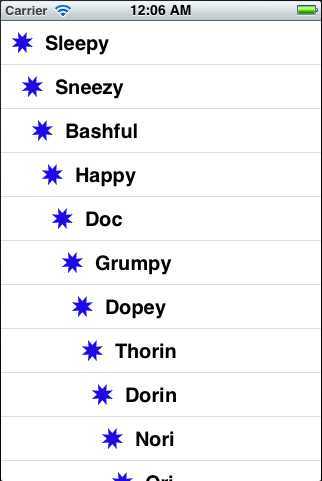
8)UITableViewCell的选择事件 UITableViewCell的选择事件有2种,一种在选中一行之前发生的事件,叫做tableView:willSelectRowAtIndexPath,另一个方法就是选中一行后发生的事件,叫做tableView:didSelectRowAtIndexPath,他们都是table view的delegate方法,在BIDViewController.m中添加如下code
- (NSIndexPath *)tableView:(UITableView *)tableView willSelectRowAtIndexPath:(NSIndexPath *)indexPath {
    NSUInteger row = [indexPath row];

    if (row == 0) {
        return nil;
    }

    return indexPath;
}

- (void)tableView:(UITableView *)tableView didSelectRowAtIndexPath:(NSIndexPath *)indexPath {
    NSUInteger row = [indexPath row];
    NSString *rowValue = [listData objectAtIndex:row];

    NSString *message = [[NSString alloc] initWithFormat:@"You selected %@", rowValue];
    UIAlertView *alert = [[UIAlertView alloc] initWithTitle:@"Row Selected!"
                                                    message:message
                                                   delegate:nil
                                          cancelButtonTitle:@"Yes I Did"
                                          otherButtonTitles:nil];
    [alert show];
}
在tableView:willSelectRowAtIndexPath中,根据indexPath来获得即将选中的是哪一行,然后判断如果即将选中的row是第一行,则返回nil,使其无法选中,如果不是,则返回indexPath。
在tableView:didSelectRowAtIndexPath中,根据indexPath来获得选中的是哪一行,然后读取这一行的数据(其实是根据行号到NSArray中找到相应的数据),然后显示出来。
编译运行,试着选择第一行,是不会有反应的,然后选择其他行,一个警告框会弹出 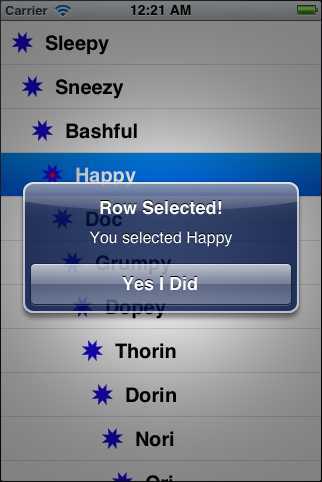
9)更改UITableViewCell的字体大小和行的高度 还是在tableView:cellForRowAtIndexPath中,添加如下代码
- (UITableViewCell *)tableView:(UITableView *)tableView cellForRowAtIndexPath:(NSIndexPath *)indexPath {
    static NSString *SimpleTableIdentifier = @"SimlpeTableIdentifier";

    UITableViewCell *cell = [tableView dequeueReusableCellWithIdentifier:SimpleTableIdentifier];
    if(cell == nil) {
        cell = [[UITableViewCell alloc]
                initWithStyle:UITableViewCellStyleDefault
                reuseIdentifier:SimpleTableIdentifier];
    }

    UIImage *image = [UIImage imageNamed:@"star.png"];
    cell.imageView.image = image;

    UIImage *image2 = [UIImage imageNamed:@"star2.png"];
    cell.imageView.highlightedImage = image2;

    NSUInteger row = [indexPath row];
    cell.textLabel.text = [listData objectAtIndex:row];
    cell.textLabel.font = [UIFont boldSystemFontOfSize:50];

    if (row < 7)
        cell.detailTextLabel.text = @"Mr. Disney";
    else
        cell.detailTextLabel.text = @"Mr. Tolkien";

    return cell;
}
将字体的大小设置成50,编译运行 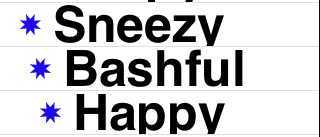 字体是变大了,但是行高太小,以至于字符无法显示完整,我们需要调整行高,添加一个新的table view的delegate,如下
- (CGFloat)tableView:(UITableView *)tableView heightForRowAtIndexPath:(NSIndexPath *)indexPath {
    return 70;
}
tableView:heightForRowAtIndexPath用来设置行高,因为是将这个table view的行高进行统一设置,所以直接返回高度即可,如果需要针对某些行进行调整,那么就需要通过indexPath来获得第几行,然后在进行行高的设置
编译运行 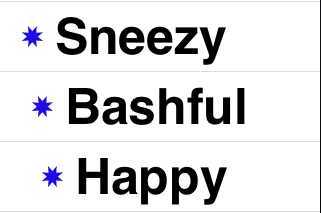
ok,现在和谐了。
10)总结 这篇是Table View的入门学习,学习了Table View中最最基础的一些东西,读取显示数据,添加图片,cell的样式,缩进,字体大小,行高等等的一些基础内容,后一篇的内容会讲到自定义Table View Cell的内容,难度有所加深,但总得来说还是很简单的。反正IOS学习到现在,给我的感觉似乎是越来越容易,很多东西开始变得容易上手了,很多概念都是融会贯通的,大家继续努力加油啊,谢谢大家的一直关注,我也会继续努力的,谢谢!
从零开始学ios开发(十二):Table Views(上),布布扣,bubuko.com
标签:style blog http java color 使用
原文地址:http://www.cnblogs.com/lovewx/p/3807556.html